User’s Manual CAMILEO S40 / S45
Introduction Welcome and thank you for choosing a TOSHIBA product. For your convenience, your TOSHIBA product is furnished with two guides: a) a Quick Start Guide, and b) this comprehensive PDF User’s Manual.
Contents Section 1 Getting to Know Your Camcorder..................................... 6 Overview.............................................................................. 6 Check the Components...................................................... 6 Safety Instructions.............................................................. 7 System Requirements........................................................ 7 Front View ...........................................................................
Contents Section 4 Playback Mode.................................................................. 28 Button Function................................................................ 28 LCD Monitor Information.................................................. 29 Operations for Playback Mode ....................................... 30 Video Playback.................................................................. 30 Video Trim..........................................................................
Contents Section 12 Other Information.............................................................. 45 TOSHIBA Support............................................................. 45 Operating Environment Conditions................................ 45 Regulatory Information..................................................... 45 Additional Information......................................................
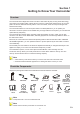
Section 1 Getting to Know Your Camcorder Overview The camcorder with 5 Mega Pixel sensor can take H.264 videos. By way of using H.264 technology, more videos can be taken within certain amount of memory. High quality images with up to 16 megapixels can also be delivered smoothly. With a color LCD monitor, users can compose images and examine them easily. The camcorder features 3” LCD touch panel which is an ideal platform for you to operate your camcorder. The menu options are accessible with your finger.
Safety Instructions 1. Do not drop, puncture or disassemble the camcorder; otherwise the warranty will be voided. 2. Avoid all contact with water, and dry hands before using. 3. Do not expose the camcorder to high temperature or leave it in direct sunlight. Doing so may damage the camcorder. 4. Use the camcorder with care. Avoid pressing hard on the camcorder body. 5. For your own safety, avoid using the camcorder when there is a storm or lightning. 6.
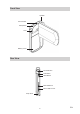
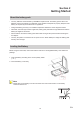
Front View Speaker SD Card Slot Microphone Lens Battery Cover Rear View Record Button Tele Button Wide Button Mini-HDMI Port Micro USB 2.
Side View LCD Touch Panel Power Bottom View Strap Hook Tripod Socket 9 EN
Section 2 Getting Started About the battery pack • Use only batteries recommended by TOSHIBA as replacements. The battery pack is lithium ion batteries, which can explode if not replaced, used, handled or disposed of properly. Dispose of the battery as required by local ordinances or regulations. • Charge the battery pack only in an ambient temperature between 5 and 35 degrees Celsius.
Inserting and Removing an microSD Card (Optional) The camcorder comes with an internal memory which allows you to store photos and videos. You can expand the memory capacity by using an optional microSD memory card. 1. Insert the memory card into the slot. Please refer to the figure on the right side. 2. To remove an installed microSD card, press the card inwards to release it. 3. When the card pops out, gently remove it from its slot. 4. Recommended memory capacity: 1GB or above.
Section 3 Record Mode Button Function Record Button: 1. In Video Record Mode, press to take video. To stop recording, press it again. 2. In Photo Record Mode, press to take photo. Tele Button: 1. Zoom In. Wide Button: 1. Zoom out. Power Button: 1. Press down for one second to turn on or turn off the camcorder.
LCD Monitor Information The indicators shown below may display on LCD when videos and photos are recorded: On-screen information icon 3 On-screen touchable function icon 1 8 9 10 7 16 9 17 15 6 4 11 12 3 2 9 1 13 14 6 12 5 11 13 14 Battery: full power Battery: more than medium power Battery: medium power (1) Battery: less than medium power Battery: low power DC power mode (2) (3) 00 :0 2 :2 3 Recording time 00 :0 2 :2 3 Pause recording 234 0 0 :0 2 :2 3 The amount of photos th
Light mode set Resolution set Self-Timer on Smile Detection on (4) ISO set Scene mode set Filter mode set White Balance mode set Anti-Glare on Light mode set Resolution set Stabilization on Motion Detect on Face Tracking on Slow Motion on (5) Pre-Record on Time Lapse on Scene mode set Filter mode set White Balance mode set Anti-Glare on Zoom meter: (6) 1x ~ 5x (5x digital zoom for 1080p FHD) 1x ~ 10x (10x digital zoom for 720p HD and VGA) (7) Self-Timer on/off 14 EN
Digital Light On (8) Light On Light Off Video Resolution (9) FHD Full HD (30fps) HD+ HD60 (60fps) HD HD30 (30fps) VGA VGA Photo Resolution 16MP High-16M 5MP Standard-5M 3MP Low-3M ISO Auto (10) ISO 800 (11) Menu icon (12) Playback Mode icon (13) Photo Mode icon (14) Video Mode icon (15) Face Tracking on/off (16) Stabilization on/off (17) Anti-Glare on/off Note • Tap on the screen to close the touchable information layer. Tap again to show it again.
Video Recording • In Video Record Mode, press [Record Button] to start recording. When a video is being recorded, a time indicator will display on the LCD monitor. To stop recording, press [Record Button] again. • To pause recording: Touch screen to pause recording. To continue the recording, touch it again. • To snapshot photo during video recording, touch the photo icon to capture the image. • Touch • Four resolution settings are available: (on-screen icon) to view the recorded video.
Options for Menu Video Setting Photo Setting Effects Setup* • Resolution • Resolution • Scene • Sound • Light • Light • Filter • TV Format • Face Tracking • Slideshow • White Balance • Language • Motion Detect • Smile Detection • Date & Time • Slow Motion • ISO • Format • Time Lapse • Self-Timer • Anti-Glare • Pre-Record • Date Printing • Default Setting • Stabilization * Please refer to Section 5 for the detailed information about [Setup]. Operations Operation Screen 1.
Video Setting Operation Display Screen 1. Touch on the screen. The main menu will show on the screen. 2. Touch the [Video Setting to enter its setting menu. ] icon on the screen 3. The Video Setting menu contains 8 options-Resolution, Light, Face Tracking, Motion Detect, Slow Motion, Time Lapse, Pre-Record, and Stabilization--for you to adjust the camcorder settings. Resolution Four resolution settings are available. Full HD Record videos at 1920 × 1080p 30 resolution.
Light You can select the mode to brighten the area or to extend the brightness of the objects. ON The light will be turned on and provides light when recording. OFF The light is turned off. DIGITAL LIGHT Extend the dynamic range for backlight and high contrast sense, so that the objects will be brighter and clearer. Operation Display Screen 1. In the Video Setting menu, find the [Light] on the screen. 2. Touch arrow to select the desired option. 3. Touch the Exit icon ( ) to exit.
Slow Motion Record videos with slow motion effect. When the video is played, the playback time will be longer than the actual recording time. Operation Display Screen 1. In the Video Setting menu, find the [Slow Motion]. 2. Touch arrow to select the desired option. 3. Or touch the Exit icon ( ) to exit. Time Lapse Record still images at specific intervals you can set and play them as one video file. Off Disable Time Lapse. 1 Second Record one frame per second.
Pre-Record The Pre-record function ensures that you will not miss any critical recording opportunities. The videos are recorded 1 second more before the [Record Button] is pressed. Operation Display Screen 1. In the Video Setting menu, find the [Pre-Record]. 2. Touch arrow to select the desired option. 3. Touch the Exit icon ( ) to exit. Note Be sure to aim the camcorder at the subject and position it securely.
Photo Setting Operation Display Screen 1. Touch on the screen. The main menu will show on the screen. 2. Touch the [Photo Setting to enter its setting menu. ] icon on the screen 3. The Photo Setting menu contains 7 options-Resolution, Light, Slideshow, Smile Detection, ISO, Self-Timer, Date Printing--for you to adjust the camcorder settings. Resolution Three resolution settings are available. High-16M Shoot photo at 4608 × 3456, 16 Mega Pixels quality.
Light You can select the mode to brighten the area or to extend the brightness of the objects. On The light will be turned on and provides light when recording. Off The light is turned off. Digital Light Extend the dynamic range for backlight and high contrast sense, so that the objects will be brighter and clearer. Operation Display Screen 1. In the Photo Setting menu, find the [Light] on the screen. 2. Touch arrow to select the desired option. 3. Touch the Exit icon ( ) to exit.
Smile Detection The camcorder capture the photo automatically when it detects a smile. Operation Display Screen 1. In the Photo Setting menu, find the [SMILE DETECT] on screen. 2. Touch arrow to select desired option. 3. Or touch the Exit icon to exit. 4. In Record mode, aim the camcorder at the smiling faces. The face frames will appear around the face with smile. 5. The camcorder will focus on the subject, then it will capture the photo automatically.
Self-Timer The self-timer allows you to take photos with a ten-second time delay. The self-timer light on the front of the camcorder will also blink. The speed of blinking will increase just before the photo is taken. Operation Display Screen 1. In the Photo Setting menu, find the [Self-Timer] twice on the screen. 2. Touch arrow to select the desired option. 3. Touch the Exit icon ( aeoo ) to exit. Date Printing Imprint the date and time on the photo. Operation Display Screen 1.
Effects Operation Display Screen 1. Touch on the screen. The main menu will show on the screen. 2. Touch the [Effects its setting menu. ] icon on the screen to enter 3. The Effects menu contains 3 options-- Scene, Filter, and White Balance --for you to adjust the camcorder settings. Scene You can select the mode according to the scene condition. Auto Automatic adjustment Skin Shoot with an effect that makes skin tones more natural. Night Use Night Mode for night scenes or low light conditions.
Filter You can select the special filter effects on the videos or photos. Auto Shoot without any special effect on the image. Black & White The image is converted to black-and-white. Classic The image is converted to a sepia look. Negative The image is converted as the negative of the normal. Operation Display Screen 1. In the Effects menu, find the [Filter] on the screen. 2. Touch arrow to select the desired option. 3. Or touch the Exit icon ( ) to exit.
Section 4 Playback Mode Button Function The Buttons have the following functions in Playback Mode. Record Button: 1. Press to start / stop video play 2. Press to stop while playing. 3. Press to go back preview when files are not played. Tele Button: 1. Volume increase. (video mode) 2. Zoom in (photo mode) Wide Button: 1. Volume decrease. (video mode) 2.
LCD Monitor Information Indicators on the LCD screen while in Playback Mode: Photo on-screen touchable function icon 3 Video on-screen touchable function icon 3 7 9 1 7 8 6 (1) 11 0 0 :0 3 :1 4 10 4 5 2 11 Length of currnet video (2) Playing time (3) Enter to thumbnail screen. (4) Indicate the function of continuous play on or off (5) Trim the beginnings and ends of the recorded video and save it as a new video clip.
Operations for Playback Mode The Playback Mode is for viewing and managing videos and photos on the built-in memory or on an SD Card. Operation 1. In Preview, touch Playback Mode. 2. Touch or Display Screen to switch to the to go to the previous video/photo; Touch to go to the next video/photo. 3. Touch section 3.) to open the menu. (Please refer to 4. Touch to open the thumbnail screen of videos and photos. 5. In the thumbnail screen of videos and photos, touch to activate multiple select function.
Video Trim You can trim away the beginnings ends of the recorded video and save it as a new video clip. Operation Display Screen 1. In the video playback screen, touch the edit icon to start to trim the video file. 2. Touch to move the dividing icon specify the beginning and end. 3. Touch the save icon on the bar to to save the red portion. 4. In the confirmation screen, you can select [Over write] or [As New] to save the edited video. Photo Playback Operation 1.
Delete File in Playback Mode Operation 1. In Playback Mode, touch 2. Touch 3. Or go to Display Screen on the screen. to delete the current photo. to cancel the operation and exit. 4. Go thumbnail to delete multiple selected files. Note Videos and Photos on a written-protected memory card cannot be deleted.
Section 5 Setting Your Camcorder Setup Menu Operation Display Screen 1. Touch on the screen. The main menu will show on the screen. 2. Touch the [Setup its setting menu. ] icon on the screen to enter 3. The Setup menu contains 7 options for configuring your camcorder setup. They are Sound (operation sound), TV, Language, Time & Date, Format, AntiGlare, and Default Setting. Sound Enable or disable the keypad tone and the operation sound. Operation Display Screen 1.
Language Use this option to select the language of the user interface. Operation Display Screen 1. In the Setup menu, find the [Language] on the screen. 2. Touch arrow to select the desired option. 3. Or touch the Exit icon ( ) to exit. Time & Date Operation 1. In the Setup menu, Touch edit icon setting. Display Screen to enter 2. Touch Year, Month, Day, Hour, or Minute to set. 3. Adjust the numeric value by touching the arrows. 4. Or touch the Exit icon ( ) to exit.
Format Use this option to erase all data in the built-in memory or the mircoSD card. Yes Format the built-in memory (When there is no microSD card in the camcorder) / microSD card (When there is an microSD card in the camcorder). No Do not format the built-in memory (When there is no SD card in the camcorder) / SD card (When there is an SD card in the camcorder). Operation Display Screen 1. In the Setup menu, find the [Format SD Card] on the screen. 2. Touch FORMAT button to enter confirmation screen.
Default Setting Use this option to restore the default factory setting. Yes Restore default factory setting. No Do not restore default factory setting. Operation Display Screen 1. In the Setup menu, find the [Default Setting] on the screen and touch [RESET] to enter the confirmation screen. 2. Touch the icon to execute the operation.
Section 6 Viewing Photos and Videos on TV Connecting to a High-Definition 16:9 (Wide) TV 1. Connect the HDMI cable to your camcorder’s mini-HDMI Out port. 2. Connect the other end of the cable to a television. 3. Set the video input source of your TV to “HDMI”. 4. The steps for viewing stored videos and photos on an HDTV are exactly the same as for viewing them on the LCD monitor.
Section 7 Viewing Video & Photo on PC Installing Bundled Software The CD-ROM supplied with this camcorder contains 2 pieces of software. • ArcSoft MediaImpression is a user-friendly application that helps you managing your media, burning your video into DVD, and uploading your files to the web sites easily. • Adobe Reader is a popular program that you need to have installed to read the User’s Manual. Many computer users will find they already have this software installed on their computer.
Section 8 Uploading Files to Internet The built-in CAMILEO UPLOADER application offers you an easy way to upload your files to the social websites instantly. It helps you share them with your family and friends on the web sites. CAMILEO UPLOADER To upload files to social networking sites: 1. Connect the camcorder to your computer by using the supplied USB cable. 2. After making a USB connection, the AutoPlay window will appear. (It may be different based on OS recognition.
4. Choose the website you want to upload. 5. Click on [VIDEOS]/[PHOTOS] to go to the videos/ photos thumbnail page. Scroll the bar to change the pages. 6. Click on the files you want to upload. Click on [Select All]/[Deselect All] to select/deselect all video or photo files shown on the current page. 7. Click on [Upload] to start uploading.
To setup your account information for the website: 1. Choose the website. 2. Click on [SETTINGS] to go to the setup page. 3. Fill in your account information in the blanks. Then click on “Save”. 4. You can check [Remember Password] to save your account information and password in this Camcorder Uploader application. (If it is unchecked, the password request will appear after clicking on [UPLOAD] on the thumbnail page.) Note • Some social websites may not be allowed to access in certain regions.
Section 9 Webcam Mode Webcam Mode 1. Connect the computer and camcorder with the supplied micro USB2.0 cable. 2. Select [WEBCAM] on the camcorder. 3. In this mode, you can implement live video conference meetings and multimedia communications. 4. Webcam mode is up to 720p support.
Section 10 Specifications Specification Image sensor 5 Mega pixel CMOS sensor Operation modes Video record, Photo record Lens Fixed Focus (F 2.2) Focus range Normal Mode: 1M~ infinity (1080p, 5M) 0.7M~ infinity (720p) 0.5M~ infinity (VGA) Zoom 1X ~ 5X (5x digital zoom for 1080p) 1X ~ 10X (10x digital zoom for 720p and VGA) Shutter Electronic LCD monitor 7.
Section 11 Troubleshooting Troubleshooting 1. If the LCD preview is not clear while shooting, how can the focus be adjusted? Try to switch between Macro and Normal Mode. 2. The files on the memory card do not display smoothly when the LCD shows the “!” marking. The “!” means the microSD card is low speed or is having wrong content inside. The way to solve this condition is to format microSD card by the camcorder instead of a PC (Please refer to the detailed Format instruction in Section 5).
Section 12 Other Information TOSHIBA Support Need help? For the latest driver updates, user’s manuals & FAQ’s please have a look at the TOSHIBA options & services support page: computers.toshiba.eu/options-support Please see computers.toshiba.eu/options-warranty for the TOSHIBA hotline numbers.
Medical environment: The compliance to the Medical Product Directive has not been verified by Toshiba, therefore this product cannot be used as a medical product without further verification. The use in usual office environments e.g. in hospitals should be no problem if there is no restriction by the responsible administration. Automotive environment: Please search the owner instructions of the related vehicle for advices regarding the use of this product (category).
Disposal of batteries and/or accumulators The crossed out wheeled dust bin symbol indicates that batteries and/or accumulators must be collected and disposed of separately from household waste. If the battery or accumulator contains more than the specified values of lead (Pb), mercury (Hg), and/or cadmium (Cd) defined in the Battery Directive (2006/66/EC), then the chemical symbols for lead (Pb), mercury (Hg) and/or cadmium (Cd) will appear below the crossed out wheeled dust bin symbol.
2520AC820L-A01 For more information, please visit: www.toshiba-multimedia.