Gebruikershandleiding CAMILEO S40 / S45
Inleiding Bedankt dat u hebt gekozen voor een TOSHIBA-product. Voor uw gemak wordt dit TOSHIBA-product geleverd met twee handleidingen: a) een snelstartgids en b) deze uitgebreide PDF-gebruikershandleiding.
Inhoud Hoofdstuk 1 Kennismaking met de camcorder.................................. 6 Overzicht.......................................................................... 6 De onderdelen controleren............................................. 6 Veiligheidsinstructies..................................................... 7 Systeemvereisten............................................................ 7 Voorkant .......................................................................... 8 Achterkant.............
Inhoud Hoofdstuk 4 Weergavemodus............................................................ 28 Knopfunctie................................................................... 28 Informatie op het LCD-scherm..................................... 29 Bewerkingen in de weergavemodus .......................... 30 Video’s weergeven........................................................ 30 Video bijsnijden............................................................. 31 Foto’s weergeven...........................
Inhoud Hoofdstuk 12 Overige informatie......................................................... 45 TOSHIBA-ondersteuning.............................................. 45 Gebruiksomgeving........................................................ 45 Voorschriften................................................................. 45 Extra informatie.............................................................
Hoofdstuk 1 Kennismaking met de camcorder Overzicht Met deze camcorder met een sensor van 5 megapixels kunt u.264-video’s opnemen. Dankzij de H.264-technologie kunt u meer video’s in minder geheugenruimte opslaan. U kunt ook probleemloos hoogwaardige foto’s van maximaal 16 megapixels maken. Op het LCD-kleurenscherm kunnen gebruikers beelden kadreren en eenvoudig bekijken. De camcorder beschikt over een LCD-aanraakscherm van 3,5 inch, dat ideaal is om de camcorder te bedienen.
Veiligheidsinstructies 1. Laat de camcorder niet vallen, prik er niet in en demonteer deze niet omdat de garantie anders komt te vervallen. 2. Laat het apparaat niet met water in aanraking komen en droog uw handen voordat u het vastpakt. 3. Stel de camcorder niet bloot aan hoge temperaturen en laat het apparaat niet in direct zonlicht achter. Hierdoor kan de camcorder beschadigd raken. 4. Ga voorzichtig met de camcorder om. Druk niet te hard op de behuizing van de camcorder. 5.
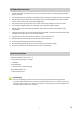
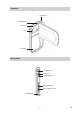
Voorkant Luidspreker SD-kaartsleuf Microfoon Lens Accuklepje Achterkant Opnameknop Teleknop Groothoekknop Mini-HDMI-poort Micro USB 2.
Zijkant LCD-aanraakscherm Voeding Onderkant Riemhaakje Statiefaansluiting 9 NL
Hoofdstuk 2 Aan de slag Informatie over de accu • Gebruik alleen accu’s die door TOSHIBA zijn aanbevolen. Deze accu is een lithium-ion-accu die kan ontploffen als deze niet correct wordt vervangen, gebruikt, gehanteerd of weggegooid. Houd u bij het afdanken van de accu aan de plaatselijke verordeningen of voorschriften. • Laad de accu op bij een omgevingstemperatuur tussen 5°C en 35ºC.
Een microSD-kaart plaatsen en verwijderen (optioneel) De camcorder bevat een intern geheugen waarin u foto’s en video’s kunt opslaan. U kunt de geheugencapaciteit uitbreiden met een optionele microSD-geheugenkaart. 1. Plaats de geheugenkaart in de sleuf. Raadpleeg hiervoor de afbeelding rechts. 2. Als u een geïnstalleerde microSD-geheugenkaart wilt verwijderen, drukt u de kaart iets naar binnen. 3. Wanneer de kaart naar voren komt, verwijdert u deze voorzichtig uit de sleuf. 4.
Hoofdstuk 3 Opnamemodus Knopfunctie Opnameknop: 1. Druk in de video-opnamemodus op deze knop om video’s op te nemen. Druk nogmaals om de opname te stoppen. 2. Druk in de foto-opnamemodus op deze knop om een foto te maken. Teleknop: 1. Inzoomen. Groothoekknop: 1. Uitzoomen. Aan/uit-knop: 1. Druk deze knop één seconde in om de camcorder in of uit te schakelen.
Informatie op het LCD-scherm De volgende aanduidingen kunnen op het LCD-scherm worden weergegeven wanneer video’s en foto’s worden opgenomen: Informatiepictogram op het scherm 3 Aanraakbaar functiepictogram op het scherm 1 8 9 10 7 16 9 17 15 6 4 11 12 3 2 9 1 13 14 6 12 5 11 13 14 Accu: volledig opgeladen Accu: meer dan halve lading Accu: halfvol (1) Accu: minder dan halve lading Accu: bijna leeg Op netvoeding (2) 00 :0 2 :2 3 Opnameduur 00 :0 2 :2 3 Opname gepauzeerd 234 (3)
Ingestelde lichtmodus Ingestelde resolutie Zelfontspanner aan Glimlachdetectie aan (4) ISO ingesteld Ingestelde onderwerpsmodus Ingestelde filtermodus Ingestelde witbalansmodus Anti-reflectie aan Ingestelde lichtmodus Ingestelde resolutie Stabilisatie aan Bewegingsdetectie aan Gezicht volgen aan Slow motion aan (5) Vooropname aan Time-lapse aan Ingestelde onderwerpsmodus Ingestelde filtermodus Ingestelde witbalansmodus Anti-reflectie aan Zoommeter: (6) 1x ~ 5x (5x digitale zoom bij 1080p FHD) 1x ~ 10x (1
Digitale verlichting aan (8) Licht aan Licht uit Videoresolutie FHD (9) Full HD (30 fps) Vaste schijf+ HD60 (60 fps) HD HD30 (30 fps) VGA VGA Fotoresolutie 16MP Hoog-16 M 5MP Standaard-5 M 3MP Laag-3 M Automatische ISO (10) ISO 800 (11) Menupictogram (12) Pictogram Weergavemodus (13) Pictogram Fotomodus (14) Pictogram Videomodus (15) Gezicht volgen aan/uit (16) Stabilisatie aan/uit (17) Anti-reflectie aan/uit Opmerking • Tik op het scherm om de aanraakbare informatielaag te
Video opnemen • Druk in de video-opnamemodus op de opnameknop om de opname te starten. Terwijl een video wordt opgenomen, wordt er een tijdsaanduiding op de LCD-monitor weergegeven. U stopt de opname door nogmaals op de opnameknop te drukken. • Opname pauzeren: raak het scherm aan om de opname te pauzeren. Raak het scherm nogmaals aan om de opname te hervatten. • Als u een foto wilt maken tijdens een video-opname, raakt u het fotopictogram aan om het beeld vast te leggen.
Menuopties Video-instelling Foto-instelling Effecten Setup* • Resolutie • Resolutie • Onderwerp • Geluid • Lampje • Lampje • Filter • Tv-indeling • Gezicht volgen • Diashow • Witbalans • Taal • Bewegingsdetectie • Glimlachdetectie • Datum en tijd • Slow motion • ISO • Formatteren • Time-lapse • Zelfontspanner • Anti-reflectie • Vooropname • Datum afdrukken • Standaardinstelling • Stabilisatie * Raadpleeg hoofdstuk 5 voor meer informatie over het menu Setup.
Video-instelling Stappen Scherm 1. Raak op het scherm aan. Het hoofdmenu wordt weergegeven op het scherm. 2. Raak het pictogram [VIDEO-INSTELLING ] op het scherm aan om het instelmenu weer te geven. 3. Het menu Video-instelling bevat acht opties, Resolutie, Lampje, Gezicht volgen, Bewegingsdetectie, Slow motion, Time-lapse, Vooropname en Stabilisatie, waarmee u de instellingen van de camcorder kunt aanpassen. Resolutie Er zijn vier resolutie-instellingen beschikbaar.
Lampje U kunt een modus selecteren waarin het beeld lichter wordt gemaakt of de helderheid van het onderwerp wordt vergroot. AAN Het lampje gaat branden en biedt licht tijdens de opname. UIT Het licht wordt uitgeschakeld. DIGITALE VERLICHTING Het dynamische bereik wordt vergroot voor onderwerpen met tegenlicht en een hoog contrast, zodat het onderwerp lichter en duidelijker wordt. Stappen Scherm 1. Zoek in het menu Video-instelling de optie [Lampje]. 2.
Slow motion Video’s opnemen met een slow motion-effect. Wanneer de video wordt afgespeeld, is de afspeelduur langer dan de werkelijke opnameduur. Stappen Scherm 1. Zoek in het menu Video-instelling de optie [Slow motion]. 2. Raak de pijl aan om de gewenste optie te selecteren. 3. U kunt ook het pictogram Sluiten ( om af te sluiten. ) aanraken Time-lapse Foto’s opnemen met een vooraf ingesteld interval, waarna u ze als één videobestand kunt afspelen. Uit Intervalopname uitschakelen.
Vooropname De functie Vooropname zorgt ervoor dat u geen belangrijke momenten mist. De opname van een video begint één seconde voordat op de videoknop wordt gedrukt. Stappen Scherm 1. Zoek in het menu Video-instelling de optie [Vooropname]. 2. Raak de pijl aan om de gewenste optie te selecteren. 3. Raak het pictogram Sluiten ( te sluiten. ) aan om af Opmerking Let erop dat u de camcorder op het onderwerp richt en goed neerzet.
Foto-instelling Stappen Scherm 1. Raak op het scherm aan. Het hoofdmenu wordt weergegeven op het scherm. 2. Raak het pictogram [Foto-instelling ] op het scherm aan om het instelmenu weer te geven. 3. Het menu Foto-instelling bevat zeven opties, Resolutie, Lampje, Diashow, Glimlachdetectie, ISO, Zelfontspanner en Datum afdrukken, waarmee u de instellingen van de camcorder kunt aanpassen. Resolutie Er zijn drie resolutie-instellingen beschikbaar. Hoog-16 M Foto’s maken van 4608 × 3456 met 16 megapixels.
Lampje U kunt een modus selecteren waarin het beeld lichter wordt gemaakt of de helderheid van het onderwerp wordt vergroot. Aan Het lampje gaat branden en biedt licht tijdens de opname. Uit Het lampje wordt uitgeschakeld. Digitale verlichting Het dynamische bereik wordt vergroot voor onderwerpen met tegenlicht en een hoog contrast, zodat het onderwerp lichter en duidelijker wordt. Stappen Scherm 1. Zoek in het menu Foto-instelling de optie [Lampje]. 2.
Glimlachdetectie De camcorder maakt automatisch een foto, zodra er een glimlach wordt waargenomen. Stappen Scherm 1. Zoek in het menu Foto-instelling de optie [Glimlachdetectie]. 2. Raak de pijl aan om de gewenste optie te selecteren. 3. U kunt ook het pictogram Sluiten ( om af te sluiten. ) aanraken 4. Richt de camcorder in de opnamemodus op de lachende gezichten. De lachende gezichten worden omkaderd weergegeven. 5. De camcorder stelt scherp op het onderwerp.
Zelfontspanner Met de zelfontspanner kunt u foto’s maken met een vertraging van tien seconden. Het zelfontspannerlampje op de voorzijde van de camcorder gaat ook knipperen. Net voordat de foto wordt genomen, gaat het lampje sneller knipperen. Stappen Scherm 1. Zoek in het menu Foto-instelling het pictogram [Zelfontspanner] aan. 2. Raak de pijl aan om de gewenste optie te selecteren. 3. Raak het pictogram Sluiten ( te sluiten. aeoo ) aan om af Datum afdrukken De datum en tijd op de foto afdrukken.
Effecten Stappen Scherm 1. Raak op het scherm aan. Het hoofdmenu wordt weergegeven op het scherm. 2. Raak het pictogram [Effecten instelmenu te openen. ] aan om het 3. Het menu Effecten bevat drie opties (Onderwerp, Filter en Witbalans) waarmee u de instellingen van de camcorder kunt aanpassen. Onderwerp U kunt de modus selecteren op basis van het onderwerp.
Filter U kunt speciale filtereffecten toepassen op video’s of foto’s. Automatisch Opnames maken zonder speciale effecten. Zwart & wit Het beeld wordt in zwart-wit omgezet. Klassiek Het beeld wordt in sepia omgezet. Negatief Het beeld wordt omgezet in een negatief van het normale beeld. Stappen Scherm 1. Zoek in het menu Effecten de optie [Filter]. 2. Raak de pijl aan om de gewenste optie te selecteren. 3. U kunt ook het pictogram Sluiten ( om af te sluiten.
Hoofdstuk 4 Weergavemodus Knopfunctie In de weergavemodus hebben de knoppen de volgende functie. Opnameknop: 1. Druk hierop om de videoweergave te starten/stoppen. 2. Druk erop om de weergave te stoppen. 3. Druk hierop om terug te gaan naar het voorbeeld wanneer er geen bestanden worden weergegeven. Teleknop: 1. Volume verhogen. (videomodus) 2. Inzoomen (fotomodus) Groothoekknop 1. Volume verlagen. (videomodus) 2.
Informatie op het LCD-scherm Aanduidingen op het LCD-scherm in de weergavemodus: Aanraakbare functiepictogrammen op het scherm voor foto’s 3 Aanraakbare functiepictogrammen op het scherm voor video’s 3 7 9 1 7 8 6 (1) 11 0 0 :0 3 :1 4 10 4 5 2 11 Duur van huidige video (2) Afspeelduur (3) Naar het miniaturenscherm gaan.
Bewerkingen in de weergavemodus In de weergavemodus kunt u video’s en foto’s in het ingebouwde geheugen of op een SD-kaart weergeven en beheren. Stappen Scherm 1. Raak in het Voorbeeld of aan om te schakelen naar de weergavemodus. 2. Raak aan om naar de vorige video/foto te gaan. Raak aan om naar de volgende video/ foto te gaan. 3. Raak aan om het menu te openen. (Raadpleeg hoofdstuk 3.) 4. Raak aan om het miniaturenscherm voor video’s en foto’s weer te geven. 5.
Video bijsnijden U kunt het begin en einde van de opgenomen video wegsnijden en het resultaat opslaan als een nieuwe videoclip. Stappen Scherm 1. Raak in het videoweergavescherm het bewerkingspictogram aan om het videobestand bij te snijden. 2. Verplaats het splitsingspictogram op de balk om het begin en het einde aan te geven. 3. Raak het opslagpictogram gedeelte te bewaren. aan om het rode 4. In het bevestigingsscherm kunt u [Overschrijven] of [Als nieuw] selecteren om de bewerkte video op te slaan.
Een bestand verwijderen in de weergavemodus Stappen 1. Raak in de weergavemodus 2. Raak Scherm aan op het scherm. aan om de huidige foto te verwijderen. 3. Of ga naar af te sluiten. om de bewerking te annuleren en 4. Ga naar de miniatuurweergave om meerdere geselecteerde bestanden te verwijderen. Opmerking Video’s en foto’s op een geheugenkaart die tegen schrijven is beveiligd, kunnen niet worden verwijderd.
Hoofdstuk 5 De camcorder instellen Het menu Setup Stappen Scherm 1. Raak op het scherm aan. Het hoofdmenu wordt weergegeven op het scherm. 2. Raak het pictogram [Setup instelmenu weer te geven. ] aan om het 3. Het menu Setup bevat zeven opties waarmee u de camcorder kunt instellen. Deze opties zijn Geluid (werkingsgeluid), Tv, Taal, Datum en tijd, Formatteren, Anti-reflectie en Standaardinstelling. Geluid Het toetsgeluid en het werkingsgeluid in- of uitschakelen. Stappen Scherm 1.
Taal Gebruik deze optie om de taal van de gebruikersinterface te selecteren. Stappen Scherm 1. Zoek in het menu Setup de optie [Taal]. 2. Raak de pijl aan om de gewenste optie te selecteren. 3. U kunt ook het pictogram Sluiten ( om af te sluiten. ) aanraken Tijd en datum Stappen Scherm 1. Raak in het menu Setup het bewerkingspictogram aan om de instelling in te voeren. 2. Raak het jaar, de maand, de dag, de uren of de minuten aan om deze in te stellen. 3.
Formatteren Gebruik deze optie om alle gegevens in het ingebouwde geheugen of op de microSD-geheugenkaart te verwijderen. Ja Het ingebouwde geheugen formatteren (als de camcorder geen microSD-kaart bevat)/de microSD-kaart formatteren (als de camcorder een microSD-kaart bevat). Nee Het ingebouwde geheugen niet formatteren (als de camcorder geen SD-kaart bevat). De SD-kaart niet formatteren (als de camcorder een SD-kaart bevat). Stappen Scherm 1. Zoek in het menu Setup de optie [SD-kaart formatteren]. 2.
Standaardinstelling Gebruik deze optie om de standaardfabrieksinstellingen te herstellen. Ja De standaardfabrieksinstelling herstellen. Nee De standaardfabrieksinstelling niet herstellen. Stappen Scherm 1. Zoek in het menu Setup de optie [Standaardinstelling] en raak [OPNIEUW INSTELLEN] aan om het bevestigingsscherm weer te geven. 2. Raak het pictogram aan om de bewerking uit te voeren. In de volgende tabel worden de standaarden van de camcorder vermeld.
Hoofdstuk 6 Foto’s en video’s op een tv weergeven Aansluiten op een HD-breedbeeld-tv (16:9) 1. Sluit de HDMI-kabel aan op de mini-HDMI-uitgang van de camcorder. 2. Sluit het andere uiteinde van de kabel aan op een televisie. 3. Stel de video-invoerbron van de tv in op HDMI. 4. De stappen die u moet uitvoeren om opgeslagen video’s en foto’s op een HD-tv weer te geven, zijn exact gelijk aan de stappen voor weergave op het LCD-scherm.
Hoofdstuk 7 Video’s en foto’s weergeven op een pc Bijgeleverde software installeren De bijgeleverde cd-rom bevat twee softwaretoepassingen. • ArcSoft MediaImpression is een gebruiksvriendelijke toepassing om uw media te beheren, video op DVD te branden en bestanden eenvoudig naar websites te uploaden. • Adobe Reader is een veelgebruikt programma dat moet zijn geïnstalleerd als u de gebruikershandleiding wilt lezen. Dit programma is al geïnstalleerd op veel computers.
Hoofdstuk 8 Bestanden uploaden naar internet Met de ingebouwde toepassing CAMILEO UPLOADER kunt u uw bestanden gemakkelijk direct uploaden naar sociale websites. Zo kunt u ze gemakkelijk delen met familie en vrienden op die websites. CAMILEO UPLOADER U kunt als volgt bestanden uploaden naar sociale netwerksites: 1. Sluit de camcorder met de meegeleverde USB-kabel aan op de computer. 2. Zodra de camera is aangesloten op de USB-poort, verschijnt het venster Automatisch afspelen.
4. Kies de website waarnaar u bestanden wilt uploaden. 5. Klik op [VIDEOS]/[PHOTOS] om naar de pagina met video-/fotominiaturen te gaan. Verschuif de balk om naar een andere pagina te gaan. 6. Klik op de bestanden die u wilt uploaden. Klik op [Select All]/[Deselect All] (Alles selecteren/ Alles deselecteren) om alle video- of fotobestanden op de huidige pagina te selecteren of te deselecteren. 7. Klik op [Upload] om het uploaden te starten.
Uw accountgegevens voor de website instellen: 1. Kies de website. 2. Klik op [SETTINGS] (Instellingen) om naar de instelpagina te gaan. 3. Voer uw accountgegevens in. Klik daarna op ‘Save’ (Opslaan). 4. U kunt [Remember Password] (Wachtwoord onthouden) inschakelen om uw accountgegevens en wachtwoord op te slaan in de Camcorder UPLOADER-toepassing. (Als u deze optie uitgeschakeld laat, wordt u om uw wachtwoord gevraagd nadat u klikt op [UPLOAD] op de pagina met miniaturen.
Hoofdstuk 9 Webcammodus Webcammodus 1. Sluit de computer en camcorder met de bijgeleverde Micro USB 2.0-kabel op elkaar aan. 2. Selecteer [WEBCAM] op de camcorder. 3. In deze modus kunt u livevideovergaderingen en multimediacommunicatie gebruiken. 4. De webcammodus ondersteunt maximaal 720p.
Hoofdstuk 10 Specificaties Specificatie Beeldsensor CMOS-sensor van 5 megapixels Gebruiksmodi Video-opname, foto-opname Lens Vast diafragma (F 2.
Hoofdstuk 11 Problemen oplossen Problemen oplossen 1. Hoe kan de scherpstelling worden aangepast als het LCD-beeld tijdens de opname niet scherp is? Probeer te wisselen tussen de modi Macro en Normaal. 2. De bestanden op de geheugenkaart worden niet goed weergegeven als op het LCD-scherm het teken ! wordt weergegeven. Het teken ! geeft aan dat de microSD-kaart traag is of onjuiste inhoud bevat. U kunt dit verhelpen door de microSD-kaart in de camcorder te formatteren in plaats van in de pc.
Hoofdstuk 12 Overige informatie TOSHIBA-ondersteuning Hebt u hulp nodig? Voor de laatste stuurprogramma-updates, handleidingen en veelgestelde vragen, gaat u naar de TOSHIBA-ondersteuningspagina voor opties en services: computers.toshiba.eu/options-support Ga naar computers.toshiba.eu/options-warranty voor de nummers van de hotline van TOSHIBA.
Medische omgeving: de naleving van de richtlijnen voor medische producten is niet gecontroleerd door Toshiba. Daarom mag dit product zonder verdere controle niet worden gebruikt als medisch product. Het gebruik in normale kantooromgevingen, zoals in ziekenhuizen, mag geen probleem zijn als er geen beperkingen zijn opgelegd door het verantwoordelijke bestuur.
Afvalverwerking van batterijen en/of accu’s Het symbool van een doorgekruiste vuilnisbak geeft aan dat batterijen en/of accu’s afzonderlijk moeten worden ingezameld en gescheiden van huishoudelijk afval moeten worden verwerkt.
2520AC820L-A01 For more information, please visit: www.toshiba-multimedia.