Benutzerhandbuch CAMILEO X150/X155
Einführung Vielen Dank für den Kauf eines Toshiba-Produkts. Im Lieferumfang dieses TOSHIBA-Produkts sind zwei Dokumentationen enthalten: a) eine Kurzanleitung, b) das vorliegende umfassende PDF-Benutzerhandbuch.
Inhalt Abschnitt 1 Vorstellung des Camcorders.......................................... 6 Überblick........................................................................... 6 Überprüfen des Lieferumfangs....................................... 6 Sicherheitshinweise......................................................... 7 Systemanforderungen..................................................... 7 Vorderseite........................................................................
Inhalt Abschnitt 4 Wiedergabemodus......................................................... 28 Tastenfunktion................................................................ 28 LCD-Informationen......................................................... 29 Bedienvorgänge im Wiedergabemodus....................... 30 Videowiedergabe............................................................ 30 Video trimmen................................................................ 31 Fotowiedergabe.....................
Inhalt Abschnitt 11 Sonstige Informationen................................................. 44 TOSHIBA-Support.......................................................... 44 Betriebsbedingungen.................................................... 44 Zulassungsbestimmungen............................................ 44 Zusätzliche Informationen.............................................
Abschnitt 1 Vorstellung des Camcorders Überblick Der Camcorder mit 5-Megapixel-Sensor kann H.264-Videos aufnehmen. Bei Verwendung der H.264Technologie lassen sich mehr Filme mit einer bestimmten Speichergröße aufnehmen. Bilder mit hoher Qualität bei bis zu 16 Megapixeln werden problemlos wiedergegeben. Mit einem Farb-LCD können Benutzer Bilder zusammenstellen und unkompliziert überprüfen. Der Camcorder verfügt über ein 3“-LCD-Touchpanel, über das Sie den Camcorder bedienen können.
Sicherheitshinweise 1. Lassen Sie den Camcorder nicht fallen, brechen Sie ihn nicht auf und nehmen Sie ihn nicht auseinander; andernfalls erlischt die Garantie. 2. Verhindern Sie, dass das Gerät mit Wasser in Kontakt kommt. Trocknen Sie vor Verwendung des Geräts Ihre Hände ab. 3. Setzen Sie den Camcorder keinen hohen Temperaturen oder direktem Sonnenlicht aus. Dies kann den Camcorder beschädigen. 4. Gehen Sie sorgsam mit dem Camcorder um. Drücken Sie nicht zu fest auf das Camcordergehäuse. 5.
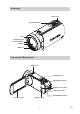
Vorderseite [Foto]-Taste [Tele/Wide]-Taste Licht Befestigung für externes Objektiv Objektiv Mikrofon Seitenansicht/Rückansicht Lautsprecher [Ein/Aus]-Taste Mini-USB-Anschluss [Digitales Licht]-Taste [Aufnahme]-Taste Mini-HDMI-Anschluss LCD-Touchpanel [Pause]-Taste 8 DE
Unterseite SD-Kartenabdeckung Stativsockel 9 DE
Abschnitt 2 Erste Schritte Hinweise zum Akku • Verwenden Sie nur von TOSHIBA empfohlene Akkus als Ersatz. Der Akku besteht aus LithiumIonen-Batterien, die bei unsachgemäßer Handhabung explodieren können. Erkundigen Sie sich bei den zuständigen Behörden, wie Sie diese Batterien entsorgen müssen. • Laden Sie den Akku bei einer Umgebungstemperatur zwischen 5 und 35 Grad Celsius auf.
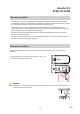
Einsetzen und Entfernen einer SD-Karte (optional) Der Camcorder ist mit einem internen Speicher für Fotos und Videos ausgestattet. Sie können die Speicherkapazität erhöhen, indem Sie eine optionale SD-Speicherkarte verwenden. 1. Setzen Sie die Speicherkarte in den Steckplatz ein. Sehen Sie sich dazu die Abbildung rechts an. 2. Um eine SD-Karte aus dem Camcorder zu nehmen, drücken Sie sie in den Steckplatz, um sie freizugeben. 3. Die Karte wird etwas herausgeschoben, sodass Sie sie leicht entnehmen können.
Abschnitt 3 Aufnahmemodus Tastenfunktion Aufnahmetaste: 1. Im Video-Aufnahmemodus drücken, um Videos aufzunehmen. Zum Beenden der Aufnahme erneut drücken. Lichttaste: 1. Drücken, um die drei Modi Licht an/Licht aus/Digitales Licht in dieser Reihenfolge zu durchlaufen. Pausetaste: 1. Drücken, um die Aufnahme zu unterbrechen. Drücken Sie erneut auf die Taste, um fortzufahren. Fototaste: 1. Halb nach unten drücken, um zu fokussieren, dann ganz herunterdrücken, um das Foto aufzunehmen. 2.
LCD-Informationen Die unten aufgeführten Anzeigen können auf dem Display eingeblendet werden, wenn Videos und Fotos aufgenommen werden: Displaysymbol (Information) 3 Displaysymbol (Funktion) 1 8 9 10 7 8 9 16 15 6 11 12 4 3 2 9 1 13 14 6 12 5 11 13 14 Akku: volle Energie Akku: mehr als halbe Energie Akku: mittlere Energie (1) Akku: weniger als halbe Energie Akku: wenig Energie Gleichstrom-Modus (2) 00 :0 2 :2 3 Aufnahmezeit 00 :0 2 :2 3 Aufnahmepause 234 (3) 0 0 :0 2 :2 3 D
Eingestellter Lichtmodus Eingestellte Auflösung Selbstauslöser ein Lächelerkennung ein (4) Eingestellte ISO-Empfindlichkeit Eingestellter Makromodus Eingestellter Szenenmodus Eingestellter Filtermodus Eingestellter Weißabgleich Blendfrei ein Eingestellter Lichtmodus Eingestellte Auflösung Bewegungserkennung ein Gesichtsverfolgung ein Zeitlupe ein Pre-Record ein (5) Zeitraffer ein Eingestellter Makromodus Eingestellter Szenenmodus Eingestellter Filtermodus Eingestellter Weißabgleich Blendfrei ein Zoom-Me
Digitale Beleuchtung an (8) Licht an Licht aus Videoauflösung (9) FHD Full HD (30 fps) HD+ HD60 (60 fps) HD HD30 (30 fps) VGA VGA Fotoauflösung 16MP Hoch-16M 5MP Standard-5M 3MP Niedrig-3M ISO Auto (10) ISO 800 (11) Menüsymbol (12) Wiedergabemodus-Symbol (13) Fotomodus-Symbol (14) Videomodus-Symbol (15) Gesichtsverfolgung ein/aus (16) Blendfrei ein/aus Hinweis • Tippen Sie auf das Display, um die berührungsempfindliche Informationsebene zu schließen.
Videoaufnahme • Drücken Sie im Video-Aufnahmemodus die [Aufnahme]-Taste, um die Aufnahme zu starten. Wenn ein Video aufgenommen wird, erscheint auf dem Display eine Zeitanzeige. Um die Aufnahme zu beenden, drücken Sie erneut die [Aufnahmetaste]. • So halten Sie die Aufnahme an: Berühren Sie das Display, um die Aufnahme zu unterbrechen. Berühren Sie es erneut, um die Aufnahme fortzusetzen.
Menüoptionen Videoeinstellungen Fotoeinstellungen Effekte Einrichtung* • Auflösung • Auflösung • Makromodus • Töne • Licht • Licht • Szene • TV-Format • Gesichtsverfolgung • Diashow • Filter • Sprache • Bewegungserkennung • Lächelerkennung • Weißabgleich • Datum & Uhrzeit • Zeitlupe • Zeitraffer • Pre-Record • ISO • Format • Selbstauslöser • Blendfrei • Datumsdruck • Standard * Ausführliche Informationen zur Einrichtung finden Sie in Abschnitt 5.
Videoeinstellungen Bedienvorgang Bildschirm 1. Berühren Sie das Displaysymbol . Das Hauptmenü wird auf dem Display eingeblendet. 2. Berühren Sie das Symbol [Videoeinstellung ] auf dem Display, um das entsprechende Einstellungsmenü aufzurufen. 3. Das Menü „Videoeinstellungen“ enthält 7 Optionen zur Konfiguration des Camcorders: Auflösung, Licht, Gesichtsverfolgung, Bewegungserkennung, Zeitlupe, Zeitraffer und Pre-Record. Auflösung Es sind vier Einstellungen für die Auflösung verfügbar.
Licht Sie können einen Modus auswählen, um die Umgebung aufzuhellen oder die Helligkeit der Motive zu verstärken. EIN Das Licht wird eingeschaltet und sorgt bei Aufnahmen für zusätzliche Beleuchtung. AUS Das Licht wird ausgeschaltet. DIGITALE BELEUCHTUNG Der dynamische Bereich für Hintergrundbeleuchtung und hohe Kontraste wird erweitert, sodass die Objekte heller und deutlicher aussehen. Bedienvorgang Display 1. Suchen Sie in den Videoeinstellungen die Option [Licht] auf dem Display. 2.
Zeitlupe Nimmt Videos mit Zeitlupeneffekt auf. Wenn das Video abgespielt wird, dauert die Wiedergabe länger als die tatsächliche Aufnahme. Operation Display 1. Suchen Sie in den Videoeinstellungen die Option [Zeitlupe]. 2. Berühren Sie den Pfeil, um die gewünschte Option auszuwählen. 3. Oder berühren Sie das Beenden-Symbol ( um die Option zu verlassen. ), Zeitraffer Nehmen Sie in bestimmten Intervallen Standbilder auf und spielen Sie sie als Videodatei ab. Das Zeitintervall legen Sie selbst fest.
Pre-Record Die Pre-Record-Funktion sorgt dafür, dass Ihnen keine wichtigen Aufnahmegelegenheiten entgehen. Die Aufnahme beginnt bereits 1 Sekunde, bevor Sie die [Aufnahmetaste] drücken. Bedienvorgang Display 1. Suchen Sie in den Videoeinstellungen die Option [Pre-Record]. 2. Berühren Sie den Pfeil, um die gewünschte Option auszuwählen. 3. Berühren Sie das Beenden-Symbol ( Option zu verlassen. ), um die Hinweis Richten Sie den Camcorder auf das Motiv und stellen Sie ihn sicher auf.
Fotoeinstellungen Bedienvorgang Bildschirm 1. Berühren Sie das Displaysymbol . Das Hauptmenü wird auf dem Display eingeblendet. 2. Berühren Sie das Symbol [Fotoeinstellung ] auf dem Display, um das entsprechende Einstellungsmenü aufzurufen. 3. Das Foto-Einstellungsmenü enthält 7 Optionen für die Konfiguration des Camcorders: Auflösung, Licht, Diashow, Lächelerkennung, ISO, Selbstauslöser, Datumsdruck. Auflösung Es sind drei Einstellungen für die Auflösung verfügbar.
Licht Sie können einen Modus auswählen, um die Umgebung aufzuhellen oder die Helligkeit der Motive zu verstärken. Ein Das Licht wird eingeschaltet und sorgt bei Aufnahmen für zusätzliche Beleuchtung. Aus Das Licht wird ausgeschaltet. Digitales Licht Der dynamische Bereich für Hintergrundbeleuchtung und hohe Kontraste wird erweitert, sodass die Objekte heller und deutlicher aussehen. Bedienvorgang Display 1. Suchen Sie in den Fotoeinstellungen die Option [Licht] auf dem Display. 2.
Lächelerkennung Der Camcorder nimmt das Foto automatisch auf, wenn er ein Lächeln erkennt. Bedienvorgang Display 1. Suchen Sie in den Fotoeinstellungen die Option [Lächelerkennung] auf dem Display. 2. Berühren Sie den Pfeil, um die gewünschte Option auszuwählen. 3. Oder berühren Sie das Beenden-Symbol um die Option zu verlassen. , 4. Richten Sie den Camcorder im Aufnahmemodus auf lächelnde Gesichter. Um Gesichter mit einem Lächeln wird ein Rahmen angezeigt. 5. Der Camcorder fokussiert auf das Motiv.
Selbstauslöser Mithilfe des Selbstauslösers können Sie ein Foto mit 10 Sekunden Verzögerung aufnehmen. Die Selbstauslöseranzeige auf der Vorderseite des Camcorders blinkt. Die Anzeige blinkt kurz vor der Aufnahme schneller. Bedienvorgang Display 1. Suchen Sie in den Fotoeinstellungen die Option [Selbstauslöser]. 2. Berühren Sie den Pfeil, um die gewünschte Option auszuwählen. 3. Berühren Sie das Beenden-Symbol ( Option zu verlassen.
Effekte Bedienvorgang Bildschirm 1. Berühren Sie das Displaysymbol . Das Hauptmenü wird auf dem Display eingeblendet. 2. Berühren Sie das Displaysymbol [Effekt ], um das entsprechende Einstellungsmenü aufzurufen. 3. Das Menü „Effekt“ enthält vier Optionen zum Anpassen der Camcordereinstellungen: Makromodus, Szene, Filter und Weißabgleich. Makromodus Bedienvorgang Display 1. Berühren Sie im Menü „Effekt“ zweimal das Symbol [Makromodus]. 2. Berühren Sie die gewünschte Option. 3.
Filter Sie können bestimmte Filtereffekte für die Videos oder Fotos auswählen. Autom. Es wird kein besonderer Effekt auf das Bild angewendet. Schwarzweiß Das Bild wird in ein Schwarzweißbild konvertiert. Klassisch Auf das Bild wird ein Sepia-Effekt angewendet. Negativ Das Bild wird in ein Negativbild des normalen Bildes konvertiert. Bedienvorgang Display 1. Suchen Sie im Menü „Effekt“ die Option [Filter]. 2. Berühren Sie den Pfeil, um die gewünschte Option auszuwählen. 3.
Abschnitt 4 Wiedergabemodus Tastenfunktion Im Wiedergabemodus haben die Tasten die folgenden Funktionen. Aufnahmetaste: 1. Drücken, um die Videowiedergabe zu starten/zu beenden. 2. Während der Wiedergabe zum Beenden drücken. 3. Wenn keine Dateien abgespielt werden, drücken, um zur Vorschau zurückzugehen. Tele-Taste: 1. Lauter (Videomodus) 2. Zoom-in (Fotomodus). Weitwinkel-Taste: 1. Leiser (Videomodus) 2. Zoom-out (Fotomodus).
LCD-Informationen Anzeigen auf dem LCD-Bildschirm im Wiedergabemodus: Berührungsempfindliche Funktionssymbole im Fotomodus 3 Berührungsempfindliche Funktionssymbole im Videomodus 3 7 9 1 7 8 6 (1) 11 0 0 :0 3 :1 4 10 4 5 2 11 Länge des aktuellen Videos (2) Spieldauer (3) Ruft die Miniaturansichten auf. (4) Zeigt an, ob die fortlaufende Wiedergabe aktiviert ist oder nicht (5) Anfang und Ende eines aufgenommenen Videos wegschneiden (trimmen) und es als neuen Videoclip speichern.
Bedienvorgänge im Wiedergabemodus Im Wiedergabemodus können Sie Videos und Fotos anzeigen und verwalten, die sich im eingebauten Speicher oder auf einer SD-Karte befinden. Bedienvorgang Display 1. Berühren Sie im Vorschaumodus oder um in den Wiedergabemodus zu wechseln. , 2. Berühren Sie , um zum vorherigen Video/Foto zu gehen; berühren Sie , um zum nächsten Video/Foto zu gehen. 3. Berühren Sie , um das Menü zu öffnen. (Lesen Sie dazu den Abschnitt 3.) 4.
Video trimmen Sie können Anfang und Ende eines aufgenommenen Videos wegschneiden (trimmen) und es als neuen Videoclip speichern. Bedienvorgang Display 1. Berühren Sie im Bildschirm für die Videowiedergabe das Bearbeiten-Symbol , um mit dem Trimmen der Videodatei zu beginnen. 2. Berühren Sie das Trennsymbol auf dem Balken und verschieben Sie es, um Anfang und Ende festzulegen. 3. Berühren Sie das Speichern-Symbol rot markierten Teil zu speichern. , um den 4.
Löschen von Dateien im Wiedergabemodus Bedienvorgang Display 1. Berühren Sie im Wiedergabemodus das Displaysymbol 2. Berühren Sie . , um das aktuelle Foto zu löschen. 3. Oder gehen Sie zu , um den Vorgang abzubrechen und das Menü zu verlassen. 4. Gehen Sie zu den Miniaturansichten, um mehrere ausgewählte Dateien zu löschen. Hinweis Videos und Fotos, die auf einer schreibgeschützten Speicherkarte gespeichert sind, können nicht gelöscht werden.
Abschnitt 5 Einrichten des Camcorders Menü „Einrichtung“ Bedienvorgang Bildschirm 1. Berühren Sie das Displaysymbol . Das Hauptmenü wird auf dem Display eingeblendet. 2. Berühren Sie das Displaysymbol [Einrichtung um das Einstellungsmenü aufzurufen. ], 3. Das Menü „Einrichtung“ enthält 7 Optionen für die Konfiguration des Camcorders: Ton (Betriebsgeräusche), TV, Sprache, Zeit & Datum, Format, Blendfrei und Standardeinstellung.
Sprache Mit dieser Option wählen Sie die Sprache der Benutzeroberfläche aus. Bedienvorgang Display 1. Suchen Sie im Menü „Einrichtung“ die Option [Sprache]. 2. Berühren Sie den Pfeil, um die gewünschte Option auszuwählen. 3. Oder berühren Sie das Beenden-Symbol ( um die Option zu verlassen. ), Zeit & Datum Bedienvorgang Display 1. Berühren Sie im Menü „Einrichtung“ das BearbeitenSymbol , um die Einstellungen aufzurufen. 2. Wählen Sie Jahr, Monat, Tag, Stunde oder Minute durch Berühren aus. 3.
Format Mit dieser Option löschen Sie alle Daten im eingebauten Speicher oder auf der SD-Karte. Ja Der integrierte Speicher wird formatiert (wenn sich keine SD-Karte im Camcorder befindet) bzw. die SD-Karte wird formatiert (wenn sich eine SD-Karte im Camcorder befindet). Nein Der integrierte Speicher wird nicht formatiert (wenn sich keine SD-Karte im Camcorder befindet) bzw. die SD-Karte wird nicht formatiert (wenn sich eine SD-Karte im Camcorder befindet). Bedienvorgang Display 1.
Standard Mit dieser Option stellen Sie die werkseitigen Standardeinstellungen wieder her. Ja Stellt die werkseitigen Standardeinstellungen wieder her. Nein Stellt die werkseitigen Standardeinstellungen nicht wieder her. Bedienvorgang Display 1. Suchen Sie im Menü „Einrichtung“ die Option [Standardeinstellung] und berühren Sie [RESET], um den Bestätigungsbildschirm aufzurufen. 2. Berühren Sie das Symbol, um den Vorgang auszuführen.
Abschnitt 6 Anzeigen von Fotos und Videos auf einem Fernsehgerät Anschluss an ein High-Definition-Breitbildfernsehgerät (16:9) 1. Schließen Sie das HDMI-Kabel an den Mini-HDMI-Ausgang des Camcorders an. 2. Schließen Sie das andere Ende des Kabels an ein Fernsehgerät an. 3. Stellen Sie beim Fernsehgerät die Videoeingangsquelle auf „HDMI“. 4. Um gespeicherte Videos und Fotos auf einem Fernsehgerät zu betrachten, führen Sie dieselben Schritte aus wie beim Betrachten auf dem LCD.
Abschnitt 7 Anzeigen von Videos und Fotos auf einem Computer Installieren der mitgelieferten Software Die im Lieferumfang des Camcorders enthaltene CD-ROM enthält zwei Softwareprogramme. • ArcSoft MediaImpression ist eine benutzerfreundliche Anwendung, mit der Sie Ihre Medien verwalten, Ihre Videos auf DVD brennen und Ihre Dateien auf bestimmte Websites hochladen können. • Adobe Reader ist ein beliebtes Programm, das installiert sein muss, damit Sie das Benutzerhandbuch lesen können.
Abschnitt 8 Hochladen von Dateien in das Internet Die integrierte Anwendung CAMILEO UPLOADER bietet Ihnen eine einfache Möglichkeit, Ihre Dateien sofort auf die Websites verschiedener sozialer Netzwerke zu hochzuladen. So können Sie Ihre Videos und Fotos ganz unkompliziert an Freunde und Familie weitergeben. CAMILEO UPLOADER So können Sie Dateien auf die Websites sozialer Netzwerk hochladen: 1. Schließen Sie den Camcorder mithilfe des mitgelieferten USB-Kabels an den Computer an. 2.
4. Wählen Sie die Website aus, auf die Sie die Dateien hochladen möchten. 5. Klicken Sie auf [VIDEOS]/[PHOTOS], um zur Seite mit Miniaturansichten der Videos bzw. Fotos zu gelangen. Verwenden Sie ggf. die Bildlaufleiste. 6. Klicken Sie auf die Dateien, die Sie hochladen möchten. Klicken Sie auf [Alles auswählen]/ [Auswahl aufheben], um alle auf der aktuellen Seite angezeigten Video- oder Fotodateien auszuwählen bzw. die Auswahl aufzuheben. 7. Klicken Sie auf [Upload], um mit dem Hochladen zu beginnen.
So richten Sie Ihre Kontoinformationen für die Website ein: 1. Wählen Sie die Website aus. 2. Klicken Sie auf [SETTINGS], um den Setup-Bildschirm aufzurufen. 3. Geben Sie Ihre Kontoinformationen ein. Klicken Sie dann auf „Save“ (Speichern). 4. Aktivieren Sie [Remember Password], wenn Ihre Kontoinformationen und Ihr Kennwort in Camcorder Uploader gespeichert werden sollen.
Abschnitt 9 Technische Daten Technische Daten Bildsensor 5 Megapixel CMOS-Sensor Betriebsmodi Videoaufnahme, Fotoaufnahme Objektiv 10-facher optischer Zoom Brennweite Makro: 1 cm (nur Weitwinkelmodus) Normal: Weitwinkel - 1 cm bis unendlich Tele - 1 m bis unendlich Zoom 1-facher ~ 10-facher optischer Zoom 1X ~ 5X (5-facher digitaler Zoom für 1080p) 1X ~ 10X (10-facher digitaler Zoom für 720p und VGA) Blende Elektronisch LCD-Monitor 7,6 cm (3 Zoll) Touchscreen-LCD Speichermedien Integriert
Abschnitt 10 Fehlerbehebung Fehlerbehebung 1. Wie kann die Brennweite angepasst werden, wenn die Vorschau auf dem Display bei der Aufnahme nicht scharf ist? Wechseln Sie zwischen Makromodus und normalem Modus. 2. Die Dateien auf der Speicherkarten werden nicht fließend angezeigt, wenn auf dem Display „!“ eingeblendet wird. Das Ausrufezeichen (!) bedeutet, dass die SD-Karte mit niedriger Geschwindigkeit arbeitet oder nicht richtig formatiert ist.
Abschnitt 11 Sonstige Informationen TOSHIBA-Support Brauchen Sie Hilfe? Die neuesten Treiber-Updates, Benutzerhandbücher und FAQs finden Sie auf der TOSHIBA-SupportWebsite für Optionen und Dienstleistungen: computers.toshiba.eu/options-support Besuchen Sie computers.toshiba.eu/options-warranty um TOSHIBA Hotline-Nummern zu erfahren.
Medizinische Umgebungen: Die Erfüllung der Richtlinie für medizinische Produkte wurde von Toshiba nicht überprüft, deshalb darf dieses Produkt nicht ohne weitere Überprüfung als medizinisches Produkt eingesetzt werden. Die Verwendung in normalen Büroumgebungen, auch in Krankenhäusern, sollte kein Problem darstellen, solange keine Einschränkungen durch die verantwortliche Verwaltung vorliegen.
Entsorgung von Batterien und/oder Akkus Das Symbol mit der durchgestrichenen Mülltonne weist darauf hin, dass Batterien und/oder Akkus getrennt vom Hausmüll gesammelt und entsorgt werden müssen. Wenn die Batterie bzw. der Akku höhere als die in der Batterierichtlinie (2006/66/EG) angegebenen Werte von Blei (Pb), Quecksilber (Hg) und/oder Kadmium (Cd) enthält, werden die chemischen Symbole für Blei (Pb), Quecksilber (Hg) und/oder Kadmium (Cd) unter dem durchgestrichenen Mülltonnensymbol aufgeführt.
X150/X155_UM_V1_0912 For more information, please visit: www.toshiba-multimedia.