
User Manual


10
EN
Section 2
Getting Started
Loading the Battery
The battery comes pre-installed in the camcorder, however you
must remove the insulator on the battery before use.
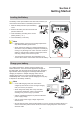
1. Slide the safety latch and open the battery
cover.
2. Remove the battery from the camcorder and
pull the insulator off
.
3. Insert the battery according to the correct
polarity marks ( + or -).
4. Close the battery cover
rmly.
Note
• Differentbatterytypesandsurroundingtemperatures
mayaffectthebatteryperformance.
• Neverexposethebatterytoaheatingequipment(e.g.,
microwaveoven)andattempttodisposeofabatteryby
burningorbythrowingitintoare.Heatcancausethe
batterytoexplodeand/orreleasecausticliquid,which
bothmaypossiblycauseseriousinjuries.
• Turnthepoweroffandstopusingthebatteryifyou
observetheconditionofexcessiveheatfromthebattery.
Charge your battery
For a better performance, please charge the battery fully
before its rst use. You must use the supplied AC charger or
the USB cable. The camcorder must be turned OFF. A blinking
light indicates active charging and a solid light indicates that
charging is complete. In adapter charging mode, the full
charging time is about 4- 5 hours and the light will turn off
automatically after 3~5 minutes. (Actual charging time may vary.
It depends on the battery condition.)
Note
• InPCUSBchargingmode,thecamcorderis
chargedbylesselectriccurrent.Alongercharging
time(12~12.5hrs)isrequired.
• Neverchargethebatterywithawayotherthan
asinstructed.Otherwise,areoranyexplosion
resultinginanyseriousinjuryispossible.
• UsethesuppliedACadapteronlywiththeindicated
powersupplyvoltage.
• Useanyotherpowersupplyvoltagemightcause
electricshock.
• Besurethatthepoweroutletthattheadapteryoupluginiseasilyaccessible.Whenyou
needtodisconnectpowerfromthedevice,besuretounplugthepowercordfromthe
electricaloutlet.
REMOVE