Introduction Connecting your TV Using the Remote Control OWNER'S MANUAL DLP Projection Television Index 46HM84 52HM84 62HM84 Owner's Record The model number and serial number are on the back of your TV. Record these numbers in the spaces below. Refer to these numbers whenever you communicate with your Toshiba dealer about this TV. Model: Serial No.
Dear Customer, Thank you for purchasing this Toshiba TV. This manual will help you use the many exciting features of your new TV. Before operating the TV, please read this manual completely, and keep it nearby for future reference. Safety Precautions WARNING: TO REDUCE THE RISK OF FIRE OR ELECTRIC SHOCK, DO NOT EXPOSE THIS APPLIANCE TO RAIN OR MOISTURE. NOTICE OF POSSIBLE TV STAND INSTABILITY CAUTION: This television is for use only with the Toshiba stand listed below.
Important Safety Instructions 1) 2) 3) 4) Read these instructions. Keep these instructions. Heed all warnings. Follow all instructions. 5) Do not use this apparatus near water. 6) Clean only with a dry cloth. 7) Do not block any ventilation openings. Install in accordance with the manufacturer’s instructions. 8) Do not install near any heat sources such as radiators, heat registers, stoves, or other apparatus (including amplifiers) that produce heat.
Installation (cont. from previous page) Care (cont. from previous column) 27) Always make sure the antenna system is properly grounded to provide adequate protection against voltage surges and built-up static charges (see Section 810 of the National Electric Code). 33) For added protection of your TV from lightning and power surges, always unplug the power cord and disconnect the antenna from the TV if you leave the TV unattended or unused for long periods of time.
Important notes about your DLPTM projection TV 1) The light source for this TV is a projection lamp unit with a limited service life. When the lamp wears out, the picture may become dark or black, or the lamp may fail, at which time you must replace the lamp unit. See “Lamp unit replacement” on pages 56-60. 5) Always sit approximately 10–25 feet away from the TV and as directly in front of it as possible. The picture quality may be affected by your viewing position and length of viewing time.
Important Safety Information ............................. 2-5 Introduction ................................................................ 7 Welcome to Toshiba ......................................................... 7 Exploring your new TV ................................................... 7 Connecting your TV .................................................. 8 Connecting an antenna or cable TV ................................. 8 Connecting a VCR ......................................................
Introduction Introduction See “Important notes about your DLP TM projection TV” on page 5. Welcome to Toshiba Using the Remote Control Connecting your TV Congratulations! You have purchased one of the finest DLPTM projection TVs on the market. The goal of this manual is to guide you through setting up and operating your Toshiba TV as quickly as possible. This manual applies to models 46HM84, 52HM84 and 62HM84. The model and serial numbers are on the back of your TV.
Introduction Connecting your TV Note: Cables are not supplied with your TV. ● Connecting your TV ● ● ● Using the Remote Control ● Coaxial cable is the cable that comes in from your antenna, cable TV service, or cable converter box. Coaxial cable uses “F” connectors. Standard A/V (audio/video) cables usually come in sets of three, and are typically color-coded according to use: yellow for video, red for stereo right audio, and white for stereo left (or mono) audio.
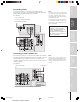
Introduction Connecting a VCR From Cable Box or Antenna Note: If you have a mono VCR, connect L/Mono to VCR Audio OUT using only one audio cable. If you have a VCR with S-video, use an Svideo cable (in the S-video jacks) instead of the standard video cable. Do not connect a standard video cable and an S-video cable to Video-1 (or Video-2) at the same time, or the picture performance will be unacceptable.
Introduction Connecting a cable converter box and VCR Connecting your TV This connection allows you to watch and record basic and premium cable channels, watch videotapes, and record one channel while watching another channel. To watch basic cable and use the TV’s features, select ANT-1. To view premium channels or record with the VCR, select ANT-2, tune the TV and VCR to channel 3 or 4 (whichever channel is vacant in your area), and use the converter box to change channels.
Introduction Connecting a DVD player or satellite receiver and a VCR Stereo VCR From Antenna L R AUDIO TV Using the Remote Control OUT VIDEO Do not connect both an S-video cable and a standard video cable between the TV and DVD player/satellite receiver at the same time or the picture performance will be unacceptable. Do not connect the DVD player/satellite receiver and VCR to the same set of Video inputs on the TV.
Introduction Connecting a DVD player with ColorStream® (component video) and a VCR Using the Remote Control Connecting your TV This connection allows you to watch DVD, VCR, and TV programs, and record TV programs. Your TV has ColorStream® (component video) inputs. Connecting your TV to a DVD player with component video (such as a Toshiba DVD player with ColorStream®) can greatly enhance picture quality and realism.
Introduction Connecting a DTV receiver/set-top box with ColorStream® (component video) and a VCR From Antenna Note: For the highest possible picture quality, use component video cables (or an HDMI cable) between the TV and DTV receiver/set-top box. Connecting your TV You can connect component video cables to either set of ColorStream inputs on the TV (HD1 or HD2). For HDMI or DVI connection, see page 15.
Introduction Connecting two VCRs Connecting your TV This connection allows you to record (dub/edit) from one VCR to another VCR while watching a videotape. You also can record from one TV channel while watching another TV channel. You will need: • two coaxial cables • two sets of standard A/V cables Do not connect the same VCR to the output and input jacks on the TV at the same time. To dub or edit, VCR 2 must select Line IN, and the TV must select VIDEO 1 (see “Selecting the antenna input” on page 23).
Introduction Connecting an HDMI™ or a DVI device to the HDMI input Note: This TV is not intended for connection to and should not be used with a PC (personal computer). To connect an HDMI device, you will need: • one HDMI cable (type A connector) For proper operation, it is recommended that you use a short HDMI cable. You should not encounter difficulty if you use an HDMI cable that is shorter than 16.4ft (5m). HDMI cable transfers both video and audio.
Introduction Connecting an audio system Connecting your TV This connection allows you to use an audio amplifier and external speakers, and adjust the audio level by using the TV’s remote control. To control the audio, turn on the TV and the stereo amplifier, and turn off the built-in speakers (see “Turning off the built-in speakers” on page 54).
Introduction Using the remote control Preparing the remote control for use Connecting your TV Your TV remote control can operate your TV and many cable converter boxes, satellite receivers, VCRs, DVD players, and HTIBs (home theater in a box), even if they are different brands. If you have a Toshiba device: Your TV remote control is preprogrammed to operate most Toshiba devices. See page 20.
Introduction Programming the remote control to operate a cable converter box, satellite receiver, VCR, DVD player, or HTIB (home theater in a box) CODE INFO 2 3 4 5 6 7 8 9 0 NU ME E IT OR V FA Channel Number CHRTN +10 100 TO P ENT FAV PI GU ID C SI ZE MENU DVDMENU EN EX IT TE R ER FAV TV CBL/SAT VCR DVD CL CH PAUSE FREEZE FF E Device Switch VOL POP DIRECT CH MUTE TV/VCR AR Connecting your TV Using the Remote Control Setting up your TV DEVICE RECALL POWER POWER E
Introduction Remote control codes (cont.
Introduction Using the remote control to operate a cable converter box, satellite receiver, VCR, DVD player, or HTIB (home theater in a box) Connecting your TV If you have a non-Toshiba device or a Toshiba device that the remote control is not preprogrammed to operate, you must first program the remote control to recognize the device (if you have not already done so). See pages 18 and 19.
Introduction Learning about the remote control The buttons used for operating the TV only are described here. POWER turns the TV on and off.
Introduction Setting up your TV Learning about the menu system Using the Remote Control Connecting your TV After you have installed the batteries and programmed the remote control, you will need to set some preferences on the TV using the menu system. You can access the menu system by using the control touchpad on the TV front or the remote control. 1. Press MENU to display the menu system. 2. Press x or • to select a menu. 3. Press y or z to select an item, then press ENTER. 4.
Introduction Changing the on-screen display language Control touchpad on TV front TV/VIDEO EXIT CHANNEL VOLUME MENU x •zy Connecting your TV You can choose from three different languages (English, French and Spanish) for the on-screen display of adjustment menus and messages. To select a language: 1. Press MENU, and then press x or • until the SET UP menu appears. 2. Press y or z to highlight LANGUAGE, and then press ENTER to display the pull-down menu.
Introduction Adding channels to the TV’s memory Note: To tune the TV to a channel not programmed in the channel memory, you must use the Channel Number buttons on the remote control. TV / VIDEO INFO 1 2 3 4 5 6 8 7 0 GU ID C ZE SI IT EX EN ER FAV T TV CBL/SAT VCR DVD ENTER : SET 4. Press ENTER. 5. Press z to select CH PROGRAM.
Introduction Adding and erasing channels manually Control touchpad on TV front TV/VIDEO EXIT POWER RECALL 1 2 3 4 5 6 7 8 9 CHRTN +10 0 GU ID IT E FA V ZE SI OR C IT E VOL POP DIRECT CH MUTE Channel yz SLEEP TV/VCR PAUSE REW FREEZE FF SPLIT SOURCE SKIP / SEARCH SWAP POP CH LIGHT CH SCAN REC STOP ENTER Setting up your TV EX CH CL PLAY Note: If Quick Restart is set to OFF and you turn off the TV, it can take up to several seconds for the picture to appear when you turn
Introduction Using the TV’s features Connecting your TV Switching between two channels using Channel Return The Channel Return feature allows you to switch between two channels without entering an actual channel number each time. 1. Select the first channel (or video mode) you want to view. 2. Select a second channel using the Channel Number buttons (0–9, 100). 3. Press CH RTN. The previous channel will display.
Note: • The FAV zy buttons operate as MENU zy buttons when a menu is on-screen. • The favorite channel feature is not available in ANT2 mode. FAVOR I TE CH CH ––– I NPUT ––– ––– ––– ––– ––– ––– Introduction 3. Press ENTER to display the FAVORITE CH menu. CH INPUT will be highlighted. ––– ––– ––– ––– ––– ––– TV CABLE Connecting your TV CLEAR ALL CUSTOM MENU 0–9 : SELECT ENTER : SET To select your favorite channels: Press FAV z or y.
INFO RECALL 1 2 3 4 5 6 7 8 9 0 ENT GU ID IT E FAV C FA V ZE SI TO P NU ME Channel Number CHRTN +10 100 OR Introduction POWER RECALL E Connecting your TV TV / VIDEO PI Labeling channels Channel labels appear above the on-screen channel number display each time you turn on the TV, change a channel, or press RECALL. You can choose any four characters to identify a channel. To create channel labels: 1. Press MENU, and then press x or • until the CUSTOM menu appears. 2.
1 2 3 4 5 6 9 CHRTN +10 0 NU ME TE RI VO FA ENT GU ID FAV E SI ZE EX CH CL E POP DIRECT CH MUTE SLEEP STOP PLAY PAUSE ENTER VOL Using the Remote Control T FAV AR ER TV CBL/SAT VCR DVD yzx • IT TE R PIC SIZE MENU MENU DVDMENU EN Connecting your TV 100 TO P Number SPLIT FREEZE SOURCE Note: REW FF SKIP / SEARCH SWAP change POP CH SCAN can You CHalso the picture size by REC LIGHT selecting PICTURE SIZE in the PICTURE menu.
Introduction Connecting your TV Theater Wide 1 picture size (For 4:3 format programs) • The picture is non-uniformly enlarged—the center of the picture remains close to its original proportion, but the left and right edges are stretched wider to fill the screen. • A small part of the picture at the top and bottom is hidden; however, this mode cannot be scrolled.
TV / VIDEO RECALL 2 3 4 5 6 8 9 CHRTN ZE 5. Press y or z to adjust the vertical position of the picture. • Normal (center) position AD JUSTMENT CH CL E POP DIRECT CH MUTE SLEEP STOP PLAY PAUSE ENTER VOL SPLIT FREEZE SOURCE Note: REW FF SKIP / SEARCH SWAP POP CH SCAN scroll YouCHcan the picture in Theater Wide 2 REC LIGHT and Theater Wide 3 only.
Aspect ratio of signal source Automatic aspect size (automatically selected when AUTO ASPECT is ON) 4:3 Normal Natural 16:9 Full 4:3 Letter box Not defined (no ID-1 data)* Full Theater wide 2 TV / VIDEO POWER RECALL INFO User-set mode 1 2 3 4 5 6 8 7 9 CHRTN +10 0 ENT GU ID IT E FAV SI OR E TO P 100 NU ME C PI ZE *If the signal does not include aspect information, the picture size you selected on pages 29–30 is displayed. To turn on the AUTO ASPECT feature: 1.
Introduction Using the POP double-window feature ANT 1 MAIN POP 6 12 2. Select POP channels in the following two ways: • To change to a specific channel, press POP DIRECT CH. While “POP” is on the screen, press the Channel Number buttons (0–9 and 100). • To change to the next programmed channel, press POP CH zy. If the V-CHIP feature is active and you try to watch a TV program that exceeds your set rating limits, the program will be blocked (see “Using the V-CHIP menu” on page 37).
Introduction Switching the main and POP pictures Press SWAP while you are using the POP feature to switch the main and POP pictures. Note: • If the POP program is not 480i format, it will not display in the main window when you press SWAP. Using the Remote Control Switching the speaker audio (main or POP) Press x or • while you are using the POP feature to switch the sound (main or POP) from the speakers. The POP sound in the TV mode is monaural only.
Introduction Double-Window aspect ratio The Double-Window feature displays each picture according to its input signal aspect ratio, as illustrated below. Note: • The AUTO ASPECT feature (page 32) does not operate in double-window mode. • Aspect ratio is the ratio of width to height of the picture.
3 4 5 6 8 9 CHRTN +10 0 100 NU ME TE RI VO FA ENT GU ID FAV MENU DVDMENU 5 EN Using the Remote Control 11 12 9 13 IT ER TV CBL/SAT VCR DVD FAV CH 5 Setting up your TV 2. Press yzx • to select one of the twelve pictures (becomes a moving picture). The selected channel number is in purple and the monaural sound of the selected channel is output. 3. Press ENTER to display the channel you selected in step 2 as a normal picture.
Introduction Using the LOCKS menu Entering the PIN code 1. Press MENU, and then press x or • until the LOCKS menu appears. Note: The V-Chip function is available for the U.S. V-Chip system only. The Canadian V-Chip system is not supported.
Introduction ENABLE BLOCKING 1. From the LOCKS menu, press z or y to highlight V-CHIP, and then press ENTER. The V-CHIP menu appears. 2. Press z or y to highlight ENABLE BLOCKING, and then press ENTER. Connecting your TV V – CH I P ENABLE BLOCK I NG TV RAT I NG MPAA RAT I NG BLOCK I NG OPT I ON LOCKS MENU : SELECT LOCKS menu LOCKS V - CH I P CH LOCK V I DEO LOCK NEW P I N CODE OFF ON OFF : MOVE ENTER : START E N T E R : SET 3. Press y or z to select ON or OFF.
MPAA RAT I NG X NC17 R PG13 PG MPAA RAT I NG V – CH I P MENU : MOVE X X G X : SELECT Introduction V-CHIP menu V – CH I P ENABLE BLOCK I NG TV RAT I NG MPAA RAT I NG BLOCK I NG OPT I ON LOCKS MENU : MOVE ON Connecting your TV MPAA RATING (Independent rating system for movies) 1. From the V-CHIP menu, press z or y to highlight MPAA RATING, and then press ENTER. MPAA RATING menu appears. 2. Press y or z to highlight MPAA RATING. 3. Press • to lock (“X”) or press x to unlock (“✓”).
Introduction Unlocking programs temporarily 1. If you try to watch a TV program that exceeds the rating limits you set, the TV enters program lock mode. After 4 seconds, the TV starts the auto favorite channel search function (page 36). You can either unlock the program temporarily (see steps 2–4 below) or select a non-locked program to watch.
Introduction TV / VIDEO 12 ––– ––– 28 ––– ––– TV CABLE 18 ––– ––– INFO 33 ––– ––– TV CABLE CLEAR ALL LOCKS MENU CLEAR ALL LOCKS MENU : SELECT ––– I NPUT : SELECT ENTER : CLEAR 1 2 3 4 5 6 ENTER : CLEAR 8 7 9 CHRTN +10 0 ENT GU ID TE FAV E FA Z SI VO RI E TO P 100 NU ME C PI 3. Repeat step 2 for other channels. To unlock all locked channels at once: Press y or z to highlight CLEAR ALL, and then press ENTER.
Introduction Locking the video inputs TV / VIDEO POWER RECALL INFO 1 2 3 4 5 6 8 7 9 CHRTN +10 IT EX EN TE R ER T FAV TV CBL/SAT VCR DVD Setting up your TV V - CH I P CH LOCK V I DEO LOCK NEW P I N CODE V I DEO V I DEO+ OFF CL CH E ENTER VOL POP DIRECT CH MUTE SLEEP STOP PLAY TV/VCR PAUSE REW FREEZE FF SPLIT SOURCE SKIP / SEARCH SWAP POP CH LIGHT CH SCAN REC :: SELECT yz ZE SI TO P C EN : Unlocks all video input sources.
Introduction Adjusting the picture Picture Quality Sports Standard Movie Preference Bright and dynamic picture (factory setting) Standard picture setting (factory setting) Movie-like picture setting (factory setting) Your personal preferences* *(see “Saving your new preferences” on page 44.) To select the picture mode: 1. Press MENU, and then press x or • until the PICTURE menu appears. 2. Press z or y to highlight MODE, and then press ENTER. 3.
3 4 5 6 Using the Remote Control Using the TV’s Features Setting up your TV TE TO P OR I Selecting the color temperature You can change the quality of the picture by selecting from three preset color temperatures: cool, medium, and warm. To select the color temperature: 1. Press MENU, and then press x or • until the PICTURE menu appears. 2. Press y or z to highlight PICTURE SETTINGS, and then press ENTER. The PICTURE SETTINGS menu appears. 3.
1 2 3 4 5 6 8 9 CHRTN +10 0 ENT GU ID E FAV FA ZE SI VO C RI T E MENU yzx • MENU DVDMENU IT EX FAV CH AR ER CL E ENTER VOL Using the Remote Control TO P 100 NU ME Connecting your TV 7 PI ANTENNA SPORTS COOL OFF SAVE Note: • When in ColorStream or HDMI mode, “CableClear DNR” will change to “DNR” in the menu. ENTER : SELECT 4. Press x or • to select AUTO. To turn off CableClear DNR: Select OFF in step 4 above. • DNR is not selectable in the HDMI mode.
POWER INFO 1 2 3 4 5 6 8 7 9 CHRTN +10 0 ENT GU ID OR IT E FAV C ZE SI TO P 100 NU ME FA V Introduction RECALL E Connecting your TV TV / VIDEO PI Selecting the Lamp mode You can select either the HI BRIGHT or LOW POWER mode. The HI BRIGHT mode is useful for situations where additional picture brightness is desired (such as in a room with bright lighting). The LOW POWER mode reduces wear on the projection lamp. Using this mode should result in longer lamp life.
Introduction Selecting the video input source Pressing TV/VIDEO on the TV changes the current signal source Labeling the video input sources The video label feature allows you to label each input source for your TV from the following preset list of labels: – – – : Uses the default label name VCR : Video cassette recorder DVD : DVD video DTV : Digital TV set-top box SAT : Satellite box CBL : Cable box To label the video input sources: 1. Press MENU, and then press x or • until the CUSTOM menu appears. 2.
Introduction Using the closed caption feature TV / VIDEO 3 4 5 6 9 CHRTN +10 0 100 NU ME ENT GU ID TO P FA VO RI TE FAV E C ZE SI Using the Remote Control 8 7 PI MENU yzx • MENU DVDMENU EN EX IT TE R ER FAV CH AR Connecting your TV 2 T : SELECT POWER 1 TV CBL/SAT VCR DVD CUSTOM ON T I MER SLEEP T I MER CC FAVOR I TE CH CH LABEL I NG V I DEO LABEL BACKGROUND QU I CK RESTART RECALL INFO EN The closed caption feature has two options: • Captions—An on-screen display of the
Introduction Setting the ON timer TV / VIDEO POWER RECALL POWER INFO 1 2 3 4 5 6 7 8 9 CHRTN +10 0 ENT GU ID IT E FAV E FA V ZE SI OR C MENU yzx • MENU DVDMENU 0–9 : SELECT IT EX ER TV CBL/SAT VCR DVD FAV CH CL 5. Press POWER to turn off the TV. (The ON timer will start.) The TV will turn on automatically after the length of time you set in the ON Timer.
Introduction Setting the clock Connecting your TV To set the clock: 1. Press MENU, and then press x or • until the SET UP menu appears. 2. Press y or z to highlight CLOCK SET, and then press ENTER. 3. Press the Number buttons (0–9) to enter the correct time. The clock operates on a 24-hour cycle. 4. Press ENTER to start the clock. Note : If the TV’s power source is interrupted (the power cord is unplugged or a power failure occurs), the clock must be reset.
Introduction Adjusting the sound INFO 6 8 9 CHRTN +10 0 ENT GU ID FAV ZE SI TO P 100 NU ME E IT OR V FA C MENU yzx • MENU DVDMENU EX IT TE R FAV TV CBL/SAT VCR DVD CH AR EN ER CL E POP DIRECT CH MUTE SLEEP STOP PLAY TV/VCR PAUSE REW FREEZE FF SPLIT SOURCE SKIP / SEARCH SWAP POP CH LIGHT CH SCAN REC ENTER VOL MUTE TV/VIDEO EXIT CHANNEL VOLUME MENU P x •zy MENU Using the TV’s Features Note : A second audio program (SAP) can be heard only on those TV stations th
TV / VIDEO POWER RECALL INFO 1 2 3 4 5 6 8 7 9 CHRTN +10 0 ZE SI EN IT TE R ER FAV Setting up your TV T Using the TV’s Features Adjusting the sound quality You can change the quality of your TV’s sound by adjusting the bass, treble, and balance. To adjust the sound quality: 1. Press MENU, and then press x or • until the AUDIO menu appears. 2. Press y or z to highlight AUDIO SETTINGS, and then press ENTER. The AUDIO SETTINGS menu appears.
1 2 3 4 5 6 8 7 GU ID C ZE SI MENU yzx • EX FAV TV CBL/SAT VCR DVD CH AR IT TE R ER CL E POP DIRECT CH MUTE SLEEP STOP PLAY TV/VCR PAUSE REW FREEZE FF SPLIT SOURCE SKIP / SEARCH SWAP POP CH LIGHT SAVE ENTER VOL Using the Remote Control TO P ENT FAV MENU DVDMENU EN Connecting your TV 0 100 NU ME TE RI VO FA E RESET : MOVE 9 CHRTN +10 T AUD I O SETT I NGS 50 50 0 POWER RECALL INFO EN BASS TREBLE BA L A N C E RESET AUD I O MENU Introduction TV / VIDEO PI
Introduction Connecting your TV Turning off the built-in speakers Use this feature to turn off the TV speakers when you connect an audio system (see “Connecting an audio system” on page 16). To turn off the built-in speakers: 1. Press MENU, then press x or • until the AUDIO menu appears. 2. Press y or z to highlight SPEAKERS, and then press ENTER. 3. Press y or z to select OFF, and then press ENTER.
Introduction Selecting the background of the menu display POWER RECALL INFO RECALL 1 2 3 4 5 6 8 7 9 CHRTN +10 0 ENT GU ID FAV E C ZE SI MENU yzx • MENU DVDMENU EX IT TE R ER FAV TV CBL/SAT VCR DVD CH AR SHADED SOL I D T : SELECT EN EN CUSTOM ON T I MER SLEEP T I MER CC FAVOR I TE CH CH LABEL I NG V I DEO LABEL BACKGROUND QU I CK RESTART CL E ENTER VOL POP DIRECT CH MUTE SLEEP STOP PLAY Using the Remote Control TO P 100 NU ME E IT OR V FA Connecting your TV TV /
Introduction Appendix Lamp unit replacement (User-replaceable component) Using the Remote Control Connecting your TV The light source for this TV is a mercury lamp with internal atmospheric pressure that increases during use. The lamp has a limited service life that varies depending on product use and user settings.
Introduction How to replace the lamp unit Required tool: Manual Phillips screwdriver; gloves. Optional tool: 5/32” or 4mm Allen wrench. WARNING: RISK OF ELECTRIC SHOCK! WARNING: Eye damage may result from directly viewing the light produced by this lamp. Always turn off the TV and unplug the power cord before opening the lamp unit door. Connecting your TV TO REDUCE THE RISK OF ELECTRIC SHOCK, NEVER REMOVE TV COVERS, EXCEPT AS SPECIFIED HEREIN.
Introduction How to replace the lamp unit (continued) Connecting your TV 5. Grasp the lamp unit handle and gently pull the lamp unit straight out of the TV. Set the old lamp unit aside (see “Lamp unit disposal” on page 60). Wear gloves when replacing the lamp unit. Setting up your TV Using the Remote Control 6. Carefully insert the new lamp unit straight into the TV until it is fully seated. Note : • Never subject the lamp unit to excessive shock.
Introduction How to replace the lamp unit (continued) 8. Reattach the lamp unit door, making sure to insert the hooks on the left side of the lamp unit door inside the opening in the TV cabinet. Connecting your TV Insert the hooks inside the TV cabinet opening. Lamp unit door Using the Remote Control 9. Replace the thumb screw and hand-tighten.
Introduction Lamp unit disposal • Place the used lamp unit in the empty box from the new lamp unit. • Keep the lamp unit out of reach of children and pets. Connecting your TV CAUTION: Always handle the lamp unit with care. The lamp unit in this TV was designed for safe replacement by consumers; however, if the lamp unit is subjected to intentional or accidental abuse (such as excessive mechanical abuse or handling by children or pets), the unit may break, exposing sharp edges or pinch points.
Introduction Specifications Note: This model complies with the specifications listed below. Designs and specifications are subject to change without notice. This model may not be compatible with features and/or specifications that may be added in the future. Audio Power 20 W + 20 W Speaker Type Main: Two 4 inches (10 cm) round Tweeter: Two 1-5/8 inches (4 cm) round Video/Audio Terminals S-VIDEO INPUT Y : 1 V(p-p), 75 ohms, negative sync. C : 0.
Introduction Troubleshooting Appendix Using the TV’s Features Setting up your TV Using the Remote Control Connecting your TV Before calling a service technician, please check the following table for a possible cause of the symptom and some solutions. Symptom TV will not turn on Solution • Make sure the power cord is plugged in, then press POWER. • The remote control batteries may be dead. Replace the batteries.
Introduction Limited United States Warranty for DLP Television Models Limited One (1) Year Warranty on Lamp Unit* TACP warrants the lamp unit in this DLP television against defects in materials or workmanship for a period of one (1) year after the date of original retail purchase. DURING THIS PERIOD, TACP WILL, AT TACP’S OPTION, EXCHANGE A DEFECTIVE LAMP UNIT WITH A NEW OR REFURBISHED LAMP UNIT WITHOUT CHARGE TO YOU. LABOR CHARGES FOR LAMP UNIT REPLACEMENT ARE NOT COVERED UNDER WARRANTY.
Introduction Limited Canada Warranty for DLP Television Models Toshiba of Canada Limited (“TCL”) makes the following limited warranties to original consumers in Canada. Connecting your TV THESE LIMITED WARRANTIES EXTEND TO THE ORIGINAL CONSUMER PURCHASER OR ANY PERSON RECEIVING THIS DLP TELEVISION AS A GIFT FROM THE ORIGINAL CONSUMER PURCHASER AND TO NO OTHER PURCHASER OR TRANSFEREE. PRODUCTS PURCHASED IN THE U.S.A. AND USED IN CANADA ARE NOT COVERED BY THESE WARRANTIES.
Introduction OP A/V cables (standard) ......................................................... 8 ANT 1/2 ................................................................................... 23 Antenna cables (coaxial) ................................................... 8 AUDIO OUT sound, selecting ....................................... 54 Audio system connection ................................................. 16 Auto aspect ............................................................................
Index Appendix Using the TV’s Features Setting up your TV Using the Remote Control Connecting your TV Introduction Notes 66 46,52,62HM84(E)66-67 66 6/21/04, 9:57 AM
Index Appendix Using the TV’s Features Setting up your TV Using the Remote Control Connecting your TV 46,52,62HM84(E)66-67 Introduction Notes 67 67 6/21/04, 9:57 AM
HEAD OFFICE: 82 TOTOWA ROAD, WAYNE, NJ 07470, U.S.A. NATIONAL SERVICE DIVISION:1420-B TOSHIBA DRIVE, LEBANON, TN 37087, U.S.A. HEAD OFFICE: 191 McNABB STREET, MARKHAM, ONTARIO, L3R 8H2, CANADA – TEL: (905) 470-5400 SERVICE CENTERS: TORONTO: 191 McNABB STREET, MARKHAM, ONTARIO L3R 8H2, CANADA – TEL: (905) 470-5400 MONTREAL: 18050 TRANS CANADA, KIRKLAND, QUEBEC, H9J 4A1, CANADA – TEL: (514) 390-7766 VANCOUVER: 22171 FRASERWOOD WAY, RICHMOND, B.C.