Introduction Connections D-R400 Basic Setup TOSHIBA DVD VIDEO RECORDER D D-R400 R400 DVD VIDEO RECORDER OWNER’S MANUAL Disc Management Recording OPERATIONS GUIDE Playback Editing DVD VIDEO RECORDER D-R400 Function Setup Others Printed in China cover.
PRECAUTIONS WARNING: TO REDUCE THE RISK OF FIRE OR ELECTRIC SHOCK, DO NOT EXPOSE THIS APPLIANCE TO RAIN OR MOISTURE. CAUTION RISK OF ELECTRIC SHOCK DO NOT OPEN CAUTION: TO REDUCE THE RISK OF ELECTRIC SHOCK, DO NOT REMOVE COVER (OR BACK). NO USER SERVICEABLE PARTS INSIDE. REFER SERVICING TO QUALIFIED SERVICE PERSONNEL.
PRECAUTIONS 1. Read these instructions. 2. Keep these instructions. 3. Heed all warnings. 5. Do not use this apparatus near water. 6. Clean only with dry cloth. 7. Do not block any ventilation openings. Install in accordance with the manufacturer’s instructions. 18. Do not place anything on top of this unit. 19. Do not place the apparatus on amplifiers or equipment that may produce heat. 20. Never block or cover the slots or openings in the unit.
PRECAUTIONS Installation Location For safety and optimum performance of this unit: • Install the unit in a horizontal and stable position. Do not place anything directly on top of the unit. Do not place the unit directly on top of the TV. • Shield it from direct sunlight and keep it away from devices of intense heat. Avoid dusty or humid places. Avoid places with insufficient ventilation for proper heat dissipation. Do not block the ventilation holes on the sides of the unit.
PRECAUTIONS Servicing Cleaning Discs Cleaning The Disc Lens Disc Handling • Handle the discs so that fingerprints and dust do not adhere to the surfaces of the discs. • Always store the disc in its protective case when it is not used. “DTS” and “DTS Digital Out” are registered trademarks of DTS, Inc. Manufactured under license from Dolby Laboratories. “Dolby” and the double-D symbol are trademarks of Dolby Laboratories.
CONTENTS Introduction Disc Management PRECAUTIONS . . . . . . . . . . . . . . . . . . . . . . . . . . . . . . . . . . . 2 CONTENTS . . . . . . . . . . . . . . . . . . . . . . . . . . . . . . . . . . . . . . 6 FEATURES . . . . . . . . . . . . . . . . . . . . . . . . . . . . . . . . . . . . . . . 8 Symbols Used in this Owner’s Manual . . . . . . . . . . . . . . .8 FUNCTIONAL OVERVIEW . . . . . . . . . . . . . . . . . . . . . . . . 11 Installing the Batteries in the Remote Control . . . . . .
CONTENTS Introduction 68 68 68 69 71 71 72 73 73 75 76 77 79 80 81 82 Disc Management INFORMATION ON DISC EDITING. . . . . . . . . . . . . . . . . Guide to a Title List. . . . . . . . . . . . . . . . . . . . . . . . . . . . . . . . Editing Discs . . . . . . . . . . . . . . . . . . . . . . . . . . . . . . . . . . . . . . DELETING TITLES . . . . . . . . . . . . . . . . . . . . . . . . . . . . . . . CREATING/DELETING PLAYLIST . . . . . . . . . . . . . . . . . . Adding Titles to a Playlist. . . . . . . . . .
FEATURES This unit not only plays back DVD and CD but also offers features for you to record on DVD and edit them after that. The following features are offered with this unit. Dividing or combining titles: Recording You can divide or combine a title. This unit is compatible with recording on DVD-RW/+RW which Editing title names: are recordable repeatedly and DVD-R, DVD+R which accept You can change the title name you prefer. the additional recordings until the disc becomes full but not overwritable.
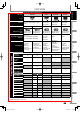
FEATURES Introduction Discs for Recording, Playing back Disc type DVD-RW DVD-R DVD+RW DVD+R Logo Automatically formatted in video mode Automatically formatted in +VR mode Automatically formatted in +VR mode 480 min (12cm) 144 min (8cm) 480 min (12cm) 144 min (8cm) 480 min (12cm) 144 min (8cm) Ver.2.0 Ver.2.0/4× Ver.2.0/8× Ver2.0/16× 1×-4× 1×-16× Playable only on VR mode compatible unit. Finalization recommended. Playable on most DVD players. Finalization necessary.
FEATURES Discs for playing back Disc Type DVD-VIDEO CD-DA CD-RW CD-R MP3 WMA JPEG DivX® CD-RW/-R CD-RW/-R CD-RW/-R CD-RW/-R DVD-RW/-R DVD+RW/+R Logo Icon Files for playing back Type of title Icon Media is a trademark of DVD Format/Logo Licensing Corporation. DivX, DivX Certified, and associated logos are trademarks of DivX, Inc. and are used under license. • Official DivX® Certified product; Plays DivX® 6.
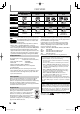
FUNCTIONAL OVERVIEW Introduction Front Panel 1 2 45 3* 6 7 8 1080p DVD -RW/R +RW/R RECORDING I/y ON/STANDBY OPEN/CLOSE SKIP STOP PLAY 1080i 720p 480p L2 VIDEO L REC R DV IN 12 11 10 9 Playback 2 3 4 5 VIDEO VIDEO IN OUT L L Recording Rear Panel 1 Disc Management When playback is paused, press to play back advance step by step. When playback is paused, press and hold for 1.5 seconds to slow foward. 7. Display Refer to “FRONT PANEL DISPLAY GUIDE” on page 17. 8.
FUNCTIONAL OVERVIEW Remote Control Installing the Batteries in the Remote Control Install the batteries (AAx2) matching the polarity indicated inside battery compartment of the remote control. 1 Open the cover. 2 Insert batteries. Using a Remote Control Keep in mind the following when using the remote control: • Make sure that there are no obstacles between the remote control and the infrared sensor window on the unit.
FUNCTIONAL OVERVIEW Basic Setup Disc Management Recording Playback Editing 16. I/y ON/STANDBY button Press to turn the unit on and off. If timer programmings have been set, press to set the unit in timerstandby mode. 17. SATELLITE LINK button Press to call up the Satellite Link setting. 18. TIMER PROG. button Press to display the timer programming list. 19. AUDIO button • Press to display the audio menu during playback. 20. DISPLAY button Press to display the display menu on or off. 21.
GUIDE TO ON-SCREEN DISPLAYS AND MENUS This unit uses the following on-screen displays and menus to guide you to the easy operations. The on-screen displays give you the information on the loaded disc, the disc/file in playback, or the HDMI status, etc. The menus allow you to change the various kinds of settings for playing back, recording, or editing to suite your preference. On-Screen Display / Menu The on-screen display changes in the following order as you press [DISPLAY].
GUIDE TO ON-SCREEN DISPLAYS AND MENUS Introduction Title/File Name Information HDMI Information 1. Displays title/file name. 1 Title name information Video Info. : Audio Info. : Title Name 480p / Bitstream 2 YCbCr My Title Connections 3 1 File name information File Name My File 1 1. Indicates artist/title information • First, artist name will be displayed. Artist Name Basic Setup WMA Tag Information 4 Disc Management *1. Indicates the resolution of the HDMI output image. *2.
GUIDE TO ON-SCREEN DISPLAYS AND MENUS Main Menu Press [SETUP] to display the main menu. Then use [K / L] to select a menu and press [ENTER] to display the menu. These menus provide entries to all main functions of the unit. Setup 1 2 3 4 5 General Setting Timer Programming Title List DVD Menu CD Playback Mode 1. General Setting: To go to general setting menu. 2. Timer Programming: To program a timer recording. 3. Title List: To call up the title list. 4. DVD Menu: To set up the DVD setting. 5.
FRONT PANEL DISPLAY GUIDE Introduction 2 1 PM 3 Connections 4 3. Current status of the unit 1. : Appears in the afternoon with the clock display. : Appears when indicating a title/track number. : Appears when indicating a chapter number. : Appears when playing back a disc. Disc Management : Appears when the timer programming or OTR has been set and is proceeding. : Flashes when all timer recordings have been finished.
CONNECTION TO A CABLE / SATELLITE BOX 1) Disconnect the power cords of the devices from the AC outlet. 2) Make the connection as illustrated below. 3) Plug in the power cords of the devices to the AC outlet. e.g.) satellite dish rear of your TV VIDEO IN AUDIO IN L R RF coaxial cable or cable TV company ANT.
SETTINGS FOR THE VIDEO INPUT Introduction You must let the unit know which video input jack you are using before making a recording. INPUT SELECT HDMI .@/: ABC DEF GHI JKL MNO PQRS TUV WXYZ TIMER PROG. SPACE DISPLAY TOP MENU AUDIO MENU/LIST ENTER SKIP FWD SKIP PAUSE PLAY STOP TIME SLIP 1.3x / 0.8x PLAY INSTANT SKIP REC ZOOM Use [K / L] to select “Select Video”, then press [ENTER]. Use [K / L] to select desired external input position, then press [ENTER].
CONNECTION TO A TV Make one of the following connections, depending on the capabilities of your display device.
CONNECTION TO A TV WITH AN HDMI™ COMPATIBLE PORT Introduction A simple 1-cable connection with a device having an HDMI (high-definition multimedia interface) connector allows digital transfer of the digital images of DVD-video and other devices. TV HDMI IN Connections HDMI cable Basic Setup this unit HDMI OUT When connecting with an HDMI cable, the audio signal will be output as the digital audio signal simultaneously, so you do not need the analog audio connection described on page 20.
CONNECTION TO A TV WITH AN HDMI™ COMPATIBLE PORT Actual Output Modes by Media Audio recording format of the disc Dolby Digital DVD-video LPCM Dolby Digital DivX® MP3 / MP2 Dolby Digital setting of this unit Actual output PCM 2channel PCM Stream Dolby Digital PCM Stream 2channel PCM PCM 2channel PCM Stream Dolby Digital PCM Stream 2channel PCM For audio CD and MP3 / WMA files, 2 channel PCM will be output regardless of the “Dolby Digital” setting.
CONNECTION TO AN AUDIO SYSTEM Introduction • When you change the connections, all devices should be turned off. • Refer to the owner’s manual accompanying external devices for more information.
INITIAL SETTING Turn on this unit for the first time, you need to follow these steps. OPEN/ CLOSE INPUT SELECT HDMI .@/: ABC DEF GHI JKL MNO PQRS TUV WXYZ DISPLAY Before: Turn the TV on. Select the input to which the unit is connected. Use [K / L] to select your desired language, then press [ENTER] to set language. Initial Setting TIMER PROG. SPACE SETUP SATELLITE LINK 1 2 Press [I/y y ON/STANDBY].
CLOCK SETTING HDMI .@/: ABC DEF GHI JKL MNO PQRS TUV WXYZ TIMER PROG. SPACE DISPLAY TOP MENU AUDIO Use [K / L] to select “Clock”, then press [ENTER]. Use [K / L] to select calendar or time, then press [ENTER].
FORMATTING A DISC Choosing the Recording Format of a Brand-New DVD-RW When inserting a brand-new DVD-RW or DVD+RW, the unit automatically starts to initialize the disc. DVD+RW will always be formatted in +VR mode, and DVD-RW will be formatted either video or VR mode according to the recording format mode setting of the unit. Before insert a brand-new DVD-RW, you need to set the recording format to the desired mode. You can also manually format a DVD-RW once it has been used.
FORMATTING A DISC If you are using a DVD-RW or DVD+RW, you can format the disc by performing “Format”. You can format DVD-RW for either video mode recording or VR mode recording. DVD+RW can be format in order to erase all content of the disc. Connections Insert a recordable disc. INPUT SELECT HDMI .@/: ABC DEF GHI JKL MNO PQRS TUV WXYZ TIMER PROG. SPACE SETUP SATELLITE LINK DISPLAY 1 2 Press [SETUP].
PREPARING A DISC Make Recording Compatible Setting for Auto Chapter You can set a specified time for chapter marks. Use this feature to make the discs recorded on other unit recordable on this unit. When you make an additional recording on this unit with “Make Recording Compatible” set to “ON”, the title menu is automatically converted to our style. 1) Press [SETUP] and use [K / L] to select “General Setting”, then press [ENTER]. 2) Use [K / L] to select “Recording”, then press [ENTER].
PREPARING A DISC You can enjoy high quality sound recording. This function works only when the recording mode is set at XP. Setting Aspect Ratio for Video Mode Recording You can set aspect ratio for video mode recording. 1) Follow step 1 to 2 on “Recording Audio Select(XP)”. 2) Use [K / L] to select “Aspect Ratio (Video mode)”, then press [ENTER]. 3) Use [K / L] to select “Recording Audio Select (XP)”, then press [ENTER]. 3) Use [K / L] to select your desired setting, then press [ENTER].
SETTING A DISC TO PROTECT To prevent accidental recording, editing or erasing the titles, you can protect them from “DVD Menu”. OPEN/ CLOSE INPUT SELECT HDMI .@/: ABC DEF GHI JKL MNO PQRS TUV WXYZ DISPLAY TOP MENU e.g.) VR mode DVD-RW DVD Menu SATELLITE LINK AUDIO MENU/LIST CLEAR 4 RETURN FWD REV PLAY STOP TIME SLIP 1.3x / 0.8x PLAY INSTANT SKIP REC Use [K / L] to select “Yes”, then press [ENTER].
PLAYING THE DISCS IN OTHER DVD PLAYERS Introduction Auto Finalizing INPUT SELECT HDMI .@/: ABC DEF GHI JKL MNO PQRS TUV WXYZ TIMER PROG. SPACE DISPLAY TOP MENU AUDIO MENU/LIST FWD PLAY STOP TIME SLIP 1.3x / 0.8x PLAY INSTANT SKIP REC Auto Chapter Recording Audio Select (XP) Auto Finalize Auto Finalize Disc Full Aspect Ratio (Video mode) End of Timer Rec Disc Menu Replace SKIP PAUSE REPEAT REC MODE Use [K / L] to select “Disc Full” or “End of Timer Rec”, then press [ENTER].
PLAYING THE DISCS IN OTHER DVD PLAYERS Finalizing a Disc You will need to finalize discs to play back on other DVD players. Finalizing may take several minutes up to an hour. Since the process of the finalization fills empty space of the disc, a shorter recording period on the disc will require a longer time period for finalization. Do not unplug the power cord during finalization. OPEN/ CLOSE INPUT SELECT HDMI .@/: ABC DEF GHI JKL MNO PQRS TUV WXYZ TIMER PROG.
PLAYING THE DISCS IN OTHER DVD PLAYERS Format Undo Finalization Disc Protect OFF Delete All Playlists ON Do you want to cancel ? Yes No Finalizing 5% If “ ” appears when [STOP C] is pressed, you cannot cancel finalizing because the finalizing has already reached at a critical point in its process. If “No” is selected and [ENTER] or [RETURN] is pressed, finalizing is continued. You cannot cancel finalizing a DVD-R, DVD+R and DVD+RW once it has started.
INFORMATION ON DVD RECORDING Recording Mode Restrictions on Recording You can select a recording mode among 5 options, and the recording time will depend on the recording mode you select as follows. Recording mode XP SP LP EP SLP Recording time 12cm 8cm Video/ Sound Quality 60 min 18 min 120 min 36 min 240 min 72 min 360 min 108 min 480 min 144 min • The recording times listed above are estimates and are for reference purposes only. Actual recording times may vary.
BASIC RECORDING & ONE-TOUCH TIMER RECORDING INPUT SELECT HDMI .@/: ABC DEF GHI JKL MNO PQRS TUV WXYZ SATELLITE LINK Basic Setup DISPLAY TOP MENU Align the disc to the disc tray guide. AUDIO MENU/LIST ENTER RETURN FWD REV SKIP PAUSE PLAY STOP TIME SLIP 1.3x / 0.8x PLAY INSTANT SKIP REC It may take awhile to load the disc completely. • When inserting a brand-new DVD-RW or DVD+RW, the unit automatically starts to format.
BASIC RECORDING & ONE-TOUCH TIMER RECORDING Press [REC I] to start recording. 6 “I” will be displayed for 5 seconds. 7 Press [STOP C] to stop recording. The recorded title will be included in the title list. (Refer to “Guide to a Title List” on page 68.) I Press [PAUSE F] to pause recording. Press [PAUSE F]] or [REC I] again to restart recording. Wait for a moment 90% This operation may take awhile to be completed. To set one-touch timer recording (OTR)...
TIMER RECORDING HDMI .@/: ABC DEF GHI JKL MNO PQRS TUV WXYZ SETUP DISPLAY SATELLITE LINK RETURN SP MON JAN/01 10:00AM Start End 12:00AM 1:00AM New Program L1/L2 L1 5 1. Title of a timer program (Contains date, time, external input, recording mode of the program) 2. Current date and time 3. Recording mode and length of the recording 4. Timer program list 5. Total number of pages and current page (2 pages maximum) SKIP 1 2 Press [TIMER PROG.].
TIMER RECORDING 3 Use [K / L] to enter the date, then press [B]. Timer Programming MON JAN/01 10:00AM Date Date JAN/02 L1/L2 L1 Start End New Start Program Auto recording mode select... When “Auto” is selected as a recording mode, the unit calculates how much time is available on the disc and determines the appropriate recording mode to complete recording the program.
TIMER RECORDING 1) Press [I/y ON/STANDBY]. If the timer program did not complete correctly, the error number appears in the timer programming list. 2) Press [TIMER PROG.]. Timer Programming E40 Date JAN/02 Timer Programming Date JAN/02 L1 Start End 12:00AM 1:00AM New Program Connections MON JAN/01 10:00AM 3) Check the information on the list you want to edit.
TIMER RECORDING Hints for Timer Recording • If there is a power failure or this unit has been unplugged for more than 30 seconds, the clock setting and all timer programming will be lost. flashes and timer recording cannot be performed. In some cases, will appear • If a disc is not inserted, momentarily around the start point as the unit attempts to record. Please insert a recordable disc. flashes.
SETTINGS FOR AN EXTERNAL DEVICE Connect the external device properly to either L2 (front) or L1 (rear) input jacks of this unit by using S-video or RCA audio / video cables. If you are connecting a DVC (digital video camcorder), connect it to L3 (front) by using DV cable. Introduction Connection to an External Device or VIDEO OUT AUDIO OUT L R DV-OUT VIDEO OUT external device AUDIO OUT L R Connections S-VIDEO OUT S-VIDEO OUT (camcorder, VCR etc.
SETTINGS FOR AN EXTERNAL DEVICE Recording from an External Device Before recording from an external device, refer to the instructions for the connection on page 41. OPEN/ CLOSE INPUT SELECT HDMI .@/: ABC DEF GHI JKL MNO PQRS TUV WXYZ TIMER PROG. SPACE SETUP SATELLITE LINK DISPLAY TOP MENU AUDIO MENU/LIST ENTER CLEAR SKIP RETURN FWD REV SKIP PAUSE PLAY STOP TIME SLIP 1.3x / 0.
1 2 Press [SATELLITE LINK]. Use [K / L] to select the time and recording mode, then press [ENTER]. Satellite Link Start 12:00 AM Connections You can set the unit to start recording whenever it detects the video signal from the external tuner. Preparing for the satellite link timer recording: Preparation on the tuner • The external tuner should be equipped with some kind of timer function.
SATELLITE LINK 5 6 Press [ENTER]. “To Standby Mode” is highlighted. Press [ENTER] again. Satellite Link Start 12:00 AM Mode XP To Standby Mode In a second, the unit will be turned off automatically as it goes into the satellite link standby mode. To cancel the satellite link function while in the satellite link standby mode: y ON/STANDBY] to turn on the unit.
DV DUBBING When the DVC is in video mode... 1 1/ 1 1/ 1 1/ 1 -RW 2 Control DV Audio Start Rec DVD Stereo1 VR 1/ 1 ORG DV AB-1234 0:12:34 -RW The menu changes according to what mode of DVC. Switch the mode on the DVC to playback mode for the dubbing information. VR ORG 5 DV AB-1234 0:12:34 1:00 SP 4 7 Basic Setup SP 3 When the DVC is not in camera mode... 1:00 6 Disc Management The following instructions are described with the operations using the remote control of this unit. 6.
DV DUBBING DVC to DVD Dubbing Before recording from DVC, see page 41 for connection instructions. OPEN/ CLOSE INPUT SELECT HDMI .@/: ABC DEF GHI JKL MNO PQRS TUV WXYZ DISPLAY TOP MENU 2 3 4 Press [REC MODE] to select a recording mode. AUDIO MENU/LIST CLEAR RETURN FWD REV SKIP PAUSE PLAY STOP TIME SLIP 1.3x / 0.8x PLAY INSTANT SKIP DV AB-1234 0:00:00 (Refer to page 34.) Press [DISPLAY]. Press [ENTER] to display the item selection.
DV DUBBING Introduction Connections Use [K / L] to select “Start Rec”, then press [ENTER]. The dubbing will start. To stop dubbing; Use [K / L] to select “Control”, then press [ENTER]. Use [K / L] to select “DVD”, then press [ENTER]. Then press [STOP C]. Basic Setup 5 6 7 Press [PLAY B] to find the point where you wish to start dubbing. Then, press [STOP C] where you wish to start dubbing.
INFORMATION ON PLAYBACK Structure of Disc Contents The contents of DVD are generally divided into titles, and the titles are subdivided into chapters. Audio CDs are divided into tracks. Data disc contains MP3/WMA/JPEG/DivX® are divided into folders, and the folders are subdivided into files. DVD video disc Title 1 Title 2 Chapter 1 Chapter 2 Chapter 1 Chapter 2 Chapter 3 Title: Chapter: Track: Folder: Divided contents of a DVD video disc.Roughly corresponds to a story title in short stories.
BASIC PLAYBACK Introduction Direct Playback HDMI .@/: ABC DEF GHI JKL MNO PQRS TUV WXYZ SATELLITE LINK TIMER PROG. SPACE SETUP DISPLAY TOP MENU Align the disc to the disc tray guide. AUDIO MENU/LIST CLEAR RETURN FWD REV SKIP PLAY STOP TIME SLIP 1.3x / 0.8x PLAY INSTANT SKIP REPEAT REC MODE REC ZOOM Press [OPEN/CLOSE A] to close the disc tray. It may take awhile to load the disc completely. Press [PLAY B] to start playback.
BASIC PLAYBACK Playback from the Title List OPEN/ CLOSE INPUT SELECT HDMI .@/: ABC DEF GHI JKL MNO PQRS TUV WXYZ DISPLAY TOP MENU Press [OPEN/CLOSE A] to open the disc tray and insert your disc with its label facing up. SATELLITE LINK Align the disc to the disc tray guide. AUDIO MENU/LIST ENTER CLEAR SKIP Turn on the TV and be sure to select the input to which the unit is connected. TIMER PROG. SPACE SETUP 1 2 Press [I/y y ON/STANDBY].
BASIC PLAYBACK Introduction 4 Use [K / L / { / B] to select a desired title, then press [ENTER]. e.g.) VR mode DVD-RW original Title List Connections ORG JAN/ 1/07 12:00AM L1 SP 12:00AM (0:12:00) JAN/ 1/07 L1 SP 1 2 3 4 5 6 1/6 Basic Setup 5 Use [K / L] to select “Play From Start”, then press [ENTER]. ORG Title List JAN/ 1/07 12:00AM L1 SP 12:00AM (0:12:00) JAN/ 1/07 4 2 Play From Start Edit Title Delete 5 Add To Playlist L1 SP Disc Management 1 3 6 1/2 Playback will start.
BASIC PLAYBACK Playing Back an Audio CD and a CD-RW/-R with MP3/WMA/JPEG Files When selecting track/file: Playback will start. OPEN/ CLOSE INPUT SELECT HDMI .@/: ABC DEF GHI JKL MNO PQRS TUV WXYZ SATELLITE LINK TIMER PROG. SPACE SETUP When selecting folder: The files in the folder will appear. Use [K / L] to select the file or folder you want to play back, then press [ENTER]. • Press [PLAY B], [ENTER] or [B] to move to any lower hierarchies.
BASIC PLAYBACK Introduction Playing Back a DivX® HDMI .@/: ABC DEF GHI JKL MNO PQRS TUV WXYZ SATELLITE LINK DISPLAY TOP MENU AUDIO MENU/LIST CLEAR SKIP RETURN FWD REV SKIP PLAY STOP TIME SLIP 1.3x / 0.8x PLAY INSTANT SKIP REPEAT REC MODE REC ZOOM 3 Use [K / L] to select the desired folder or file, then press [ENTER]. File List DISC NAME Folder1 Folder2 1 DivX File1 2 DivX File2 When selecting file: Playback will start.
BASIC PLAYBACK It is recommended that files to be played back in this unit are recorded under the following specifications: Official DivX® Certified product • Playable codec of AVI files : DivX®3.x, DivX®4.x, DivX®5.x, DivX®6.
BASIC PLAYBACK Introduction Using the Title/Disc Menu Pause 1) During playback, press [PAUSE F]. Playback will be paused and sound will be muted. Connections DVD may contain a title list, which describes the contents of the disc, or a disc menu, which guides you through the available functions in the disc. 1) Press [MENU/LIST] or [TOP MENU] to call up the title list or disc menu. 2) Use [K / L / { / B] to make a selection, and then press [ENTER] to enable your selection.
SPECIAL PLAYBACK Resume Playback Note You can play back from where you stopped playing back the disc last. 1) During playback, press [STOP C]. The resume message will appear. Resume ON 2) Press [PLAY B]. In a few seconds, playback will resume from the point at which it stopped last. You can resume playback at the same point even if you turn off the unit. To cancel the resume playback and start playing back the disc from the beginning, press [STOP C] again while the playback is stopped.
SPECIAL PLAYBACK Slow Forward / Slow Reverse Playback 1) During playback, press [PAUSE F]. Then press [FWD D] or [REV E]. Every time you press [FWD D] or [REV E], approximate speed will be changed as follows. (The sound will remain muted.) Connections Rapid playback function is available only during playback. This function is available only on discs recorded in the Dolby Digital format, and plays back in a slightly faster/ slower speed while keeping the sound quality just as normal playback.
SPECIAL PLAYBACK Marker Setting Zoom 1) During playback, press [DISPLAY] or [ZOOM]. • If [ZOOM] is pressed, skip to step 3. , then press [ENTER] within 2) Use [{ / B] to select 1 second, or wait for 1 second to display the selection menu. e.g.) DVD-video 1/ 5 1/ 5 0:01:00 / 1:23:45 DVD Video This feature allows you to assign a specific point on a disc to be called back later. • For audio CD, skip to step 2. 1) During playback, press [DISPLAY].
SPECIAL PLAYBACK Introduction Chasing Playback during Recording 1) During recording, press [PLAY B]. Playback will start from the beginning of the programme that you are currently recording. Screen for the current playback: 1/ 5 0:01:00 / 1:23:45 -RW VR ORG 1/ 5 1/ 5 1:23:45 -RW VR ORG L1 LP 1:01 Playback Resume ON • Playback image may freeze momentarily using this function. However, this does not affect the recording. • The 2x fast forward playback is not available.
SPECIAL PLAYBACK Simultaneous Playback and Recording You can also play back a recorded title during current recording or the timer recording on the same disc. 3) Press [STOP C] once to stop playback. The resume message will appear. Screen for the current recording: 1) During recording, press [DISPLAY]. Screen for the current recording: 1/ 5 1/ 5 1:23:45 -RW VR ORG L1 1/ 5 1/ 5 1:23:45 -RW VR ORG L1 Resume ON 2) Select icon using [{ / B], then press [ENTER]. will be highlighted.
SEARCH Introduction Title/Chapter Search Track Search Using [SKIP j ] / [SKIP i ] 1) During playback, press [SKIP i ] to skip the current title or chapter and move to the next. The title or chapter will move forward by one at a time. • If there is no chapter in one title, the current title will be skipped. 1) During playback, press [SKIP i] to skip the current track/file and move to the next. The track/file will move forward one at a time.
SEARCH Time Search • For audio CD, skip to step 2. 1) During playback, press [DISPLAY]. 2) Use [{ / B] to select e.g.) DVD-video 1/ 5 , then press [ENTER]. 1/ 5 0:01:00 / 1:23:45 DVD Video e.g.) audio CD 1/ 5 0:00:15 / 0:05:00 CD The number next to will be highlighted. To move to the number next to , press [B]. When time search is not available, counter are not displayed. and time 3) Use [K / L / { / B] or [the Number buttons] to enter a desired time to search, then press [ENTER].
REPEAT/RANDOM/PROGRAM PLAYBACK/SLIDE SHOW Note , then press [ENTER] within 2) Use [{ / B] to select 1 second, or wait for 1 second to display the selection menu. 1/ 5 1/ 5 0:01:00 / 1:23:45 • Point B for the repeat A-B playback should be set within the same chapter or track of point A. • To cancel the repeat playback, select “OFF” at step 3. The repeat setting will also be canceled when you stop playback. • You cannot select “Group” during the random playback of MP3/WMA/JPEG files.
REPEAT/RANDOM/PROGRAM PLAYBACK/SLIDE SHOW Program Playback Slide Show You can program the disc to play back in your desired order. You can select the display time between 5 seconds and 10 seconds. 1) Press [SETUP] in stop mode. 1) Follow steps 1 and 2 in “Program Playback” on the left. 2) Use [K / L] to select “CD Playback Mode”, then press [ENTER]. “CD Playback Mode” menu will appear. 2) Use [K / L] to select “Slide Show”, then press [ENTER].
SELECTING THE FORMAT OF AUDIO AND VIDEO Switching Subtitles Switching Audio Soundtrack When playing back a DVD-video recorded with 2 or more soundtracks (these are often in different languages), you can switch them during playback. When playing back audio CD, you can switch “L/R”(stereo), “L”(left) or “R”(right). 1) During playback, press [DISPLAY]. Connections DVD-video may have subtitles in one or more languages. Available subtitle languages can be found on the disc case.
SELECTING THE FORMAT OF AUDIO AND VIDEO Switching Virtual Surround System Switching Camera Angles You can enjoy stereophonic virtual space through your existing 2 channel stereo system. Some DVD-video have scenes shot from two or more angles. Angle information should be on the disc case if the disc contains multi-angle scenes. 1) During playback, press [DISPLAY]. 1) During playback, press [DISPLAY].
SELECTING THE FORMAT OF AUDIO AND VIDEO Introduction Adjusting Black Level You can adjust the black level to control the brightness of the picture in order to get a better picture. Connections 1)During playback, press [DISPLAY]. 2) Use [{ / B] to select . Press [ENTER] within 1 second, or wait for 1 second to display the selection menu. e.g.) DVD-video 1/ 5 0:01:00 / 1:23:45 Basic Setup 1/ 5 DVD Video 1/ 5 1/ 5 Disc Management 3) Use [K / L] to select “Black Level”, then press [ENTER].
INFORMATION ON DISC EDITING Guide to a Title List Editing Discs Title list allows you to check the titles recorded on the disc easily. You can choose a title to play back from this list and easily edit the titles as you prefer. Press [TOP MENU]. 4 ORG 5 6 Title List JAN/ 1/07 12:00AM L1 LP 12:00AM (2:00:00) JAN/ 1/07 L1 LP 1 2 3 4 5 6 1/2 3 2 1 ORG 3 Edit 2 Scene Delete Edit Title Name Chapter Mark Protect JAN/31/07 11:00PM L1 LP 0:00:59 11 10 9 8 7 1.
DELETING TITLES Introduction Notes for deleting titles After the disc is fully recorded: DVD-RW/DVD+RW TITLE 2 TITLE 2 TITLE 3 TITLE 2 TITLE 3 TITLE 2 TITLE 2 TITLE 2 TITLE 3 You cannot record a new title. Disc Management TITLE 3 The deleted title cannot be created the space. Basic Setup Delete! TITLE 1 You can record a new title. TITLE 1 Delete! TITLE 1 TITLE 1 You can record a new title.
DELETING TITLES You can delete titles which you do not need anymore. Please be advised that the titles once deleted cannot be brought back to the disc. Be sure to read “Notes for deleting titles” on page 69 before you delete the title. 1 2 OPEN/ CLOSE INPUT SELECT HDMI .@/: ABC DEF GHI JKL MNO TUV SATELLITE LINK WXYZ In stop mode, press [TOP MENU]. Title list, original or playlist will appear. • For VR mode DVD-RW, press [MENU/LIST] to switch between “Original” and “Playlist”.
CREATING/DELETING PLAYLIST Introduction Adding Titles to a Playlist Playlist INPUT SELECT HDMI .@/: ABC DEF GHI JKL MNO PQRS TUV WXYZ TIMER PROG. SPACE SETUP SATELLITE LINK DISPLAY MENU/LIST Use [K / L/ s / B] to select the desired title, then press [ENTER]. Use [K / L] to select “Add To Playlist”, then press [ENTER]. ORG Title List JAN/ 1/07 12:00AM L1 LP 12:00AM (2:00:00) JAN/ 1/07 1 ENTER 4 CLEAR RETURN FWD REV PLAY STOP TIME SLIP 1.3x / 0.
CREATING/DELETING PLAYLIST Erasing All Playlist Playlist A playlist can be deleted if it is no longer needed. OPEN/ CLOSE INPUT SELECT HDMI .@/: ABC DEF GHI JKL MNO PQRS TUV WXYZ TIMER PROG. SPACE SETUP SATELLITE LINK DISPLAY TOP MENU AUDIO 1 2 3 Press [SETUP]. Main menu will appear. Use [K / L] to select “DVD Menu”, then press [ENTER]. Use [K / L] to select “Delete All Playlists”, then press [ENTER].
EDITING DISCS Introduction Putting Names on Titles You can put a name on the disc and change it from this menu. INPUT SELECT HDMI .@/: ABC DEF GHI JKL MNO PQRS TUV WXYZ 4 ORG Edit 1 SATELLITE LINK Connections OPEN/ CLOSE Use [K / L] to select “Edit Title Name”, then press [ENTER]. JAN/ 1/07 12:00AM L1 Scene Delete Edit Title Name Chapter Mark Protect LP SETUP DISPLAY TOP MENU AUDIO MENU/LIST 5 To enter a title name, follow the steps of “Guide to Edit Title Name” on page 74.
EDITING DISCS Putting Names on Titles (cont’d) Guide to Edit Title Name OPEN/ CLOSE INPUT SELECT HDMI .@/: ABC DEF GHI JKL MNO PQRS TUV WXYZ 1) Use [K / L] to select a desired character set, then press [ENTER]. 2) Follow the list below, use [the Number buttons] repeatedly until the desired letter appears. Select SATELLITE LINK ABC abc 123 @!? 0 (*1) (*1) 1 ! ”# $ % & ’( ) *+,-.
EDITING DISCS You can put chapter marks in each title. Once a chapter is marked, you can use it for the chapter search feature. HDMI .@/: ABC DEF GHI JKL MNO PQRS TUV WXYZ 4 Use [K / L] to select “Add” or “Delete”, then press [ENTER]. TIMER PROG. SPACE SETUP SATELLITE LINK DISPLAY AUDIO MENU/LIST ENTER CLEAR PAUSE e.g.
EDITING DISCS Hiding Chapters You can hide chapters from the title list. Hidden chapters are skipped during playback. OPEN/ CLOSE INPUT SELECT 3 Use [K / L] to select “Edit”, then press [ENTER]. +VR Title List JAN/15/07 12:00AM L1 LP 12:00AM (2:00:00) JAN/15/07 1 HDMI .@/: ABC DEF GHI JKL MNO TUV SATELLITE LINK WXYZ 4 L1 LP 2 3 Play From Start Edit Title Delete 5 6 1/2 PQRS SETUP 4 5 6 TIMER PROG.
EDITING DISCS Introduction Deleting a Part of a Title Original Playlist 3 Use [SKIP H / G], [REV E], [FWD D], [PLAY B] and [PAUSE F] to find the start point, then press [ENTER]. PL Edit - Scene Delete 1 INPUT SELECT HDMI .
EDITING DISCS Deleting a Part of a Title (cont’d) 4 Use [K / L] to select “Delete” then press [ENTER]. PL Edit - Scene Delete 1 OPEN/ CLOSE INPUT SELECT HDMI .@/: ABC DEF GHI JKL MNO PQRS TUV WXYZ JAN/ 1/07 12:00AM L1 Start End Preview Delete LP 1 : 40 : 00 TIMER PROG. SPACE SETUP SATELLITE LINK DISPLAY TOP MENU AUDIO 5 Use [K / L] to select “Yes” then press [ENTER]. “Are you sure?” will appear. Select “Yes” using [K / L] and then press [ENTER].
EDITING DISCS Playlist You can divide one title into two new titles. e.g.) VR mode DVD-RW playlist PL OPEN/ CLOSE INPUT SELECT Title List JAN/ 1/07 12:00AM L1 LP 12:00AM (2:00:00) JAN/ 1/07 HDMI ABC DEF GHI JKL MNO PQRS TUV WXYZ 1 4 L1 LP 2 3 Play From Start Edit Title Delete 5 6 1/2 TIMER PROG. SPACE SETUP SATELLITE LINK DISPLAY MENU/LIST ENTER CLEAR FWD REV SKIP PAUSE PLAY STOP TIME SLIP 1.3x / 0.
EDITING DISCS Combining Titles Playlist You can combine two titles into a single title. OPEN/ CLOSE INPUT SELECT HDMI .@/: ABC DEF GHI JKL MNO PQRS TUV WXYZ 1 2 Follow the steps 1 to 3 in “Dividing a Title” on page 79 to display “Edit” menu. Use [K / L] to select “Title Combining”, then press [ENTER]. PL Edit 1 SATELLITE LINK JAN/ 1/07 12:00AM L1 LP TIMER PROG.
EDITING DISCS Introduction Setting or Releasing the Title Protection Original INPUT SELECT HDMI .@/: ABC DEF GHI JKL MNO TUV SATELLITE LINK WXYZ Use [K / L] to select “Protect”, then press [ENTER]. ORG Edit 1 JAN/ 1/07 12:00AM L1 PQRS • If the title is protected, the original list. DISPLAY TOP MENU AUDIO MENU/LIST 3 icon will appear in Confirm the indication “OFF ON”. Press [ENTER] again. • If the title is already protected, “ON OFF” will appear.
EDITING DISCS Setting or Clearing All Chapter Marks at Once For titles in video mode DVD-RW, you can set or edit chapter at every time interval. You can clear the chapter mark too. You can specify the interval of chapter marks for titles last more than 5 minutes. 1 2 Follow the steps 1 to 3 in “Putting Names on Titles” on page 73 to display “Edit” menu. Use [K / L] to select “Chapter Mark”, then press [ENTER]. Video Edit 1 OPEN/ CLOSE INPUT SELECT HDMI .
LIST OF THE DEFAULT SETTINGS Introduction The following table is the contents which you can set and the default settings. Refer to the following table for useful operation. Setup Playback All level 8 to 1 Audio Out → page 87 Dynamic Range Control ON OFF Compressing the range of sound volume. PCM 48kHz 96kHz PCM Stream ON OFF Set whether the sound recorded in 96kHz will be down sampled in 48kHz. Disc Menu Language → page 88 English French Spanish Other Set the language for disc menu language.
LIST OF THE DEFAULT SETTINGS Setup Video Items (highlight is the default) Progressive → page 91 TV Aspect → page 91 Select Video L1(Rear) → page 19 L2(Front) Recording Auto Chapter → page 28 General Setting Recording Audio Select (XP) → page 29 Auto Disc Full Finalize → page 31 End of Timer Rec Aspect Ratio(Video mode) → page 29 Clock DivX HDMI Make Recording Compatible → page 28 Clock Setting → page 25 DivX®VOD → page 92 DivX Subtitle → page 92 Format → page 93 HDMI Audio → page 94 RGB Range → pag
GENERAL SETTING Introduction Playback Press [STOP C] if you are playing back a disc. INPUT SELECT HDMI .@/: ABC DEF GHI JKL MNO PQRS TUV WXYZ 3 Use [K / L] to select a desired item, then press [ENTER]. General Setting Basic Setup DISPLAY Playback Display Video Recording Clock DivX HDMI Reset All AUDIO MENU/LIST TOP MENU RETURN FWD REV SKIP PLAY STOP TIME SLIP 1.3x / 0.8x PLAY INSTANT SKIP REPEAT REC MODE REC Submenu will appear.
GENERAL SETTING Playback (cont’d) 1 Parental Lock (Default: All) Some DVD-video feature a parental lock level. Playback will stop if the ratings exceed the levels you set, it will require you to enter a password before the disc will playback. This feature prevents your children from viewing inappropriate material. Use [K / L] to select the desired level, then press [ENTER]. General Setting Playback Display Video Recording Clock DivX HDMI Reset All A Use [K / L] to select “Yes”, then press [ENTER].
GENERAL SETTING Introduction Playback (cont’d) 2 C Audio Out Choose the appropriate audio setting for your external device. It will only affect a disc playback. Use [K / L] to select a setting, then press [ENTER].
GENERAL SETTING Playback (cont’d) 3 Disc Menu Language (Default : English) Set the language for disc menu. Use [K / L] to select a language, then press [ENTER]. General Setting Playback Display Video Recording Clock DivX HDMI Reset All Parental Lock Out Disc Menu Audio Language Disc Menu Language EnglishAudio Language FrenchSubtitle Language Spanish Angle Icon Other Still Mode Note • Only the languages supported by the disc can be selected. • Audio language setting may not be available to some discs.
GENERAL SETTING 1 INPUT SELECT HDMI .@/: ABC DEF Set the language for the on-screen display. Use [K / L] to select a language, then press [ENTER]. Connections OPEN/ CLOSE OSD Language (Default : English) General Setting GHI JKL MNO PQRS TUV WXYZ SATELLITE LINK OSD Language Screen Saver OSD Language FL Dimmer EnglishCC Style Français V-Chip Español TIMER PROG. SPACE DISPLAY TOP MENU AUDIO MENU/LIST Your setting will be activated.
GENERAL SETTING Video Press [STOP C] if you are playing back a disc. OPEN/ CLOSE INPUT SELECT HDMI .@/: ABC DEF GHI JKL MNO PQRS TUV WXYZ TIMER PROG. SPACE SETUP SATELLITE LINK DISPLAY TOP MENU AUDIO MENU/LIST 1 2 3 Press [SETUP] and use [K / L] to select “General Setting”, then press [ENTER]. Use [K / L] to select “Video”, then press [ENTER]. Use [K / L] to select a desired item, then press [ENTER]. 1 Progressive 2 TV Aspect 3 Select Video Submenu will appear.
GENERAL SETTING 1 Progressive (Default : OFF) 1) Use [K / L] to select “ON“, then press [ENTER]. Progressive TV Aspect Progressive Select Video ON OFF General Setting ޓ ޓWait about 15 seconds for auto recovery. Yes If you have a standard TV: Select “4:3 Letter Box”, so that black bars appear on the top and bottom of the TV screen when playing back a wide-screen picture. Select “4:3 Pan & Scan” for a full height picture with both sides trimmed when playing back wide-screen picture.
GENERAL SETTING DivX® 3 OPEN/ CLOSE INPUT SELECT HDMI .@/: ABC DEF GHI JKL MNO PQRS TUV WXYZ SATELLITE LINK TIMER PROG. SPACE SETUP 1 DISPLAY TOP MENU AUDIO This unit allows you to play back the files purchased or rented from DivX® VOD (video-on-demand) services. The files are available on the internet. When you purchase or rent DivX® VOD files on the internet, you will be asked to enter an activation/registration code. This menu item provides you with the activation/registration code.
GENERAL SETTING INPUT SELECT HDMI .@/: ABC DEF GHI JKL MNO PQRS TUV WXYZ Use [K / L] to select “HDMI”, then press [ENTER]. General Setting Playback Display Video Recording Clock DivX HDMI Reset All Basic Setup DISPLAY TOP MENU AUDIO MENU/LIST CLEAR RETURN FWD REV SKIP PLAY STOP TIME SLIP 1.3x / 0.8x PLAY INSTANT SKIP REPEAT REC MODE REC ZOOM 1 1 Format 2 HDMI Audio 3 RGB Range Format (Default : RGB) You can select the color space for HDMI output.
GENERAL SETTING HDMI (cont’d) 2 HDMI Audio (Default : ON) If you do not want to output the audio through HDMI (when you digitally output the audio through the COAXIAL DIGITAL AUDIO OUTPUT jack to your audio system, etc.), you can set the HDMI audio output off. Use [K / L] to select a setting, then press [ENTER]. • Set to “OFF” when the HDMI sound is not outputted.
GENERAL SETTING GENERAL SETTING Reset the setting to default. INPUT SELECT HDMI .@/: ABC DEF GHI JKL MNO PQRS TUV WXYZ 3 Use [K / L] to select “Reset All”, then press [ENTER]. General Setting Playback Display Video Recording Clock DivX HDMI Reset All Basic Setup DISPLAY TOP MENU AUDIO MENU/LIST RETURN FWD REV SKIP PLAY STOP TIME SLIP 1.3x / 0.
TROUBLESHOOTING Before requesting service for this unit, check the table below for a possible cause of the problem you are experiencing. Some simple checks or a minor adjustment on your part may eliminate the problem and restore proper operation. Symptom Power The power does not turn on. Picture There is no picture. • Check that the AC power cord is connected securely. • Check the breaker (in case of power failure). • Re-connect the connecting cords securely. • Check if the connecting cords are damaged.
TROUBLESHOOTING Introduction Symptom Playback The disc does not play back. Remedy Connections • No disc is inserted. • A blank disc is inserted. • The disc is upside down. Insert the disc with the labeled side facing up. • The disc is not correctly inserted. • The unit cannot play back certain discs (such as a CD-ROM) (page 10). • The region code on the DVD-video does not match the unit (page 10). • Moisture has condensed inside the unit.
TROUBLESHOOTING Symptom DV DV signal cannot be input. Remedy • Before connection, turn on the power supplies for both this unit and the DVC, and make sure that these units are in stop mode. • Only a “DVC-SD” signal can be input from the DVC to this unit. Other types of signals are not supported. • Do not connect any device other than the DVC. Even if a recorder or PC with another DV terminal is connected, the DV function will not operate.
TROUBLESHOOTING Cause Solution • Unplayable disc is inserted in the unit. • The disc is upside down. • Check “Parental Lock” setting in “Playback” menu (page 86). Connections • Playback is not authorized in the region of the DVD-video which you inserted in the unit. • The current selected parental level prohibits playback. • Insert the standardized disc which have the marks on page 10. • Insert the disc with the labeled side facing up. • Insert the DVD-video with region codes 1 or ALL.
LANGUAGE CODE Language Abkhazian Afar Afrikaans Albanian Amharic Arabic Armenian Assamese Aymara Azerbaijani Bashkir Basque Bengali;Bangla Bhutani Bihari Bislama Breton Bulgarian Burmese Byelorussian Cambodian Catalan Chinese Corsican Croatian Czech Danish Dutch English Esperanto Estonian Faroese Fiji Finnish French Frisian Galician Georgian German Greek Greenlandic Guarani Gujarati Hausa Hebrew Hindi Code 4748 4747 4752 6563 4759 4764 5471 4765 4771 4772 4847 5167 4860 5072 4854 4855 4864 4853 5971 4851 5
GLOSSARY MP3 is a method of compressing files. You can copy MP3 files on CD-RW/-R from the computer and play back the files on this unit. Aspect Ratio The most common system of encoding digital audio, found on CD and DAT. Excellent quality, but requires a lot of data compared to formats such as Dolby Digital and MPEG audio. For compatibility with digital audio recorders (CD, MD and DAT) and AV amplifiers with digital inputs, this unit can convert Dolby Digital and MPEG audio to PCM.
SPECIFICATIONS • This model complies with the below specifications. • Designs and specifications are subject to change without notice. • This model may not be compatible with features and/or specifications that may be added in the future.
LIMITED WARRANTY Toshiba America Consumer Products, L.L.C. (“TACP”) makes the following limited warranties to original consumers in the United States. THESE LIMITED WARRANTIES EXTEND TO THE ORIGINAL CONSUMER PURCHASER OR ANY PERSON RECEIVING THIS DAV PRODUCT AS A GIFT FROM THE ORIGINAL CONSUMER PURCHASER AND TO NO OTHER PURCHASER OR TRANSFEREE. Introduction Limited United States Warranty Digital Audio Video (“DAV”) Product - Exchange Warranty DAV PRODUCTS PURCHASED IN THE U.S.A.