
User manual


1716
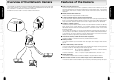
Viewing
・
Listening
and Operation
Others
Set up
Introduction
Recording
Viewing
・
Listening
and Operation
Others
Set up
Introduction
Recording
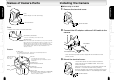
Names of Camera Parts
Front
Lens
(Focal range: 0.4 inch to infinity)
SD Card Cover
Front
Bottom
Unfasten the screw in the SD card cover.
SD Memory Card Slot
Insert an SD memory card into the slot.
Reset button
Reset the settings to the defaults by using a thin, pointed
object to press the button for at least 5 seconds. (The AC
adaptor must be connected)(The log information is not
returned to the default state. To return the log information
to the default state, delete the log information in the
settings screen.)
LAN Terminal
Connects a
LAN cable.
ALARM IN
Alarm input terminal
GND
Hook
MIC IN
・ A microphone input terminal.
Use a monaural plug microphone 3.5mm
in diameter.
DC IN 12V
Power plug input terminal (→page 22)
・Be sure to use the AC adaptor included
with the network camera.
ALARM OUT
Alarm output terminal
AUDIO OUT
・ An audio output terminal. Connect to an audio output device
such as a speaker with an amplifier.
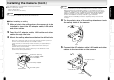
■ When using on a desk
1 Remove the terminal cover.
2 Connect the AC adapter cable and LAN cable to the
camera.
・See "Connecting Power Cord" on page 22 for connection of the
power source.
3 Mount the terminal cover.
Installing the Camera
Terminal cover
LAN cable
AC adapter cable
Terminal cover
・ The terminal cover has the function to prevent
coming off of the AC adapter cable. Be sure to
mount the cover.
・ Mount the terminal cover in the correct position and
direction. The terminal cover facing a wrong
direction disables the function to prevent coming off
of the AC adapter cable. It also damages the cable.