SAFETY PRECAUTIONS The lightning flash with arrowhead symbol, within an equilateral triangle, is intended to alert the user to the presence of uninsulated “dangerous voltage” within the product’s enclosure that may be of sufficient magnitude to constitute a risk of electric shock to persons. The exclamation point within an equilateral triangle is intended to alert the user to the presence of important operating and maintenance (servicing) instructions in the literature accompanying the appliance.
- Reorient or relocate the receiving antenna. - Increase the separation between the equipment and receiver. - Connect the equipment into an outlet on a circuit different from that to which the receiver is connected. - Consult the dealer or an experienced radio/TV technician for help. RESPONSIBLE PARTY: TOSHIBA AMERICA INFORMATION SYSTEMS, INC. 9740 Irvine Blvd., Irvine, CA 92618-1697 U.S.
IMPORTANT SAFETY INSTRUCTIONS CAUTION: P L E A S E R E A D A N D O B S E R V E A L L W A R N I N G S A N D INSTRUCTIONS GIVEN IN THIS OWNER’S MANUAL AND THOSE MARKED ON THE UNIT. RETAIN THIS BOOKLET FOR FUTURE REFERENCE. This set has been designed and manufactured to assure personal safety. Improper use can result in electric shock or fire hazard. The safeguards incorporated in this unit will protect you if you observe the following procedures for installation, use and servicing.
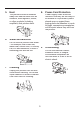
5. Heat 8. The product should be situated away from heat sources such as radiators, heat registers, stoves, or other products (including amplifiers) that produce heat. 6. Power-supply cords should be routed so that they are not likely to be walked on or pinched by items placed upon or against them, paying particular attention to cords at plugs, convenience receptacles, and the point where they exit from the product. Water and Moisture Do not use this product near water.
IMPORTANT SAFETY INSTRUCTIONS (Continued) 10. Lightning storms 12. Do not place the product vertically For added protection for this product during storm, or when it is left unattended and unused for long periods of time, unplug it from the wall outlet. This will prevent damage to the product due to lightning and power-line surges. However, while it is thundering or lightning, do not touch the apparatus and any connected cable and/or equipment.
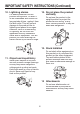
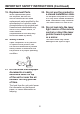
Introduction 15. Accessories e) If the product has been dropped or damaged in any way. f) When the product exhibits a distinct change in performance this indicates a need for service. Do not place this product on an unstable cart, stand, tripod, bracket, or table. The product may fall, causing serious injury to a child or adult, and serious damage to the product. A product and cart combination should be moved with care.
IMPORTANT SAFETY INSTRUCTIONS (Continued) 19. Replacement Parts 22. Do not use the product in a closed installation state. When replacement parts are required, be sure the service technician has used replacement parts specified by the manufacturer or have the same characteristics as the original part. Unauthorized substitutions may result in fire, electric shock, or other hazards. (Replacement of the lamp only should be made by users.
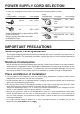
POWER SUPPLY CORD SELECTION If your line voltage is 220 to 240V, use one of the following types of cable. Plug configuration Plug type Plug configuration Line voltage EURO 220 240V UK 220 240V Use a 5A fuse which is approved by ASTA or BSI to BSI362. Always replace the fuse cover after changing the fuse.
IMPORTANT PRECAUTIONS (Continued) • The set of projector is hot after use. Handle with care. • Do not use the projector while holding it in your hands or lap. • Do not use the projector near a power source and the like, or in locations like a ship or vehicle that are subject to vibration or shock. Doing so may lead to a malfunction or shorten service life. Avoid Volatile Liquid Do not use volatile liquids, such as an insect spray, near the unit.
OTHER CAUTIONS AND INFORMATIONS Copyrights Showing or transmitting commercial imaging software or broadcast or cable-broad casting programs with the purpose of other than the personal and private viewing, including modifying images using the freeze, resize, PIP, or SPLIT screen functions, or displaying with the varying aspect ratio of the images, could violate the direct or indirect copyrights of the imaging software or broadcast program, etc., if done without first consulting with the copyright holder.
REMOTE CONTROL BATTERIES Caution • Never throw batteries into a fire. Notes • • • • • Be sure to use AAA size batteries. Dispose of batteries in a designated disposal area. Attention should be drawn to the environmental aspects of battery disposal. Do not mix different battery types or combine used batteries with new ones. If the remote control does not operate correctly, or if the operating range becomes reduced, replace both batteries with new ones.
Table of Contents Table of Contents ....................................................................................... 13 Introduction ................................................................................................ 14 Package Overview .............................................................................................14 Product Overview ...............................................................................................15 Main Unit ................................
Introduction Package Overview This projector comes with all the items shown below. Check to make sure your unit is complete. Contact your dealer immediately if anything is missing. The shape and number of supplied power cords vary depending on the product destination.
Introduction (Continued) Product Overview Main Unit 8 1 2 3 7 4 5 6 1 8 10 9 1. 2. 3. 4. 5. 6. 7. 8. 9. 10. Control Panel (See page 16 for detailed information.) Zoom Lever Focus Ring Projection lens Lens Cap Foot adjuster Front foot adjuster release button Infrared remote sensor Rear panel (Connection external devices.
Introduction (Continued) Control Panel 2 3 1 6 5 4 7 1. Temp Indicator LED (Refer to page 37 for more information.) 2. On indicator light(Refer to page 37 for more information.) 3. LAMP indicator(Refer to page 37 for more information.) Indicates the status of the lamp has developed a problem. 4. ON/STANBY button (Refer to page 24 for more information.) Turns the projector on or off. 5. MENU button Open,saves and exits the on-screen menu. 6.
Introduction (Continued) Connection Ports 1 7 6 5 4 3 2 1. Infrared remote sensor 2. AC IN socket(Connect the supplied power cord here.) 3. COMPUTER (Y/PB/PR) IN terminal RGB : Input analog RGB signal from a computer or other source, or a component video signal (Y/PB/PR) from video equipment. 4. Video IN terminal 5. S-Video IN terminal 6. USB terminal (for remote mouse control) 7. Antitheft lock hole (Attach a safety cable or any other antitheft device.
User Controls Control Panel & Remote Control There are two ways for you to control the functions: Remote Control and Control Panel. Control Panel Remote Control Using the Control Panel On / Standby Refer to the “Power On/Off the Projector” section on page 24. Input Press “Input” to choose RGB, Component-p, Component-i, S-Video, Composite Video and HDTV sources. Menu Press “Menu” to launch the on screen display (OSD) menu. To exit OSD, press “Menu” again.
User Controls (Continued) Front Remote Control Rear Remote control transmitter Laser emitter (5) Mouse remote control receiver (12) CAUTION Label (LASER) (11) (7) Remote Control (6) (8) (15) (9) (10) (1) (3) (2) (13) (4) (14) LASER WARNING CAUTION Label (LASER) CAUTION Label (LASER) Battery cover Control button cover CAUTION • Do not look into the laser light source of the remote control or direct the laser pointer toward a person or a mirror.
User Controls (Continued) Preparing and using the remote control Loading dry-cell batteries into the remote control 1. Operating the remote control Point the remote control toward the projectorfs infrared remote sensor, and press a button on the remote control. • Operating the projector from the front Remove the battery cover. Appr ox. 1 Ap pr 2. Insert the dry-cell batteries. Be sure to align the plus and minus ends of the batteries properly. ox 5° .
User Controls (Continued) Preparing and using the remote control (Continued) Switching operation mode Operation modes should be switched between projector operation and computer operation. Switching the remote control operation mode. Pressing this button toggles the mode. When this button is lit, the remote control is in [PJ Mode] (Projector operation mode). If no operations are made for 30 seconds, this light goes out, and the remote switches back to [PC Mode] (Computer operation mode).
User Controls (Continued) Operating a computer using the remote control A computer can be operated using the projector’s remote control. This function is available on any computer with the Windows 98/98SE, Windows Me, Windows 2000, or Windows XP OS, that is equipped with a USB port supporting the USB 1.1 (The mouse remote control is supported on OS 9 or OS X for the Macintosh). The operation cannot be guaranteed for all the environments of computers.
Installation Connecting the Projector USB RGB 4 DVD Player, Settop Box, HDTV receiver 2 6 5 3 1 S-Video Output Video Output Due to the difference in applications for each country, some regions may have different accessories. 1. ..................................................................................................Power Cord 2. ...................................................................................................VGA Cable 3. ...............................................
Installation (Continued) Turning the power on and off Connecting the power cord Insert the power cord connector into the AC IN socket of the projector. Insert the power cord plug into a wall or other power outlet. Power cord connector (Supplied) Removing the lens cover Be sure to remove the lens cover when the power is turned on. If it is left on, it could become deformed due to heat. Turning the power on Press the ON/STANDBY button.
Installation (Continued) • The first time you use the projector after purchase, after the start-up screen, please press “MENU” button. Turning the power off Press the ON/STANDBY button. A message appears on the screen, confirming that you wish to shut off the power. This message will disappear after a moment. (This operation is no longer valid after the message disappears.) Press the ON/STANDBY button again. If the screen turns off, but the internal cooling fan continues to operate for a short while.
Installation (Continued) Adjusting the Projected Image Adjusting the Projector Image Height The projector is equipped with an elevator foot for adjusting the image height. To raise the image: 1. Press the foot adjuster button . 2. Raise the image to the desired height angle , then release the button to lock the foot adjuster into position. 3. Use to fine-tune the display angle. To lower the image: 1. Press the foot adjuster button. 2.
Installation (Continued) Adjusting the Projector Zoom / Focus You may turn the zoom lever to zoom in or out. To focus the image, rotate the focus ring until the image is clear. The projector will focus at distances from 5 to 40 feet (1.5 to 12.2 meters). Zoom Lever Focus Ring Adjusting Projection Image Size 300"(762.5cm) 246.0"(625.0cm) 172.2"(437.5cm) 123.0"(312.5cm) 74.0"(187.5cm) 37.0" (93.8cm) 32.1" (64.1cm) 64.1" (163.0cm) 106.98" (271.7cm) 149.78" (380.4cm) 213.97" (543.5cm) 261.04" (663.
Installation (Continued) Adjusting the screen size and focus Use the zooming lever to adjust the screen size. Use the focusing lever to adjust the focus. Notes • Note that a lamp characteristics may rarely cause the brightness to fluctuate slightly. • A lamp is consumable item. If used for extended periods, images will appear dark, and the lamp could burn out. This is characteristic of a lamp, and is not malfunction. (The lifetime of the lamp depends on conditions of use.
Using the menus You can call up on-screen menus, and conduct a number of adjustments and settings using the operation buttons on the control panel (main unit side) and remote control. How to use the menus The menu shown below is for operation instructions purposes and might differ from the actual display. 1. Press the MENU button 2. Select a Category Select a category by using Display the Setting display menu. . Displays the current adjustments and settings of selected category.
Using the menu (Continued) The image adjustment menu Use this menu to adjust image-related items. Items that can be adjusted are marked with “Yes”, and those that cannot are marked with “No”. Item Contrast Description Computer Y/PB/PR Adjust the image contrast. Lower Higher Video S-video Yes Yes Yes Brightness Adjust the brightness of the image. Darker Brighter Yes Yes Yes Color Adjust the color of the image. Lighter Deeper No Yes Yes Tint *1 Adjust the tint of the image color.
Using the menu (Continued) The display setting menu Use this menu to set screen display-related items.
Using the menu (Continued) The default setting menu This menu shows placement status and other settings. Item Description Projection mode Sets projection mode in accordance with Placement Style. Standard : The factory default setting. Rear-Desktop: When you select this function, the projector reverses the image so you can project behind a translucent screen. No signal power off Set the timer to wait for the power to be turned off after signal input stops. Press . Switch with and .
Using the menu (Continued) Manual adjustments and settings The menu items of the Set up menu vary depending on the input type, as shown in the table below. Use the buttons to adjust the items in the table below, then press the button when you are finished. Select Item Description Computer Y/PB/PR Video S-video Auto. Keystone Automatically corrects the keystone distortion. Press . Yes Yes Yes Keystone Correct the keystone (trapezoid) distortion of the screen.
Using the menu (Continued) Displaying Information (Status display) This displays information about the input signal, lamp use time, etc.
Appendices Trouble shooting If you experience trouble with the projector, refer to the following information. If the problem persists, please contact your local reseller or service center. Problem : No image appears on screen. Ensure all the cables and power connections are correctly and securely connected as described in the “Installation” section. Ensure the pins of connectors are not crooked or broken. Check if the projection lamp has been securely installed.
Appendices (Continued) 4. Verify the resolution setting is less than or equal to 1280 x 1024 resolution. 5. Select the “Change” button under the “Monitor” tab . 6. Click on “Show all devices.” Next, select “Standard monitor types” under the SP box; choose the resolution mode you need under the “Models” box. If you are using a Notebook: 1. First, follow the steps above to adjust resolution of the computer. 2. Press the toggle output settings.
Appendices (Continued) Problem : Image is out of focus Adjusts the Focus Ring on the projector lens. Refer to page 27. Make sure the projection screen is between the required distance 5 to 40 feet (1.5 to 12.2 meters) from the projector. Problem : The image is stretched when displaying 16: 9 DVD. The projector automatically detects 16:9 DVD and adjusts the aspect ratio by digitizing to full screen with 4:3 default setting.
Appendices (Continued) Replacing the lamp The projector will detect the lamp life itself. It will show you a warning message “The Lamp life is ending” When you see this message, change the lamp. Make sure the projector has been cooled down for at least one hour before changing the lamp. 3 1 Warning: Lamp compartment is hot! Allow it to cool down before changing lamp! 2 4 Lamp Replacing Procedure: Warning: To reduce the risk of personal injury, do not drop the lamp module or touch the lamp bulb.
Appendices (Continued) Notes and Precautions • It is recommended that the lamp be replaced after 2,000 hours of use. When [Lamp time] reaches 2,000 hours, the icon and a message will appear with a beep sound. (After 2,000 hours, they will appear when the power is on at the first time every 100 hours.) This display disappears when you press button. • Attach the outer lamp cover correctly so that it is not loose.
Appendices (Continued) Computer Compatibility (Analog) This project supports the following RGB signals. Note, however, that depending on the computer model, the screen may show flicker or streaking. Please adjust the projector if this happens. (Press the SET UP button, and adjust automatically or manually.) Resolution 640x350 640x400 640x480 720x400 800x600 1024x768 1280x1024 1152x864 1280x960 Remark : 1.> “*”compressed computer image. 2.> The interlaced analog signals are not supported.
Appendices (Continued) Specifications List of general specifications Consumption Power Weight External Dimensions Cabinet material Conditions for usage environment - Display pixels Picture elements Lens - Lamp Projection screen size Projection distance - 195W 1.0Kg 200 x 75.3 x 154.2 mm (WxHxD) AL & MG alloy + PC + ABS resin Temp : 5 oC to 35 oC Relative humidity : 30% to 70% 1 Chip DMD ™ 786,432 pix els (1024H x 768V) Zoom lens F= 2.7-2.88 f = 28.43 32.73 mm High - pressure mercury lamp 31.
About Lamp About Lamp The product’s light source is a mercury lamp that lights at increased internal pressure. Be sure to fully understand the following characteristics of the lamp and handle it with extreme care. • The lamp may burst with a loud noise due to impact or deterioration, or fail to light at the expiration of its life. • How long it takes before the lamp bursts or the life expires may vary greatly by lamp. Some may burst shortly after first use.
About Lamp Lamp replacement A lamp is consumable supplies. If used for extended periods, images will appear dark, and the lamp could burn out. This is characteristic of a lamp, and is not malfunction. (The lifetime of the lamp depends on condition of use.) If this happens, replace it with a new one. CAUTION If you have been using the projector, the lamp will be very hot, and may cause burn injuries. Wait for the lamp to cool (for longer than 1 hour) before replacing it.