DATA PROJECTOR Maintenance Operations Preparations (SVGA / With PC Card Slot) Others TDP-SW25 Before Using OWNER’S MANUAL
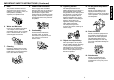
Before Using The lightning flash with arrowhead symbol, within an equilateral triangle, is intended to alert the user to the presence of uninsulated "dangerous voltage" within the product's enclosure that may be of sufficient magnitude to constitute a risk of electric shock to persons. The exclamation point within an equilateral triangle is intended to alert the user to the presence of important operating and maintenance (servicing) instructions in the literature accompanying the appliance.
5. Heat 8. Power-Cord Protection The product should be situated away from heat sources such as radiators, heat registers, stoves, or other products (including amplifiers) that produce heat. Power-supply cords should be routed so that they are not likely to be walked on or pinched by items placed upon or against them, paying particular attention to cords at plugs, convenience receptacles, and the point where they exit from the product. 6. Water and Moisture Do not use this product near water.
e) If the product has been dropped or damaged in any way. f) When the product exhibits a distinct change in performance this indicates a need for service. 15. Accessories Do not place this product on an unstable cart, stand, tripod, bracket, or table. The product may fall, causing serious injury to a child or adult, and serious damage to the product. A product and cart combination should be moved with care.
25. Do not carry the projector by having the terminal cover parts or the PC card cover part POWER SUPPLY CORD SELECTION If your line voltage is 220 to 240V, use one of the following types of cable. Plug configuration Plug type Doing so, the projector may fall if that cover comes off, and injury or damage may result. Plug configuration Line voltage EURO 220 – 240V UK 220 – 240V Use a 5A fuse which is approved by ASTA or BSI to BSI362. Always replace the fuse cover after changing the fuse.
OTHER CAUTIONS AND INFORMATIONS Avoid Volatile Liquid Copyrights Do not use volatile liquids, such as an insect spray, near the unit. Do not leave rubber or plastic products touching the unit for a long time. They will leave marks on the finish. If cleaning with a chemically saturated cloth, be sure to follow the product's precautions.
Before Using SAFETY PRECAUTIONS .................................................................................. IMPORTANT SAFETY INSTRUCTIONS ........................................................... POWER SUPPLY CORD SELECTION .............................................................. IMPORTANT PRECAUTIONS ........................................................................... EXEMPTION CLAUSES ....................................................................................
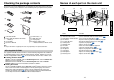
Preparations Checking the package contents Names of each part on the main unit Please make sure that the following items are included in the box, along with the main unit. If any item is missing, please contact the store immediately where you purchased the product.
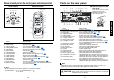
Names of each part on the control panel and remote control Control panel Parts on the rear panel Remote Control (11) (10) MONITOR AUDIO OUT (1) CONTROL (2) (4) AUDIO IN L Press on the circle (“O”) while sliding the cover in the direction of the arrow. The cover will come off.
Preparing and using the remote control Placement ■ Loading dry-cell batteries into the remote control ■ Operating the remote control Placement Styles q Remove the battery cover. Point the remote control toward the projector’s infrared remote sensor, and press a button on the remote control. As shown in the figures below, this device can be placed in 4 different styles. The factory setting is “floor-mounted front projection.” Set the Projection mode in the default setting menu p.
How to use the PC card slot Before connection The wireless LAN PC card enables you to connect the projector wirelessly with a personal computer that supports IEEE802.11b based wireless LAN. p.34 (Please note that communication between all the computers based on IEEE802.11b and this projector is not guaranteed.) You can also use a commercially available memory card to project JPEG image files using this projector. p.42 Please follow the steps below when removing or mounting a PC card.
Operations Turning the power on and off ■ Connecting the power cord Notes 1 Insert the power cord connector into the AC IN socket of the projector. 2 Insert the power cord plug into a wall or other power outlet. • The start-up screen will disappear after a moment. You can dismiss the start-up screen before this by performing any operation. You can also configure the start-up screen not to appear via the Display setting menu p.31 .
Basic operations 5 Projector placement angle adjustments Turn on the power by following the instructions in “Turning the power on” p.22 . 2 Select the language and the lamp power (When using the first time). When the projector is used for the first time after purchase, menu for language and lamp power selection and configuration is displayed in English. (If the screen is out of focus, adjust it according to the step 6 .) q Use the or button to select the desired language and press the button.
Using handy features ■ Using auto setting ● Manual adjustments and settings Control panel Remote Control 1 Press the SET UP button. The Set up menu appears. 2 Press the SET UP button again. The menu items of the Set up menu vary depending on the input type, as shown in the table below. buttons to adjust the items in the table below, then press Use the the RETURN button when you are finished. Select Item The menu item is automatically adjusted/set.
Using handy features (Continued) Using the menus ■ Cutting off the picture and sound temporarily (Mute) You can call up on-screen menus, and conduct a number of adjustments and settings using the operation buttons p.16 on the control panel (main unit side) and remote control. Remote Control The menu shown below is for operation instructions purposes and might differ from the actual display. Press the remote control’s MUTE button. The picture and sound are cut off.
Using the menu (Continued) ■ The image adjustment menu ■ The display setting menu Use this menu to adjust image-related items. Items that can be adjusted are marked with “Yes”, and those that cannot are marked with “No”. Use this menu to set screen display-related items. Contrast Description Computer Y/PB/PR Adjust the image contrast. Higher Lower Video S-video PC card Yes Yes Yes Yes Brightness Adjust the brightness of the image.
Using the menu (Continued) ■ The default setting menu ■ Displaying Information (Status display) This menu shows placement status and other settings. This displays information about the input signal, lamp use time, etc. Description “Yes”: displayed, “No”: not displayed Projection mode Sets projection mode in accordance with Placement Style. No signal power off Set the timer to wait for the power to be turned off after signal input stops. Press . Switch with and . Off (not turned off)/1 min./5 min.
Setting up the wireless LAN ■ Functions ■ Caution when using the wireless LAN functions The following functions are available via wireless communications, when the wireless LAN PC card and dedicated Wireless Utility software p.50 included with this projector are used. Note: A wireless LAN PC card except the supplied one (or recommended by Toshiba) does not work with this product. Please ask your dealer about the available wireless LAN PC card.
Setting up the wireless LAN (Continued) ■ Setup using the Wireless/Card menu ■ How to enter characters ● Projector settings (Be sure to read this subsection.) The factory settings can be used as-is. However, if you need higher security, the projector settings should be changed. Use the numeric keypad on the remote control to enter characters. Enter each character of interest and press the button to accept it. Text input mode Display the Wireless/Card menu. 2.
Setting up the wireless LAN (Continued) If you select Network in step 2 in “Projector settings” p.36 , the following items can be set. Item Description Mode Ad hoc Infrastructure Channel Use SSID Specify an arbitrary character string (1 to 32 characters). [ : Enter the setting mode] [ : Move from digit to digit] to : Enter the string] [Accept: ] to select the number (1 to 11) to be set. [ Encryption On Key Specify an arbitrary character string.
Setting up the wireless LAN (Continued) • Subnet mask A subnet mask is used to determine what subnet the IP address assigned to a terminal belongs to. (Example: 255.255.xxx.xxx) • Gateway This value specifies the device, such as a router, to be used to access servers outside the network. It is identified by the IP address. (Example: 111.112.xxx.xxx) • [Setting initialization] This item resets the wireless LAN settings to their factory defaults.
Projecting images stored in a memory PC card ■ Memory PC cards ● PC card slot types The PC card slot installed on this projector is TYPE II (PCMCIA Release 2.1)-compliant. Please use memory PC cards and conversion adapters compliant with this type of PC card slot. Only a 3.3-V PC card can be used. (A 5-V only PC card cannot be used.) ● Supported storage media types This projector supports the following types of ATA-compliant storage media.
Projecting images stored in a memory PC card (Continued) 44 ■ Automatic demonstration • • • • • If you set Auto. demo to On in “Setting slideshow options” p.43 , the projector starts playing a slide show automatically when a memory PC card is plugged into the PC card slot according to the procedure in “Mounting a PC card” p.21 . The slide show is played as set in “Setting slideshow options”. The slide show displays the JPEG files stored in the root directory of the memory PC card.
Projecting images stored in a memory PC card (Continued) ● Playing a slide show from a thumbnail list 1 Plug a memory PC card. Plug a memory PC card into the PC card slot according to the procedure in “Mounting a PC card” p.21 . The projector starts loading data from the memory PC card and displays a thumbnail list on the screen. 5 Rotating a slide Pressing the buttons with a slide displayed rotates the slide 90 degrees. The rotation information is preserved as long as you remain in the current folder.
Checking the projector status Installing the applications ■ Status display If you will use the wireless LAN PC card function, install the application on the supplied CD-ROM onto your computer. To check the current status of the projector, select Status display in step 2 in “Projector settings” p.36 . The following items of information will then be displayed. The name of the application currently running on the projector is displayed.
Using the Wireless Utility ■ Displaying a computer’s screen via the projector 4 Select the screen image you wish the projector to display. software application. When the Wireless Utility launches, the Screen Image transmission mode window appears on the computer screen. To switch to the Screen Image transmission mode window from another mode (File or Projector Camera), click on the Screen Image icon . 2 Select Transmission mode. Click on Update automatically or Update manually.
Using the Wireless Utility (Continued) ■ Displaying a JPEG image saved on a computer via the projector 1 Launch the Wireless Utility software application. The Screen Image transmission mode window appears on the computer’s screen. 2 Click on the File icon . The Wireless Utility window changes to File transmission mode. 5 Select the projector to be transmitted. The IDs of projectors accessible for communication will be listed.
How to use the JPEG Conversion Tool Using the Wireless Utility (Continued) 3 Select the projector to be operated. The JPEG Conversion Tool converts JPEG files not supported by the projector, image files in other formats, Microsoft® PowerPoint® files, and the like into JPEG files supported by the projector. The JPEG files converted with this tool can be displayed by sending them using the wireless LAN PC card p.52 , or saving them on a memory PC card p.42 .
How to use the JPEG Conversion Tool (Continued) ■ Converting files created with Microsoft® PowerPoint® ■ Making a presentation with converted JPEG files This process provides presentations without using a computer by converting presentation files created with Microsoft® PowerPoint® into JPEG files, storing them on a memory PC card, and displaying them in a slide show. ® • To use this conversion mode, Microsoft PowerPoint must be installed on the computer.
Setting up the projector using a Web browser ■ How to use the “Projector Configuration Tool” 4 Select items from the menu on the left. The “Projector Configuration Tool” uses the Web server features of the projector to set up the projector using a wireless LAN PC card. When using the “Projector Configuration Tool”, set up the wireless LAN connecting the projector and the computer. 1 See “Checking the projector status” p.48 to display information on the screen and write down the IP address.
Setting up the projector using a Web browser (Continued) • Features Introduces the functions available in Wireless/Card input mode. Slide Show Wireless Utility Displays the Help page. Updates the settings. Discards what you have entered. Enter single-byte alphanumeric characters in text input fields. Operations • Status display Displays some states of the projector. Projector: Displays the contents of status display in the menu.
Maintenance About lamp ■ Immediately replace the lamp when a sign appears on the screen. • When the replacement time approaches, a message will appear on the screen. • The risk of burst will increase if the lamp is continuously used without being replaced. • Frequently check the used hours and prepare spares when the replacement time approaches. (Refer to “Status display”. p.
Others Lamp replacement (Continued) Used Lamps Trouble indications The indicator lights inform you of internal abnormalities. This projector’s lamps contain trace amounts of environmentally harmful inorganic mercury. Be careful not to break used lamps, and dispose of them in accordance with local regulations. TEMP FAN LAMP No power ⇒ Problem with projector • Unplug the power cord, and contact your dealer.
Before calling service personnel If you think something is wrong, check the followings before contacting customer service. Please see “Trouble indications” p.65 as well. If This Happens Check No power • Is the power cord plugged in? Is it connected to the projector? • Is the lamp cover loose? p.63 Power goes out during use • Is the ambient temperature high? p.65 • Is the air intake or air exhaust blocked? No picture • • • • • Is the projector turned on? p.24 Is the mute function on? p.
Specifications ■ List of general specifications Item 250 W 3.1 kg 285 × 98 × 254 mm (W × H × D) PC+ABS resin and ABS resin Temp: 5°C to 35°C; relative humidity: 30% to 70% 1 chip DMD™ 480,000 pixels (800H × 600V) Zoom lens F=2.0-2.2 f=18.20-21.84 mm High-pressure mercury lamp 30-300 inches 1.15-10.00m 1 W (Monaural) Mini D sub 15 pin RGB / Y/PB/PR (dual use) Mini D sub 15 pin RGB / Y/PB/PR (dual use) Mini D sub 15 pin RGB / Y/PB/PR (dual use) Mini DIN 4 pin RCA Pin Jack × 2, 1.
Specifications (Continued) ■ CONTROL terminal Signal format 480i(525i)@60Hz 480p(525p)@60Hz 576i(625i)@50Hz 576p(625p)@50Hz 720p(750p)@60Hz fh(kHz) 15.73 31.47 15.63 31.25 45.00 fv(Hz) 59.94 59.94 50.00 50.00 60.00 720p(750p)@50Hz 1080i(1125i)@60Hz 1080i(1125i)@50Hz 1035i(1125i)@60Hz 1152i(1250i)@50Hz 37.50 33.75 28.13 33.75 31.25 50.00 60.00 50.00 60.00 50.00 ■ List of supported signals (Video, S-Video signals) Video mode fh(kHz) fv(Hz) fsc(MHz) NTSC PAL SECAM PAL-M PAL-N PAL-60 NTSC4.43 15.