
User's Manual


10
EN
Functional Overview
You can also turn on the unit by pressing these buttons.
Press to turn on the unit, or to turn the unit into the standby mode. (To completely shut down the unit, you must unplug the
AC power cord.)
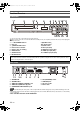
1 B ON\STANDBY button*
2
2 Disc tray
3 A OPEN\CLOSE button*
1
4 Infrared sensor window
5 Display (“Off” in standby)
6 HDMI indicator
7 H SKIP button
8 G SKIP button
9 C STOP button
10 B PLAY button*
1
11 I REC button
12 DV IN jack (AV4)
13 AUDIO input jacks (AV3)
14 VIDEO input jack (AV3)
15 S-VIDEO input jack (AV3)
1 ANTENNA IN
2 ANTENNA OUT
3 AUDIO OUT (DIGITAL COAXIAL) jack
4 AUDIO OUT (ANALOG L\R) jacks
5 COMPONENT VIDEO OUTPUT jacks
6 AV2 (DECODER) socket
7 HDMI OUT jack
8 AV1 (TV) socket
9 Mains cable
Note
• Do not touch the inner pins of the jacks on the rear panel. Electrostatic discharge may cause permanent damage to the unit.
• After turning off the unit, leave the mains cable plugged for about one minute. Otherwise it may cause data loss or the unit may
not work properly.
• This unit does not have an RF modulator.
Front Panel
2 74 8
14
13 12
910
*
1
11
15
5 6
1*
2
3
*
1
Button names described in the Owner’s Manual
The instructions in this manual are described mainly with the operations using the remote control. Some operations can be
carried out using the buttons on the front panel.
Rear Panel
1 3 4568 92 7
E7TE0BD_EN.book Page 10 Friday, March 5, 2010 5:08 PM