
User Manual


7
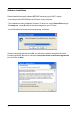
Double-click on the Savvy TV icon, which appears on your desktop.
The Savvy TV display panel and control panel will appear in the
background and the following Setup screen will appear on top.
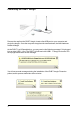
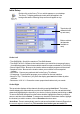
Initial Setup
On the Left
- Time Shift Buffer : Specify the maximum Time Shift allowed.
- Time Shift File Drive : Browse to the location where you would like to temporarily store
time shifted programs (Also shows available maximum space available for Time Shift).
- Record Video Folder : Browse to the location where recorded programs will be stored.
- Snapshot Folder : Browse to the location where you would like to store snapshot
images
- Select Skin : Choose your preferred skin for the Savvy TV software.
- UI Language : Choose which language you would like for the user interface.
- Always on Top : Tick this box if you prefer the display panel not to be hidden by other
windows.
- Panorama / 16:9 / 4:3 : Choose the screen proportions that best suit your needs.
On the Right
The top window displays all the channels found by pressing Auto Scan*. The bottom
window displays the channels that you wish to be available to you. You can add individual
channels by highlighting the channel of your choice (in the top window) and clicking on Add.
To remove individual channels from the bottom window, highlight the channel you wish to
remove, and then click on Delete. To rename any channels in the bottom window, highlight
the channel you wish to rename, click on Rename and enter a name.
*Auto Scan : Press to automatically scan for and save all available channels (Ensure that
the correct region is chosen first). This must be done before you can watch TV.
Top window (all
channels found
by auto scan)
Bottom window
(all channels
available to
user)