
User manual
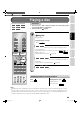

Introduction Connections
Playback
(Basic)
Playback
(Advanced)
Others
21
2
Chapter
2
Connections
Internet
connection
Switching output signals (Switching to HDMI output and setting the resolution)
HDMI stands for High Defi nition Multimedia Interface. HDMI transfers digital audio and uncompressed digital
video on a single cable. As a result, audio cables and video cables don’t need to be connected separately to a
device. The HDMI OUTPUT jack is designed to HDMI Version 1.1.
To view 480 , 720 , 1080 pictures, use the HDMI OUTPUT jack or the COMPONENT OUTPUT jacks to connect
to a TV (
page 22, “Connecting to a TV with component video inputs”). Some discs may require use of the
HDMI OUTPUT for viewing of high resolution material. See note regarding copy protection.
Notes
Refer to the owner’s manual for the TV to be connected to this player for more information concerning HDMI connections.
When the HDMI connection is not verifi ed, the error message appears on the front panel display. In this case, disconnect the
HDMI cable then connect it again, or turn off the connected HDMI device then turn it on.
HDMI output is digital only, DVI analog is not supported.
HDMI is an evolving technology, so it is possible that some devices may not operate properly with this player.
Be sure to use an HDMI cable with the HDMI logo ( ) to connect an HDMI device.
If your display does not support multi-channel audio, to use multi-channel audio you will need to either use an AV receiver that
supports multi-channel audio over HDMI (set “Digital out HDMI” to “Auto” or to match the decoding capability of your equipment)
or use a receiver that has a coaxial or optical SPDIF digital audio input (set “Digital audio SPDIF” to match the decoding capability
of your equipment).
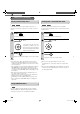
Turn on the player ( page 28) before you confi gure the following setting.
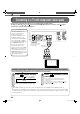
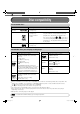
Press (remote control).
Player display window
When the HDMI indicator illuminates. signals are
being input from the HDMI OUTPUT jack.
When HDMI output is selected, video cannot be
displayed from the COMPONENT OUTPUT jacks,
S-VIDEO jack, and VIDEO jack (yellow).
11
Press repeatedly (remote
control).
Set the resolution to output from the player in
accordance with the scanning method of the
connected TV.
Pressing the button switches between 480
, 720 ,
and 1080
. The setting is indicated on the player
display window.
22
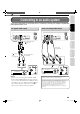
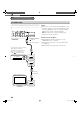
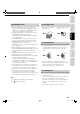
HDMI compatible device
HDMI cable (supplied)
Depending on the equipment
connected to this player, such
as a TV or a projector, no
sound may be output by the
display. In this case, set
“Digital out HDMI” ( page
53) to “PCM”. If sound still is
not heard, use analog output.
• Set “Digital out HDMI” ( page 53).
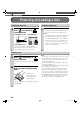
Note on copy protection and high definition viewing
HD DVD and DVD video disc
creators have the option to
include copy protection
instructions in their discs that
prohibit the output of some
standard video or high definition
video (original 720p or 1080i or
up-converted 480i or 480p) from
the COMPONENT OUTPUT
jacks. If such instructions are
present in the disc you are
playing, you must use the HDMI
OUTPUT jack to view the disc in
a high definition format and the
COMPONENT OUTPUT jacks, if
activated, will output video only in
480i or 480p resolution.
HDMI input
HDMI
Make sure the HDMI
indicator
ILLUMINATES
.
Connecting to a device with an HDMI input
HDMI, the HDMI logo and High-Defi nition Multimedia Interface are trademarks or registered trademarks of HDMI Licensing LLC.
HD-A1_02_E 21HD-A1_02_E 21 2/12/06 9:30:56 PM2/12/06 9:30:56 PM