Document Manager Bedieningshandleiding voor Basisfuncties
EPA ENERGY STAR ® (MFD) Het Amerikaanse Environmental Protection Agency (Bureau voor Milieubescherming) (EPA) heeft het ENERGY STAR-programma geïntroduceerd. Dit programma wil op vrijwillige basis de algemeen aanvaarde en vrijwillige toepassing van energiezuinige technologieën aanmoedigen met als doelstelling de verbetering van de werkplek en de productprestaties en het voorkomen van vervuiling.
INHOUDSOPGAVE OPMERKINGEN VOOR DE GEBRUIKER ..............................................................................................5 DE ONGEËVENAARDE TOSHIBA-KWALITEIT .....................................................................................6 VOORWOORD ........................................................................................................................................8 Kenmerken van de e-STUDIO3511/4511 ...................................................................
• Sorteren en stapelen .....................................................................................................................78 • Roteren en sorteren.......................................................................................................................79 • Gesorteerd nieten ..........................................................................................................................80 • Brochure en rughechten (boekjesmaker) .........................................
9. OPDRACHTSTATUS .........................................................................................................................183 1. OPDRACHTSTATUS .....................................................................................................................184 2. LIJST MET AFDRUKOPDRACHTEN ............................................................................................185 3. PROEFAFDRUK .........................................................................................
4
OPMERKINGEN VOOR DE GEBRUIKER Waarschuwing: Dit is een Klasse A-product. Binnenshuis kan deze copier radiostoring veroorzaken. In dat geval moet de gebruiker wellicht gepaste maatregelen nemen. 1 Raak de contactpennen niet aan wanneer u de snoeren van de randapparatuur loskoppelt. 2 Voordat u kleppen of deuren opent, of onderdelen uit de copier verwijdert, moet u uw lichaam elektrisch ontladen. U doet dit door een metalen onderdeel van de copier aan te raken.
DE ONGEËVENAARDE TOSHIBA-KWALITEIT Tonercartridges voor de e-STUDIO3511/4511. Gebruik de originele TOSHIBA-verbruiksmaterialen en -onderdelen voor optimale resultaten.
Verbruiksmaterialen/onderdelen - Betrouwbaarheid Originele Toshiba-verbruiksmaterialen worden onderworpen aan zeer strenge controles, zodat alle verbruiksmaterialen die u ontvangt zo optimaal mogelijk presteren. - Hoge productiviteit Originele Toshiba-verbruiksartikelen zijn gemaakt om te voldoen aan de eisen van onze prestatiegerichte maatschappij en leveren snel en probleemloos betrouwbare kopieën op het moment dat u ze nodig hebt.
VOORWOORD Hartelijk dank voor het kopen van de Toshiba-kleurencopier e-STUDIO3511/4511. Dit bedieningsvoorschrift behandelt de volgende onderwerpen: - het gebruik van de e-STUDIO3511/4511. - het controleren en onderhouden van de e-STUDIO3511/4511. - het oplossen van mechanische problemen en kopieerproblemen. Lees dit bedieningsvoorschrift goed door voordat u de copier in gebruik neemt. Bewaar dit bedieningsvoorschrift onder handbereik zodat u het te allen tijde kunt raadplegen.
KENMERKEN VAN DE e-STUDIO3511/4511 De e-STUDIO3511/4511 is een milieuvriendelijke en compacte kleurencopier voor een redelijke prijs. De eSTUDIO3511/4511 kan zowel zwart-wit kopieën als kleurenkopieën maken. Beide functies kunnen via het netwerk worden gebruikt. Om aan uw kantoorbehoeften tegemoet te komen kan de e-STUDIO3511/4511 tevens worden voorzien van verschillende optionele afwerkingseenheden. De e-STUDIO3511/4511 biedt de volgende handige kenmerken, functies en opties.
ALGEMENE VEILIGHEIDSMAATREGELEN Installeren of verplaatsen Waarschuwing - Deze e-STUDIO3511/4511 verbruikt 220-240 Volt wisselstroom (50/60 Hz). Voor de 100 Volt-versie in Saudi-Arabië is het verbruik 100-127 Volt wisselstroom (50/60 Hz). Gebruik GEEN voeding met een voltage anders dan gespecificeerd. Sluit geen andere apparaten aan op de dezelfde wandcontactdoos. Dit kan brand of een elektrische schok veroorzaken. Neem contact op met een elektricien als u het aantal contactdozen wilt uitbreiden.
Voorzichtig - De copier NIET meer dan 10 graden kantelen bij het verplaatsen. Als het apparaat valt kan dit persoonlijk letsel veroorzaken. - Installeer de copier op een plaats die het gewicht van het apparaat kan dragen en controleer of de ondergrond vlak is. Als de copier omvalt, kunt u ernstig persoonlijk letsel oplopen. Het gewicht van de copier bedraagt: ongeveer 112 kg - De copier is voorzien van vier stelschroeven of klemmen (twee aan elke zijde).
ALGEMENE VEILIGHEIDSMAATREGELEN (vervolg) Overige aandachtspunten - Controleer of er voldoende ruimte rondom de copier is vrijgelaten voor het eventueel vervangen van onderdelen en het uitvoeren van onderhoudswerkzaamheden. Bij onvoldoende ruimte kunnen sommige bewerkingen, bijvoorbeeld de handmatige invoer, slechts met moeite worden uitgevoerd en de copier kan zelfs defect raken.
Het gebruik van de e-STUDIO3511/4511 Waarschuwing - Plaats GEEN metalen voorwerpen of voorwerpen die vloeistoffen bevatten (bloemenvazen, koffiekopjes, enzovoort) op of in de buurt van de copier. Houd paperclips en nietjes uit de buurt van de luchtopeningen. Dit kan brand of een elektrische schok veroorzaken. - Voer de volgende stappen uit als de copier oververhit raakt, als er rook uit de copier komt, of als u een vreemde geur ruikt of een vreemd geluid hoort.
ALGEMENE VEILIGHEIDSMAATREGELEN (vervolg) - Let er bij het instellen van de hoek van het bedieningspaneel op dat uw handen niet bekneld raken in de ruimte tussen de copier en het bedieningspaneel. Dit kan verwondingen veroorzaken. 1 2 3 4 5 1: Waarschuwing voor gebieden met een hoge temperatuur (ventilatiegaten). 2: Waarschuwing voor gebieden met een hoge temperatuur (fusereenheid) - De labels zijn bevestigd op drie plaatsen. 3: Waarschuwing voor het werken met de transportband.
Tijdens onderhoud of controle Waarschuwing - Probeer NOOIT de copier zelf te repareren, uit elkaar te halen, of aan te passen. U kunt brand veroorzaken of een elektrische schok krijgen. Neem ALTIJD contact op met uw serviceleverancier voor onderhoud of reparatie van het binnenwerk van de copier. - De stekker en de wandcontactdoos ALTIJD schoon houden. Voorkom dat stof- en vuildeeltjes zich ophopen. Dit kan brand of een elektrische schok veroorzaken als gevolg van de vrijgekomen warmte bij stroomlekkage.
ALGEMENE VEILIGHEIDSMAATREGELEN (vervolg) Omgaan met verbruiksartikelen Voorzichtig - Probeer NOOIT tonercartridges te verbranden. Dit kan een explosie veroorzaken. Gebruikte tonercartridges NIET weggooien. Geef ze terug aan de serviceleverancier, zie "3.SYMBOOL VERVANG TONERCARTRIDGE" pagina 246.
AFWIJZING VAN AANSPRAKELIJKHEID De onderstaande kennisgeving bevat de aansprakelijkheidsuitsluitingen en -beperkingen van TOSHIBA TEC CORPORATION (inclusief haar werknemers, tussenpersonen en toeleveranciers) jegens enige koper of gebruiker (‘Gebruiker’) van de e-STUDIO3511/4511, met inbegrip van bijbehorende accessoires, opties en programmapakket (‘Product’). 1 De in deze kennisgeving vermelde aansprakelijkheidsuitsluitingen en -beperkingen zijn van kracht in de hoogste mate die de wet toelaat.
VOORKOMING VAN VERVALSINGEN/OPSLAG KLEURENKOPIEËN VOORKOMING VAN VERVALSINGEN Deze copier heeft een functie ter voorkoming van vervalsingen. Let erop dat uw digitale copier voor het maken van kleurenafdrukken niet wordt gebruikt voor het maken van verboden kopieën van documenten. OPSLAG VAN KLEURENKOPIEËN 1 De kopieën moeten worden opgeslagen op een plaats die niet is blootgesteld aan licht om te voorkomen dat de afdrukken vervagen wanneer ze gedurende langere tijd worden opgeslagen.
1. VOORDAT U GAAT KOPIËREN 1 1. BESCHRIJVING VAN ELK ONDERDEEL ...........................................................................20 Belangrijkste onderdelen .....................................................................................................20 Optionele uitrusting ..............................................................................................................21 Bedieningspaneel..........................................................................................
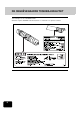
1. BESCHRIJVING VAN ELK ONDERDEEL Belangrijkste onderdelen 1 1: Voordeur 9: Tonerkleur (cyaan/magenta/geel) 2: Papierladen 10: Bedieningspaneel 3: Opbergvak voor bedieningsvoorschrift (achterzijde)11: Aanraakscherm 4: Aan/uit-schakelaar 12: Contrastregeling aanraakscherm 5: Automatische duplexer 13: Zwarte toner 6: Handinvoergeleiding 14: Toneropvangbak 7: Aanleglijst originelen *1, *2: Optioneel 8: Binnenste lade *2 3 4 1 5 2 6 *1 7 10 8 13 9 20 1.
Optionele uitrusting 1 1 7 2 10 3 8 4 5 6 9 1 : Afdekklep originelen (KA-3511) Houdt het origineel vast. 2 : Automatisch documentinvoersysteem met omkeerinrichting (MR-3015) Voert een stapel originelen automatisch één voor één in. 3 : Kopieteller (MU-8, MU-10) Registreert of telt het aantal gemaakte kopieën voor elke persoon of groep afzonderlijk. 4 : Tandem papierinvoermagazijn (KD-1012) Voert ononderbroken maximaal 2500 vel A4-papier in (80 g/m2) (aanbevolen door Toshiba).
1.BESCHRIJVING VAN ELK ONDERDEEL (vervolg) 1 10: Perforatoreenheid (MJ-6004) Maakt perforatiegaten in de kopieën. Overige opties: werktafel (KK-3511), faxkaart (GD-1150), faxkaart 2e lijn (GD-1160), uitbreidingsgeheugen (GC-1180), draadloze LAN-adapter (GN-1010), codeersysteem (GP-1030) Neem voor meer informatie contact op met uw leverancier. 22 1.
Bedieningspaneel Met de toetsen op het bedieningspaneel kunt u de copier bedienen en de verschillende instellingen specificeren. 1 1 : [HELP] toets Gebruik deze toets om de juiste werkwijze weer te geven. 2 : [USER FUNCTION] toets Druk deze toets in voor het instellen van het papierformaat van de lade, de lade voor speciale toepassingen, of het instellen/registreren van de instellingen, zoals het veranderen van de standaardinstellingen van de kopieer-, scan- en faxfuncties.
1.BESCHRIJVING VAN ELK ONDERDEEL (vervolg) 1 9 : PRINT DATA/MEMORY RX/FAX-COMMUNICATIE Als deze lampjes branden, geven ze de status weer van de ontvangen gegevens en/of origine(e)l(en) die gereed zijn om te worden afgedrukt. Ook wordt de huidige in gebruik zijnde telefoonlijn (1 of 2) weergegeven. 10: [INTERRUPT] toets Gebruik deze toets om de huidige kopieeropdracht te onderbreken en een andere kopieeropdracht uit te voeren.
De hoek van het bedieningspaneel aanpassen De hoek instellen 1 U kunt het bedieningspaneel (tijdens de installatie) onder elke hoek van 5 tot 45 graden instellen, gerekend vanuit de horizontale positie. * Let er bij het instellen van de hoek van het bedieningspaneel op dat uw handen niet bekneld raken in de ruimte tussen de copier en het bedieningspaneel. U kunt hierdoor verwondingen oplopen.
1.BESCHRIJVING VAN ELK ONDERDEEL (vervolg) 1 de stop iets naar rechts en trek 1 Schuif deze er vervolgens uit. de vergrendelingen van de stop in 2 Plaats de opening van de positie (2). Zet de hoek vast door de stop zelf te draaien. de stop naar links totdat u een klik 3 Schuif hoort. - De hoek van het bedieningspaneel is vastgezet op 7 graden. 26 1.
Aanraakscherm Wanneer de copier is ingeschakeld en ‘BEDRIJFSKLAAR’ wordt weergegeven, wordt het onderstaande basisvenster op het aanraakscherm weergegeven. In het venster worden de huidige ingestelde functies, de geselecteerde functies en de status van de copier weergegeven door middel van meldingen en symbolen. 1 * De afgebeelde aanraakschermen in deze handleiding zijn van een copier die uitgerust is met alle opties.
1.BESCHRIJVING VAN ELK ONDERDEEL (vervolg) 1 - [SETTING] (bevestiging ingestelde functies) toets Met deze toets kunt u de ingestelde functies bevestigen. (Zie het volgende voorbeeld). - De volgende iconen worden in het venster weergegeven (sommige iconen verschijnen niet in het venster): 28 1.
Wissen van geselecteerde functies 1 Als u op een willekeurige toets met een lichtgrijze achtergrond drukt, wordt de geselecteerde functie gewist. Wanneer de copier gedurende een bepaalde tijd niet wordt gebruikt, treedt de automatische wis-functie ook in werking en worden de instellingen gewist.
2. DE AAN/UIT-SCHAKELAAR BEDIENEN De stroom in-/uitschakelen 1 De copier inschakelen het schakelaardeksel en schakel de 1 Open copier in. - De melding “Wacht: machine warmt op” verschijnt in het basisvenster van het aanraakscherm. ongeveer 40 seconden is de copier 2 Na bedrijfsklaar. - De melding “BEDRIJFSKLAAR” verschijnt in het basisvenster. - Tijdens het opwarmen van de copier kunt u de automatische start-functie gebruiken, zie "4.AUTO START (STANDAARD OPDRACHT)" pagina 55.
op de [GEBRUIKER] toets om het 2 Druk menu voor gebruikersinstellingen te 1 openen. Druk vervolgens op de [UITSCHAKELEN] toets. melding “De lopende opdracht wordt 3 De verwijderd. Weet u zeker dat u wilt uitschakelen?” verschijnt in het scherm. Druk op de [JA] toets. - Druk op de [NEE] toets om het uitschakelen te annuleren. melding “Bezig met uitschakelen” 4 De verschijnt in het scherm. De copier wordt vervolgens uitgeschakeld. - De stroomschakelaar keert automatisch terug in de positie UIT.
2.DE AAN/UIT-SCHAKELAAR BEDIENEN (vervolg) Het gebruik van de copier regelen met afdelingscodes 1 Met behulp van de afdelingscodes kunt u het aantal gebruikers beperken alsmede het aantal kopieën dat door individuele groepen of afdelingen van uw bedrijf worden gemaakt. Raadpleeg de [Gebruikershandleiding]. * De afdelingscodes en de kopietellers ("Het gebruik van de copier regelen met de optionele kopieteller" pagina 33) kunnen niet tegelijkertijd worden gebruikt.
Het gebruik van de copier regelen met de optionele kopieteller Als de copier is voorzien van de optionele kopieteller kunt u alleen kopiëren als u de kopieteller plaatst. Wanneer u na het plaatsen van de teller kopieën maakt, wordt het aantal gemaakte kopieën in de kopieteller geregistreerd (of opgeteld). U kunt een onbeperkt aantal kopietellers gebruiken. 1 * Raadpleeg uw service leverancier over het gebruik van de kopieteller.
3. OVERSCHAKELEN NAAR DE SPAARSTAND 1 Als u de copier gedurende een bepaalde tijd niet gebruikt, drukt u enkele seconden op de [SPAARSTAND] toets op het bedieningspaneel om over te schakelen naar de spaarstand. In deze stand zijn het display en de lampjes op het bedieningspaneel uitgeschakeld. De [SPAARSTAND] toets licht groen op. Om de copier opnieuw te starten, drukt u op de [SPAARSTAND] toets (of op de [KOPIE], [SCAN], [FAX], [e-FILING], [START] toets op het bedieningspaneel).
2. KOPIËREN 2 1. KOPIEERPAPIER PLAATSEN.............................................................................................36 Geschikte soorten en formaten kopieerpapier .....................................................................36 Door Toshiba aanbevolen papier/papier gebruiken en opslaan ...........................................37 Papierformaat lade veranderen/lade instellen voor speciale toepassingen .........................38 2. ORIGINELEN PLAATSEN ................................
1. KOPIEERPAPIER PLAATSEN Geschikte soorten en formaten kopieerpapier Toevoermagazijn 2 Papierladen (inclusief de optionele laden) Papiersoort Papierformaat Normaal papier (Standaardformaat) A/B-formaat: A3, A4, A4-R, A5-R, B4, B5, B5-R, FOLIO (210 x 330 mm) LT-formaat: 2 (64-80 g/m ) Dikte 1 (81-105 g/m2) Maximum invoercapaciteit 600 vel (64 g/m2) 550 vel (80 g/m2) 450 vel (81-105 g/m2) * Hoogte: ong.
Door Toshiba aanbevolen papier/papier gebruiken en opslaan Het aanbevolen papier Om zeer scherpe kopieën te maken raadt Toshiba de volgende papiersoorten aan. Raadpleeg uw serviceleverancier als u andere soorten kopieerpapier gebruikt.
1.KOPIEERPAPIER PLAATSEN (vervolg) Papierformaat lade veranderen/lade instellen voor speciale toepassingen Het papierformaat van de papierladen kan worden gewijzigd. De papierladen kunnen ook worden ingesteld voor kaften, invoegvellen, dik papier 1, faxpapier en afwijkend papier. 2 Het papierformaat van de papierlade veranderen de papierlade voorzichtig naar u toe 1 Trek totdat deze niet verder kan. het onderste gedeelte van de 2 Duw breedtegeleiding in de richting van de pijl en verwijder de geleiding.
de hendel voor de selectie van het 4 Duw papierformaat in de door de pijl aangegeven richting en stel tegelijkertijd de papiergeleider in op het gewenste papierformaat (aangegeven op de bodem van de lade). 2 - Stel de papiergeleiders met beide handen in. op het door de pijl aangegeven deel 5 Duw (linkerkant) om de hendel voor de selectie van het papierformaat te vergrendelen. 6 Leg het papier in de papierlade(n). - Let het papier in de lade met de te bedrukken zijde naar boven.
1.KOPIEERPAPIER PLAATSEN (vervolg) de formaataanduiding zodat 8 Verander deze overeenkomt met het geplaatste papierformaat. 2 op de [USER FUNCTION] toets op 9 Druk het bedieningspaneel. op de [GEBRUIKER] toets en 10 Druk vervolgens op de [ALGEMEEN] toets in het aanraakscherm. 11 Druk op de [PAPIERLADE] toets. 40 2.
Druk op het ladepictogram dat 12 overeenkomt met dat van het gewijzigde papierformaat. Druk vervolgens op de toets van het nieuwe papierformaat. 2 Papierlade instellen voor speciale toepassingen U kunt de papierlade instellen voor verschillende toepassingen (kaften, invoegvellen, dik papier, faxpapier, afwijkend papier). - Geschikt kopieerpapier "1.KOPIEERPAPIER PLAATSEN" pagina 36. - Papierlade voor kaften "9.KOPIËREN MET KAFTEN" pagina 122. - Papierlade voor invoegvellen "10.
1.KOPIEERPAPIER PLAATSEN (vervolg) op de [GEBRUIKER] toets om het 3 Druk gebruikersmenu te openen. Druk vervolgens op de [ALGEMEEN] toets. 2 4 Druk op de [PAPIERLADE] toets. op de papierladetoets die 5 Druk overeenkomt met die van het gewijzigde papierformaat. Druk vervolgens op de toets voor de nieuwe papiersoort. - Als u de [KAFT] of [INVOEG] toets wilt selecteren, controleer dan eerst of de andere papierlade papier van het juiste formaat bevat.
- Druk op [DIK 1] afhankelijk van de papierdikte van de kaften, invoegvellen en ander afwijkend papier. Bij kaften en invoegvellen wordt weergegeven in de papierladetoets overeenkomstig het ingestelde papierformaat. 2 * Wanneer er bijvoorbeeld papier van 90 g/m2 in de papierlade zit, drukt u op de [INVOEG] toets en op de [DIK 1] toets. - De instelling is nu compleet zoals rechts is afgebeeld. - Er kunnen twee papierladen worden ingesteld voor invoegvellen.
1.KOPIEERPAPIER PLAATSEN (vervolg) De papierlade instellen voor speciale toepassingen 2 op de papierladetoets die 1 Druk overeenkomt met de toets die is geactiveerd voor de speciale toepassing. Druk vervolgens op de juiste toets (dik, invoeg, kaft, enz.) onderaan in het scherm. - Wanneer zowel INVOEG 1 als INVOEG 2 zijn ingesteld en u wist INVOEG 1, dan wijzigt de papierlade voor INVOEG 2 in INVOEG 1. - Beide toetsen schakelen de bijbehorende lade in/uit.
2.
2.ORIGINELEN PLAATSEN (vervolg) Maximum aantal vellen 2 46 Er kan maximaal 1000 vel papier van A4-formaat worden opgeslagen per opdracht, of totdat het geheugen vol raakt. Wanneer deze limiet tijdens het scannen wordt overschreden, verschijnt het hierna afgebeelde scherm. De gescande gegevens worden afgedrukt door op de [JA] toets te drukken en verwijderd door op de [NEE] toets te drukken. 2.
Een origineel op de glasplaat leggen Losse originelen de klep van het automatisch 1 Til documentinvoersysteem met omkeerinrichting (optioneel) op en leg het origineel op de glasplaat met de bedrukte zijde naar beneden. 2 (A) - Til de klep 60 graden of meer op om detectie van het origineel mogelijk te maken. - A: origineel het origineel tegen de linker 2 Leg binnenhoek van de glasplaat. langzaam de klep van het 3 Sluit automatisch documentinvoersysteem met omkeerinrichting (optioneel).
2.ORIGINELEN PLAATSEN (vervolg) Boeken 2 de klep van het automatisch 1 Til documentinvoersysteem met omkeerinrichting (optioneel) op en leg het origineel in de richting die in de afbeelding staat aangegeven. - Wanneer u de functie Originelen van boeken >Dubbelzijdige kopieën ("5. Originelen van boeken -> dubbelzijdige kopieën" pagina 91) of de functie Twee pagina's ("4.TWEE PAGINA'S" pagina 111) gebruikt, moet u het boek centreren op de gele markeringslijn.
Het automatisch documentinvoersysteem met omkeerinrichting (optioneel) gebruiken Aanwijzingen voor het gebruik van het automatisch documentinvoersysteem met omkeerinrichting 2 De volgende originelen niet gebruiken omdat ze kunnen vastlopen of beschadigen: 1 : Originelen met verschillende breedtes (geen originelen met verschillende breedtes door elkaar gebruiken). 2 : Zwaar gekreukelde of gevouwen originelen.
2.ORIGINELEN PLAATSEN (vervolg) Als het scangebied en het geleidingsgebied niet schoon zijn, kan de afdruk zwarte vegen, enz. vertonen. U kunt het beste deze delen eenmaal per week schoonmaken. Zie "Wekelijks onderhoud" pagina 286. 2 De continu invoerfunctie * Zie "Continu invoerfunctie" pagina 133.
De enkelvoudige invoerfunctie Zie "Enkelvoudige invoerfunctie" 1 pagina 134. Pas de geleiders aan het formaat van de originelen aan. 2 het origineel recht en met de 2 Plaats bedrukte zijde naar boven tussen de geleiders. Het origineel wordt automatisch naar binnen getrokken. - Laat het origineel los wanneer het naar binnen wordt getrokken.
3. ALGEMENE WERKWIJZE Controleer of er papier in de papierlade zit en vul eventueel het papier bij. Als u op de [START] toets drukt zonder de instellingen te wijzigen, worden er kopieën gemaakt op basis van de standaardinstellingen. U kunt eventueel andere kopieerinstellingen opgeven.
2 Plaats het origineel/de originelen. - "Geschikte soorten en formaten originelen/ maximum aantal vellen" pagina 45. - "Een origineel op de glasplaat leggen" pagina 47. - "Het automatisch documentinvoersysteem met omkeerinrichting (optioneel) gebruiken" pagina 49. 2 Als het automatisch documentinvoersysteem met omkeerinrichting (optioneel) is geïnstalleerd en de enkelvoudige invoerfunctie is geselecteerd, geeft u de gewenste kopieerinstellingen op en plaatst u vervolgens het origineel/de originelen.
3.ALGEMENE WERKWIJZE (vervolg) het volgende origineel en druk op 5 Plaats de [START] toets. 2 - Plaats eerst de eerste pagina van uw originelen. - U kunt in plaats van de [START] toets ook de [JA] toets indrukken. - Herhaal deze stap voor de volgende originelen. op de [GEREED] toets nadat het 6 Druk laatste origineel is gescand. - Het kopiëren start. Het kopiëren start. De kopie komt tevoorschijn met de bedrukte zijde naar beneden.
4. AUTO START (STANDAARD OPDRACHT) Tijdens het opwarmen of meervoudig kopiëren kunt u de kopieeropdracht voorbereiden. Automatische start instellen 2 1 Plaats het origineel/de originelen. 2 Selecteer de kopieerinstellingen. Controleer of de opdracht met de vorige kopieerinstellingen start als u geen kopieerinstellingen selecteert. 3 Druk op de [START] toets. - Er kunnen maximaal zes opdrachten in het geheugen worden opgeslagen.
4.AUTO START (STANDAARD OPDRACHT) (vervolg) Bevestigen en annuleren Automatische start 2 - Automatische start bevestigen en de te kopiëren opdracht annuleren. Druk voor het bevestigen en annuleren van de gegevens op de [[OPDRACHTSTATUS] toets op het bedieningspaneel om de lijst met opdrachten weer te geven. Zie "9.OPDRACHTSTATUS" pagina 183 voor het annuleren van de opdracht. - Automatische start annuleren.
5. KOPIËREN MET ONDERBREKING Tijdens het uitvoeren van meervoudige kopieeropdrachten kunt u de opdracht onderbreken en kopieën van andere originelen maken. * - De volgende functies kunnen niet worden gebruikt tijdens het kopiëren met onderbreking: kopiëren met kaften kopiëren met invoegvellen scannen naar e-Filing/opslaan als bestand 2 1 Druk op de [INTERRUPT] toets. - De melding “Opdracht onderbroken opdracht 1 opgeslagen” verschijnt.
6. AFBREKEN VAN EEN KOPIEEROPDRACHT Gebruik de [STOP] toets om een opdracht tijdens het scannen of meervoudig kopiëren af te breken. 2 tijdens het scannen of meervoudig 1 Druk kopiëren op de [STOP] toets. op de [WIS GEHEUGEN] toets 2 Druk wanneer het rechts afgebeelde menu verschijnt. - Tijdens het scannen: de gegevens worden verwijderd. - Tijdens het meervoudig kopiëren: de gegevens worden verwijderd en de opdracht wordt afgebroken.
7. KOPIËREN MET HANDINVOER Kopiëren met handinvoer Gebruik de handinvoer als u kopieën wilt maken op dik papier, vellen voor de overheadprojector, calqueerpapier, etiketten of ander speciaal papier. (Alleen papier met dikte 1 kan in de lade worden geplaatst "Papierlade instellen voor speciale toepassingen" pagina 41). Wanneer het gewenste papierformaat (standaardformaat) zich niet in de laden bevindt, of als u afwijkende papierformaten wilt gebruiken, kunt u kopieën maken met behulp van de handinvoer.
7.KOPIËREN MET HANDINVOER (vervolg) - Trek eventueel de driedelige papierhouder naar buiten (afhankelijk van het papierformaat). - Trek (B) omhoog voordat u A3/LD-formaat of groter plaatst. 2 (B) 2 Plaats het origineel/de originelen. op de toets die overeenkomt met het 3 Druk papierformaat dat is ingesteld voor A3, A4, B4 en B5. Als het papierformaat niet is gespecificeerd, kan de kopieersnelheid lager zijn als gevolg van de instelprocedure van de copier.
6 Druk op de [ANDERS] toets. 2 op de [MEDIA TYPE] toets wanneer 7 Druk er geen normaal papier is geplaatst. Selecteer het mediatype dat overeenkomt 8 met het geplaatste papier en druk vervolgens op de [ENTER] toets. Als u een mediatype selecteert dat niet overeenkomt met de geplaatste papiersoort, kan er een probleem ontstaan, zoals een papierstoring, kwaliteitsvermindering van de afdruk, enz. z Selecteer eventueel andere kopieerinstellingen. 9 Druk op de [START] toets.
7.KOPIËREN MET HANDINVOER (vervolg) Kopiëren met handinvoer op afwijkend papierformaat 2 Afwijkende papierformaten vallen binnen de volgende afmetingen: A (lengte): 100-297 mm, B (breedte): 148-432 mm B A de stappen 1 t/m 2 uit in "Kopiëren 1 Voer met handinvoer" pagina 59. 2 Druk op de [NIET STANDAARD] toets. de afmetingen (lengte en breedte) in, 3 Voer of roep de gegevens op die in het GEHEUGEN zijn opgeslagen. Druk daarna op de [ENTER] toets.
- Druk op de [GEHEUGEN 1] (of [GEHEUGEN 2], [GEHEUGEN 3], [GEHEUGEN 4]) toets. Het papierformaat dat onder GEHEUGEN 1 is opgeslagen, wordt weergegeven. z Selecteer eventueel andere kopieerinstellingen. 4 Druk op de [START] toets. 2 Een afwijkend papierformaat opslaan in het GEHEUGEN Een veelgebruikt afwijkend papierformaat kunt u beter in het geheugen opslaan. de stappen 1 t/m 2 uit in "Kopiëren 1 Voer met handinvoer" pagina 59. 2 Druk op de [NIET STANDAARD] toets.
7.KOPIËREN MET HANDINVOER (vervolg) op de gewenste 3 Druk geheugenplaatstoets (bijv. geheugen 1). 2 - Als het papierformaat '0 mm' is, is de geselecteerde geheugenplaatstoets vrij. - Als er wel een papierformaat wordt weergegeven, is onder de geselecteerde geheugenplaatstoets reeds een afwijkend papierformaat opgeslagen. Voer stap 4 uit om deze instellingen te wissen. U kunt nu nieuwe instellingen onder deze geheugenplaatstoets opslaan.
3. ALGEMENE KOPIEERFUNCTIES INSTELLEN 3 1. PAPIERSELECTIE...............................................................................................................66 Automatische papierselectie (APS)......................................................................................66 Handmatige papierselectie...................................................................................................68 De [ANDER FORM] toets instellen ............................................................
1. PAPIERSELECTIE Automatische papierselectie (APS) Als u standaard originelen op de glasplaat of in het automatisch documentinvoersysteem met omkeerinrichting (optioneel) legt, wordt het formaat van de originelen automatisch gedetecteerd. Hierdoor kan de copier papier selecteren dat hetzelfde formaat heeft als het origineel. * Als de kwaliteit van het origineel slecht is, is het mogelijk dat de automatische papierselectie niet correct werkt.
Als het papierformaat van de geselecteerde papierlade overeenkomt met het formaat van het origineel, draait de copier de oorspronkelijke gegevens 90o en maakt een kopie op hetzelfde formaat als het origineel -ook als de richtingen verschillend zijn (een origineel op A4-formaat wordt bijvoorbeeld ingevoerd wanneer het juiste formaat papier in de R-richting aanwezig is). z Selecteer eventueel andere kopieerinstellingen. 3 4 Druk op de [START] toets.
1.PAPIERSELECTIE (vervolg) Handmatige papierselectie De automatische papierselectie kan niet worden gebruikt voor zeer lichtdoorlatende originelen, zoals vellen voor de overheadprojector en calqueerpapier, zeer donkere originelen, originelen met donkere randen, of originelen met een afwijkend formaat, bijvoorbeeld kranten en brochures. Voor dit soort originelen gebruikt u de handmatige papierselectie.
De [ANDER FORM] toets instellen Als het origineel of het papierformaat is gespecificeerd en u een papierformaat wilt gebruiken dat niet in het menu voorkomt (met uitzondering van afwijkende formaten), drukt u op de [ANDER FORM] toets om het formaat te selecteren. Met behulp van deze functie herkent de [ANDERS] toets het gebruikte formaat. - De standaardinstelling voor deze toets is COMP. op de [ZOOM...] toets om het 1 Druk instellingenmenu van het origineel of het 3 papierformaat te openen.
1.PAPIERSELECTIE (vervolg) Gemengde originelen Originelen van verschillend formaat kunnen met behulp van het automatisch documentinvoersysteem met omkeerinrichting (optioneel) worden gekopieerd, mits de breedte van de originelen gelijk is. * Geen originelen met verschillende breedten plaatsen. 3 1 Plaats papier in de papierlade(n). - "1.KOPIEERPAPIER PLAATSEN" pagina 36. - Kopiëren met handinvoer is niet mogelijk. 2 Plaats het origineel/de originelen. - "2.ORIGINELEN PLAATSEN" pagina 45.
2. ZWART-WIT EN/OF KLEUR Met deze functie kunt u Kleur, Zwart en Autokleur selecteren. op de [KLEUR], [ZWART] of 1 Druk [AUTOKLEUR] toets. - [KLEUR]: alle originelen worden in kleur gekopieerd, ongeacht de oorspronkelijke kleur. - [ZWART]: alle originelen worden in zwart-wit gekopieerd, ongeacht de oorspronkelijke kleur (standaardinstelling). - [AUTOKLEUR]: het type origineel wordt automatisch bepaald.
3. VERKLEINEN EN VERGROTEN Op de glasplaat geplaatste originelen kunnen worden gekopieerd met een verkleinings- en vergrotingsfactor van 25 tot 400%. Voor originelen in het automatisch documentinvoersysteem met omkeerinrichting (optioneel) is de verkleinings- en vergrotingsfactor 25 tot 200%.
3 Druk op de [AMS] toets. - "De [ANDER FORM] toets instellen" pagina 69. 4 Plaats het origineel/de originelen. - "2.ORIGINELEN PLAATSEN" pagina 45. - De ingebouwde sensoren detecteren automatisch het formaat van de originelen en berekenen de reproductiefactor aan de hand van het gespecificeerde papier. - Als de melding "Verander origineel van richting" verschijnt, voert u de aangegeven instructies uit: 3 z Selecteer eventueel andere kopieerinstellingen. 5 Druk op de [START] toets.
3.VERKLEINEN EN VERGROTEN (vervolg) op de [FORMAAT ORIGINEEL] toets 4 Druk die overeenkomt met het formaat van het origineel. 3 - Aan de hand van het formaat van het origineel en het kopieerpapier wordt de juiste reproductiefactor berekend en in het scherm weergegeven. - "De [ANDER FORM] toets instellen" pagina 69. z Selecteer eventueel andere kopieerinstellingen. 5 Druk op de [START] toets.
op de [HOGER] (of [LAGER]) toets 4 Druk om de gewenste reproductiefactor in te stellen. - Telkens wanneer u op een van deze toetsen drukt, verandert de reproductiefactor met 1%. Door de toets ingedrukt te houden, blijft de reproductiefactor veranderen. - U kunt de reproductiefactor ook selecteren door rechtstreeks op de [400%], [200%], [100%], [50%] of [25%] toets te drukken. (Als u het automatisch documentinvoersysteem met omkeerinrichting (optioneel) gebruikt, kunt u de [400%] toets niet selecteren.
4. AFWERKINGSFUNCTIES Afwerkingsfuncties en finishers (optioneel) De beschikbare functies verschillen en zijn afhankelijk van het feit of er een finisher is geïnstalleerd en welk type finisher dit is (MJ-1022, MJ-1023 of MJ-1024). * Het aanraakscherm dat in dit hoofdstuk staat beschreven is van toepassing op een copier die is voorzien van de optionele finisher met rughechter (MJ-1024) en perforatoreenheid (MJ-6004).
Belangrijkste onderdelen finishers (optioneel) 1: Sorteervakken 2: Bovenste deksel 3: Perforatoreenheid (MJ-6004) 4: Voordeur 5: Opvangbin rughechter 3 2 MJ-1024 MJ-1023 1 3 1 2 3 4 4 5 MJ-1022 1 Wanneer de sorteervakken van de finisher de maximum opslagcapaciteit hebben bereikt (zie "2.SPECIFICATIE VAN DE OPTIES" pagina 297), verschijnt de melding "Verwijder papier van finisher". Verwijder de kopieën uit de sorteervakken en de copier gaat automatisch verder met kopiëren.
4.AFWERKINGSFUNCTIES (vervolg) Sorteren en stapelen Indien gewenst kunt u voor het maken van meervoudige kopieën de sorteer- of stapelfunctie selecteren. - Voorbeeld van het maken van vijf sets kopieën van een origineel met vijf pagina’s 1: kopiëren en sorteren 2: kopiëren en stapelen 2 1 1 2 3 4 5 3 1 2 3 4 5 1 2 3 4 5 1 2 3 4 5 1 2 3 4 5 1 2 3 4 5 1 2 3 4 5 1 1 1 1 1 1 Plaats papier in de papierlade(n). - "1.KOPIEERPAPIER PLAATSEN" pagina 36. 2 Plaats het origineel/de originelen. - "2.
Roteren en sorteren Bij deze kopieerfunctie worden sets met kopieën uitgevoerd naar de binnenste lade. De sets worden om de beurt in de lengte of de breedte boven op elkaar gelegd (optionele lade of papierstapelaar voor handmatige invoer vereist). A4/A4-R, B5/B5-R, LT/LT-R papier is geschikt voor deze functie. 3 * Deze functie kan niet worden gebruikt met de Automatische Papier Selectie. 1 Plaats papier in de papierlade(n). - "1.KOPIEERPAPIER PLAATSEN" pagina 36. 2 Plaats het origineel/de originelen.
4.AFWERKINGSFUNCTIES (vervolg) Gesorteerd nieten Als de finisher (optioneel) is geïnstalleerd, kunt u elke set automatisch nieten. Er kunnen drie nietposities worden geselecteerd wanneer de copier is voorzien van een rughechter (MJ-1024) of meervoudige finisher (MJ-1023). * Papier met een gewicht van 64-105 g/m2 is geschikt voor de rughechter (MJ-1024) of meervoudige nieteenheid (MJ-1023), en papier met een gewicht van 64-80 g/m2 is geschikt voor de enkelvoudige nieteenheid(MJ-1022).
op de [VOORAAN NIETEN-1] (of 4 Druk [DUBBEL NIETEN], of [ACHTERAAN NIETEN]) toets. - Wanneer de finisher voor enkelvoudig nieten (MJ-1022) is geïnstalleerd, is alleen de [VOORAAN NIETEN-1] toets beschikbaar. 3 z Selecteer eventueel andere kopieerinstellingen. 5 Druk op de [START] toets. Als de hoeveelheid papier het maximum aantal te nieten vellen overschrijdt, schakelt de finisher automatisch over naar de sorteerfunctie.
4.AFWERKINGSFUNCTIES (vervolg) Brochure en rughechten (boekjesmaker) Wanneer de functie Brochure is geselecteerd, kunnen enkelzijdige originelen worden gekopieerd en als brochure of boekje worden gebonden. Als de copier is uitgerust met een rughechter (optioneel, MJ-1024), kunt u de rughechterfunctie selecteren. Deze functie vouwt de kopieën automatisch in tweeën en niet ze precies in het midden vast. Geschikte papierformaten zijn A3, A4-R, B4, LD, LG en LT-R.
2 Het papierformaat instellen. - Voor ladetoevoer zie "Handmatige papierselectie" pagina 68, stap 3. - Voor handinvoer zie "Kopiëren met handinvoer op standaard papierformaat" pagina 59, stap 4. 3 Plaats het origineel/de originelen. - "2.ORIGINELEN PLAATSEN" pagina 45. - Als u de originelen in het automatisch documentinvoersysteem met omkeerinrichting (optioneel) plaatst, moet u de volgorde van de afbeeldingen op de vorige pagina’s aanhouden.
4.AFWERKINGSFUNCTIES (vervolg) Wanneer u rughechten gebruikt voor papier van het formaat A3, B4 en LD, d.w.z. wanneer de [BROCHURE & RUGHECHTEN] toets of de [RUGHECHTEN] toets is geselecteerd, moet u de stop van de opvangbin rughechter omhoogtrekken. z Selecteer eventueel andere kopieerinstellingen. 3 6 Druk op de [START] toets. - Bij het plaatsen van originelen op de glasplaat volgt u de stappen 5 tot 6 in "Werkwijze in onderstaande situaties" pagina 54.
Perforeren (optioneel) Als de finisher is voorzien van een optionele perforatoreenheid (optioneel: MJ-1024, MJ-1023), kunt u perforatiegaatjes in de kopieën maken. * Papier met een gewicht van 64-209 g/m2 is geschikt voor perforeren. Het gebruik van speciaal papier, zoals vellen voor de overheadprojector of etiketten, is niet mogelijk. 1 Plaats papier in de papierlade(n). - "1.KOPIEERPAPIER PLAATSEN" pagina 36. - Als u deze functie gebruikt bij het kopiëren met handinvoer ("7.
4.
5. DUBBELZIJDIG KOPIËREN Enkelzijdig, dubbelzijdig, boek Met deze functie kunt u het type originelen instellen (enkelzijdig, dubbelzijdig, of boek) alsmede de gewenste soort kopieën (enkelzijdig of dubbelzijdig). Normaal papier (64-80 g/m2) en papier met dikte 1 (81-105 g/m2) is geschikt voor dubbelzijdig kopiëren.
5.DUBBELZIJDIG KOPIËREN (vervolg) 1. Enkelzijdige originelen -> enkelzijdige kopieën (standaardinstelling) 1 Plaats papier in de papierlade(n). - "1.KOPIEERPAPIER PLAATSEN" pagina 36. 2 Plaats het origineel/de originelen. 3 - "2.ORIGINELEN PLAATSEN" pagina 45. dat [1 1 ENKELZIJDIG] is 3 Bevestig geselecteerd in het basismenu. - Als “1 1ENKELZIJDIG” niet is geselecteerd, drukt u op de (geselecteerde) toets in het rechts afgebeelde menu en vervolgens op de [1 scherm.
in het basismenu op de toets die 3 Druk hiernaast is geselecteerd. 3 4 Druk op de [1 2 DUBBELZIJDIG] toets. z Selecteer eventueel andere kopieerinstellingen. 5 Druk op de [START] toets. - Bij het plaatsen van originelen op de glasplaat volgt u steeds de stappen 5 en 6 in "3.ALGEMENE WERKWIJZE" pagina 52. 3. Dubbelzijdige originelen -> dubbelzijdige kopieën 1 Plaats papier in de papierlade(n). - "1.KOPIEERPAPIER PLAATSEN" pagina 36. - Als u deze functie gebruikt bij het kopiëren met handinvoer ("7.
5.DUBBELZIJDIG KOPIËREN (vervolg) 4 Druk op de [2 2 DUBBELZIJDIG] toets. z Selecteer eventueel andere kopieerinstellingen. 5 Druk op de [START] toets. - Bij het plaatsen van originelen op de glasplaat volgt u steeds de stappen 5 en 6 in "3.ALGEMENE WERKWIJZE" pagina 52. 3 4. Dubbelzijdige originelen -> enkelzijdige kopieën Gebruik Beeldrichting als de richting van de uitgevoerde pagina’s wisselt wanneer u liggend georiënteerde originelen gebruikt. Raadpleeg voor meer informatie "13.
5. Originelen van boeken -> dubbelzijdige kopieën * De papierformaten A4 of B5 zijn alleen geschikt voor deze functie. 1 Plaats papier in de papierlade(n). - "1.KOPIEERPAPIER PLAATSEN" pagina 36. - Als u deze functie gebruikt bij het kopiëren met handinvoer ("7.KOPIËREN MET HANDINVOER" pagina 59) moet u niet vergeten het papierformaat te specificeren. 3 in het basismenu op de toets die 2 Druk hiernaast is geselecteerd. 3 Druk op de [BOEK 2] toets. het soort boek dat u wilt 4 Selecteer kopiëren.
5.DUBBELZIJDIG KOPIËREN (vervolg) 5 Selecteer het kopieerformaat A4 of B5. u inbindruimte nodig heeft, selecteert 6 Als u de functie voor de inbindruimte in de beeldbewerkingsfunctie ("Inbindruimte van een boek bepalen" pagina 107). 3 z Selecteer eventueel andere kopieerinstellingen. de eerste pagina(s) op de glasplaat 7 Plaats en druk vervolgens op de [START] toets. - Als u uw originelen niet kopieert vanaf de eerste pagina, worden de kopieën niet in dezelfde volgorde gerangschikt als het origineel.
6. ORIGINELEN INSTELLEN Kies een beeldtype dat overeenkomt met uw type origineel zodat u er zeker van kunt zijn dat u kopieën maakt met een correct beeldtype. * Vergeet niet een beeldtype te selecteren nadat u een keuze heeft gemaakt tussen zwart-wit of kleur. 1 Plaats papier in de papierlade(n). - "1.KOPIEERPAPIER PLAATSEN" pagina 36. 3 2 Plaats het origineel/de originelen. - "2.ORIGINELEN PLAATSEN" pagina 45. in het basismenu op de toets die 3 Druk hiernaast is geselecteerd.
7. AFDRUKDICHTHEID INSTELLEN De dichtheid van de afdrukken kan op twee manieren worden ingesteld: automatisch en handmatig. Bij de automatische instelling wordt de dichtheid van elk origineel automatisch gedetecteerd en de optimale beelddichtheid geselecteerd. Bij de handmatige instelling kunt u het gewenste dichtheidsniveau van het beeld selecteren. Stel de dichtheid in aan de hand van de kwaliteit van het origineel.
4. BEELD BEWERKEN EN BEELD INSTELLEN 1. KLEURBALANS (CMYK INSTELLEN) ................................................................................96 2. RGB INSTELLEN.................................................................................................................97 3. INSTELLEN MET SNELTOETSEN......................................................................................98 4 4. ACHTERGROND INSTELLEN ..................................................................................
1. KLEURBALANS (CMYK INSTELLEN) Met deze functie kunt u de kleurbalans instellen door wijziging van de hoeveelheid toner voor de kleuren geel (Y), magenta (M), cyaan (C) en zwart (K). * Allen mogelijk bij gebruik van de functie Kleur. 1 Plaats papier in de papierlade(n). - "1.KOPIEERPAPIER PLAATSEN" pagina 36. 2 Plaats het origineel/de originelen. 4 - "2.ORIGINELEN PLAATSEN" pagina 45. op de [BEELD] toets om het 3 Druk beeldmenu te openen. Druk vervolgens op de [KLEURBALANS] toets.
2. RGB INSTELLEN Met deze functie kunt u de kleurbalans instellen door tijdens het scannen van het origineel de sterkte van de kleuren rood (R), groen (G) en blauw (B) aan te passen. Allen mogelijk bij gebruik van de functie Kleur. 1 Plaats papier in de papierlade(n). - "1.KOPIEERPAPIER PLAATSEN" pagina 36. 2 Plaats het origineel/de originelen. - "2.ORIGINELEN PLAATSEN" 3 pagina 45. 4 Druk op de [BEELD] toets om het beeldmenu te openen. Druk vervolgens op de [RGB INSTELLEN] toets.
3. INSTELLEN MET SNELTOETSEN U kunt de afbeelding “warm”, “koel”, “levendig” of “helder” maken met behulp van een sneltoets. Allen mogelijk bij gebruik van de functie Kleur. 1 Plaats papier in de papierlade(n). - "1.KOPIEERPAPIER PLAATSEN" pagina 36. 2 Plaats het origineel/de originelen. - "2.ORIGINELEN PLAATSEN" 4 pagina 45. op de [BEELD] toets om het 3 Druk beeldmenu te openen. Druk vervolgens op de [SNEL INSTELLEN] toets. op de [KOEL] ([WARM], [LEVENDIG], 4 Druk of [HELDER]) toets.
4. ACHTERGROND INSTELLEN Met deze functie kunt u de dichtheid van de achtergrond van het origineel instellen. Hiermee voorkomt u dat u de achterkant van het origineel kopieert. * Allen mogelijk bij gebruik van de functie Kleur. * Deze functie kan niet samen met de functie voor automatische afdrukdichtheid worden gebruikt. 1 Plaats papier in de papierlade(n). - "1.KOPIEERPAPIER PLAATSEN" pagina 36. 2 Plaats het origineel/de originelen. - "2.ORIGINELEN PLAATSEN" pagina 45.
5. SCHERPTE INSTELLEN Met deze functie kunt u de tekens en randen van afbeeldingen scherper weergeven. Deze functie is tevens beschikbaar bij zwart-wit kopiëren. 1 Plaats papier in de papierlade(n). - "1.KOPIEERPAPIER PLAATSEN" pagina 36. 2 Plaats het origineel/de originelen. - "2.ORIGINELEN PLAATSEN" 4 pagina 45. op de [BEELD] toets om het 3 Druk beeldmenu te openen. Druk vervolgens op de [SCHERPTE] toets. 4 Druk op de [ZACHT] (of [HARD]) toets.
6. KOPIËREN IN TWEE KLEUREN U kunt van een gekleurd origineel een kopie in twee kleuren maken. Er zijn twee manieren om dit te doen: - Maak kopieën in twee kleuren met twee handmatig geselecteerde kleuren: kopieer het zwarte gedeelte van het gekleurde origineel in een geselecteerde kleur en het andere gedeelte in een andere geselecteerde kleur. - Maak kopieën in rood en zwart: kopieer het rode gedeelte van het gekleurde origineel in rood en het andere gedeelte in zwart.
6.KOPIËREN IN TWEE KLEUREN (vervolg) een kleur voor de zwarte 5 Selecteer gebieden van het origineel. - Druk op de [VERANDER ZWART IN] toets en selecteer vervolgens de gewenste kleur. 4 een kleur voor de gedeelten van 6 Selecteer het origineel die niet zwart zijn. - Druk op de [TWEEDE KLEUR] toets en selecteer vervolgens de gewenste kleur. na het selecteren van de gewenste 7 Druk kleuren op de [ENTER] toets. z Selecteer eventueel andere kopieerinstellingen. 8 Druk op de [START] toets. 102 4.
Kopiëren in rood en zwart 1 Plaats papier in de papierlade(n). - "1.KOPIEERPAPIER PLAATSEN" pagina 36. 2 Plaats het origineel/de originelen. - "2.ORIGINELEN PLAATSEN" pagina 45. op de [BEELD] toets om het 3 Druk beeldmenu te openen. Druk vervolgens op de [TWEEKLEUREN KOPIE] toets. 4 4 Druk op de [ROOD & ZWART] toets. 5 Druk op de [ENTER] toets. z Selecteer eventueel andere kopieerinstellingen. 6 Druk op de [START] toets.
4 104 4.
5. HET GEBRUIK VAN DE BEWERKINGSFUNCTIES 1. BEELD VERPLAATSEN ....................................................................................................106 2. RAND WISSEN..................................................................................................................109 3. BINNENMARGE BOEK WISSEN ...................................................................................... 110 4. TWEE PAGINA'S ...............................................................................
1. BEELD VERPLAATSEN Een marge voor het inbinden wordt gemaakt door het af te drukken gedeelte naar links of naar rechts te verschuiven. U kunt ook inbindruimten in het midden (binnenmarge) maken door te kopiëren met de functie Boeken naar Dubbelzijdige kopieën (zie "5. Originelen van boeken -> dubbelzijdige kopieën" pagina 91). 5 Rechter- of linkermarge bepalen 1 Plaats papier in de papierlade(n). - "1.KOPIEERPAPIER PLAATSEN" pagina 36. - Als u deze functie gebruikt bij het kopiëren met handinvoer ("7.
de breedte van de inbindruimte in en 5 Stel druk vervolgens op de [ENTER] toets. - De standaardbreedte van de marge is 7 mm. - Pas de breedte aan door op de [0mm] of [30mm] toets te drukken en selecteer de gewenste breedte. Druk vervolgens op de [ENTER] toets. - Bij dubbelzijdig kopiëren wordt de inbindruimte op de achterzijde aan de tegenovergestelde kant van de voorzijde gemaakt. "5.DUBBELZIJDIG KOPIËREN" pagina 87. z Selecteer eventueel andere kopieerinstellingen. 6 Druk op de [START] toets.
1.BEELD VERPLAATSEN (vervolg) de breedte van de marge aan en druk 3 Pas vervolgens op de [ENTER] toets. - De standaardbreedte van de marge is 7 mm (de inbindruimte van een boek is 14 mm). - Pas de breedte aan door op de [2 mm] of [30 mm] toets te drukken en selecteer de gewenste breedte. Druk vervolgens op de [ENTER] toets. 5 108 5.
2. RAND WISSEN Als het origineel een vieze of gescheurde rand heeft, wordt deze als een zwarte vlek op de kopie weergegeven. Gebruik in dat geval de functie Rand wissen. Langs de buitenzijden van de kopie wordt een witte rand gemaakt waardoor de onregelmatigheden worden weggewerkt. * Deze functie is alleen beschikbaar wanneer een origineel met een standaardformaat wordt gebruikt. 5 1 Plaats papier in de papierlade(n). - "1.KOPIEERPAPIER PLAATSEN" pagina 36.
3. BINNENMARGE BOEK WISSEN Met deze functie kunt u de schaduw in het midden van een boek wissen. 1: Voor 2: Nadat de binnenmarge van het boek is gewist 1 5 1 Plaats papier in de papierlade(n). - "1.KOPIEERPAPIER PLAATSEN" pagina 36. - Als u deze functie gebruikt bij het kopiëren met handinvoer ("7.KOPIËREN MET HANDINVOER" pagina 59) moet u niet vergeten het papierformaat te specificeren. 2 Plaats het origineel/de originelen. - "2.ORIGINELEN PLAATSEN" pagina 45.
4. TWEE PAGINA'S Met deze functie kunt u de tegenover elkaar liggende pagina’s van een boek of brochure blad voor blad kopiëren op twee aparte vellen of dubbelzijdig kopiëren op één vel. U hoeft het origineel op de glasplaats hierbij niet te verplaatsen. U kunt ook twee originelen van het formaat A4 (of B5, LT) naast elkaar op de glasplaat leggen en ze op aparte vellen kopiëren. * Alleen de papierformaten A4, B5 en LT zijn geschikt voor deze functie.
4.TWEE PAGINA'S (vervolg) op de [BASIC] toets om het 5 Druk basismenu te openen en selecteer het kopieerformaat A4 (of B5, LT). z Selecteer eventueel andere kopieerinstellingen. de eerste te kopiëren pagina(s) op 6 Plaats de glasplaat en druk op de [START] toets. 5 - Als u uw originelen niet kopieert vanaf de eerste pagina, worden de kopieën niet in dezelfde volgorde gerangschikt als het origineel.
5. 2 IN 1/4 IN 1 Met deze functie kunt u meerdere originelen verkleinen en op één vel papier kopiëren. Er zijn twee mogelijkheden: kopiëren met 2 IN 1 waarbij twee originelen worden verkleind en op één vel worden gekopieerd en kopiëren met 4 IN 1 waarbij vier originelen worden verkleind en op één vel worden gekopieerd. Bovendien zijn de dubbelzijdige functies voor 2 IN 1/4 IN 1 beschikbaar, waarbij vier/acht originelen op twee zijden van één vel papier kunnen worden gekopieerd.
5.2 IN 1/4 IN 1 (vervolg) -4 IN 1 DUBBELZIJDIG (a: kant 1, b: kant 2) * Wanneer een kopie wordt gedraaid met de ------ lijn als as, worden de originelen volgens bovenstaande afbeelding op kant 2 (achterzijde) afgedrukt. a b a b 5 1 Plaats papier in de papierlade(n). - "1.KOPIEERPAPIER PLAATSEN" pagina 36. - Als u deze functie gebruikt bij het kopiëren met handinvoer ("7.KOPIËREN MET HANDINVOER" pagina 59) moet u niet vergeten het papierformaat te specificeren. Druk op de [ZOOM...
4 Selecteer de gewenste paginacombinatie. - Druk op de [2 IN 1] (of [4 IN 1], [2 IN 1 DUPLEX] of [4 IN 1 DUPLEX]) toets. 5 Selecteer het type origineel. - Druk op de [1 ZIJDE] (of [2 ZIJDEN]) toets. z Selecteer eventueel andere kopieerinstellingen. 5 6 Druk op de [START] toets. - Bij het plaatsen van originelen op de glasplaat volgt u steeds de stappen 5 en 6 in "3.ALGEMENE WERKWIJZE" pagina 52.
6. BROCHURE (VIA BEWERKINGSMENU) Met de functie Brochure kunt u enkelzijdige originelen kopiëren en sorteren zodat ze net als brochures en boekjes in het midden kunnen worden gevouwen en gebonden. Voorbeeld van het kopiëren van een document met 12 pagina’s 1 6 2 7 4 3 2 12 5 9 11 - Als u deze functie gebruikt in combinatie met de optionele finisher met rughechter (MJ-1024) worden de kopieën automatisch dubbel gevouwen en op de hartlijn geniet.
op de [EDIT] toets om het 4 Druk bewerkingsmenu te openen en druk vervolgens op de [BROCHURE] toets. de inbindruimte in en druk op de 5 Stel [ENTER] toets. 5 - De standaardbreedte van de marge is 2 mm. - Pas de breedte aan door op de [2 mm] of [30 mm] toets te drukken en selecteer de gewenste breedte. Druk vervolgens op de [ENTER] toets. - Als de optionele finisher met rughechter (MJ-1024) is geïnstalleerd, kunnen de kopieën automatisch langs de hartlijn worden geniet.
7. BEELD BEWERKEN Trimming/Masking U kunt op een origineel een gebied selecteren en dit kopiëren als uitgeknipt gebied (alleen de inhoud van het gebied wordt gekopieerd) of als afgedekt gebied (alleen de omgeving van het gebied wordt gekopieerd). Op een origineel kunnen vier rechthoekige gebieden worden gespecificeerd. * Beeldbewerking is alleen mogelijk met originelen op standaardformaat.
een origineel op de glasplaat om 4 Plaats het gebied te specificeren. - Leg het origineel met de te kopiëren zijde naar boven en met de onderkant naar u toe. Leg de linkerbovenhoek tegen de linkerbovenhoek van de glasplaat en lijn het origineel uit met de aanleglijst originelen. de aanleglijst originelen aan de 5 Gebruik linkerkant en aan de (binnenste) bovenkant. Lees de positie van het gewenste gebied als volgt af: 5 - X1 Afstand van de linkerbovenhoek naar de linkerrand van het gespecificeerde gebied.
7.BEELD BEWERKEN (vervolg) Spiegelbeeld Met deze functie kunt u kopieën maken met geheel gespiegelde afbeeldingen (rechts en links). 5 1 Plaats papier in de papierlade(n). - "1.KOPIEERPAPIER PLAATSEN" pagina 36. - Als u deze functie gebruikt bij het kopiëren met handinvoer ("7.KOPIËREN MET HANDINVOER" pagina 59) moet u niet vergeten het papierformaat te specificeren. 2 Plaats het origineel/de originelen. - "2.ORIGINELEN PLAATSEN" pagina 45.
8. X-Y ZOOM Met deze functie kunt u kopieën maken met reproductiefactoren van 25 tot 400% voor de X (horizontaal) en Y (verticaal) richtingen. In de volgende gevallen moet u de reproductiefactor instellen tussen 25 en 200%. - Als u de functie “Kleur”, “Autokleur”, “Tweekleuren” of “Afbeelding polijsten” gebruikt. - Als u de originelen in het automatisch documentinvoersysteem met omkeerinrichting (optioneel) plaatst. 100% 200% 100% 200% 5 1 Plaats papier in de papierlade(n). - "1.
9. KOPIËREN MET KAFTEN Aan de voor- en/of achterkant van iedere set kopieën kan een kaft (speciaal papier, bijvoorbeeld gekleurd papier) worden toegevoegd. Deze functie is alleen beschikbaar bij gebruik van het automatisch documentinvoersysteem met omkeerinrichting (optioneel).
de kaften in de papierlade voor 1 Plaats kaften of leg ze op de handinvoergeleiding.. - Als u de kaften in de papierlade voor kaften legt, moet u de papiersoort (kaft), het formaat en het gewicht instellen. Stel de papierlade in voor speciale toepassingen "Papierlade instellen voor speciale toepassingen" pagina 41. - Als u de kaften op de handinvoergeleiding legt, moet u het papierformaat en gewicht instellen. "Kopiëren met handinvoer op standaard papierformaat" pagina 59.
9.KOPIËREN MET KAFTEN (vervolg) - De papierlade instellen voor kaften. "Papierformaat lade veranderen/lade instellen voor speciale toepassingen" pagina 38 - De handinvoergeleiding instellen "7.KOPIËREN MET HANDINVOER" pagina 59. 5 z Selecteer eventueel andere kopieerinstellingen. 7 Druk op de [START] toets. Als u de [[VOOR KOPIE] toets of [VOOR KOPIE ACHTER BLANK] toets heeft geselecteerd, kan alleen de voorzijde van de kaft worden gekopieerd (enkelzijdig).
10. KOPIËREN MET INVOEGVELLEN Speciale vellen papier (bijvoorbeeld gekleurd papier) kunnen op gespecificeerde plaatsen in een set kopieën worden ingevoegd.
10.KOPIËREN MET INVOEGVELLEN (vervolg) 5 Druk op de [KOPIE] of [BLANK] toets. - Voor gekopieerde invoegvellen op de gespecificeerde plaatsen: [KOPIE] - Voor blanco vellen vóór de gespecificeerde pagina’s: [BLANK] [BLANK] 5 het gewenste paginanummer voor 6 Toets het invoegen in (niet meer dan drie cijfers) en druk op de bovenste [SET] toets. - In het scherm wordt de pagina weergegeven waar het eerste vel wordt ingevoegd.
11. DATUM EN TIJD TOEVOEGEN De scandatum en -tijd kan op de kopieën worden afgedrukt. 1: aan de onderkant van de staande kopie 2: aan de bovenkant van de liggende kopie 2 1 11.15. 2003 14:54 11.15. 2003 14:54 5 1 Plaats papier in de papierlade(n). - "1.KOPIEERPAPIER PLAATSEN" pagina 36. 2 Plaats het origineel/de originelen. - "2.ORIGINELEN PLAATSEN" pagina 45. op de [EDIT] toets om het 3 Druk bewerkingsmenu te openen en druk vervolgens op de [DATUM/TIJD] toets.
12. PAGINA'S NUMMEREN Met deze functie kunt u kopieën op gespecificeerde posities van paginanummers voorzien. 1: paginanummer afgedrukt aan de onderzijde (midden) van de staande kopie. 2: paginanummer afgedrukt aan de bovenzijde (rechts) van de liggende kopie. 2 1 1 2 3 1 2 3 5 1 Plaats papier in de papierlade(n). - "1.KOPIEERPAPIER PLAATSEN" pagina 36. 2 Plaats het origineel/de originelen. - "2.ORIGINELEN PLAATSEN" pagina 45.
Toets het nummer van de eerste pagina 5 in. - Als het nummer van de eerste pagina ''1'' is, hoeft u alleen maar op de [ENTER] toets te drukken. z Selecteer eventueel andere kopieerinstellingen. 6 Druk op de [START] toets.
13. BEELDRICHTING VAN KOPIEËN BIJ “1 NAAR 2” EN “2 NAAR 1” Wanneer een A3-, A5- of B4-origineel in de lengterichting wordt gekopieerd met de instelling Enkelzijdige originelen naar dubbelzijdige kopieën, of Dubbelzijdige originelen naar enkelzijdige kopieën, kunt u met behulp van deze functie de richting voor ‘horizontaal openslaan’ instellen. * Deze functie is niet nodig voor het kopiëren in de richting voor ‘verticaal openslaan’. 1: ingesteld 2: niet ingesteld 1 5 1 Plaats papier in de papierlade(n).
5 Druk op de [ENTER] toets. z Selecteer eventueel andere kopieerinstellingen. 6 Druk op de [START] toets.
14. BEELDRICHTING VAN DUBBELZIJDIGE KOPIEËN BIJ “2 NAAR 2” Als u de functie Dubbelzijdige originelen naar dubbelzijdige kopieën gebruikt, kunt u de achterkant van het te kopiëren origineel met 180 graden draaien. Dit is handig wanneer originelen die 'horizontaal openslaan' (boek) moeten worden gekopieerd naar 'verticaal openslaan' (blok). 5 1 Plaats papier in de papierlade(n). - "1.KOPIEERPAPIER PLAATSEN" pagina 36. 2 Plaats het origineel/de originelen. - "2.
15. CONTINU INVOER/ENKELVOUDIGE INVOER Het optionele automatisch documentinvoersysteem met omkeerinrichting maakt gebruik van twee invoerfuncties. Bij de continu invoerfunctie (standaardinstelling) worden meervoudige (of enkelvoudige) originelen continu één voor één ingevoerd. Bij de enkelvoudige invoerfunctie wordt een origineel na het plaatsen automatisch naar binnen getrokken en gekopieerd. * Zie voor het instellen van afwijkende formaten van originelen "Gemengde originelen" pagina 70.
15.CONTINU INVOER/ENKELVOUDIGE INVOER (vervolg) Enkelvoudige invoerfunctie 1 Plaats papier in de papierlade(n). - "1.KOPIEERPAPIER PLAATSEN" pagina 36. op de [EDIT] toets om het 2 Druk bewerkingsmenu te openen en druk vervolgens op de [ADF] toets. - Als de gewenste functietoetsen niet worden weergegeven, drukt u op de [Volgende] of [Vorige] toets om het menu te wijzigen. 5 3 Druk op de [SADF] toets. z Selecteer eventueel andere kopieerinstellingen.
6. ORIGINELEN OPSLAAN 1. OPSLAAN NAAR e-FILING ...............................................................................................136 2. OPSLAAN ALS FILE..........................................................................................................139 3. TEKENS INVOEREN .........................................................................................................
1. OPSLAAN NAAR e-FILING Met deze functie kunt u de gegevens van de gekopieerde originelen opslaan in e-Filing. Tijdens het kopiëren kunt u ze eventueel tegelijkertijd afdrukken. Als u de gegevens van de originelen heeft opgeslagen, kunt u ze op elk moment afdrukken. U kunt de openbare box of een van de gebruikersboxen specificeren voor het opslaan van de gegevens van de originelen.
op de [OPSLAAN NAAR E-FILING] 3 Druk toets. 4 Druk op de [BOX/MAP] toets. - De lijst met boxen wordt weergegeven. 6 de box waarin u de gegevens 5 Selecteer wilt opslaan en druk vervolgens op de [ENTER] toets. - Selecteer de “Openbare box” of de “Gebruikersbox”. - Raadpleeg voor het instellen van een nieuwe gebruikersbox de procedure voor e-FILING in "2.BOX INSTELLEN" pagina 214. lijst met documenten in de 6 De geselecteerde box wordt weergegeven.
1.OPSLAAN NAAR e-FILING (vervolg) op de [DOCUMENTNAAM] toets om 7 Druk de naam van de gescande gegevens in te voeren. - Het menu voor het invoeren van tekens ("3.TEKENS INVOEREN" pagina 142) wordt weergegeven. Een bestandsnaam mag maximaal 64 tekens bevatten. 8 Druk op de [ENTER] toets. 6 de melding “DIT DOCUMENT 9 Als AFDRUKKEN?” verschijnt, drukt u op de [JA] toets om het document op te slaan en af te drukken. - Als u het document zonder afdrukken wilt opslaan, drukt u op de [NEE] toets.
2. OPSLAAN ALS FILE Met de functie OPSLAAN ALS FILE kunt u de gekopieerde gegevens van originelen verzenden en opslaan naar de harde schijf in het apparaat of naar de gespecificeerde computer. Via het netwerk kunt u de opgeslagen gegevens in e-Filing direct vanaf de computer beheren en bewerken. * De netwerkbeheerder moet instellingen maken voor het opslaan van gegevens van originelen naar de computers. Raadpleeg voor meer informatie de [Handleiding netwerkbeheerder].
2.OPSLAAN ALS FILE (vervolg) op de [FILE NAME] toets om de 4 Druk bestandsnaam van de opgeslagen gegevens in te voeren. - Het menu voor het invoeren van tekens wordt weergegeven. Een bestandsnaam mag maximaal 64 tekens bevatten. 5 Selecteer de gewenste locatie. 6 - [MFP LOCAL]: selecteer deze locatie als de originelen moeten worden opgeslagen op de harde schijf van het hoofdapparaat. De gegevens van de originelen worden opgeslagen in een map. Het pad naar deze map wordt in het scherm weergegeven.
melding “VOLGENDE ORIGINEEL?” 9 De verschijnt. Druk op de [JA] toets als u nog meer originelen wilt opslaan. Druk op de [GEREED] toets als u klaar bent met opslaan. - Dit scherm verschijnt als het scannen is uitgevoerd vanaf de glasplaat voor originelen. Het scherm verschijnt niet als u het automatisch documentinvoersysteem met omkeerinrichting (optioneel) gebruikt.
3. TEKENS INVOEREN Het volgende scherm is bestemd voor het invoeren van tekens. * Gebruik de numerieke toetsen op het bedieningspaneel voor het invoeren van cijfers. 6 Gebruik de volgende toetsen voor het invoeren van tekens. - [CapsLock] Druk op deze toets om over te schakelen van hoofdletters naar kleine letters. - [B Space] Druk op deze toets om het teken vóór de cursor te wissen. - [Space] Druk op deze toets om een spatie in te voegen.
7. HET SCANNEN VAN ORIGINELEN 1. SCAN-INSTELLING IN HET AANRAAKSCHERM ............................................................144 2. SCANNEN NAAR e-FILING...............................................................................................147 3. SCANNEN NAAR FILE ......................................................................................................151 4. SCANNEN NAAR E-MAIL .................................................................................................
1. SCAN-INSTELLING IN HET AANRAAKSCHERM Met de scanfunctie kunnen originelen die in het automatisch documentinvoersysteem met omkeerinrichting (optioneel) of op de glasplaat worden geplaatst op eenvoudige wijze worden gescand als afbeeldingsgegevens. De gescande afbeeldingsgegevens kunnen worden verzonden of opgeslagen naar de bestemmingen “SCAN NAAR e-FILING”, “SCAN NAAR FILE” of “SCAN NAAR E-MAIL”. * Zie de [Handleiding e-Filing] over het opslaan van de gegevens naar computers.
Scanprocedure 1 Plaats het origineel/de originelen. - "2.ORIGINELEN PLAATSEN" pagina 45. - Zie voor geschikte originelen "2.ORIGINELEN PLAATSEN" pagina 45. - Zie voor het plaatsen van een origineel op de glasplaat "Een origineel op de glasplaat leggen" pagina 47. - Zie voor het plaatsen van een origineel in het automatisch documentinvoersysteem met omkeerinrichting (optioneel) "15.CONTINU INVOER/ENKELVOUDIGE INVOER" pagina 133. op de [SCAN] toets op het 2 Druk bedieningspaneel om het scanmenu te openen.
1.SCAN-INSTELLING IN HET AANRAAKSCHERM (vervolg) 5 Druk op de [SCAN!] toets. melding "Plaats document op 6 De glasplaat om door te gaan. Druk op Scan!" verschijnt. Druk op de [VERVOLG] toets om door te gaan. Druk op de [OPDRACHT GEREED] toets als u klaar bent met scannen. 7 146 - Dit scherm verschijnt niet als het origineel in het automatisch documentinvoersysteem met omkeerinrichting (optioneel) is geplaatst om te worden gescand in de Continu invoerfunctie.
2. SCANNEN NAAR e-FILING Met deze functie kunt u de gegevens van originelen opslaan in e-Filing. Tijdens het scannen kunt u, indien gewenst, tegelijkertijd de functies SCAN NAAR e-FILING of SCAN NAAR E-MAIL uitvoeren. Als de gegevens van de originelen zijn opgeslagen, kunt u ze op elk moment afdrukken. U kunt de openbare box of een van de gebruikersboxen specificeren voor het opslaan van de gegevens van de originelen.
2.SCANNEN NAAR e-FILING (vervolg) 3 Druk op de [SCAN NAAR E-FILING] toets. 4 Druk op de [BOX/MAP] toets. - De lijst met boxen wordt weergegeven. 7 de box waarin u de gegevens 5 Selecteer wilt opslaan en druk op de [ENTER] toets. - Selecteer de “Openbare box” of de “Gebruikersbox”. - Raadpleeg voor het instellen van de gebruikersbox de werkwijze voor “e-FILING” "2.BOX INSTELLEN" pagina 214. - Tekens invoeren "3.TEKENS INVOEREN" pagina 142.
op de [DOCUMENTNAAM] toets om 7 Druk de naam van de gescande gegevens in te voeren. - Het menu voor het invoeren van tekens ("3.TEKENS INVOEREN" pagina 142) wordt weergegeven. Een bestandsnaam mag maximaal 64 tekens bevatten. - Druk op de [ENTER] toets in het menu voor het invoeren van tekens. op de [EDIT] toets om het type en 8 Druk formaat van het origineel in te stellen alsmede de scanvoorwaarden.
2.SCANNEN NAAR e-FILING (vervolg) 10 Druk op de [SCAN!] toets. Als u op de [SCAN NAAR FILE] of de [SCAN NAAR E-MAIL] toets drukt voordat u op de [SCAN!] toets drukt, kunnen de gespecificeerde twee opdrachten tegelijk worden uitgevoerd. melding "Plaats document op 11 De glasplaat om door te gaan. Druk op Scan!" verschijnt. Druk op de [OPDRACHT GEREED] toets als u klaar bent met scannen. 7 - Druk op de [SCAN!] toets als u door wilt gaan met scannen.
3. SCANNEN NAAR FILE Met de functie SCAN NAAR FILE kunt u de gescande gegevens van originelen verzenden en opslaan naar de harde schijf van het apparaat of naar de gespecificeerde computer. Via het netwerk kunt u de opgeslagen gegevens in e-Filing direct vanaf de computer beheren en bewerken. * De netwerkbeheerder moet instellingen maken voor het opslaan van gegevens van originelen naar de computers. Raadpleeg voor meer informatie de [Handleiding netwerkbeheerder].
3.SCANNEN NAAR FILE (vervolg) op de [FILE NAME] toets om de 4 Druk bestandsnaam van de gescande gegevens in te voeren. - Het menu voor het invoeren van tekens wordt weergegeven. Een bestandsnaam mag maximaal 64 tekens bevatten. - Druk op de [ENTER] toets na het invoeren van de tekens. 5 Selecteer de gewenste locatie. - [MFP LOCAL]: selecteer deze locatie als de originelen moeten worden opgeslagen op de harde schijf van het hoofdapparaat. De gegevens van de originelen worden opgeslagen in een map.
- Druk op de [Volgende] of [Vorige] toets om te schakelen tussen de schermen en geef de noodzakelijk instellingen op. 8 Druk op de [ENTER] toets. 7 9 Druk op de [SCAN!] toets. Als u op de [SCAN NAAR E-FILING] of de [SCAN NAAR E-MAIL] toets drukt voordat u op de [SCAN!] toets drukt, kunnen de gespecificeerde twee opdrachten tegelijk worden uitgevoerd. melding "Plaats document op 10 De glasplaat om door te gaan. Druk op Scan!" verschijnt. Druk op de [OPDRACHT GEREED] toets als u klaar bent met scannen.
3.SCANNEN NAAR FILE (vervolg) - U kunt het formaat en type van de originelen, alsmede de scanvoorwaarden veranderen door op de [EDIT] toets te drukken voor de volgende scan. - Druk op de [OPDRACHT ANNULEREN] toets als u de opslag van gescande gegevens wilt annuleren. 7 154 7.
4. SCANNEN NAAR E-MAIL Met deze functie kunt u de gescande gegevens als bijlage naar het gespecificeerde e-mailadres verzenden. Als u de instelling voor de overdracht via e-mail heeft voltooid, kunt u de instellingen voor SCAN NAAR EFILING of SCAN NAAR FILE invoeren. De gegevens kunnen tegelijkertijd worden gescand. * De netwerkbeheerder moet het apparaat configureren voor het gebruik van de functie SCAN NAAR EMAIL. 1 Plaats het origineel/de originelen. - "2.ORIGINELEN PLAATSEN" pagina 45.
4.SCANNEN NAAR E-MAIL (vervolg) op de [E-MAIL NAAR] toets en 4 Druk selecteer het adres. - Druk op de [E-MAILADRES] toets wanneer u het adres rechtstreeks via het schermtoetsenbord wilt invoeren. - Als het adresboek verschijnt, selecteert u het adres waar u de gegevens naar toe wilt sturen. - Raadpleeg de [Handleiding gebruikersfunctie] voor het invoeren en instellen van het adres. - Druk op de [TERUG] toets om vanuit het adresboek terug te keren naar het menu SCAN NAAR E-MAIL.
8 Selecteer het bestandsformaat. op de [EDIT] toets om het formaat en 9 Druk type van het origineel in te stellen. - Druk op de [VOLGENDE] toets nadat stap 9 is voltooid.
4.SCANNEN NAAR E-MAIL (vervolg) 10 Voer de grootte van de bijlage in. - Afbeeldingsgegevens worden verdeeld in enkele kleine blokken en vervolgens verzonden. GROOTTE BERICHTFRAGMENT (KB): GEEN, 64 KB, 128 KB, 256 KB, 512 KB, 1024 KB, 2048 KB Druk op de [Volgende] of [Vorige] toets om te schakelen tussen de schermen en geef de noodzakelijk instellingen op. 7 Het volume van de afbeeldingsgegevens met hoge resolutie kan zeer groot zijn.
op de [ENTER] toets nadat alle 13 Druk instellingen zijn ingevoerd. 14 Druk op de [SCAN!] toets. - Als u op de [SCAN NAAR E-FILING] of de [SCAN NAAR E-MAIL] toets drukt voordat u op de [SCAN!] toets drukt, kunnen de gespecificeerde twee opdrachten tegelijk worden uitgevoerd.
7 160 7.
8. INTERNETFAX 1. INTERNETFAX ..................................................................................................................162 2. VERZENDENDE INTERNETFAX ......................................................................................164 De overdrachtsinstellingen opgeven ..................................................................................164 De ontvangers specificeren ...............................................................................................
1. INTERNETFAX Met de functie Internetfax kunt u een gescand origineel verzenden als e-mail met bijgevoegd TIFF-Sbestand. Omdat de verzending verloopt via een internetlijn in plaats van een telefoonlijn zijn de communicatiekosten laag. Bij deze functie geeft u in plaats van een telefoonnummer een e-mailadres op om een gescand origineel naar de internetfax of de cliëntcomputers te verzenden. Een ontvangen internetfax wordt automatisch als gewone fax uitgevoerd.
- Internetfax naar internetfax Het apparaat kan via internet of intranet een document naar een andere internetfax verzenden. Het document wordt verzonden als e-mail. e-STUDIO3511/4511 e-STUDIO3511/4511 - Internetfax naar/vanaf cliëntcomputers Het apparaat kan via internet of intranet een document als e-mail naar cliëntcomputers verzenden. De cliëntcomputers kunnen zelf ook e-mail naar het apparaat verzenden. 8 e-STUDIO3511/4511 Opm.
2. VERZENDENDE INTERNETFAX De overdrachtsinstellingen opgeven Configureer de instellingen voor de resolutie, de beeldkwaliteit, de belichting en het formaat van het origineel. U kunt tevens een onderwerp en tekst aan het origineel toevoegen. Wanneer een overdracht is voltooid, keert de instelling automatisch terug naar de standaardinstelling. Het volgende overzicht geeft een beschrijving van de instelling van elk item. - Resolutie: Stel de resolutie in voordat u het te verzenden origineel scant.
op de [ADRES] toets om het 2 Druk adresmenu te openen en druk vervolgens op de [OPTIE] toets.
2.VERZENDENDE INTERNETFAX (vervolg) na het selecteren van elke 3 Druk overdrachtsinstelling op de [ENTER] toets. - Druk op de [Vorige] of [Volgende] toets om te schakelen tussen de menu’s. - De gearceerde toetsen in het rechts afgebeelde menu zijn de standaardinstellingen. 8 166 8.
De ontvangers specificeren - Directe invoer: vul het e-mailadres direct via het invoermenu in. Invoer via adresboek: geef een ontvanger op die reeds in het adresboek staat vermeld. Invoer als groep: verzend originelen in één keer naar ontvangers die reeds als groep zijn gespecificeerd. Multi-adres verzending: verzend hetzelfde origineel in één handeling naar twee of meer ontvangers. Directe invoer op de [FAX] toets op het 1 Druk bedieningspaneel. 2 Plaats het origineel/de originelen. - "2.
2.VERZENDENDE INTERNETFAX (vervolg) Invoer via adresboek - Het adresboek moet vooraf worden geregistreerd. Raadpleeg de [Handleiding gebruikersfunctie] voor het registreren van het adresboek. op de [FAX] toets op het 1 Druk bedieningspaneel. 2 Plaats het origineel/de originelen. - "2.ORIGINELEN PLAATSEN" pagina 45. op de [OPTIE] toets en geef de 3 Druk overdrachtsinstellingen op. - "De overdrachtsinstellingen opgeven" pagina 164. de functie Geavanceerd in, indien 4 Stel gewenst.
Invoer als groep - De ontvangers moeten vooraf aan de groep zijn toegevoegd. Raadpleeg voor het maken van groepen de [Handleiding gebruikersfunctie]. op de [FAX] toets op het 1 Druk bedieningspaneel. 2 Plaats het origineel/de originelen. - "2.ORIGINELEN PLAATSEN" pagina 45. op de [OPTIE] toets en geef de 3 Druk overdrachtsinstellingen op. - "De overdrachtsinstellingen opgeven" pagina 164. de functie Geavanceerd in, indien 4 Stel gewenst. - "De functie Geavanceerd" pagina 177.
2.VERZENDENDE INTERNETFAX (vervolg) op de groep met ontvangers waar u 6 Druk de fax naar toe wilt sturen. Druk op de [INHOUD] toets om een gespecificeerd lid van de groep te controleren. - U kunt een ontvanger zoeken aan de hand van het ID-nummer of de groep. - Raadpleeg voor zoeken op ID-nummer "Zoeken op ID-nummer" pagina 171. Raadpleeg voor zoeken op adres "Zoeken op adres" pagina 173. 7 Druk op de [START] toets. 8 170 8.
Zoeken op ID-nummer U kunt ontvangers die in het adresboek of in een groep zijn geregistreerd snel opzoeken met behulp van het ID-nummer. op de [FAX] toets op het 1 Druk bedieningspaneel. 2 Plaats het origineel/de originelen. - "2.ORIGINELEN PLAATSEN" pagina 45. op de [OPTIE] toets en geef de 3 Druk overdrachtsinstellingen op. - "De overdrachtsinstellingen opgeven" pagina 164. de functie Geavanceerd in, indien 4 Stel gewenst. - "De functie Geavanceerd" pagina 177.
2.VERZENDENDE INTERNETFAX (vervolg) op de [E-MAIL] toets van de 7 Druk bestemming. - Eén scherm toont acht bestemmingen. Om de niet getoonde bestemmingen te bekijken, drukt u op de [Vorige] of [Volgende] toets om door de schermen te bladeren. - Druk op de [BEKEND ID] toets om door te gaan met zoeken op ID-nummer. - Druk op de [ZOEK ADRES] toets om door te gaan met zoeken op adres ("Zoeken op adres" pagina 173). 8 Druk op de [START] toets. 8 172 8.
Zoeken op adres U kunt ontvangers die in het adresboek of in een groep zijn geregistreerd snel opzoeken door op een lettertoets te drukken. De ontvanger wiens naam begint met die letter wordt weergegeven in het scherm zodat u de gewenste naam snel en eenvoudig kunt kiezen. op de [FAX] toets op het 1 Druk bedieningspaneel. 2 Plaats het origineel/de originelen. - "2.ORIGINELEN PLAATSEN" pagina 45. op de [OPTIE] toets en geef de 3 Druk overdrachtsinstellingen op.
2.VERZENDENDE INTERNETFAX (vervolg) op de toets van het item dat u wilt 6 Druk zoeken. de letter of het cijfer in en druk 7 Voer vervolgens op de [ENTER] toets. - Zie voor het invoeren van tekens "3.TEKENS INVOEREN" pagina 142. 8 8 Druk op de [ZOEKEN] toets. op de [E-MAIL] toets van de 9 Druk bestemming en druk vervolgens op de [ENTER] toets. - Eén scherm toont acht bestemmingen. Om de niet getoonde bestemmingen te bekijken, drukt u op de [Vorige] of [Volgende] toets om door de schermen te bladeren.
Verzending naar meerdere adressen Met de functie Multi-adres verzending kunt u hetzelfde origineel in één handeling naar twee of meer ontvangers verzenden. Het invoeren gebeurt door het combineren van de functie Directe invoer, Invoer via adresboek, en Invoer als groep.
2.VERZENDENDE INTERNETFAX (vervolg) 6 Druk op de [START] toets. Bestemmingen bevestigen Druk op de [BESTEMMING] toets om de lijst met adressen (die u bijvoorbeeld via Multi-adres verzending heeft gespecificeerd) te bevestigen. Druk eventueel op de [VERWIJDEREN] toets om de adressen te verwijderen. 1 Druk op de [BESTEMMING] toets. - Eén scherm toont acht bestemmingen. - Om de niet getoonde bestemmingen te bekijken, drukt u op de [Vorige] of [Volgende] toets om door de schermen te bladeren.
De functie Geavanceerd U kunt gebruikmaken van de volgende geavanceerde functies: - Dubbelzijdig origineel TX: dubbelzijdige originelen verzenden met behulp van het automatisch documentinvoersysteem met omkeerinrichting. - Priority TX: originelen verzenden voorafgaand aan de gereserveerde opdrachten. Dubbelzijdige originelen verzenden U kunt dubbelzijdige originelen scannen en verzenden met behulp van het automatisch documentinvoersysteem met omkeerinrichting (optioneel).
2.VERZENDENDE INTERNETFAX (vervolg) op de [GEAVANCEERD] toets om het 4 Druk geavanceerde menu te openen en druk vervolgens op de [DUBBELZIJDIGE SCAN] toets. afhankelijk van het type 5 Selecteer, origineel, de [BOEK] of [BLOK] toets en druk vervolgens op de [ENTER] toets. 6 Specificeer de ontvanger. - "De ontvangers specificeren" pagina 167. 7 Druk op de [START] toets. 8 Verzending met prioriteit Met Priority TX kunt u originelen verzenden voorafgaand aan de andere gereserveerde overdrachten.
op de [GEAVANCEERD] toets om het 4 Druk geavanceerde menu te openen. Druk vervolgens op de [PRIORITEIT RESERVEREN] toets. 5 Druk op de [ENTER] toets. 6 Specificeer de ontvanger. - "De ontvangers specificeren" pagina 167. 7 Druk op de [START] toets.
3. ONTVANGENDE INTERNETFAX Instellingen voor de ontvangstfunctie Er zijn verschillende methoden voor het ontvangen van een internetfax. Dit hangt af van het type protocol dat wordt gebruikt voor het ontvangen van e-mail. Als POP3* is geselecteerd voor het ontvangen: - Het apparaat maakt volgens gespecificeerde intervallen contact met de e-mailserver om te controleren of er e-mail is ontvangen. Als er e-mail is ontvangen, haalt het apparaat de e-mail automatisch op en drukt deze af.
op de [USER FUNCTION] toets op 1 Druk het bedieningspaneel. op de [GEBRUIKER] toets en 2 Druk vervolgens op [CHECK E-MAIL]. - Het controleren op eventueel ontvangen e-mail begint. 3 Het controleren is voltooid. - Als de internetfax is ontvangen, verschijnt de melding “ONTVANGEN e-mail” in de rechterbovenhoek van het scherm. Vervolgens wordt “NIEUWE e-mail ONTVANGEN” gedurende twee seconden weergegeven. Daarna wordt de internetfax afgedrukt.
8 182 8.
9. OPDRACHTSTATUS 1. OPDRACHTSTATUS .........................................................................................................184 2. LIJST MET AFDRUKOPDRACHTEN ................................................................................185 3. PROEFAFDRUK ................................................................................................................188 4. PERSOONLIJKE AFDRUKOPDRACHT ...........................................................................190 5.
1. OPDRACHTSTATUS Met [JOB STATUS] kunt u: - De lijst met afdruk-, internetfax- en scanopdrachten in de wachtrij weergeven - De status van het afdruk-, overdracht-, ontvangst- en scanlogboek weergeven en afdrukken - De opdrachten in de wachtrij uitvoeren, pauzeren, verwijderen en verplaatsen. Elk scherm (pagina) bevat vier opdrachten. U kunt in totaal de opdrachten van 250 pagina's (1.000 opdrachten) weergeven.
2. LIJST MET AFDRUKOPDRACHTEN Met de functie Afdrukopdracht kunt u de status weergeven van afdrukopdrachten die tussen het apparaat en de netwerkcontroller zijn verzonden. Ook kunt u opdrachten verwijderen, pauzeren, verplaatsen en afdrukken. Druk op de [Volgende] toets om de vijfde of hogere opdracht weer te geven en druk op de [Vorige] toets om de vorige pagina weer te geven. Een opdracht verwijderen op de [JOB STATUS] toets op het 1 Druk bedieningspaneel om het scherm OPDRACHTSTATUS weer te geven.
2.LIJST MET AFDRUKOPDRACHTEN (vervolg) melding "Verwijderen OK?" verschijnt. 4 De Druk op de [VERWIJDEREN} toets om de opdracht te verwijderen. Een afdrukopdracht pauzeren en hervatten op de gebruikersnaam in de lijst die 1 Druk u wilt onderbreken. 2 Druk op de [PAUZE] toets. op de [VRIJGEVEN] toets om de 3 Druk opdracht te hervatten. 9 186 9.
Een afdrukopdracht verplaatsen op de gebruikersnaam in de lijst die 1 Druk u wilt verplaatsen. 2 Druk op de [VERPLAATSEN] toets. 3 Geef de positie van de volgorde op. 9 - (Voorbeeld) Druk op de eerste gebruikersnaam en verplaats de doelopdracht naar de tweede positie.
3. PROEFAFDRUK Met deze functie kunt u een proefafdruk maken indien de [PROEF] toets vooraf is gespecificeerd voor deze toepassing. De voor een proefafdruk opgegeven afdrukopdracht staat in de lijst. Er wordt één set afgedrukt als proefafdruk voordat het opgegeven aantal sets wordt afgedrukt. Na voltooiing worden de resterende afdrukopdrachten uitgevoerd als normale afdrukopdracht. Vóór het uitvoeren van de normale afdrukopdracht kunt u bovendien het aantal sets veranderen en een opdracht verwijderen.
Een opdracht verwijderen 1 Druk op de [PROEF] toets. wordt een lijst met proefafdrukken 2 Er getoond. Druk op de gebruikersnaam in de lijst die u wilt verwijderen. 3 Druk op de [VERWIJDEREN] toets. melding "Verwijderen OK?" verschijnt. 4 De Druk op de [VERWIJDEREN} toets om de 9 opdracht te verwijderen.
4. PERSOONLIJKE AFDRUKOPDRACHT Met de persoonlijke afdrukopdracht kunt u de gewenste documenten afdrukken door invoering van het wachtwoord dat voor deze toepassing is ingesteld. * Raadpleeg voor persoonlijk afdrukken de [Afdrukhandleiding]. Persoonlijk afdrukken op de [PERSOONLIJK] toets om de 1 Druk lijst met persoonlijke afdrukopdrachten weer te geven. op de gebruikersnaam in de lijst 2 Druk waarmee u wilt beginnen.
Een persoonlijke afdrukopdracht verwijderen op de [PERSOONLIJK] toets om de 1 Druk lijst met persoonlijke afdrukopdrachten weer te geven. op de gebruikersnaam in de lijst die 2 Druk u wilt verwijderen. 3 Druk op de [VERWIJDEREN] toets. 4 Voer het wachtwoord in. 9 melding "Verwijderen OK?" verschijnt. 5 De Druk op de [VERWIJDEREN} toets om de opdracht te verwijderen.
5. DE AFDELINGSCODES GEBRUIKEN Opdrachten die zonder afdelingscode of met een niet-geregistreerde afdelingscode naar het apparaat worden verzonden, worden in de Ongeldige wachtrij van de Opdrachtstatus geplaatst. De ongeldige code (afdrukfout) veranderen in een normale afdrukopdracht op de [ONGELDIG] toets om de lijst 1 Druk weer te geven. op de gebruikersnaam in de lijst die 2 Druk u wilt afdrukken. 3 Druk op de [VRIJGEVEN] toets. 9 invoerscherm voor afdelingscodes 4 Het opent.
Een opdracht uit de lijst verwijderen op de [ONGELDIG] toets om de lijst 1 Druk weer te geven. op de gebruikersnaam in de lijst die 2 Druk u wilt verwijderen. 3 Druk op de [VERWIJDEREN] toets. melding "Verwijderen OK?" verschijnt. 4 De Druk op de [VERWIJDEREN} toets om de 9 opdracht te verwijderen.
6. DE STATUS FAX/INTERNETFAX-OPDRACHT BEVESTIGEN Met behulp van de functie fax (optioneel)/internetfax-opdracht kunt u de status weergeven en de opdracht verwijderen of verzenden. Elk scherm (pagina) bevat vier opdrachten. U kunt in totaal de opdrachten van 250 pagina's (1.000 opdrachten) weergeven. Druk op de [Volgende] toets om de vijfde of hogere opdracht weer te geven en druk op de [Vorige] toets om de vorige pagina weer te geven.
7. DE SCANSTATUS BEVESTIGEN Met SCAN-OPDRACHT kunt u de status weergeven en de opdracht verwijderen. Elk scherm (pagina) bevat vier opdrachten. U kunt in totaal de opdrachten van 250 pagina's (1.000 opdrachten) weergeven. Druk op de [Volgende] toets om de vijfde of hogere opdracht weer te geven en druk op de [Vorige] toets om de vorige pagina weer te geven. * Raadpleeg [AFBEELDINGEN SCANNEN] voor meer informatie over de SCAN-functie "1.SCANINSTELLING IN HET AANRAAKSCHERM" pagina 144.
8. LOGBOEKLIJST LOGBOEK Met de functie LOGBOEK kunt u een lijst maken met voltooide afdrukopdrachten, scanopdrachten, verzonden en ontvangen faxen (ter bevestiging van de resultaten). U kunt ook de faxnummers en emailadressen (*1) van het verzenden/ontvangen faxlogboek en scanlogboek in het adresboek registreren. *1 Gebruikte e-mailadressen bij het verzenden van e-mails Afdruklogboek Druk op de [AFDRUKKEN] toets in het logmenu om de afdrukstatus weer te geven.
Verzenden/ontvangen faxlogboek Druk op de [VERZENDEN] of [ONTVANGEN] toets in het logboekmenu om de verzend-/ontvangststatus van de fax of internetfax weer te geven. - Items in de lijst Bestandsnr.
8.LOGBOEKLIJST (vervolg) Scanlogboek Druk op de [SCAN] toets in het logboekmenu om de scanstatus weer te geven. - Items in de lijst Naar: de opslaglocatie van de gescande gegevens of het e-mailadres van de ontvanger Agent: gescande opdracht in het scanmenu Datum, tijd: scandatum en -tijd Pagina's: aantal gescande pagina's of aantal pagina's van verzonden e-mail Status: weergave opdrachtstatus 'OK' of 'Foutcode', zie "12.FOUTCODES" pagina 204.
9. ADRESREGISTRATIE VANUIT LOGBOEK U kunt de ontvanger (of afzender) in het adresboek registreren vanuit de lijst VERZENDEN/ONTVANGEN LOGBOEK of de lijst SCANLOGBOEK. Selecteer hiertoe de ontvanger (of afzender) en druk op de [INVOER] toets. * Raadpleeg de [Gebruikershandleiding] voor meer informatie over het adresboek]. op de [LOGBOEK] toets en 1 Druk vervolgens op de [VERZENDEN] (of [ONTVANGEN]) toets. lijst VERZENDEN LOGBOEK (of de 2 De Lijst ONTVANGEN LOGBOEK) wordt weergegeven.
9.ADRESREGISTRATIE VANUIT LOGBOEK (vervolg) 4 Druk op de [INVOER] toets. scherm ADRESINVOER opent. Druk 5 Het op de [NAAM] toets om de naam van de ontvanger in te voeren. - Zie voor het invoeren van tekens "3.TEKENS INVOEREN" pagina 142. 6 Druk op de [ENTER] toets. 9 200 9.
10. VERZENDEN/ONTVANGEN FAXLOGBOEK AFDRUKKEN U kunt maximaal 120 logboeken (3 pagina's) en 1 geselecteerd VERZENDEN (of ONTVANGEN) LOGBOEK in de lijst VERZENDEN/ONTVANGEN faxlogboek afdrukken. * Er kunnen 40 logboeken (1 pagina) of 120 logboeken (3 pagina's) worden ingesteld voor het afdrukken van de logboeklijst. Raadpleeg de [Gebruikershandleiding] voor meer informatie. op de [LOGBOEK] toets en 1 Druk vervolgens op de [VERZENDEN] (of [ONTVANGEN]) toets.
11. STATUS De functie STATUS geeft het ladeformaat van het apparaat weer en selecteert de actieve papierlade tijdens het afdrukken. Druk op [STATUS] wanneer een afdrukopdracht stopt als gevolg van een fout. Nu kan het ladeformaat en de actieve papierlade worden gewijzigd als het papier op is en er geen papierlade gereed is. Vrijgave bij afdrukfout Als de papierlade voor het gespecificeerde papierformaat niet gereed is, doet zich een afdrukfout voor en gaat de [JOB STATUS] toets knipperen.
het papierformaat in door op de 4 Stel papierformaattoets in het scherm te drukken. 5 Druk op de [START] toets.
12. FOUTCODES Als er zich een fout voordoet tijdens het gebruik van de fax, internetfax of scan, wordt de foutcode in de status van elk logboek getoond. Corrigeer de fout aan de hand van de volgende tabel. Fax/internetfax Foutcode Oorzaak Correctie Fax 0011 Papier zit vast Verwijder het vastgelopen printpapier. 0012 Originelen zitten vast Verwijder de vastgelopen originelen. 0013 Deur staat open Doe de deur goed dicht. 0020 Stroomstoring Controleer het stroomstoringsrapport.
Foutcode Oorzaak Correctie 1C14 Ongeldige parameter Bij gebruik van een sjabloon: maak de sjabloon nog een keer. Schakel de stroom UIT en daarna weer IN als de fout zich weer voordoet. Voer de opdracht opnieuw uit. 1C15 Overschrijding bestandscapaciteit Vraag de beheerder de instelling "Fragment Paginaformaat" te wijzigen voor de internetfax-instelling of reduceer het aantal pagina's en voer de opdracht opnieuw uit.
12.FOUTCODES (vervolg) Foutcode 9 206 Oorzaak Correctie 1C61 Kan adresboek niet lezen Schakel de stroom UIT en daarna weer IN. Voer de mislukte opdracht opnieuw uit. Stel de gegevens in het Adresboek opnieuw in en voer de opdracht nog een keer uit. Neem contact op met uw leverancier als de fout zich weer voordoet. 1C62 Geen toegang tot geheugen Schakel de stroom UIT en daarna weer IN. Voer de mislukte opdracht opnieuw uit. Neem contact op met uw leverancier als de fout zich weer voordoet.
Foutcode Oorzaak Correctie 1C6C Fout mailadres bestemming Controleer of het e-mailadres van de bestemming een ongeldig teken bevat. Verwijder het ongeldige teken en stel het correcte e-mailadres van de bestemming in. Voer de opdracht nog een keer uit. 1C6D Systeemfout Schakel de stroom UIT en daarna weer IN. Voer de mislukte opdracht opnieuw uit. Neem contact op met uw leverancier als de fout zich weer voordoet.
12.FOUTCODES (vervolg) Foutcode Correctie 2C40 Kan conversie bestandsformaat afbeelding niet uitvoeren Probeer de scan opnieuw. Het systeem kon de scanopdracht niet verzenden. 2C61 Kan adresboek niet lezen Probeer de scan opnieuw. Het systeem kon de scanopdracht niet verzenden. Ongeldig domeinadres Controleer of u naar het juiste e-mailadres verstuurt en probeer de scan opnieuw.
Foutcode 2D31, 2D33 Bericht Correctie Kan geen bestand maken Probeer de scan opnieuw. Het systeem kon de scanopdracht niet opslaan. 2D32 Kan geen bestand verwijderen Probeer de scan opnieuw. Het systeem kon de scanopdracht niet opslaan. 2D40 Kan conversie bestandsformaat afbeelding niet uitvoeren Probeer de scan opnieuw. Het systeem kon de scanopdracht niet opslaan. 2D60 Kan bestand niet kopiëren Probeer de scan opnieuw. Het systeem kon de scanopdracht niet opslaan.
12.FOUTCODES (vervolg) Foutcode Bericht 2B32 Kan e-Filing document niet afdrukken. Het geselecteerde document wordt door een andere gebruiker gebruikt. Probeer het later opnieuw. 2B50 Kan afbeelding niet verwerken. Probeer de scan opnieuw. Het systeem kon de scanopdracht niet opslaan. 2B51 Kan afbeelding niet afdrukken. Voer het afdrukken opnieuw uit. 2B60 Duplicaatfout. Mapnaam automatisch gewijzigd. De geselecteerde box bevat een map met dezelfde naam.
10. e-FILING 1. FUNCTIES e-FILING .........................................................................................................212 2. BOX INSTELLEN ...............................................................................................................214 3. DE INVOERGEGEVENS WIJZIGEN .................................................................................216 4. BOX VERWIJDEREN ......................................................................................................
1. FUNCTIES e-FILING Met de functies van e-Filing kunt u documenten beheren in e-Filing (harde schijf) in het apparaat. Het betreft documenten die zijn verkregen door kopiëren, scannen, afdrukken, ontvangen faxen (indien deze optie is ge•nstalleerd), internetfaxen en e-mails. U moet e-Filing eerst instellen voordat u het kunt gebruiken. eFiling bestaat uit een publieke box en maximaal 200 gebruikersboxen.
Met het apparaat kunt u documenten als originele gegevens opslaan in e-Filing door middel van kopiëren en scannen, zie ("1.OPSLAAN NAAR e-FILING" pagina 136 en "2.SCANNEN NAAR e-FILING" pagina 147). De opgeslagen documenten in e-Filing kunnen worden afgedrukt door het specificeren van sommige pagina’s of “Alle pagina’s”, eventueel na toevoeging/verandering van de afdrukinstellingen. Overbodige documenten kunnen ook worden verwijderd uit de gespecificeerde gebruikersbox.
2. BOX INSTELLEN e-Filing bestaat uit één openbare box en maximaal 200 gebruikersboxen. De openbare box wordt vooraf ingesteld bij de installatie van de apparatuur. U hoeft deze dus niet zelf in te stellen. De gebruikersbox kan worden ingesteld/geregistreerd door middel van toewijzing van een boxnaam. Als de gebruikersbox is beveiligd met een wachtwoord kunnen belangrijke documenten veilig worden opgeslagen. Er kunnen maximaal 200 gebruikersboxen worden ingesteld/geregistreerd.
4 Druk op de [ENTER] toets. - Er is een nieuwe box ingesteld.
3. DE INVOERGEGEVENS WIJZIGEN De “geregistreerde boxnaam” en het “wachtwoord” van de gebruikersbox kunnen worden veranderd. * U kunt de naam van de map niet veranderen op het apparaat. Verander de naam eventueel via het netwerk met behulp van een cliëntcomputer en de webtoepassing e-Filing. Raadpleeg de [Handleiding e-Filing] voor meer informatie. op de [e-FILING] toets op het 1 Druk bedieningspaneel. de box die u wilt wijzigen en 2 Selecteer druk vervolgens op de [EDIT] toets.
5 Druk op de [ENTER] toets. - De boxinstellingen zijn bijgewerkt.
4. BOX VERWIJDEREN Een overbodige gebruikersbox kan worden verwijderd. In dat geval worden alle documenten in de gebruikersbox ook verwijderd. * De openbare box kan niet worden verwijderd. * U kunt de map in een gebruikersbox niet op het apparaat verwijderen. Verander de naam eventueel via het netwerk met behulp van een cliëntcomputer en de webtoepassing e-Filing. Raadpleeg de [Handleiding e-Filing] voor meer informatie. op de [e-FILING] toets op het 1 Druk bedieningspaneel.
5. OPGESLAGEN DOCUMENT AFDRUKKEN Documenten die in de box of map zijn opgeslagen, kunnen worden afgedrukt. De afwerking van de documenten kan worden geselecteerd. U kunt tevens de afdruk controleren door middel van een proefafdruk. Het gehele document afdrukken. Alle pagina’s van het document worden afgedrukt. Raadpleeg voor het afdrukken van meerdere kopieën "Opgeslagen document afdrukken met toegevoegde/gewijzigde instellingen" pagina 221. op de [e-FILING] toets op het 1 Druk bedieningspaneel.
5.OPGESLAGEN DOCUMENT AFDRUKKEN (vervolg) 5 Druk op de [AFDRUKKEN] toets. - Het afdrukken van het gehele document begint. Proefafdruk maken U kunt een gedeelte afdrukken van een document dat bestaat uit verschillende pagina’s. de stappen 1 tot en met 4 uit van “Het 1 Voer gehele document afdrukken”. 2 Druk op de[PROEFAFDRUK] toets. 10 het nummer van de laatste pagina in 3 Voer om de af te drukken pagina te specificeren. - Druk op de [ALLE PAGINA’s] toets als u alle pagina’s af wilt drukken. 220 10.
4 Druk op de [AFDRUKKEN] toets. - Het afdrukken van de ingestelde pagina begint. Opgeslagen document afdrukken met toegevoegde/gewijzigde instellingen De volgende instellingen kunnen worden toegevoegd aan (of gewijzigd in) het opgeslagen document in de filingbox. 1: De papierlade instellen (druk op het cassettegebied van de papierlade) 2: Het aantal afdrukken invoeren (met behulp van de numerieke toetsen) 3: Enkelzijdige/dubbelzijdige afdrukken instellen.
5.OPGESLAGEN DOCUMENT AFDRUKKEN (vervolg) 2 Druk op de [INSTELLINGEN] toets. 3 Stel het gewenste aantal afdrukken in. - Zie de vorige pagina voor meer bijzonderheden. Druk met betrekking tot de instellingen 3 tot en met 8 op de betreffende toets, selecteer de gewenste toets in het menu en druk vervolgens op de [ENTER] toets. 4 Druk op de [AFDRUKKEN] toets. - Het afdrukken begint. 10 222 10.
11. SJABLOON 1. SJABLOON........................................................................................................................224 2. SJABLOON OPROEPEN ..................................................................................................225 3. SJABLOON REGISTREREN .............................................................................................228 4. INVOERGEGEVENS WIJZIGEN .......................................................................................
1. SJABLOON Een combinatie van veel gebruikte functies kan worden geregistreerd als sjabloon en naar wens worden opgeroepen. * U kunt bijvoorbeeld de instellingen van de kopieerfuncties, scanfuncties of faxfuncties (optioneel) als sjabloon registreren en oproepen. De combinaties worden geregistreerd in de “OPENBARE SJABLOONGROEP” of de “GEBRUIKERSGROEP (maximaal 200 groepen beschikbaar)” in het menu van de sjabloon. Er kunnen maximaal 60 combinaties worden geregistreerd in één groep.
2. SJABLOON OPROEPEN U hoeft alleen maar op de [START] toets te drukken (voor scannen de [SCAN] toets op het aanraakscherm) nadat u de gewenste sjabloon heeft opgeroepen. Een sjabloon oproepen in de openbare groep 1 Plaats papier in de papierlade(n). - "1.KOPIEERPAPIER PLAATSEN" pagina 36. 2 Plaats het origineel/de originelen. - "2.ORIGINELEN PLAATSEN" pagina 45. op de [TEMPLATE] toets op het 3 Druk bedieningspaneel. - Het menu voor het oproepen van de sjabloon opent.
2.SJABLOON OPROEPEN (vervolg) dat “De sjablooninstelling is 6 Bevestig bijgewerkt” wordt weergegeven in het scherm. z Selecteer eventueel andere kopieerinstellingen. 7 Druk op de [START] toets. Een sjabloon oproepen in de gebruikersgroep 1 Plaats papier in de papierlade(n). - "1.KOPIEERPAPIER PLAATSEN" pagina 36. 2 Plaats het origineel/de originelen. - "2.ORIGINELEN PLAATSEN" pagina 45. op de [TEMPLATE] toets op het 3 Druk bedieningspaneel. - Het menu voor het oproepen van de sjabloon opent.
6 Selecteer de gewenste sjabloon. het wachtwoord (5 cijfers) van de 7 Toets geselecteerde sjabloon in. Druk vervolgens op de [ENTER] toets. - Sla stap 7 over als het wachtwoord niet is ingesteld tijdens de registratie van de groep. dat “De sjablooninstelling is 8 Bevestig bijgewerkt” wordt weergegeven in het scherm. z Selecteer eventueel andere kopieerinstellingen. 9 Druk op de [START] toets.
3. SJABLOON REGISTREREN Om de sjabloon op te roepen moet u eerst de instellingencombinatie als sjabloon registreren. De sjabloon wordt - afhankelijk van de doelstelling - geregistreerd in de “OPENBARE SJABLOONGROEP” of de “GEBRUIKERSGROEP”. - OPENBARE SJABLOONGROEP: In deze groep kunt u de instellingencombinatie registreren van de functies die veel worden gebruikt in het gehele bedrijf of de gehele organisatie. Iedereen kan dan de sjabloon gebruiken.
het “Beheerderswachtwoord” (6 5 Voer cijfers) in en druk vervolgens op de [ENTER] toets. op de blanco toets in het 6 Druk sjabloonmenu en druk vervolgens op de [OPSLAAN] toets. de gegevens in voor het registreren 7 Voer van de sjabloon. - U moet “NAAM 1” of “NAAM 2” invoeren, maar het invoeren van de “GEBRUIKERSNAAM” en het “WACHTWOORD” is niet verplicht. - Als u op de [NAAM 1] toets drukt, opent het invoermenu voor tekens ("3.TEKENS INVOEREN" pagina 142). Voer een naam in van maximaal 11 tekens.
3.SJABLOON REGISTREREN (vervolg) 9 Druk op de [OPSLAAN] toets. - Het menu keert terug naar stap 1 (het menu voordat er op de [SJABLOON] toets op het bedieningspaneel werd gedrukt). De sjabloon registreren in de gebruikersgroep 1 Stel alle functies in die u wilt combineren. - Voorbeeld: instelling “Beeldverplaatsing”, “90% reductie” en “10 sets kopieën” voor de kopieerfunctie. op de [TEMPLATE] toets op het 2 Druk bedieningspaneel. 3 Druk op de [REGISTRATIE] toets.
- Voer bij het selecteren van de geregistreerde “GEBRUIKERSGROEP” in het volgende menu het “GROEPSWACHTWOORD” (5 cijfers) in. Ga vervolgens verder met stap 8. de gegevens in voor het registeren 5 Voer van de nieuwe gebruikersgroep. - U moet “NAAM” invoeren, maar het invoeren van de “GEBRUIKERSNAAM” en het “WACHTWOORD” is niet verplicht. - Als u op de [NAAM 1] toets drukt, opent het invoermenu voor tekens ("3.TEKENS INVOEREN" pagina 142). Voer een naam in van maximaal 20 tekens.
3.SJABLOON REGISTREREN (vervolg) op de lege [TEMPLATE] toets en 8 Druk vervolgens op de [OPSLAAN] toets. 9 Voer de gevraagde gegevens in. - U moet “NAAM 1” of “NAAM 2” invoeren, maar het invoeren van de “GEBRUIKERSNAAM” en het “WACHTWOORD” is niet verplicht. - Als u op de [NAAM 1] toets drukt, opent het invoermenu voor tekens ("3.TEKENS INVOEREN" pagina 142). Voer een naam in van maximaal 11 tekens.
4. INVOERGEGEVENS WIJZIGEN U kunt de geregistreerde naam, gebruikersnaam, en wachtwoord van sjabloon/gebruikersgroep wijzigen. De gegevens van de sjabloon wijzigen op de [TEMPLATE] toets op het 1 Druk bedieningspaneel. 2 Druk op de [REGISTRATIE] toets de groep (met de geregistreerde 3 Selecteer sjabloon) die u wilt wijzigen. Druk vervolgens op de [ENTER] toets. - Blader naar het juiste menu met behulp van de [Vorige] of [Volgende] toets.
4.INVOERGEGEVENS WIJZIGEN (vervolg) de sjabloon die u wilt wijzigen 5 Selecteer en druk vervolgens op de [EDIT] toets. het “Wachtwoord” (5 cijfers) voor de 6 Voer geselecteerde sjabloon in. Druk vervolgens op de [ENTER] toets. - Sla stap 6 over als het wachtwoord niet is ingesteld bij de registratie van de sjabloon. op de toets “NAAM 1”, “NAAM 2” en/ 7 Druk of “GEBRUIKERSNAAM”. - Als u op de [NAAM 1] toets drukt, opent het invoermenu voor tekens ("3.TEKENS INVOEREN" pagina 142).
9 Druk op de [ENTER] toets. - De gegevens van de sjabloon zijn gewijzigd. De gegevens van de gebruikersgroep wijzigen De gegevens van de openbare groep kunnen niet worden gewijzigd. op de [TEMPLATE] toets op het 1 Druk bedieningspaneel. 2 Druk op de [REGISTRATIE] toets. de “GEBRUIKERSGROEP” die 3 Selecteer u wilt wijzigen en druk vervolgens op de 11 [EDIT] toets. - Blader naar het juiste menu met behulp van de [Vorige] of [Volgende] toets.
4.INVOERGEGEVENS WIJZIGEN (vervolg) het “Wachtwoord” (5 cijfers) voor de 4 Voer geselecteerde groep in. Druk vervolgens op de [ENTER] toets. - Sla stap 4 over als het wachtwoord niet is ingesteld bij de registratie van de groep. op de [NAAM] toets en/of op de 5 Druk [GEBRUIKERSNAAM] toets. - Als u op de [NAAM ] toets drukt, opent het invoermenu voor tekens ("3.TEKENS INVOEREN" pagina 142). Voer een naam in van maximaal 20 tekens.
5. SJABLOON VERWIJDEREN Overbodige sjablonen kunnen worden verwijderd. U kunt ook gebruikersgroepen verwijderen. Een sjabloon verwijderen op de [TEMPLATE] toets op het 1 Druk bedieningspaneel. 2 Druk op de [REGISTRATIE] toets. de groep (waarin de sjabloon is 3 Selecteer geregistreerd) die u wilt verwijderen. Druk vervolgens op de [ENTER] toets. - Blader naar het juiste menu met behulp van de [Vorige] of [Volgende] toets.
5.SJABLOON VERWIJDEREN (vervolg) de sjabloon die u wilt 5 Selecteer verwijderen en druk vervolgens op de [VERWIJDEREN] toets. het “Wachtwoord” (5 cijfers) voor de 6 Voer geselecteerde sjabloon in. Druk vervolgens op de [ENTER] toets. - Sla stap 6 over als het wachtwoord niet is ingesteld bij de registratie van de gebruikersgroep. 7 Druk op de [VERWIJDEREN] toets. - De geselecteerde sjabloon wordt verwijderd. 11 238 11.
Een gebruikersgroep verwijderen op de [TEMPLATE] toets op het 1 Druk bedieningspaneel. 2 Druk op de [REGISTRATIE] toets. de gebruikersgroep die u wilt 3 Selecteer verwijderen en druk vervolgens op de [VERWIJDEREN] toets. - Blader naar het juiste menu met behulp van de [Vorige] of [Volgende] toets. - Toets het nummer van de gewenste gebruikersgroep in om het juiste menu meteen te openen. het “Wachtwoord” (5 cijfers) voor de 4 Voer geselecteerde groep in. Druk vervolgens op de [ENTER] toets.
5.SJABLOON VERWIJDEREN (vervolg) 5 Druk op de [VERWIJDEREN] toets. - De geselecteerde groep is verwijderd. 11 240 11.
12. KNIPPERENDE GRAFISCHE SYMBOLEN OP HET AANRAAKSCHERM 1. BESCHRIJVING KNIPPERENDE GRAFISCHE SYMBOLEN...........................................242 2. SYMBOOL PAPIER BIJVULLEN .......................................................................................244 De papierladen bijvullen.....................................................................................................244 Het tandem papierinvoermagazijn (optioneel) bijvullen .....................................................245 3.
1. BESCHRIJVING KNIPPERENDE GRAFISCHE SYMBOLEN De grafische symbolen op het aanraakscherm tonen de status van het apparaat. Als een van de grafische symbolen knippert, moet u de juiste handelingen uitvoeren. In onderstaand overzicht wordt verwezen naar de pagina waar de betreffende beschrijving staat vermeld. 1 2 3 13 4 12 5 11 6 7 10 9 8 1 : Symbool CONTROLEER ORIGINELEN Knippert wanneer een origineel in het automatisch documentinvoersysteem met omkeerinrichting is vastgelopen. "1.
8 : Symbool VASTGELOPEN PAPIER IN DE ONTGRENDELINGSEENHEID Knippert wanneer er papier is vastgelopen in de ontgrendelingseenheid. "6. Vastgelopen papier in de ontgrendelingseenheid" pagina 259. 9 : Symbool VERVANG TONERCARTRIDGE Knippert wanneer de tonercartridge bijna leeg is. "3.SYMBOOL VERVANG TONERCARTRIDGE" 10: Symbool VERVANG TONEROPVANGBAK Knippert wanneer de toneropvangbak bijna vol is. "4.SYMBOOL VERVANG TONEROPVANGBAK" pagina 246. pagina 253.
2. SYMBOOL PAPIER BIJVULLEN De papierladen bijvullen Als het papier in de geselecteerde papierlade of het optionele tandem papierinvoermagazijn bijna op is, knippert in het scherm het symbool van de papierlade of van het tandem papierinvoermagazijn. De melding “Papier bijvullen” verschijnt. Vul het papier als volgt bij. de papierlade voorzichtig naar buiten 1 Trek totdat deze niet verder kan. 2 Plaats papier in de papierlade(n). - Let het papier met de te bedrukken zijde naar boven.
Het tandem papierinvoermagazijn (optioneel) bijvullen het tandem papierinvoermagazijn 1 Trek voorzichtig naar buiten totdat het niet verder kan. het papier keurig uitgelijnd in bak (A) 2 Leg en bak (B). - Let het papier met de te bedrukken zijde naar boven. - Raadpleeg voor het maximum aantal vellen "Geschikte soorten en formaten kopieerpapier" pagina 36. - Maak het papier goed los. Leg het papier voor bak (A) tegen de rechterzijkant en voor bak (B) tegen de linkerzijkant.
3. SYMBOOL VERVANG TONERCARTRIDGE Wanneer de toner in de tonercartridge bijna op is, knippert het symbool VERVANG TONERCARTRIDGE. Als de zwarte toner bijna op is, verschijnt de melding, “Vervang zwarte tonercartridge”. Als de gele, magenta- of cyaankleurige toner bijna op is, verschijnt de melding “Vervang ***** tonercartridge. Druk op de *** toets”. Druk vervolgens op de [***] toets. 12 246 12.
Gebruik de originele toner Toshiba heeft als doelstelling het leveren van betrouwbare producten met een hoge afdrukkwaliteit. Koop alleen de originele Toshiba-toners zodat u zeker weet dat u milieuvriendelijke kwaliteitsproducten gebruikt.
3.SYMBOOL VERVANG TONERCARTRIDGE (vervolg) De zwarte (K) tonercartridge vervangen 1 Open de voordeur. op de vergrendeling en laat de 2 Druk cartridgehouder zakken (naar u toe). 3 Trek de cartridge er voorzichtig uit. - Als u de cartridge er niet recht uit kunt trekken, draai de cartridge dan tijdens het trekken rechtsom. Als het niet lukt, sluit dan de voordeur en schakel de stroom UIT en daarna weer IN. Wanneer de melding “Vervang zwarte tonercartridge” verschijnt, begint u opnieuw met stap 1.
de nieuwe tonercartridge een paar 4 Schud keer heen en weer om de toner los te maken. de tonercartridge rechtop en trek de 5 Houd verzegeling eruit in de richting van de pijl. 6 Plaats de cartridge. - Breng het (oranje) label op de copier in lijn met de (oranje) sluiting op de tonercartridge en plaats vervolgens de cartridge. - Als er toner op de cartridge is gemorst, verwijder dit dan zorgvuldig voordat u de cartridge plaatst.
3.SYMBOOL VERVANG TONERCARTRIDGE (vervolg) 8 Sluit de voordeur. - De melding “Wacht toner wordt toegevoegd” verschijnt. De copier begint automatisch toner toe te voeren. De gele (Y), magenta- (M), of cyaankleurige (C) tonercartridge vervangen * Raadpleeg de [Gebruikershandleiding] als u een cartridge wilt vervangen voordat het symbool VERVANG TONERCARTRIDGE gaat knipperen. * Bij het vervangen van een tonercartridge worden de te nemen stappen afgebeeld in het scherm.
cartridge beweegt naar de juiste 2 De positie om te worden vervangen. 3 Open de voordeur. op de vergrendeling en trek de 4 Druk cartridge eruit. Let op! Probeer NOOIT tonercartridges te verbranden. Dit kan een explosie veroorzaken. Gebruikte tonercartridges NIET weggooien. Geef ze terug aan de serviceleverancier. de nieuwe tonercartridge een paar 5 Schud keer heen en weer om de toner los te maken.
3.SYMBOOL VERVANG TONERCARTRIDGE (vervolg) de nieuwe tonercartridge vast en 6 Houd trek de verzegeling eruit in de richting van de pijl. 7 Plaats de cartridge. 8 Druk op de [GEREED] toets. - Als er twee of meer cartridges leeg zijn, herhaalt u de bovenstaande procedure vanaf stap 1 tot en met stap 6. 9 Sluit de voordeur. 12 252 - De melding “Wacht toner wordt toegevoegd” verschijnt. De copier begint automatisch toner toe te voeren. 12.
4. SYMBOOL VERVANG TONEROPVANGBAK Wanneer de toneropvangbak bijna vol is met gebruikte toner, gaat het symbool VERVANG TONEROPVANGBAK knipperen en de melding “Verwijder gebruikte toner” verschijnt. 1 Open de voordeur. de toneropvangbak er voorzichtig 2 Trek uit. Let op! Probeer NOOIT toneropvangbakken te verbranden. Dit kan een explosie veroorzaken. Gebruikte toneropvangbakken NIET weggooien. Geef ze terug aan de serviceleverancier. 3 Doe het deksel op de toneropvangbak.
5. SYMBOOL VASTGELOPEN PAPIER Wanneer er papier in de copier is vastgelopen, knippert het symbool of op het aanraakpaneel op de plaats waar het papier is vastgelopen. Verwijder het vastgelopen papier door middel van de volgende werkwijze. 1 8 7 5 9 10 11 4 12 2 3 6 1. Vastgelopen papier in het automatisch documentinvoersysteem met omkeerinrichting (optioneel) op de toets op het automatisch 1 Druk documentinvoersysteem met omkeerinrichting om de bovenklep te openen.
aan de groene knop om de 2 Draai vastgelopen originelen te verwijderen. er nog steeds vastgelopen originelen 3 Als zijn, draait u de groene knop in de tegenovergestelde richting van stap 2. Verwijder de originelen. 4 Til de groene hendel op. - Verwijder de eventueel aanwezige vastgelopen originelen. de groene knop aan uw kant in de 5 Draai richting van de pijl en verwijder alle vastgelopen originelen.
5.SYMBOOL VASTGELOPEN PAPIER (vervolg) de invoerklep originelen op en 6 Til verwijder alle vastgelopen originelen. de invoerklep originelen zakken, 7 Laat beweeg de groene knop naar voren en open de onderklep. 8 Verwijder het vastgelopen papier. 9 Sluit de boven- en onderklep. 12 2. Vastgelopen papier in het gebied van de papierlade 1 Open de klep. 256 12.
2 Verwijder het vastgelopen papier. 3 Sluit de klep. 3. Vastgelopen papier in het tandem papierinvoermagazijn (optioneel) 1 Open de klep. 2 Verwijder het vastgelopen papier. 12 Vastgelopen papier in het externe, extra grote papierinvoermagazijn (optioneel) -Open de klep zoals hiernaast is afgebeeld en verwijder het vastgelopen papier. 3 Sluit de klep.
5.SYMBOOL VASTGELOPEN PAPIER (vervolg) 4. Vastgelopen papier in de handinvoergeleiding het vastgelopen papier uit de 1 Trek handinvoergeleiding. 5. Vastgelopen papier in de automatische duplexer of de handinvoergeleiding 1 Controleer open is en open vervolgens de automatische duplexer. Let op! - Zorg ervoor dat uw vingers niet bekneld raken tussen het apparaat en de automatische duplexer. Dit kan verwondingen veroorzaken. - Raak het metalen gedeelte van de geleidingsplaat niet aan.
6. Vastgelopen papier in de ontgrendelingseenheid of de handinvoergeleiding en 1 Controleer de automatische duplexer open zijn. Open vervolgens de klep van de ontgrendelingseenheid. de groene knop in de richting van de 2 Draai pijl naar binnen en verwijder het vastgelopen papier. de klep van de 3 Sluit ontgrendelingseenheid en breng de automatische duplexer en de handinvoergeleiding weer terug in de oorspronkelijke positie. - Beide zijden van de automatische duplexer goed sluiten. 7.
5.SYMBOOL VASTGELOPEN PAPIER (vervolg) 2 Open de klep van de fusereenheid. knop (A) in en open de 3 Druk transportgeleiding. (A) het vastgelopen papier in de 4 Verwijder fusereenheid. de transportgeleiding en de klep van 5 Sluit de fusereenheid. Druk de 12 ontgrendelingshendel van de fuser omhoog zodat u de klep van de ontgrendelingseenheid, de automatische duplexer, en de handinvoergeleiding weer in de oorspronkelijke positie terug kunt brengen.
het papier met beide handen naar 7 Trek buiten. 8. Vastgelopen papier in de bridge unit (optioneel) de klep van de bridge unit met 1 Open behulp van de handgreep. het vastgelopen papier in de 2 Verwijder bridge unit. 12 z Verwijder het vastgelopen papier in de fusereenheid als dat handiger is. 3 Sluit de klep van de bridge unit.
5.SYMBOOL VASTGELOPEN PAPIER (vervolg) 9. Vastgelopen papier in de perforatoreenheid (optioneel) de voorklep van de 1 Open perforatoreenheid (optioneel). 2 Til de perforatoreenheid omhoog. de groene knop zodanig dat de pijl 3 Draai in het gebied op het label komt. - In deze toestand staat de perforator open zodat het papier kan worden verwijderd, zoals op de afbeelding is te zien. - Als er nog vastgelopen papier is, opent u de bovenste klep van de finisher om het te verwijderen.
10. Vastgelopen papier in de finisher (optioneel: MJ-1024/1023) de bovenklep van de finisher totdat 1 Open deze open blijft staan. - Verwijder het vastgelopen papier. Houd de geleiding omhoog en verwijder 2 het vastgelopen papier in de uitvoer. 3 Sluit de bovenklep.
5.SYMBOOL VASTGELOPEN PAPIER (vervolg) 11. Vastgelopen papier in de finisher met enkelvoudige nieteenheid (optioneel: MJ-1022) aan de hendel en koppel de finisher 1 Trek voorzichtig los van de copier. de groene hendel op en verwijder het 2 Til vastgelopen papier. Verwijder het vastgelopen papier in de 3 papieruitvoer. 4 Koppel de finisher aan de copier. Let op! Let erop dat uw vingers niet bekneld raken tussen de copier en de finisher (optioneel). 12 264 Dit kan verwondingen veroorzaken. 12.
12. Vastgelopen papier in de finisher met rughechtereenheid (optioneel: MJ-1024) * Alleen wanneer de finisher met rughechtereenheid (MJ-1024, optioneel) is geïnstalleerd de voordeur van de finisher met 1 Open rughechtereenheid. de groene hendel naar rechts en 2 Schuif verwijder het vastgelopen papier. op het onderste gedeelte van de 3 Druk groene hendel.
5.SYMBOOL VASTGELOPEN PAPIER (vervolg) het vastgelopen papier en 4 Verwijder breng de hendel weer terug in de oorspronkelijke positie. 5 Draai de rechterknop linksom. op de linkerknop en draai deze 6 Druk rechtsom. 12 266 het vastgelopen papier aan de 7 Verwijder uitvoerzijde van de rughechtereenheid. 12.
de hendel omhoog en open de 8 Til uitvoerklep van de rughechtereenheid. - Verwijder het vastgelopen papier. 9 Sluit de uitvoerklep en de voordeur.
6. NIETJES BIJVULLEN (OPTIONEEL) Wanneer het nietjesmagazijn bijna leeg is,verschijnt de melding, “Controleer nietjesmagazijn”. Vul het nietjesmagazijn bij volgens de onderstaande werkwijze. Finisher met rughechtereenheid (MJ-1024)/meervoudige nieteenheid (MJ1023) 1 Open de voordeur van de finisher. - Indien MJ-1024 is geïnstalleerd - Indien MJ-1023 is geïnstalleerd 2 Verwijder het nietjesmagazijn. 12 268 12.
de lege nietjeshouder uit het 3 Verwijder nietjesmagazijn. de afsluitplaat die de nietjes 4 Verwijder vasthoudt. - Let erop dat de nietjes recht blijven liggen. de nieuwe nietjeshouder in het 5 Druk nietjesmagazijn totdat u een klik hoort. het nietjesmagazijn weer op de 6 Breng oorspronkelijke plaats aan. 12 - Duw het nietjesmagazijn terug totdat deze door de klauw wordt gevangen en met een klikgeluid wordt vergrendeld. 7 Sluit de voordeur van de finisher. Opm.
6.NIETJES BIJVULLEN (OPTIONEEL) (vervolg) Finisher met rughechtereenheid (MJ-1024) * Alleen wanneer de finisher met rughechtereenheid (MJ-1024, optioneel) is geïnstalleerd 1 Open de voordeur van de finisher. de rughechtereenheid voorzichtig 2 Schuif naar voren. de hendel van de rughechterhouder 3 Trek (1) naar u toe en draai (2) deze 90º in de richting van de pijl. (2) (1) 12 270 12.
de lege nietjeshouder en plaats 4 Verwijder een nieuwe houder. - Vervang beide nietjeshouders door nieuwe houders. de rughechterhouder weer terug in 5 Breng de oorspronkelijke positie. - Trek de hendel van de rughechterhouder (1) naar u toe en draai (2) deze 90º in de richting van de pijl. (2) (1) de rughechtereenheid weer terug 6 Breng in de oorspronkelijke positie. of er papier van het formaat 7 Controleer A3, A4-R of B4 in de copier aanwezig is.
6.NIETJES BIJVULLEN (OPTIONEEL) (vervolg) Finisher met enkelvoudige nieteenheid (MJ-1022) de handgreep aan en koppel de 1 Trek finisher voorzichtig los van de copier. 2 Verwijder het nietjesmagazijn. de lege nietjeshouder uit het 3 Verwijder nietjesmagazijn. 12 4 Plaats de nieuwe nietjeshouder. - Duw een nieuwe nietjeshouder in het nietjesmagazijn totdat u een klik hoort. - Verwijder de afsluitplaat (die de nietjes vasthoudt) pas als de nietjeshouder in het magazijn is geplaatst. 272 12.
de afsluitplaat terwijl u de 5 Verwijder nietjes recht omhoog houdt. het nietjesmagazijn weer terug in 6 Breng de oorspronkelijke positie. - Duw het nietjesmagazijn terug totdat deze door de klauw wordt gevangen en met een klikgeluid wordt vergrendeld. Als de melding “Controleer nietjesmagazijn” nog steeds zichtbaar is, herhaalt u de bovenstaande werkwijze van stap 1 tot en met 6. 7 Koppel de finisher aan de copier.
7. VASTGELOPEN NIETJES VERWIJDEREN (OPTIONEEL) Wanneer de kopieën niet worden geniet in de nietfunctie, verschijnt de melding, “Controleer nietmachine”. Dit betekent dat de nietjes zijn vastgelopen. Verwijder de vastgelopen nietjes als volgt. Finisher met rughechtereenheid (MJ-1024)/meervoudige nieteenheid (MJ1023) 1 Open de voordeur van de finisher. - Indien MJ-1024 is geïnstalleerd - Indien MJ-1023 is geïnstalleerd 2 Verwijder het nietjesmagazijn. 12 274 12.
de knop in en laat de klep van de 3 Druk nieteenheid zakken. (A) - A: nieteenheid Let op! Het nietgebied niet aanraken. De nieteenheid kan verwondingen veroorzaken. 4 Verwijder de vastgelopen nietjes. de knop ingedrukt en breng de klep 5 Houd van de nieteenheid weer terug in de oorspronkelijk positie. het nietjesmagazijn weer terug in 6 Breng de oorspronkelijke positie. 12 - Duw het nietjesmagazijn terug totdat deze door de klauw wordt gevangen en met een klikgeluid wordt vergrendeld.
7.VASTGELOPEN NIETJES VERWIJDEREN (OPTIONEEL) (vervolg) Finisher met rughechtereenheid (MJ-1024) * Alleen wanneer de finisher met rughechtereenheid (MJ-1024, optioneel) is geïnstalleerd 1 Open de voordeur van de finisher. de rughechtereenheid voorzichtig 2 Schuif naar voren. de hendel van de rughechterhouder 3 Trek (1) naar u toe en draai (2) deze 90º in de richting van de pijl. (2) (1) 12 276 12.
de nietjeshouders uit de 4 Verwijder nietjesmagazijnen. de hendel (1) in en trek tegelijkertijd 5 Druk de knop (2) omhoog. (1) (2) de vastgelopen nietjes en breng 6 Verwijder de knop (2) weer terug in de oorspronkelijke positie. (2) Let op! Het nietgebied niet aanraken. De nieteenheid kan verwondingen veroorzaken. de nietjeshouders weer terug in de 7 Breng oorspronkelijke positie.
7.VASTGELOPEN NIETJES VERWIJDEREN (OPTIONEEL) (vervolg) de rughechterhouder weer terug in 8 Breng de oorspronkelijke positie. - Trek de hendel van de rughechterhouder (1) naar u toe en draai (2) deze 90º in de richting van de pijl. (2) (1) de rughechtereenheid weer terug 9 Breng in de oorspronkelijke positie. of er papier van het formaat 10 Controleer A3, A4-R of B4 in de copier aanwezig is. - Indien geen van deze papierformaten aanwezig is, kan het testen van de nieteenheid niet worden uitgevoerd.
Finisher met enkelvoudige nieteenheid (MJ-1022) de handgreep aan en koppel de 1 Trek finisher voorzichtig los van de copier. 2 Verwijder het nietjesmagazijn. de knop in en laat de klep van de 3 Druk nieteenheid zakken. (A) - A: nieteenheid Let op! Het nietgebied niet aanraken. De nieteenheid kan verwondingen veroorzaken. 4 Verwijder de vastgelopen nietjes.
7.VASTGELOPEN NIETJES VERWIJDEREN (OPTIONEEL) (vervolg) de knop ingedrukt en breng de klep 5 Houd van de nieteenheid weer terug in de oorspronkelijk positie. het nietjesmagazijn weer terug in 6 Breng de oorspronkelijke positie. - Duw het nietjesmagazijn terug totdat deze door de klauw wordt gevangen en met een klikgeluid wordt vergrendeld. 7 Koppel de finisher aan de copier. Let op! Let erop dat uw vingers niet bekneld raken tussen de copier en de finisher (optioneel). Dit kan verwondingen veroorzaken.
8. PERFORATORAFVAL VERWIJDEREN (OPTIONEEL) Wanneer de stukjes papier die uit de kopieën zijn geperforeerd zich tot een bepaald niveau hebben opgehoopt, verschijnt de melding “GEREED (OPVANGBAK PERFORATOR IS VOL)”. Verwijder het perforatorafval als volgt. 1 Open de klep van de perforatoreenheid. de zwarte opvangbak naar buiten en 2 Trek verwijder het perforatorafval. de opvangbak weer terug in de 3 Breng oorspronkelijke positie. 4 Sluit de klep van de perforatoreenheid.
9. SYMBOOL BEL VOOR SERVICE/MELDING PERIODIEK ONDERHOUD Symbool Bel voor service Probeer nooit zelf het apparaat te repareren, uit elkaar te halen, of aan te passen. U kunt brand veroorzaken of een elektrische schok krijgen. Neem altijd contact op met uw serviceleverancier voor onderhoud of reparatie van het binnenwerk van de copier. Als het symbool BEL VOOR SERVICE knippert en de melding “Vastgelopen papier in copier, druk op HELP” verschijnt, kunt u niet meer kopiëren.
12 283
12 284 12.
13. ONDERHOUD 1. DAGELIJKS ONDERHOUD...............................................................................................286 2. OPLOSSEN VAN EENVOUDIGE PROBLEMEN...............................................................
1. DAGELIJKS ONDERHOUD Dagelijks onderhoud Werking AAN-/UIT-schakelaar Wij raden u aan de copier elke morgen in te schakelen met behulp van de AAN-/UIT-schakelaar zodat u op elk moment kopieën kunt maken.
2. OPLOSSEN VAN EENVOUDIGE PROBLEMEN Controleer de volgende punten. Neem contact op met uw leverancier als de problemen zich blijven voordoen. Probeer NOOIT zelf de copier te repareren, uit elkaar te halen, of aan te passen. U kunt brand veroorzaken of een elektrische schok krijgen. Neem ALTIJD contact op met uw leverancier voor onderhoud of reparatie van het binnenwerk van de copier.
2.OPLOSSEN VAN EENVOUDIGE PROBLEMEN (vervolg) De afdrukdichtheid (zwarting) is te laag Te controleren punten Wat moet u doen Zie pagina Is de melding “Vervang tonercartridge” in het scherm verschenen? Vervang de tonercartridge. "3.SYMBOOL VERVANG TONERCARTRIDGE" pagina 246.
De kopieën zijn gevlekt Te controleren punten Wat moet u doen Zie pagina Is de klep voor originelen, of het optionele automatisch documentinvoersysteem met omkeerinrichting, goed gesloten? Voorkom externe belichting door de klep voor originelen, of het documentinvoersysteem, goed te sluiten. "Een origineel op de glasplaat leggen" pagina 47. Is de glasplaat voor originelen, de klep voor originelen, of het scangebied vuil? Maak de oppervlakken schoon. "Wekelijks onderhoud" 286.
2.OPLOSSEN VAN EENVOUDIGE PROBLEMEN (vervolg) De kopieën zijn niet volledig Te controleren punten Wat moet u doen Zie pagina Is het formaat en de richting van het origineel alsmede de reproductiefactor geschikt voor het papierformaat? Gebruik kopieerpapier van hetzelfde formaat als het origineel, of stel de reproductiefactor in die geschikt is voor het papierformaat. "1.PAPIERSELECTIE" pagina 66, "3.VERKLEINEN EN VERGROTEN" pagina 72.
13 291
13 292 13.
14. SPECIFICATIES EN OPTIES 1. Specificaties e-STUDIO3511/4511.....................................................................................294 2. SPECIFICATIE VAN DE OPTIES ......................................................................................297 3. PAKLIJST...........................................................................................................................305 4. COMBINATIEMATRIX KOPIEERFUNCTIE ....................................................................
1.
Reproductiefactor Actueel formaat: 100±0,5% Zoom: 25-400% (in stappen van 1%) Voor het documentinvoersysteem met omkeerinrichting 25-200% (in stappen van 1%) Papiervoorra ad Papierlade 600 vel (64 g/m2) Handinvoer 100 vel (64 g/m2) Instelling afdrukdichtheid (zwarting) Zwart (K): magnetisch auto-tonersysteem geel (Y)/magenta (M)/cyaan (C): optisch auto-tonersysteem Belichtingsregeling Automatische en handmatige keuze uit 11 belichtingsstappen Omgevingsfactoren (bij normaal gebruik) Temperatuur:
1.Specificaties e-STUDIO3511/4511 (vervolg) Continu kopieersnelheid Papiersoort Papierformaat Eenheid: vellen.min.
2.
2.
Opslagcapaciteit (Zie "Aanvaardbare omstandigheden voor het rughechten" rughechterlade) pagina 84 voor de (MJ-1024 niet geladen met gemengd papier) Functie Niet sorteren Sorteren/ stapelen Geladen met nietjes Nummer lade 1 2 1 2 1 2 A4, A5-R, B5, LT, ST-R, 147 (1000) 147 (1000) 147 (1000) 147 (1000) 147 (1000 vel of 30 sets) 147 (1000 vel of 30 sets) *1 *1 73,5 (500 vel of 30 sets) 73,5 (500 vel of 30 sets) *1 *1 A3, A4-R, B4, B5- 73,5 R, FOLIO, LD, (500) LG, LT-R, COMP 73,5 (500)
2.
(MJ-1023 geladen met gemengd papier) Functie Niet sorteren Sorteren/ stapelen Geladen met nietjes Nummer lade 1 2 1 2 1 LD en LT 73,5 (500) 73,5 (500) 73,5 (500) 73,5 (500) 73,5 mm, 500 vel of LG en LT-R 73,5 (500) 73,5 (500) 73,5 (500) 73,5 (500) A4-R en FOLIO 73,5 (500) 73,5 (500) 73,5 (500) 73,5 (500) A3 en A4 73,5 (500) 73,5 (500) 73,5 (500) 73,5 (500) B4 en B5 73,5 (500) 73,5 (500) 73,5 (500) 73,5 (500) 30 sets. 2 *1 73,5 mm, 500 vel of 30 sets. *1 *1.
2.
(MJ-1022 geladen met gemengd papier) Functie Niet sorteren Sorteren/ stapelen Geladen met nietjes Nummer lade 1 2 1 1 Combinatie van verschillende papierbreedten 15 (100) 49 (350) LD en LT 15 (100) 49 (350) 15 (100) 49 (350) 80 vel of 15 sets 15 (100) 49 (350) 15 (100) 49 (350) 110 vel of 15 sets 15 (100) 49 (350) 15 (100) 49 (350) 80 vel of 15 sets 15 (100) 49 (350) 15 (100) 49 (350) 110 vel of 15 sets LG en LT-R A3 en A4 B4 en B5 2 - - 2 - - 300 vel of 15 sets *1 *
2.
3.
306 14.SPECIFICATIES EN OPTIES YES NO NO YES NO YES Staple sort Magazine sort Magazine sort & Saddle stitch Hole punch Saddle stitch Rotate sort YES YES SADF Image direction The function set first takes precedence. NO: YES Page number The functions can be combined.
YES NO YES YES YES YES NO NO YES YES YES YES YES YES YES YES YES YES YES YES YES YES NO YES NO YES YES YES YES YES YES YES NO NO YES YES YES YES YES YES YES YES YES YES YES YES The function set first takes precedence. NO YES The functions can be combined.
308 14.SPECIFICATIES EN OPTIES YES YES Warm Cool *1 *1 *1 *1 *1 YES *1 *1 *1 *1 *1 YES ACS YES YES YES YES YES YES YES YES *1 *1 *1 YES Full colour *1 *1 *1 *1 *1 YES *1 *1 *1 *1 *1 YES Black Colour mode The functions can be combined. The function set first takes precedence.
INDEX Numerics 1-Sided Originals -> 1-Sided Copies (default setting) .............................................................. 88 1-Sided Originals -> 2-Sided Copies ................. 88 2 IN 1/4 IN 1 .....................................................113 2-Sided Originals -> 1-Sided Copies ................. 90 2-Sided Originals -> 2-Sided Copies ................. 89 A Acceptable copy paper types and sizes ............ 36 Acceptable Original Types and Sizes ................
INDEX (Cont.) Cost Advantage ................................................... 7 COVER COPYING .......................................... 122 Cover sheet copying ......................................... 57 Creating a Bookbinding Margin ....................... 107 Creating a Right or Left Margin ....................... 106 Currently selected drawer size .......................... 27 D DAILY INSPECTION ....................................... 284 Date and time ..............................................
INSERT SOURCE 2 ........................................ 126 Inside the Single-feed Mode ............................. 51 INTERNET FAX ...................................... 161, 162 Internet Fax Transmission Overview ............... 162 INTERRUPT button ..................................... 24, 57 INTERRUPT COPYING .................................... 57 Items for Daily Check ...................................... 284 J JAM RELEASING UNIT MISFEED ................. 242 JOB STATUS ...........................
INDEX (Cont.) PRINTING STORED DOCUMENT ................. 219 Printing the Stored Document with Added/Changed Settings ................................ 221 Priority Transmission ....................................... 178 Private Print ..................................................... 190 PRIVATE PRINT JOB ...................................... 190 PROOF PRINT JOB ........................................ 188 R RECALLING TEMPLATE ................................ 225 Receiving from POP3 Server ...........
TOUCH PANEL ..................................... 20, 24, 27 Touch panel contrast adjustment volume .......... 20 Touch-buttons .................................................... 27 Tray load capacity ....................................... 81, 84 Trays ................................................................. 77 Trimming ..........................................................118 Trimming/Masking ............................................118 TURNING ON THE POWER SWITCH .............
INDEX (Cont.
TOSHIBA TEC Netherlands Imaging Systems Pelmolen 26 3994XZ HOUTEN http://www.toshibatec-tnis.