9EL93* 23EL93*
Safety Precautions ................................................. 2 Air Circulation ..................................................... 2 Heat Damage...................................................... 2 Mains Supply ...................................................... 2 Warning .............................................................. 2 Do ....................................................................... 2 Do Not.................................................................
Safety Precautions English This equipment has been designed and manufactured to meet international safety standards but, like any electrical equipment, care must be taken to obtain the best results and for safety to be assured. Please read the points below for your own safety. They are of a general nature, intended to help with all electronic consumer products and some points may not apply to the goods you have just purchased.
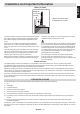
Installation and Important Information English Where to install Sturdy tie (as short as possible) * Button and stand style is dependent on model. P Clip Locate the television away from direct sunlight and strong lights. Soft, indirect lighting is recommended for comfortable viewing. Use curtains or blinds to prevent direct sunlight falling on the screen. the screen. Also, please be certain that small items cannot be inserted into slots or openings in the case.
Important safety information English WHEN THIS UNIT IS PLUGGED INTO THE WALL OUTLET, DO NOT PLACE YOUR EYES CLOSE TO THE OPENINGS TO LOOK INTO THE INSIDE OF THIS UNIT. USE OF CONTROLS OR ADJUSTMENTS OR PERFORMANCE OF PROCEDURES OTHER THAN THOSE SPECIFIED HEREIN MAY RESULT IN HAZARDOUS RADIATION EXPOSURE. DO NOT OPEN COVERS AND DO NOT REPAIR YOURSELF. REFER SERVICING TO QUALIFIED PERSONNEL. Headphone Warning Loud music can damage your hearing irreversibly.
• Ensure that the unit is sufficiently ventilated! Never place it next to or underneath curtains! • When you leave your home for a long period of time, unplug the AC power cord for safety. • This set should only be connected to a 220-240V AC 50Hz mains power supply. Do not attempt to connect it to any other type of supply. • The unit becomes warm when in operation. Do not place any covers or blankets on the unit in order to prevent overheating.
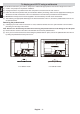
To display your LCD TV using a wall bracket If you decide to wall mount your LCD TV, always use a wall bracket appropriate for the size and weight of the LCD TV: English (1) Caution: Two people are required for installation. (2) Unplug and remove any cables and/or other component connectors from the rear of the TV. (3) Follow the instructions provided with your wall bracket.
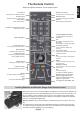
Simple at-a-glance reference of your remote control. Standby / On mode AV / Source To switch your TV to standby mode. To select input from external sources. Subtitle On/Off Freeze Picture To enable the displaying of subtitles. To freeze the picture on the screen. TEXT button Dual l-ll To call up text services. Stereo / Bilingual Transmission To select TV programme number Direct number entry. Analogue/Digital broadcasts To toggle between ATV and DTV broadcasts.
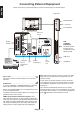
Connecting External Equipment English Before connecting any external equipment, remove the mains plug from the wall socket. Side View Standby Button +/- Controls P/V-AV Button HDMI Input Sockets DVB COMMON INTERFACE SCART Socket The DVB Common Interface is for a Conditional Access Module (CAM). USB Input * a decoder could be Digital Satellite, Free to Air or any other compatible decoder. Composite input & decoder* PC Input ANT. (Aerial) Input SPDIF Coaxial Out Component Input Aerial cable: ...
English Connecting an HDMI® or DVI Device to the HDMI Input The HDMI input on your television receives digital audio and uncompressed digital video from an HDMI source device or uncompressed digital video from a DVI (Digital Visual Interface) source device. This input is designed to accept HDCP (High-Bandwidth Digital-Content Protection) programme material in digital form from EIA/CEA-861-D–compliant [1] consumer electronic devices (such as a set-top box or DVD player with HDMI or DVI output).
Connecting a Computer Connecting a USB Device English To Connect a Computer To Connect a USB Device With either an RGB/PC or an HDMI connection, you can watch your computer’s display on the television. When connecting a PC to the PC input on television, use an analogue RGB (15-pin) computer cable. • It is possible that certain types of USB devices (e.g. MP3 Players) may not be compatible with this TV.
Standby / On button +/- control/volume buttons Programme / Volume / AV Function Timer LED Standby LED Remote Control Sensor Switching on Using the Controls and Connections on the TV Make sure that the mains plug is connected to the power and the standby LED lights up in red. Press the button on the left side of the television to switch the television on and the standby LED turns green. To put the television into Standby, press on the remote control. To view the television, press again.
Initial Installation English Before switching on the television put your decoder and media recorder to Standby if they are connected and ensure the aerial is connected to your television. To set up the television, use the buttons on the remote control as detailed on page 7. to input the values of frequency, symbol rate and network ID; use the or button to select a modulation mode. • Press OK to start initial setup for all available channels. Note: The searching progress bar will move along the line.
General Operation English Basic Operations Stereo and Bilingual Transmissions If stereo or dual language broadcasts are transmitted, the word Stereo or Dual will appear on the screen each time positions are changed, disappearing after a few seconds. If the broadcast is not in stereo, the word Mono will appear. Stereo… Press Viewing Channel List Channel list allows you to quickly find the channel you are searching for. • Press OK to bring up the channel list menu as shown below.
General Operation, continued English Input Selection Electronic Programme Guide • Press the button on your remote control repeatedly button to for directly changing sources. Or press the display the input list and use or to select a certain input and press OK to switch to the selected input. • Display the Electronic Programme Guide for digital channels by pressing GUIDE, and the TV guide will appear as below.
Features in Menu Picture Menu Press MENU button and select PICTURE by using button. Press OK to enter the PICTURE menu. or English Please note that some of the functions might be unavailable in certain input source. MPEG NR: Selects an option from Off, Low, Middle and High. Press RETURN to go back to the previous menu. PICTURE Press MENU to exit. ... Picture Settings Active Backlight Control On 3D Colour Management Off OK Enter Sound Menu ...
Features in Menu, continued English following screen. Setup Menu Press MENU and select SETUP by using the or button. Press OK to enter the SETUP menu. Updating Wizard SETUP 1: “V0.08” update to “V0.10” Language German Country Germany Tuner Mode Antenna Are you sure to update the firmware? Channel Install ... Channel Settings ... AV Connection ... Select Diagnostics ...
English Features in Menu, continued Reset TV: Press OK and input your correct code. If you are sure to reset the TV, select OK and press OK to reset all the TV settings to the default. Then the initial setup wizard will appear. Note: The hint of TV's switching off will appear during the last minute if power off timer or sleep timer is activated. Press EXIT to keep the TV on and cancel TV's shutting down. Demo: Allows you to enable or disable the sticker demo feature.
Set Up Your TV English - Press OK to start search. When a desired channel is Auto Tuning As new services are broadcast, it will be necessary to retune the television in order to view them. Auto Tuning will completely retune the television and can be used to update the channel list. It is recommended that Auto Tuning be run periodically to ensure that all new services are added. All current channels and settings, i.e. locked channels, will be lost after Auto Tuning is done. 1.
English Use More of Your TV Setting Subtitles Parental Control If Subtitles are available for your current programme, pressing the SUBTITLE button will toggle Subtitles on or off. For digital programmes, you can set the subtitles type and subtitle language. 1. Select Channel Settings under the SETUP menu and press OK to enter. 2. Select Subtitle and Audio under the Channel Settings menu and press OK to enter.
Use more of your TV, continued English - Press Setting Timer You can set date/time, power on timer or power off timer for the TV. 1. Press MENU and use or to select APPLICATIONS, then press OK to continue. 2. Press or to select Clock and press OK to continue. • - Auto Synchronization: When On, the TV will detect the date and the time from digital channels. When Off, you can set the date and the time manually as below: - Date: Press or to move the highlight and use the numeric buttons to input the date.
HDMI-LINK Playback Device Control This is a new feature that uses CEC technology and allows you to control HDMI-LINK compatible devices from the TV remote control via HDMI connection. When there are two or more HDMI-LINK devices connected to the television, the device selection menu appears. Highlight the desired device, and then press OK to select.
Media Player English This TV allows you to enjoy photo, video or music files stored on a USB device. Start Media Player • When a USB device is detected, the TV enters the Media Player directly. • Or you can press QUICK button on the remote control and select Media Player by pressing the or button. Then press the OK button to enter. The following menu will be displayed automatically. Media Player - Parser: You can select Recursive to display all photos stored in the USB device. 3.
To Close the Media Player • Press EXIT on the remote control to close the media player. English - 23 - English Media Player, continued This TV allows you to enjoy photo, video or music files stored on a USB device.
Changing Picture Format English Depending on the type of broadcast being transmitted, programmes can be viewed in a number of formats. Press the QUICK button and select Picture Size. Press OK to display the option list, including Wide, 4:3, Super Live, 14:9, Subtitle, or Cinema. Use the or button to select one format. “Note: Using the special functions to change the size of the displayed image (i.e.
Your TV may not support different resolutions. Supported resolution modes are listed below. If you switch your PC to an unsupported mode, a warning OSD will appear on the screen.
AV and HDMI Signal Compatibility (Input Signal Types) English Source Supported Signals Available PAL 50/60 O EXT NTSC 60 O (SCART) RGB 50 O SIDE AV YPbPr HDMI1 HDMI2 RGB 60 O PAL 50/60 O NTSC 60 O 480i 60Hz O 480p 60Hz O 576i 50Hz O 576p 50Hz O 720p 50Hz O 720p 60Hz O 1080i 50Hz O 1080i 60Hz O 1080p 50Hz X 1080p 60Hz X 480i 60Hz O 480p 60Hz O 576i 50Hz O 576p 50Hz O 720p 50Hz O 720p 60Hz O 1080i 50Hz O 1080i 60Hz O 1080p 50Hz O 10
Media File Extension Format Video Remarks Audio (Maximum resolution/Bit rate etc.) MPEG2 MP@HL, MPEG4 SP, MPEG4 ASP, .avi H.264 BP LV4, MPEG1 layer2, H.264 MP LV4, MP3, 1920x1080 / 40M bit/sec, H.264 HP LV4, AC3, Motion JPEG: 320x240 / 30M bit/sec DivX 3.11, MPEG4 AAC-LC DivX 4.x, DivX 5.1, Motion JPEG MPEG4 SP, .mp4, MPEG4 ASP, .mov, H.264 BP LV4, .m4v H.264 MP LV4, MP3, MPEG4 AAC-LC 1920x1080 / 40M bit/sec H.264 HP LV4 Movie MPEG4 ASP, .mkv H.264 HP LV4, DivX 5.1 .
Specifications and Accessories English Broadcast Systems DVB-T DVB-C Video Input PAL, SECAM, NTSC 4.43 Stereo Nicam External Connections 1-SCART 1 Input 2-YPbPr Input 21-pin SCART RGB, A/V, S-VIDEO 3-AV2 ( via YPbPr) Input 4-HDMI 1/2 Input HDMI® (RGB Range supported) 5-PC Input 15-Pin Analogue RGB Signal 6-Digital Audio Output S/PDIF (Coaxial) USB Port Media Browser Interface Version: USB 2.0 Video + Audio L + R USB Class: Mass Storage File System: FAT32 Headphone Socket 3.
• [1] EIA/CEA-861-D compliance covers the transmission of uncompressed digital video with high-bandwidth digital content protection, which is being standardized for reception of high-definition video signals. Because this is an evolving technology, it is possible that some devices may not operate properly with the television. • MPEG Layer-3 audio coding technology licensed from Fraunhofer IIS and Thomson.
License Information on the Software Used in This Product English * This document is statement purpose only. Not concerned with operation of this product. The software pre-installed in this product consists of multiple, independent software components. Each software component is copyrighted by a third party. This product uses software components that are distributed as freeware under a third-party end-user license agreement or copyright notice (herein-after referred to as a “EULA”).
GNU LESSER GENERAL PUBLIC LICENSE Version 2.1, February 1999 Copyright (C) 1991, 1999 Free Software Foundation, Inc. 51 Franklin Street, Fifth Floor, Boston, MA 02110-1301 USA Everyone is permitted to copy and distribute verbatim copies of this license document, but changing it is not allowed. [This is the first released version of the Lesser GPL. It also counts as the successor of the GNU Library Public License, version 2, hence the version number 2.1.
English “modification”.) “Source code” for a work means the preferred form of the work for making modifications to it. For a library, complete source code means all the source code for all modules it contains, plus any associated interface definition files, plus the scripts used to control compilation and installation of the library. Activities other than copying, distribution and modification are not covered by this License; they are outside its scope.
You must give prominent notice with each copy of the work that the Library is used in it and that the Library and its use are covered by this License. You must supply a copy of this License. If the work during execution displays copyright notices, you must include the copyright notice for the Library among them, as well as a reference directing the user to the copy of this License.
English consistent application of that system; it is up to the author/ donor to decide if he or she is willing to distribute software through any other system and a licensee cannot impose that choice. This section is intended to make thoroughly clear what is believed to be a consequence of the rest of this License. 12.
THE SOFTWARE IS PROVIDED “AS IS”, WITHOUT WARRANTY OF ANY KIND, EXPRESS OR IMPLIED, INCLUDING BUT NOT LIMITED TO THE WARRANTIES OF MERCHANTABILITY, FITNESS FOR A PARTICULAR PURPOSE AND NONINFRINGEMENT OF THIRD PARTY RIGHTS.
The FreeType Project is copyright (C) 1996-2000 by David Turner, Robert Wilhelm, and Werner Lemberg. All rights reserved except as specified below. English 1. No Warranty THE FREETYPE PROJECT IS PROVIDED `AS IS’ WITHOUT WARRANTY OF ANY KIND, EITHER EXPRESS OR IMPLIED, INCLUDING, BUT NOT LIMITED TO, WARRANTIES OF MERCHANTABILITY AND FITNESS FOR A PARTICULAR PURPOSE.
Cleaning the screen and cabinet... Turn off the power, clean the screen and cabinet with a soft, dry cloth. We recommend that you do not use any proprietary polishes or solvents on the screen or cabinet as this may cause damage. Disposal... The following information is only for EU-member states: Disposal of products The crossed out wheeled dust bin symbol indicates that products must be collected and disposed of separately from household waste.
English Questions and Answers Below are the answers to some of the most common queries. For more information, go to www.toshiba.co.uk Q A Q A Q A Q A Q A Why is there no sound or picture? Check the television is not in standby mode. Check the mains plug and all mains connections. Why is there a picture but no sound? Check the volume has not been turned down or that sound mute has not been selected. What can cause a poor picture? Interference or a weak signal. Try a different television station.
Below are the answers to some of the most common queries. For more information, go to www.toshiba.co.uk Q A Q A Q A Why doesn't the Media Browser feature operate? Make sure that USB is connected correctly. Incorrect behaviour may occur with a USB Hub connection. Why is the digital channel locked? Parental control is activated. Check parental settings. Why are some encrypted digital channels unavailable? Your subscription needs upgrading. Contact your service provider.
0810-144 122 (7,3 ct/min aus dem Festnetz der Telekom Austria, Mobil ggf.