Networking Documents.
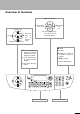
Description of the machine paper tray paper feeder document tray automatic document feeder scanner cover control panel paper exit tray Symbols on the display Selected options will be highlighted with an arrow (»).
Overview of functions M select functions C return to previous menu K colour copy OK confirm selection / choose between options, move the cursor on the display Z scan to PC i help X stop, return to stand-by mode K black-and-white copy L redial W send an SMS; the lamp next to the key will flash when messages are received v If this symbol flashes please read the display O contrast & broadcast – send a fax or SMS to several recipients f%F resolution Y start fax transmission a call up directory entries
Contents Safety instructions .......................... 5 SMS.................................................. 20 Installation........................................ 6 Send SMS ................................................................ 20 Receiving an SMS ................................................... 20 Unpacking ................................................................. 6 Set-up........................................................................ 6 Loading paper ................
Safety instructions Please read and follow all warning notices and instructions. The e-STUDIO60F should be installed on a level and stable surface. The surface should be smooth and horizontal. The machine may be damaged if it falls and may cause serious injury, especially to small children. Place the e-STUDIO60F at least 10 cm away from other electrical devices and objects. Do not place the e-STUDIO60F in direct sunlight.
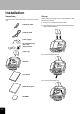
Installation Unpacking Set-up Unpack the box and check that it includes the following: Please read all warning notices and instructions and follow them precisely. telephone cable 1 Remove the transport protection strips. 2 Insert the paper tray in the slots provided behind the paper feed mechanism. network cable power supply ink cartridges and chip card “Plug ’n Print” paper tray 3 Pull out the paper exit tray. machine user guide 4 Pull up the document tray.
Loading paper Please use only paper which is specifically intended for use with ink cartridge printers (standard format is A4 210×297 mm, 80 g/m²). Follow the instructions of the manufacturer. Next connect the telephone plug to the line socket on the wall.
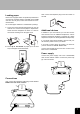
v If you want to connect the e-STUDIO60F to a PC, please refer to the chapter PC connection. You must install the software first and then connect the e-STUDIO60F to the PC! After you have connected the e-STUDIO60F to the mains, it will prompt you to make some basic settings as follows. 3 Take the ink cartridges out of their packaging and remove the protective strip. v Please make sure that the protective strip was removed completely.
7 Insert the chip card “Plug ’n Print” with the contacts facing up into the slot under the control panel and confirm with OK. Remove the cartridge and repeat the process for the second cartridge.
4 Click “Next” and follow the instructions on the screen. You will be prompted to accept a license agreement. After the installation has finished, the PC has to be rebooted.
Settings You can print out a list of the current parameter settings by pressing M, 54 and OK. v To return to stand-by mode, press X as often as necessary. Date and time 1 Press M, 21 and OK. 2 Enter the date and time and confirm with OK, e. g. 12 09 03 16 30 OK for September 12th 2003, 4:30 p. m. Your number and name 1 Press M, 22 and OK. 2 Enter your fax number (max. twenty digits) and press OK. (To enter a plus sign hold down the CTRL key and press Q; to enter a blank space, press the _@ key.
Directory Your e-STUDIO60F lets you create a directory by memorising single entries and lists of entries. Your machine can store up to 200 entries with names and fax numbers. You may also group several names together to create a list. When entering a name, you can use + to type capital letters (press and hold the + key and type the desired key). With CTRL you can type special characters (e. g. hold down CTRL and press W to type a hyphen).
Fax • pages that are smaller than A5. • pages from newspapers (printer’s ink). • stapled pages or pages with paper clips. • creased or torn pages. • wet pages or pages with corrections made with correction fluid; dirty pages or pages with a glossy or laminated surface. • pages joined with sticky tape or glue, with adhesive stickers such as “post-it®” notes, or pages which are too thin or too thick. 2 Place the document face down onto the glass.
2 Press a and use /, a letter or a number key to choose a record or a list from the directory. Receiving faxes Redial L If you don’t change the factory settings, faxes will be automatically printed. If the e-STUDIO60F has run out of paper or ink, incoming faxes will be stored in the memory. The last ten numbers dialled on the e-STUDIO60F will be stored in the redial memory. After inserting paper or cartridges, start printing by pressing Y. 1 Insert a document.
WITHOUT—no transmission report; however, your e-STUDIO60F notes all transmissions that took place in its log (see Hints & tips / Logs). ALWAYS—a report is printed with each transmission. ON ERROR—a report is only printed if the transmission failed or is abandoned. 2 Confirm with OK. Delayed transmission 1 Press M, 31 and OK. 5 Enter the number of pages and press OK (this is only necessary when you have chosen MULTIPLE above).
Copy aure auare a im pr prim sinsin a sa e elegleg a ta sata prim ætas e efidfid em estesæt t æt as as ta emrere ntereactsaqu ququ ctum suaumæesvin um t æt æ vinvin dicasect que æ dice aunu ecoco nulloqu rellosinque eleg e nu leb dic co qu a leb nu pr sp sp llo fidatæ vin im sppr on saeleb one atatauau dic onim rere sp tea saa te su emaure te sullo coes a sina a primonte su pr nu ata ta aessin recta um leb su t sin t sp a e a qu e æt at leg ae sa as e im asrequ e legeæt au estreæt cota o lege sata fid æ em
FAST—for good quality documents, without drawings or small details NORMAL—for documents with drawings or small characters QUALITY—for maximal resolution Press OK. 5 Your e-STUDIO60F can reduce or magnify a specific part of a document from 25% to 400%. Set the desired zoom value with the key pad and press OK. ZOOMING 9 If you have chosen colour copy, you can adjust the RGB values. All colours can be defined as combinations of red (R), green (G) and blue (B).
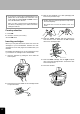
Scan to PC Open the scan window Z 3 Align it with back left corner of the scanner (marked with arrows). The following points are the most common causes of problems when inserting documents into the feeder. Do not insert ... 2 Place the document face down onto the glass. Place the document face up into the document feeder (up to 10 pages on 60–90 g/m² paper).
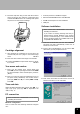
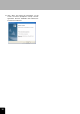
Click on the lower left icon to create a preview, click on the lower right icon to start scanning. Click on “Profile” to create different profile for different document types you want to scan. A profile contains all important settings for a certain type of document. To create a profile, first make all settings and then choose “New” profile. Enter a profile name and click “Save”.
SMS Your e-STUDIO60F lets you send SMS messages all over the world. SMS (Short Message Service) was originally devised for mobile communication, but it is now available in many countries via regular telephone lines. Availability of the SMS service depends on the country and operator. Your e-STUDIO60F has been pre-set to use the SMS service in your country . If it does not work correctly, please contact your SMS service provider and change these settings (see Advanced settings / SMS settings).
Advanced settings Settings list SMS settings You may print a list of your e-STUDIO60F’s parameter settings to monitor any changes made to the default parameters! When you select your country when setting up the e-STUDIO60F, the parameters for SMS emission and reception will be pre-set. If these settings do not work or if you want to use another provider, you will need to change these settings. Your SMS service provider will provide the numbers you need. Press M, 54 and OK.
Saturation is the colour judged in proportion to its brightness: closer to - is greyer, + has greater saturation. M, 276, OK—RGB All colours can be defined as combinations of red (R), green (G) and blue (B). You can change the values for each of these basic colours.
Hints & tips Paper feed Before you call the technical service In case of a paper jam, try to pull out the paper. If this is not possible, press M, 74 and OK to eject the paper. If you can’t solve your problem with the proposals above, please unplug your e-STUDIO60F from the mains and reconnect it after a few minutes. If a document is not drawn in correctly by the automatic feeder, press the button on the scanner cover and open the scanner cover.
3 Open the cartridge holder. 8 Close the machine. 4 Remove the empty cartridge. 9 Insert the chip card “Plug ’n Print” with the contacts facing up into the slot below the control panel to update the cartridge information. Press OK. 5 Take the ink cartridge out of its packaging and remove the protective strip. Be careful not to touch the nozzles and the contacts.
TX—transmission DOC—in deposit POL—polling TR—ongoing commands v After each operation, the machine locks automatically. To unlock the keyboard, enter WITHOUT in step 3. SMS—SMS transmission Locking numbers Press M, 62 and OK. Use / to select a document from the waiting queue and confirm with OK. Modify the parameters and confirm with OK. You can also just lock the keypad for numbers with a code. Transmissions are only possible from numbers included in the directory.
2 Use a cloth to lightly wipe the scanner glass (A). 2 Place a lint-free cloth on a smooth surface. Moisten half of the cloth (A). Hold the cloth firmly to prevent creasing. Place the nozzle end of the cartridge on the moistened half (A) and move the cartridge in the direction of the arrow (B) into the dry half (C). Do this once only . B 1x A A 3 Close the scanner. Cleaning and aligning the cartridges If the quality of printed documents deteriorates, the cartridges should be cleaned and aligned.
Annex Functions list 35 MANUAL CALL ................................................... 23 Start fax transmission manually Press M, 51 and OK to print a function list. The list will be printed. SMS Directory 41 SEND SMS .......................................................... 20 Send an SMS message 11 ADD NAME.......................................................... 12 Add a name with a number to the directory 42 READ SMS ..........................................................
74 PAPER FEED ....................................................... 23 Feed paper through the mechanism Printer Type colour bubble ink-jet Technical settings Resolution 600×600 dpi Your e-STUDIO60F is delivered with factory-default settings. However, you may adjust it to meet your requirements by changing the technical parameters. Printing speed b/w up to 9 pages/minute, colour up to 5 pages/minute Printing width 203.2 mm Printing length b/w 284.3 mm, colour 279.
any cause which prevents the Product from operating or functioning correctly which arises from or is attributable to either acts, omissions, events or accidents beyond the reasonable control of TOSHIBA TEC Germany Imaging Systems GmbH including without limitation acts of God, war, riot, civil commotion, malicious or deliberate damage, fire, flood, or storm, natural calamity, earthquakes, abnormal voltage or other disasters; additions, modifications, disassembly, transportation, or repairs by any person othe
Index A additional devices 7 additional telephone 10, 14 add list 11 add name 11 aligning the cartridges 24 answering device 13 answer code 13 automatic document feeder 2 automatic feeder 17 automatic printing 20 B beep 20 broadcast 3, 13 C “creative” copy 15 cancel 11 cancelling a transmission 24 capacity 23 care and maintenance 24 cartridges 22 cartridge alignment 8 cartridge capacity 23 CD-ROM 9 change cartridges 22 chip card 6 cleaning the machine 24 commands 23 confirm 3 connections 7 contrast 3, 13 co
(To C5) EN 5103 506 4024.1 TOSHIBA TEC Germany Imaging Systems GmbH Carl-Schurz-Straße 7 41460 Neuss, Germany Tel.: +49 (0) 2131 1245-0 Fax: +49 (0) 2131 1245-402 www.toshiba-europe.