
Spec Sheet


Toshiba America Information Systems, Inc. Imaging Systems Division
9740 Irvine Boulevard, Irvine, California 92618
= 1-800-550-8674 = www.ipvideo.toshiba.com
2006 Toshiba American Information Systems, Inc.
All specifications are subject to change.
Made for Toshiba by BATKO
1
8
2
4
6
7
9
3
1
10
7
5
1/4
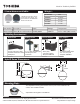
Installation Steps for FB-3610-93-HB-C
** Do not immediately remove the plastic film on the lower dome section. Install the wall bracket (FSM3610)
or ceiling bracket (FSP3610). Make sure it is safely secured in place.
a) Use a SLOT screwdriver, release the four screws holding the lower dome to the upper dome section (
see #1).
IMPORTANT: 1/4 turn counter-clockwise to unlock each screw (1).
Carefully remove the lower dome (use a light twisting movement if needed to undo).
b) Attach the upper dome section to the mounting bracket (2).
c) The camera voltage output is factory set to 12VDC.
Pull cables through the bracket (4). Fix the camera to the mounting plate. (5) The camera is adjustable ± 45
o
for the
best viewing angle.
d) Connect the 24VAC power cable to the "AC IN" terminals (6). Insure that the transformer isn't connected to the 120VAC
source at this time (input: 24VAC, 100VA).
e) Connect the pre-wired plug-in Jack terminal to camera (7).
g) Check all connections before connecting the transformer to 120VAC. If the camera doesn't work, verify the fuse (8) and the
transformer ! Complete camera testing. Insure voltage output is 12VDC. Adjust if necessary (3).
h) Fix the lower dome section back in place arrow above arrow (9) and secure the four screws. IMPORTANT: 1/4 turn clockwise
to lock each screw (10). Remove the protective film off the lower dome.
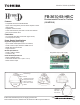
Heater Board
Power Supply
Outdoor Dome for TOSHIBA
IK-WB15A