
user manual
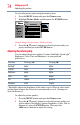
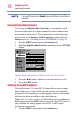
Table Of Contents
- Introduction
- Connecting Your TV
- Overview of cable types
- Connecting a VCR, antenna, cable TV, or camcorder
- Connecting a Blu-ray™ / DVD player, satellite receiver with ColorStream® or VCR
- Connecting an HDMITM or DVI device to the HDMITM input
- HDMITM CEC connection
- Connecting a digital audio system
- Connecting an analog audio system
- Connecting a computer
- Using the Remote Control
- Menu Layout and Navigation
- Setting up your TV
- Setting up your TV
- Selecting the video input source
- Labeling the video input sources
- Tuning channels using the Channel Browser
- Favorites browser
- Selecting the picture size
- Scrolling the TheaterWide® picture (TheaterWide 2 and 3 only)
- Using the Auto Aspect feature
- Using the 4:3 Stretch
- Using the FREEZE feature
- Adjusting the picture
- Using closed captions
- Adjusting the audio
- Selecting the PIN code
- Using parental controls (for USA region)
- Using the input lock feature
- Locking channels
- Using the PC settings feature
- Using the Media Player
- Setting the sleep timer
- No Signal Power Down
- Using HDMITM CEC
- Using the HDMITM settings feature
- Using the HDMITM settings feature
- Displaying TV status information
- Understanding the last mode memory feature
- Using the TV’s Advanced Features
- Troubleshooting
- Specifications
- License Agreement
74
Setting up your TV
Adjusting the picture
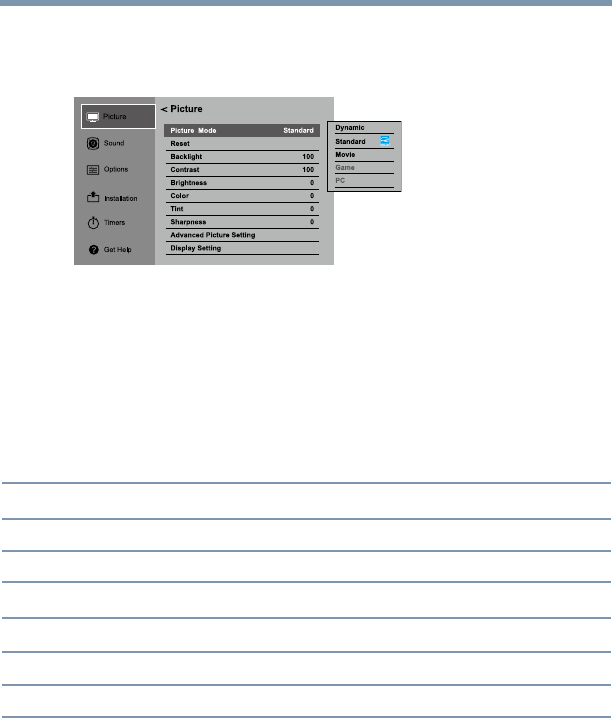
To select the picture mode using the menu system:
1 Press the MENU button and open the Picture menu.
2 Highlight Picture Mode, and then press the ENTER button.
(Sample Image) Picture menu - Mode selection
3 Press the ▲/▼(arrow) buttons to select the picture mode you
prefer, and then press the ENTER button.
Adjusting the picture quality
You can adjust the picture quality (Contrast, Backlight, DynaLight
®
,
Brightness, Color, Tint, and Sharpness.) to your personal
preferences.
Selection Pressing (◄) Pressing (►)
Backlight* darker lighter
Contrast lower higher
Brightness darker lighter
Color paler deeper
Tint reddish greenish
Sharpness softer sharper
* Backlight: adjusts the brightness of the entire screen. When in video mode
and no signal is input, this selection is automatically set to 0. (Settings are
stored in memory.)
To adjust the picture quality:
1 Press the MENU button and open the Picture menu.
2 Press the ▲/▼(arrow) buttons to select the picture quality you
wish to adjust ( Backlight, Contrast, Brightness, Color, Tint, or
Sharpness), press the ENTER button. Then press the
◄/►(arrow) buttons to adjust the setting.