OWNER’S MANUAL LCD COLOUR TV 32AV800E 32AV800V 32AV800T © 2011 TOSHIBA CORPORATION All Rights Reserved
English Contents Introduction...................................................................................................................................... 3 Welcome to Toshiba .................................................................................................................. 3 Important Safety Instructions ...............................................................................................................................3 Important information.............................
English Introduction Welcome to Toshiba About the fuse • Thank you for purchasing this Toshiba LCD Colour TV. This manual will help you use the exciting features of your new TV. In a three pin earthing-type, the fuse fitted in this plug is approved by ASTA or BSI to BS1362. It should be only be replaced by a correctly rated and approved type and the fuse cover must be refitted. • Instructions in this manual are based on using the remote control.
English Introduction 4) Never block or cover the slots and openings in the cabinet. • Never place the TV so that it is facing upward or on its side. • Never place the TV in a closet, bookcase or other similar area where the ventilation is poor. • Never drape a newspaper, tablecloth or curtain on the TV. • Never stand the TV on cloth or other material placed between the TV and supporting furniture. • When installing the TV against a wall, always keep the TV at least 10 cm away from the wall.
! " # • Purchase a VESA compatible wall bracket: VESA 200x200/ M6 screws/ 8mm/ 20kg. • Locate your ideal TV position on the wall. • Fix the wall bracket firmly on the wall. English Introduction Use 1) sources, such as lighted candles or nightlights, on or close to the TV. High temperatures can melt plastic and lead to fires. • Secure the TV to the bracket using the 4 mount screws on the back and the centre of the TV.
English Introduction 5) When the TV will not be used for a long period of time, such as during vacation or travel, remove the power plug from the wall outlet for safety. • The TV is not completely disconnected from the power supply line, as minute current is consumed even when the Power switch is turned off. Service 1) Never repair, modify or disassemble the TV by yourself. It may cause a fire or an electric shock. Consult a service technician for inspection and repairs.
Cleaning English Introduction 3) Some pixels of the screen do not light up 1) Remove the power plug before cleaning. Never use solvents such as benzine or thinner to clean the TV. • These solvents may distort the cabinet or damage its finish. • If rubber or vinyl products remain in contact with the TV for a long time, a stain may result. If the cabinet becomes dirty, clean it with a soft, dry cloth. When cleaning the surface of the LCD display, wipe the panel surface gently with a soft, dry cloth.
English Getting started Connecting an aerial Exploring your new TV Optimum reception of colour requires a good signal and will generally mean that an outdoor aerial must be used. Installing the remote control batteries The exact type and positioning of the aerial will depend upon your particular area. Insert two R03 (AAA), 1.5V batteries matching the –/+ polarities of the battery to the –/+ marks inside the battery compartment. Remove the battery cover.
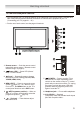
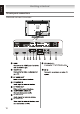
English Getting started TV front and side panel controls • You can operate your TV using the buttons on the side panel or the remote control. The back and side of the panel provide the terminal connections to connect other equipment to your TV ( “Connecting your TV” pages 21 – 25 ). • For the use of each control, see the pages in brackets. 1 Remote sensor — Point the remote control toward this remote sensor ( “Remote control effective range” on page 8).
English Getting started TV back panel connections 32AV800E/32AV800T/32AV800V AV AUDIO IN AV VIDEO IN 10
English Getting started Learning about the remote control Location of controls In TV and AV1/2 mode: Display current channel information normal picture 11
English Getting started Turning the TV on Learning about the menu system Switching on the TV We suggest you familiarize yourself with the display charts before using the menu system: Connect the power cord to a wall outlet, the power indicator lights in red (standby mode). on the TV right Press on the remote control or side panel, the power indicator lights in green. Note: If you watch black and white programmes when the colour system mode is set to Auto, colour noise may appear on the screen.
Note: • In the video input mode, Auto Tuning and Manual Tuning are not available. • If you do not make a selection for a while, the menu display disappears automatically. • If you want to close the menu display instantly, press EXIT or MENU. • To return to the previous menu, press RETURN. Changing the position 1 Enter the desired position number using the Number buttons on the remote control. For positions below 10, use 0 and the requiring number. Ex., for position 1.
English Getting started Programming channels into the TV’s channel memory Auto tuning 1 From the CHANNEL menu, press or to select Auto Tuning. Channel Auto Sound System Auto 63.25MHZ Auto Tuning Manual Tuning Swap Select EXIT Exit Press or to start the automatic search. CH: 1 77.25MHZ 3 When the automatic search is completed, the TV will automatically return to programme position 1. 4 Closing the Auto Tuning menu, press EXIT. The search will begin for all available stations.
English Picture adjustment Available Picture Size and Position Control Selecting the picture size Press MENU b utton o n th e rem ote co ntrol, th en press / bu tton to selec t PICTURE menu. n Screen Mode 16:9 PICTURE Picture Mode 4:3 User Brightness 50 Contrast Saturation 50 50 Tint 50 Sharpness 50 Backlight Colour Temp.
English Using the TV’s features (General) a t S Adjusting the Picture Mode Activating the picture preferences This TV offers the choice of personalising the picture style. You can customise current picture mode settings while selecting User. Standard, Dynamic, Mild and User are preset options and affect may features/settings within the TV. 1 1 From the PICTURE menu press or to select Picture Mode.
English 3 English Using the TV’s features (General) A dju stin g E qualizer Other features settings Setting the Set Up menu Press / bu tto n to select Equalizer , an d press / bu tto n to enter sub menu , press / b utto n to select a c irtain fren qu en cy, and u se / b utto n to adju st its value. MENU SET UP menu. SET UP SOUND 120Hz Language 50 500Hz 50 1.
English English Using the TV’s features (General) Setting the manual setting menu Setting the TIMER menu Press MENU then press / button to selec t TIMER m enu . Press MENU, then press or to display the CHANNEL menu. CHANNEL Channel TIMER No Signal Sleep Off Sleep Timer Off 1 Color System Auto Sound System Auto Skip Off Fine Tune 63.
English 6 From the CHANNEL menu, press or to select Swap, and press / b utton to enter submenu. Current Channel, Target Channel and Exchange are used to swap two programs' numbers. CHANNEL Current Channel 1 Target Channel 1 English Using the TV’s features (General) Teletext Languages To select a language for teletext: 1 Press MENU, then press or to display the SET UP menu. 2 Press or to select Teletext Language, then press or to select the required language.
English Using the TV’s features (General) Using Subtitles 1 Press on the remote control to display the current Subtitle status. While this status is displayed, press again to change the setting. Note: If Subtitle is On, the TV will always display subtitles whenever such information is available for the channel you are viewing. Teletext buttons on the remote control Below is an introduction to the teletext buttons on your remote control and their functions.
English English Connecting your TV Side and back connections Please always refer to the owner’s manual of the equipment to be connected for full details. Connection examples: / Video Games • Before connecting any external equipment, turn off all main power switches. until the • To select desired input, press input list appears on the screen. Press or to make the selection, and then press OK .
English The HDMI input is designed for best performance with 1080i (50/60 Hz) and 1080p (50/60 Hz) high-definition video signals, but will also accept and display 576i/ p, 720p (50Hz); 480i/p, 720p (60 Hz: except for E-EDID) signals. Please see “Acceptable Video signals through HDMI terminals“ on page 24.
English Connecting a computer Signal names for mini D-sub 15 pin connector Pin assignment for RGB/PC terminal To connect a PC to the RGB/PC terminal on the TV: 5 10 15 An analogue RGB (15 pin) computer cable can be connected. Pin No. 1 2 3 4 TV back view Mini D-sub 15 pin 5 6 7 8 Computer RGB PC cable Conversion adapter (if necessary) English Connecting your TV 1 6 11 Signal name Pin No.
English English Connecting your TV Acceptable Video signals through HDMI terminals Format Resolution V. Frequency H. Frequency Pixel Clock Frequency 480i 720 x 480i 60Hz 15.734KHz 27MHz 480p 720 x 480p 60Hz 31.5KHz 27MHz / 27.027MHz 576i 720 x 576i 50Hz 15.625KHz 27MHz 576p 720 x 576p 50Hz 31.25KHz 54MHz 720p 1280 x 720p 50Hz 37.5KHz 74.25MHz 720p 1280 x 720p 59.94Hz / 60Hz 44.9KHz / 45KHz 74.17MHz / 74.25MHz 1080i 1920 x 1080i 50Hz 28.125KHz 74.
English English Connecting your TV Using the PC Setting Adjusting the clock phase of the picture • This function may not be available for some signal or if no signal is received. If the clock phase, which synchronize the PC signal and LCD display, is not optimized, the picture will blur. • The optimum points of the clock phase and sampling clock adjustments may be incomprehensible according to the input signals. This function enables you to adjust clock phase and display a clear picture.
English Troubleshooting Before calling a service technician, please check the following table for a possible cause of the symptom and some solutions. Symptom and solution • When you just buy and start to use this TV, a flickering may be caused in the screen. In this case, switch off the TV, then switch on it again to cure the condition. • The cold cathode fluorescent lamp used for the back light on this TV has longevity.
English English Reference section Broadcast system Broadcast transmission systems of each country or region Asia M.E. Country or region Colour Sound Bahrain, Kuwait, Israel, Oman, Qatar, United Arab Emirates, Yemen, etc. PAL B/G China, Vietnam PAL D/K China Hong Kong PAL I Iraq, Islamic Republic of Iran, Lebanon, Saudi Arabia, etc. SECAM B/G Russian Federation, etc. SECAM D/K Myanmar, etc. NTSC M Country or region Colour Sound Australia, New Zealand, etc.
English Aspect ratio 16:9 LCD COLOUR TV Visible size English Reference section 32AV800*-80.0cm Model 32AV800E 32AV800T 32AV800V Number of pixels 1,366 (H) dots x 768 (V) dots Audio power Power source 110-240V, 50/60Hz 32AV800*- 5W + 5W Power consumption 32AV800*-120W Input/Output terminals AV1/2 Dimensions 32AV800*-56.5(H)cmx79.6cm(W)x23.