MP7630 Multimedia Projector Operator’s Guide MP7630 Projecteur multimédia Guide de l’opérateur MP7630 Multimedia-Projektor Benutzerhandbuch Proyector de Multimedia MP7630 Manual del Usuario MP7630 Proiettore Multimediale Manuale dell’operatore MP7630 Bruksanvisning för multimediaprojektor MP7630 Multimedia Projector Gebruiksaanwijzing MP7630 A TEXAS MENTS PRODU CT D LP INSTRU Lo © 3M IPC 2000 ck 3M™ Multimedia Projector MP7630 1
3M™ Multimedia Projector MP7630 © 3M IPC 2000
Table of Contents Please click on any section to jump to that section Introduction Safeguards .................................................................................... 4 Thank You for Choosing 3M .......................................................... 6 Warranty ........................................................................................ 6 Shipping Box Contents .................................................................. 7 Optional Accessories ................................
Introduction Intended Use Before operating the machine, please read the entire manual thoroughly. The 3M Multimedia Projector MP7630 was designed, built, and tested for use indoors, using 3M lamps, 3M ceiling mount hardware, and nominal local voltages.
Introduction Product Safety Labels The following safety labels are used on or within the MP7630 projector to alert you to items or areas requiring your attention. Tested To Comply With FCC Standards Model No.: FP850 FOR HOME OR OFFICE USE Rating: ~100-240V, 50-60Hz, 2A This device complies with part 15 of the FCC Rules.
Introduction Thank You for Choosing 3M Thank you for choosing 3M multimedia projection equipment. This product has been produced in accordance with 3M’s highest quality and safety standards to ensure smooth and troublefree use in the years to come. For optimum performance, please follow the operating instructions carefully. We hope you will enjoy using this high performance product in your meetings, presentations, and training sessions.
Introduction Shipping Box Contents The 3M™ MP7630 Multimedia Projector is shipped with the necessary cables required for standard VCR, PC, Macintosh™ or laptop computer connections. Carefully unpack and verify that you have all of the items shown below. If any of these items are missing, please contact your place of purchase.
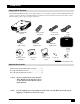
Introduction Part Identification 2 1 3 4 MP7630 A TEXAS MENTS PRODU CT D LP INSTRU 5 ck Lo 6 7 8 9 12 11 10 14 Laser Standby/On Source Menu Exit Freeze Blank R -C k Clic lic k LDrag - + 8 Standby/On Button External Control Pad (see next page) Remote Control Sensor Carrying Handle Image Tilt Control Kensington Lock Lamp Access Door (underneath unit) + Ch Up Mute Ch Down Reverse 1 2 3 4 5 6 7 8 9 +/- 0 Add/Erase 1. 2. 3. 4. 5. 6. 7.
Introduction Machine Characteristics The MP7630 Multimedia Projector integrates ultra-high bright lamp and TI™ DLP™ technology into a single unit. The MP7630 Multimedia Projector offers the following features: • • • • • • • Small and portable unit Easy to set up and use SVGA resolution and component video compatible Horizontal and vertical image inverting Horizontal and vertical image position control Ultra-high brightness projection lamp Ability to display 16.
Introduction Remote Control Identification Source Press button to change input source. Standby/On Laser Press STANDBY/ON button to begin projection mode (lamp on). To turn lamp off, press STANDBY/ON, then select YES on Shutdown screen. Select NO to continue running. Press button to turn on the Laser Pointer Exit Laser Standby/On Press button to exit menu screens. Source Menu Exit Menu Menu Selection Arrows Press buttons to change between the four menus. Press to display the menu screen.
Introduction Remote Control Features The remote control sensor is located near the back of the projector. The distance between the sensor and the remote control unit must be shorter than 4 meters (13 feet). Freeze The image will be frozen when the FREEZE button is pressed. A “Pause” icon appears at the lower right of the screen for three seconds during the freeze function. A “Play” icon appears at the lower right of the screen for three seconds when the freeze function is released.
Introduction Laser Press this button to generate the laser beam that functions as a red pointer on the screen. Laser button Disk Pad If the PS/2 (ADB) mouse cable is connected with the PC Notebook or Mac PowerBook mouse port, the Disk Pad can take over the Notebook or PowerBook mouse function. When the MAGNIFY function is activated, use the Disk Pad to move around the display areas. Note: The mouse function is not available when the MAGNIFY function is turned on.
System Setup Screen Chart Place the projector at the required distance from the screen according to the desired picture size (see the table below). Screen Size Lens center a Distance to Screen Width Height Diagonal Minimum Maximum 81 cm (32 in.) 61 cm (24 in.) 102 cm (40 in.) 140 cm (4.6 ft.) 433 cm (14.2 ft.) 122 cm (48 in) 91 cm (36 in.) 152 cm (60 in.) 214 cm (7.0 ft.) 655 cm (21.5 ft.) 163 cm (64 in.) 122 cm (48 in.) 203 cm (80 in.) 287 cm (9.4 ft.) 384 cm (28.7 ft.
System Setup Connecting to Various Equipment It only takes a few minutes to connect the 3M™ Multimedia Projector MP7630 to your computer, VCR, or other device. Caution Turn off power to all devices before making connections. Never plug anything into the projector or computer while any device is in operation. The MP7630 must be powered down when making connections. The mouse emulation may not work if the unit is not powered down before the mouse cable connections are made.
System Setup Apple™ Desktop Mouse The Macintosh operating system should recognize the MP7630 as a mouse without any drivers being loaded. VirtualMouse for PC Computer For IBM™ compatible computers, set the operating systems to Serial Mouse or PS/2 Mouse to recognize projector as the mouse pointer device. To set mouse driver information: a) Windows™ 95/Windows™ 98/Windows™ NT 1. Select Start/Settings/Control Panel. 2. Select Add New Hardware. 3. “Windows will now search for any PnP devices...” Click Next.
Operation Startup 1 ✓ Note: Make all cable connections and line hookups with the power off. Power 2 Standby/ON Standby/On Standby/On Standby/On 1. Plug power cord into wall socket. 2. Press the STANDBY/ON button • The ON indicator blinks green and then stays green. • The ON indicator will blink green during warm-up and lamp ignition. (When power is turned off, there is a 90-second reset period before the STANDBY/ON button will function again.) 3. Turn on all connected equipment.
Operation Main Menu Press “Menu” key and the main menu will display on the screen. Press “Menu” again to enter page items, and press and to select sub-menus. The main menu will go off automatically if there is no further action from user for 10 seconds. Press EXIT button to leave the current sub-menu, and press EXIT again to leave the main menu.
Operation DLP A TEXAS INSTRUMENTS PRODUCT Menu Exit MP7630 Menu MENU EXIT STANDBY/ON Keystone Keystone 00 Brightness Brightness 50 50 Contrast Contrast 50 50 ColorBalance Balance Color 11 Menu MENU Exit EXIT To Menu Items Menu 1 Menu x2 Keystone 00 Brightness 50 50 Contrast 50 50 Color Balance 11 Display Menu 18 3M™ Multimedia Projector MP7630 © 3M IPC 2000
Operation Display Menu Keystone (0-255) 128 Brightness 128 128 193 128 193 1 2 96 (0-255) 65 Contrast (0-255) 65 Color Balance (0-2) 0 © 3M IPC 2000 160 3M™ Multimedia Projector MP7630 19
Operation Image Menu To Menu Items 1 Menu Auto Auto Resize Resize x1 Menu Off Off On On H.Phase H.Phase 2 Menu x1 Menu 3 31 31 Menu x1 Menu Auto Resize H.Size H.Size 127 127 H.Position H.Position 165 165 V.Position V.Position 105 105 Will automatically adjust image to fit onto screen.
Operation Operation Menu To Menu Items 1 Menu x1 Menu 2 Menu En Fr Mirror Normal It De V-Inv Es N-Inv Sv Ne N/V-Inv x1 Menu 3 Language Auto Off 0(Stop) 15 Reset Press “+” or “-” to reset Menu x1 Menu Language Mirror English (En) French (Fr) Swedish (Sv) Dutch (Ne) V-Inv (Vertically Inverted) (Ceiling-mounted projection) H-Inv (Horizontally H/V-Inv (Horizontally and Inverted) Vertically Inverted) (Rear-screen (Ceiling-mounted and projection) Rear screen projection) 00:60:
Operation Shutdown 1 Standby/ON Standby/On Standby/On Standby/On 2 Wait 90 seconds 00:00:00 00:01:00 00:00:30 00:01:30 3 Power 1. Press the STANDBY/ON button. The Shutdown screen will display. Select the YES option (press arrow button or mini-joystick) to turn off. 2. The fan will continue to run for approximately 90 seconds. 3. Disconnect power cord from wall socket. 4. Disconnect cables if moving projector to new location.
Optional Video Module Features The Optional Video Module makes it possible to hook the MP7630 to a laser disc, VCR, or other video devices. Two versions will be available: an NTSC Package (with RCA connectors and television tuner), and a PAL package (with a SCART connector and no television tuner). NTSC Package: PAL Package: • NTSC Tuner Module • PAL Video Module • CATV • S-Video • S-Video • SCART connector • 3 RCA • Audio • Audio 1 Back of projector without Optional Video Module 4 3 2 1. 2. 3. 4.
Optional Video Module Attaching the Optional Video Module to the MP7630 Power down the projector before connecting the Optional Video Module or any other device. Failure to do so may cause serious damage. Caution 1. Precisely align the two metal tabs on the bottom of the module and insert into the corresponding slots on the back of the projector. 2. Slowly push the module to fit with the unit. Make sure that the module plugs into the AV con nection on the projector. 3.
Optional Video Module Image Sub-Menu This menu is only available when the input signal is from Video, S-Video, TV or CATV.
Optional Video Module Operation 1. Go into the menu system and move to the Source sub-menu. Use the Menu key on the control pad or remote control unit to scroll through items in the sub-menu. Select the Tuner items and press or keys to prompt out of the tuner menu. } Source PC Video S-Video Tuner 15 Volume Treble 8 Bass 8 Mute Tuner Off On Press "<-" or "->" to select 2. Use the Menu key on the control pad or remote control unit to scroll through the Tuner sub-menu.
Optional Video Module 3. After leaving the menu system, press the Scan button to scan all existing channels in that region. ✓ Note: Scan function must be done for the first use in certain regions to catch all the channels in the local CATV system. START SCANNING? Yes No After the “Start scanning” dialog box prompt, use the channel up/down key to select “Yes” or “No.” Press Return key to set.
Optional Video Module Source Menu } Source PC Video S-Video 15 Volume Treble 8 Bass 8 Mute Tuner 28 Tuner Off On Press "<-" or "->" to select 3M™ Multimedia Projector MP7630 © 3M IPC 2000
Maintenance Lamp Use and Replacement of Lamp The projector lamp has a normal operating time of approximately 1200 to 1500 hours, called the lamp life. During the normal lamp life, the picture will be bright and the colors clear. If the lamp is used beyond the normal lamp life, the picture will become dark and the colors poor. Always replace lamps with new ones. Using an old lamp in the projector could cause a malfunction.
Maintenance Lamp Replacement WARNING To reduce the risk of electrical shock, always turn off projector and disconnect power cord before changing lamp. 1. Turn the main power switch off and disconnect the power cord from the outlet. 2. Loosen screw and remove the lamp cover. If the lamp is hot, avoid burns by waiting 45 minutes until lamp has cooled. 3. Loosen three screws designated by arrows below. (It is strongly recommended to use a magneticheaded screwdriver, if possible.
Maintenance Resetting the Lamp Hours Please do the following within 10 minutes from turning power on if you replace the lamp after 1500 hours. 1. Press the Exit button on projector or remote control for three seconds to display the total used lamp time. 2, Press MENU button on projector or remote control during the lamp hour message. Then an adjustment message will appear. 3. Press or to select the setting. To select the default setting, select “Reset” (or “Cancel” to return to the default setting). 4.
Troubleshooting PROBLEMS NO POWER NO PICTURE IMAGE ISN'T SQUARE ON SCREEN POOR COLOR ✓ Plug the power cord into the AC inlet. ✓ Plug the power cord into the power inlet. ✓ Wait 2 minutes after turning off the projector before turning it back on. ✓ Check that you have selected the proper input source to project. ✓ Ensure that all cables are connected properly. ✓ Adjust the brightness and contrast. ✓ Remove the lens cap. ✓ Reposition the unit to improve its angle to the screen.
Troubleshooting Status Indicator Lights and Messages Message Displayed Meaning (and Solution, if applicable) SEARCHING Projector cannot identify input signal. INPUT SIGNAL DETECTED, ACTIVATING AUTO IMAGE Projector has identified input signal. SYNC IS OUT OF RANGE The input signal's horizontal frequency exceeds the range of the projector's. CHANGE THE LAMP AND RESET THE LAMP TIMER The lamp has been operated for over 1200 hours and needs to be replaced soon.
Service Information Accessories Description Part Number Power Cord (EU) ........................................................................................ DY-0205-1354-4 Power Cord (US) ........................................................................................ DY-0205-1356-9 Power Cord (UK) ....................................................................................... DY-0205-1355-1 Adapter, PS/2 Mouse ...........................................................................
Appendix Technical Specifications ✓ Note: All specifications are subject to change without notice. General Product name Model name Multimedia Projector MP7630 Optical Display system 1-CHIP DMD Lens Lamp F/Number: F/2.7 – F/3.4 150 W UHP lamp Focal Length: F = 72 – 108 mm (2.8 in. – 4.3 in.) Electrical Power supply AC100 ~ 240V, 6.5A ~ 2.9A, 50/60 Hz (Automatic) Power consumption 200 W (Max) Mechanical Dimensions 8 in. (W) x 2.6 in. (H) x 9.7 in.
Appendix Dimensions DLP A TEXAS INSTRUMENTS PRODUCT 246 mm ( 9.7 in ) Lock MP7630 MENU EXIT STANDBY/ON 202 mm ( 8 in ) 67 mm ( 2.6 in ) 67 mm ( 2.
Appendix Preset Display Resolution Table Resolution H Sync (kHz) V Sync (kHz) 640 x 350 31.5 70.1 640 x 400 37.9 85.1 720 x 400 31.5 70.0 720 x 400 37.9 85.1 VESA 640 x 480 31.5 60.0 VESA 640 x 480 37.9 72.8 VESA 640 x 480 35 66.7 Macintosh 640 x 480 43.3 85.0 VESA 800 x 600 35.2 56.3 VESA 800 x 600 37.9 60.3 VESA 800 x 600 46.9 75.0 VESA 800 x 600 48.1 72.2 VESA 800 x 600 53.7 85.1 VESA 832 x 624 49.7 74.5 Macintosh 1024 x 768 48.4 60.
Appendix Nationality Codes API TV System Code Definition NTSC Tuner Box 38 Area Channel NTSC USA 1 (STD) NTSC Taiwan 1 NTSC Canada 1 NTSC Chile 1 NTSC Columbia 1 NTSC Mexico 1 NTSC Peru 1 NTSC South Korea 1 NTSC Venezuela 1 NTSC Japan 4 PAL-N Argentina 5 PAL-N Paraguay 5 PAL-N Uruguay 5 PAL-M Brazil 6 2 (HRC) 3M™ Multimedia Projector MP7630 2 (IRC) © 3M IPC 2000
© 3M IPC 2000 3M™ Multimedia Projector MP7630 39
Important Notice All statements, technical information, and recommendations related to 3M’s products are based on information believed to be reliable, but the accuracy or completeness is not guaranteed. Before using this product, you must evaluate it and determine if it is suitable for your intended application. You assume all risks and liability associated with such use.