MULTIFUNCTIONAL DIGITAL COLOR SYSTEMS Copying Guide
©2008, 2009 TOSHIBA TEC CORPORATION All rights reserved Under the copyright laws, this manual cannot be reproduced in any form without prior written permission of TTEC. No patent liability is assumed, however, with respect to the use of the information contained herein.
Preface How to read this manual Thank you for purchasing TOSHIBA Multifunctional Digital Systems or Multifunctional Digital Color Systems. This manual describes how to use the copying functions of this equipment. Read this manual before using this equipment. Symbols in this manual In this manual, some important items are described with the symbols shown below. Be sure to read these items before using this equipment.
CONTENTS Preface....................................................................................................................................... 1 Chapter 1 BEFORE USING EQUIPMENT BASIC Menu for the Copier Function ..................................................................................... 8 Placing Paper.......................................................................................................................... 11 Acceptable copy paper .......................................
Specifying both the original size and the copy paper size separately ................................. 64 Specifying reproduction ratio manually................................................................................ 66 Copying photo originals in the optimal reproduction ratio for copy paper size (PHOTO ZOOM).................................................................................................................. 68 Selecting Finishing Mode ...................................................
Outside Erase ....................................................................................................................... 142 Chapter 5 IMAGE ADJUSTMENT Displaying IMAGE Menu ...................................................................................................... 146 Using Image Adjustment Functions ................................................................................... 147 Color balance (YMCK adjustment) ...............................................................
Combination matrix 1/2...................................................................................................... 201 Combination matrix 2/2...................................................................................................... 202 INDEX ...................................................................................................................................................................
BEFORE USING EQUIPMENT 1. This chapter describes what you need to know before using this equipment, such as the composition of the BASIC menu for the copying functions and how to place copy paper. BASIC Menu for the Copier Function ..................................................................................... 8 Placing Paper.......................................................................................................................... 11 Acceptable copy paper ............................
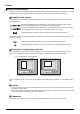
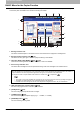
1 BEFORE USING EQUIPMENT BASIC Menu for the Copier Function When a few seconds have passed after you have turned the power ON, the BASIC menu for the copier function appears on the touch panel. The BASIC menu shows the following information: 20 19 18 17 16 15 1 14 2 13 12 3 4 5 6 7 8 9 10 11 1. Message indication area This shows a brief description of the functions or the current status of this equipment in message form. 2. Equipment status indication area ( P.
1 BEFORE USING EQUIPMENT 1.BEFORE USING EQUIPMENT 9. [ORIGINAL MODE] button ( P.59) This is for selecting an original mode. 10. Date and time 11. [JOB STATUS] button ( P.186) This is for confirming the processing status of copy, fax, scan or print jobs, and also for viewing their performing history. 12. [PROOF COPY] button ( P.38) This is for making a proof copy to check an image before making a large amount of copies. 13. Density adjustment buttons ( P.
1 BEFORE USING EQUIPMENT Equipment status indication area The equipment status indication area shows the following information: 5 1 4 3 2 1. Receiving tray indication ( P.40) This shows the tray to which copied paper exits. 2. [EXIT TRAY] button ( P.40) This is for switching receiving (exit) trays. 3. Drawer buttons ( P.55) These show the size of paper, amount of paper remaining in each drawer and the paper type set for the drawer.
1 BEFORE USING EQUIPMENT Placing Paper Acceptable copy paper The following paper can be placed and used for copying. The values are valid only when Toshiba-recommended paper is used. For the recommended paper, refer to the Quick Start Guide. y Do not place paper with mixed sizes or paper types in the same drawer. y Be sure that the height of the stacked paper does not exceed the line indicated on the guides.
1 BEFORE USING EQUIPMENT Feeder Bypass tray Paper type Maximum sheet capacity Plain paper, recycled paper (64 - 105 g/m2) (17 - 28 lb. Bond) 100 sheets (64 - 80 (17 - 20 lb. Bond) 80 sheets (81 - 105 g/m2) (21 - 28 lb. Bond) THICK 1 (- 163 g/m2) (- 90 lb. Index) 40 sheets THICK 2 (- 209 g/m2) (- 110 lb. Index) 30 sheets THICK 3 (- 256 g/m2) (- 140 lb. Index) 30 sheets THICK 4 *2, *3 (- 300 g/m2) (- 110 lb.
1 BEFORE USING EQUIPMENT 1.BEFORE USING EQUIPMENT Placing paper in drawers Follow the procedure below to place paper in a drawer. For acceptable copy paper, see the following page: P.11 “Acceptable copy paper” 1 Turn the power of this equipment ON. 2 Pull out a drawer carefully until it comes to a stop. 3 Push the part shown with an arrow (right side) of the side guide to unlock it. 4 Place paper in the drawer. y Up to 600 sheets (64 g/m2) (17 lb. Bond) can be placed in one drawer.
1 BEFORE USING EQUIPMENT 5 Move the end guide to the trailing edge of the paper while pushing its lower part in the direction of the arrows. 6 While holding the green lever of the front side guide, adjust the side guides to the paper size. Adjust the side guides with both hands. 7 Confirm that there is no extra gap between the paper and the side or end guides.
1 BEFORE USING EQUIPMENT 1.BEFORE USING EQUIPMENT 10 Push the drawer straight into this equipment carefully until it comes to a stop. Be careful not to let your fingers be caught when pushing the drawer into this equipment. This could injure you. The procedure differs as follows depending on the menu displayed after the drawer is closed. When “Did you change paper type?” appears 11 When the paper type is different from the one that was in the drawer, press [YES] on the touch panel.
1 BEFORE USING EQUIPMENT When “Did you change paper size and type?” appears 11 When the paper size and type are different from the one that was in the drawer, press [YES] on the touch panel. When it is the same, press [NO]. If you press [NO], the procedure is completed. 12 Select the size and type of the paper placed in the drawer on the touch panel. 1) Select the paper size. 2) Select the paper type if required ( 3) Press [OK]. P.19).
1 BEFORE USING EQUIPMENT 1.BEFORE USING EQUIPMENT Registering paper size When you place paper for the first time or you replace the paper with that of a different size, you need to register the size to this equipment. When paper size is set to be detected automatically: When [AUTO (mm)] or [AUTO (inch)] has been selected for the paper size, the following procedure is not required. The paper size is set automatically. 1 Press the [USER FUNCTIONS] button on the control panel.
1 BEFORE USING EQUIPMENT 3 Select the paper size on the touch panel. 1) Select the drawer in which you placed paper. 2) Select the paper size. To automatically detect the size of paper placed in a drawer: Select [AUTO (mm)] when A/B format paper is placed and [AUTO (inch)] when LT format paper is placed instead of selecting a specified paper size. The paper size is automatically registered to the equipment with the automatic paper size detection function when paper is placed in this drawer.
1 BEFORE USING EQUIPMENT 1.BEFORE USING EQUIPMENT Setting paper type When you place any special paper other than plain paper or that not used for normal copying, you need to set the thickness and attribute into this equipment. y The thickness and attribute can be set together. y When the thickness “THICK 1, 2 or 3”, or an attribute other than “NONE” is set for a drawer, the paper placed in this drawer will not be used for the automatic paper selection mode.
1 BEFORE USING EQUIPMENT 20 1 Press the [USER FUNCTIONS] button on the control panel. 2 Press the [USER] tab on the touch panel to display the user setting menu, and then press [DRAWER]. 3 Press [PAPER TYPE].
1 BEFORE USING EQUIPMENT 1.BEFORE USING EQUIPMENT 4 Select the paper type. 5 Press the [USER FUNCTIONS] or [COPY] button on the control panel. 1) Select the drawer in which you placed paper. 2) Select the paper type. The menu returns to the BASIC menu. Clearing the set paper type Press the drawer button on the menu in step 4, and then press the paper type whose setting you want to clear.
1 BEFORE USING EQUIPMENT y Paper in the right-hand tray is used first. When it runs out, paper in the left-hand tray will be moved automatically to the right-hand tray and fed. y A maximum of 2360 sheets (80 g/m2) (20 lb. Bond) can be placed in the 2 trays. However the stack height of the paper must not exceed the line indicated inside the side guides. P.11 “Acceptable copy paper” y The copy side may be noted on its wrapping paper. y Be careful not to cut your fingers when fanning the paper.
1 BEFORE USING EQUIPMENT 1.BEFORE USING EQUIPMENT 3 Push the drawer of the Tandem Large Capacity Feeder straight into this equipment carefully. When the paper on the right tray has run out, that on the left tray will be automatically shifted to the right tray. Do not slam the drawer shut. Stacked sheets may collapse and they cannot be transported correctly. Be careful not to let your fingers be caught when pushing the drawer into this equipment. This could injure you.
HOW TO MAKE COPIES 2. This chapter explains the basic copying procedures. Before Making Copies............................................................................................................ 26 Storage of color copies.........................................................................................................................................26 Forgery prevention function.................................................................................................................
2 HOW TO MAKE COPIES Before Making Copies Storage of color copies When storing color copies, be careful of the following: y Avoid a place exposed to light. The colors may fade when they are stored in such a place for a long time. y If copies are stored pressed between plastic sheets made of chloroethylene for a long time, toner may melt and stick to the plastic. For long-time storage, use polyethylene binders. y When a color copy is folded, toner at the folded part may flake off.
2 HOW TO MAKE COPIES Placing Originals Acceptable originals When the RADF (Reversing Automatic Document Feeder) is used, 2-sided originals can be automatically scanned one sheet after another. When the original glass is used, originals such as OHP films, tracing paper, booklet or 3-dimensional objects, that cannot be placed on the RADF can be scanned, as well as plain paper. Location Maximum size Original glass Paper weight — Length: 297 mm (11.69") Width: 432 mm (17.
2 HOW TO MAKE COPIES Placing originals on the original glass The original glass can be used for originals such as OHP films or tracing paper, as well as plain paper, that cannot be placed on the RADF. Do not place any heavy objects (4 kg (9 lb.) or over) on the original glass and do not press on it with force. Breaking the glass could injure you. 1 Raise the RADF. Raise it 60 degrees or more so that the size of the original can be detected correctly.
2 HOW TO MAKE COPIES 2.HOW TO MAKE COPIES Book-type originals You can place book-type originals on the original glass. Do not place any heavy objects (4 kg (9 lb.) or over) on the original glass and do not press on it with force. Breaking the glass could injure you. 1 Raise the RADF. 2 Open the desired page of the original and place it with its face down. Align it against the left rear corner of the original glass.
2 HOW TO MAKE COPIES Using the RADF (Reversing Automatic Document Feeder) Precautions Do not use the types of originals 1 to 8 shown below because such originals may cause misfeeding or damage to the equipment. 1. Badly wrinkled, folded or curled originals 2. Originals with carbon paper 3. Taped, pasted or cut-out originals 4. Clipped or stapled originals 5. Originals with holes or tears 6. Damp originals 7. OHP films or tracing paper 8. Coated paper (with wax, etc.
2 HOW TO MAKE COPIES 2.HOW TO MAKE COPIES Continuous feed mode The feeding mode is set at “continuous feed mode” by default. Once you set the originals and then press the [START] button, they are scanned page by page continuously. It is useful when you want to copy more than one original at one time. 1 Align all the originals. 2 Place the originals with their face up and align the side guides to the original length. Collate the originals in the order that you want them to be copied.
2 HOW TO MAKE COPIES Single feed mode When the feeding mode is set at “single feed mode”, an original is fed automatically as it is placed on the RADF. It is useful when you want to copy only 1 original sheet. P.134 “ADF -> SADF” 1 Align the side guides to the original length. 2 Insert the original with its face up and straight along the side guides. The original is automatically pulled in and then the menu of step 3 will be displayed on the touch panel.
2 HOW TO MAKE COPIES Making Copies Basic copying procedure Make copies following the procedure below. 3 4 5 2 RADF 1 Original glass OR 1 Make sure that paper is placed in the drawer(s). 2 Place the original(s). 3 Key in the desired number of copies if you want more than one copy. 4 Select the copy modes as required. For the types and sizes of acceptable paper and how to place it, see the following pages: P.11 “Acceptable copy paper” P.13 “Placing paper in drawers” P.
2 HOW TO MAKE COPIES 5 Press the [START] button on the control panel. Copying starts. The paper exits with its copied side down. Be careful because the paper exiting area and the paper itself are hot. The menu shown below may appear when you are using particular modes.
2 HOW TO MAKE COPIES 2.HOW TO MAKE COPIES Stopping and restarting copying 1 Press the [STOP] button on the control panel. 2 Press [MEMORY CLEAR] on the touch panel to stop copying. Press the [START] button on the control panel to restart. Copying or scanning stops. When you press [MEMORY CLEAR], the scanned data will be deleted and any waiting jobs will be performed. Even if you do not press [MEMORY CLEAR], the scanned data will be deleted by means of the automatic function clear.
2 HOW TO MAKE COPIES Scanning the next original during copying Even if copying is in progress or “READY (WARMING UP)” is displayed on the touch panel, you can scan the next original (auto job start). Up to 10 jobs can be stored in the memory. 1 Place the original(s). 2 Set the number of copy sets and the copy modes as required. The new job starts in the copy modes that you previously selected unless you select other modes. 3 Press the [START] button on the control panel.
2 HOW TO MAKE COPIES 2.HOW TO MAKE COPIES Interrupting copying and making other copies You can interrupt the copy job in progress to make other copies (interrupt copying). When restarting the interrupted job, you do not have to reselect copy modes that have been set because they are memorized in this equipment.
2 HOW TO MAKE COPIES Proof copy When you make a large amount of copies, you can check if they will be made exactly as you desire by copying only one page before copying them all (proof copy). Then you can change the modes or settings (e.g. the number of copy sets, receiving tray, page number, time stamp, sort/stapling, hole punching) after checking the proof copy.
2 HOW TO MAKE COPIES 2.HOW TO MAKE COPIES 6 Change the number of copy sets and copy modes as required after checking the proof copy. Modes or settings such as the number of copy sets, the receiving tray, page number, time stamp, sort/stapling and hole punching can be changed. If you want to change settings such as the reproduction ratio, density, original mode or 1/2-sided copying, you must finish the proof copy first. Then change these settings and scan the original again.
2 HOW TO MAKE COPIES Selecting exit tray You can select the exit tray. y Exit trays that can be selected vary depending on whether the finisher is installed or not. y The available exit tray may be restricted depending on copy modes and paper sizes. y Exit tray selection is set at automatic selection by default. Changing the exit tray The exit tray currently selected is displayed on the equipment status indication area. To change the exit tray, press [EXIT TRAY].
2 HOW TO MAKE COPIES Bypass Copying Bypass copying When you make copies on OHP film, sticker labels, Thick 4 paper or non-standard size paper, place copy paper on the bypass tray. Bypass copying is also recommended for copying on standard size paper which is not set in any of the drawers. If you select the paper size, you can utilize various functions such as the automatic paper selection (APS) or the automatic magnification selection (AMS). For details, see the following page: P.
2 HOW TO MAKE COPIES Bypass copying on standard size paper Copying on A3, A4, B4 and B5 size paper (in equipment other than for North America) / LD, LT, LG and ST-R size paper (in equipment for North America) 1 Place the original(s). 2 Place paper with its copy side down on the bypass tray. Then align the side guides to the paper length while holding the tab. When paper is placed, the menu for bypass copying appears. y The height of the paper must not exceed the indicator on the side guides.
2 HOW TO MAKE COPIES 2.HOW TO MAKE COPIES 4 Press [PAPER TYPE]. 5 Select the paper type and then press [OK].
2 HOW TO MAKE COPIES y If you select a wrong paper type, this could cause a paper jam or significant image trouble. y When you select a paper type, you can confirm it with the icons displayed on the equipment status indication area as shown below.
2 HOW TO MAKE COPIES 2.HOW TO MAKE COPIES 6 Select other copy modes as required, and then press the [START] button on the control panel. When you copy on sheets of OHP film, remove the copied OHP film one sheet at a time as they exit onto the receiving tray. If the sheets of OHP film pile up, they may get curled and may not be projected properly.
2 HOW TO MAKE COPIES 4 Press [OTHER] under “COPY”. The paper size is now set. If the paper size is not selected in this step, copying may be slowed down. 5 46 Press [PAPER TYPE].
2 HOW TO MAKE COPIES 2.HOW TO MAKE COPIES 6 Press the button of the same paper type as the paper you placed on the bypass tray. Then press [OK]. y If you select a wrong paper type, this could cause a paper jam or significant image trouble. y When you select a paper type, you can confirm it with the icons displayed on the equipment status indication area.
2 HOW TO MAKE COPIES Bypass copying on non-standard size paper You can use non-standard size paper within the sizes shown on the right. 148 - 432 mm (5.8" - 17") 100 - 297 mm (3.9" - 11.7") 1 Place the original on the original glass. 2 Place paper with its copy side down on the bypass tray. Then align the side guides to the paper length while holding the tab. When paper is placed, the menu for bypass copying appears. y The height of the paper must not exceed the indicator on the side guides.
2 HOW TO MAKE COPIES 2.HOW TO MAKE COPIES 4 Key in the dimension. 1) Press [LENGTH] and key in the value. (100 mm (3.94") to 297 mm (11.69")) 2) Press [WIDTH] and key in the value. (148 mm (5.83") to 432 mm (17.01")) 3) Press [OK]. Length and width are indicated as shown on the right: Width Length To call up the dimension data registered previously, press the desired button from [MEMORY 1] to [MEMORY 4], and then press [OK]. To register dimension data into the memory, see the following page: P.
2 HOW TO MAKE COPIES Registering non-standard size in the memory 50 1 Follow the same procedure noted in steps 1 to 3 in “Bypass copying on non-standard size paper” ( P.48). 2 Register dimensions. 1) 2) 3) 4) Select a desired memory number. Press [LENGTH] and key in the value. (100 mm to 297 mm (3.94" to 11.69")) Press [WIDTH] and key in the value. (148 mm to 432 mm (5.83" to 17.01")) Press [MEMORY].
BASIC COPY MODES 3. This chapter describes the basic copying functions including how to change the reproduction ratio, how to set sorting modes or how to perform duplex copying. Before Using Copying Functions ......................................................................................... 52 Default settings.....................................................................................................................................................52 Confirming the set functions ..........
3 BASIC COPY MODES Before Using Copying Functions Default settings This equipment is under its “default settings” when the power is turned ON, namely, if no setting change has been applied yet, the equipment’s settings return to the default ones when the energy saving mode is cleared or the [FUNCTION CLEAR] button on the control panel is pressed. The default settings for basic copy modes at installation are shown below.
3 BASIC COPY MODES 3.BASIC COPY MODES Clearing the set functions If you want to clear any settings of the EDIT menu, press the button of the desired functions. P.95 “EDITING FUNCTIONS” If you want to clear any setting of the IMAGE menu, reset the adjustment value in the setting menu of the desired functions. However, if you want to clear the one-touch adjustment or mono color copying function, press the corresponding button. P.
3 BASIC COPY MODES Paper Selection Automatic Paper Selection (APS) This equipment detects the size of an original and selects paper of the same size automatically. This function is called Automatic Paper Selection (APS). y For the original sizes detectable, see the following page: P.27 “Acceptable originals” y Some original sizes may not be detected with this function. In this case, select the desired size manually. P.55 “Selecting desired paper manually” 1 Place paper in the drawer(s).
3 BASIC COPY MODES 3.BASIC COPY MODES Selecting desired paper manually You need to select paper by yourself when copying the following originals whose sizes cannot be detected correctly: y Highly transparent originals (e.g. OHP film, tracing paper) y Totally dark originals or originals with dark borders y Non-standard size originals (e.g. newspaper, magazines) When paper of the size you want to use is not in any drawer, place it in a drawer or on the bypass tray. P.13 “Placing paper in drawers” P.
3 BASIC COPY MODES Copying mixed-size originals in one operation You can copy a set of originals whose sizes are individually different, using the RADF (Reversing Automatic Document Feeder). The original sizes that can be mixed are as follows: North America: LD, LG, LT, LT-R, COMP Other than North America: A3, A4, A4-R, B4, B5, FOLIO 1 Place paper in the drawer(s). 2 Adjust the side guides to the widest original, and then align the originals against the side guide on the front side.
3 BASIC COPY MODES 3.BASIC COPY MODES 4 Press [MIXED SIZE]. 5 Press [AMS] to make copies on paper in one size. To make copies on paper of the same size as the originals, press [CLOSE] so that the menu returns to the BASIC menu, and then press [APS]. When [AMS] is selected: y In the Automatic Magnification Selection, copy images cannot be enlarged from A4 (portrait), B5 (portrait) or LT (portrait) to A3 (landscape), B4 (landscape), LD (landscape) or LG (landscape).
3 BASIC COPY MODES Switching Color Modes You can switch the color mode. There are 3 color modes as shown below. FULL COLOR: All originals are copied in full colors. (Default) BLACK: All originals are copied in black and white. AUTO COLOR: The equipment automatically judges the type of each color on originals. Colored originals are copied in full colors and black-and-white originals are copied in black and white. Switching color modes Press any of [FULL COLOR], [BLACK] and [AUTO COLOR] on the touch panel.
3 BASIC COPY MODES Setting Original Modes You can make copies with the optimal image quality by selecting the following modes for your original. The selectable original mode differs depending on the color mode as shown in the table below. Select the color mode first, and then the original mode.
3 BASIC COPY MODES 2 Select the original mode. The selectable original modes differ depending on the color modes currently set.
3 BASIC COPY MODES Density Adjustment This equipment detects the density level of originals and automatically adjusts the density level of the copied image to the optimal one. Alternatively, you can manually adjust it to the desired level. Adjusting automatically (automatic density adjustment) Press [AUTO] on the touch panel.
3 BASIC COPY MODES Enlargement and Reduction Copying You can change the reproduction ratio of copied images in the following procedures: Automatic Magnification Selection (AMS): You need to specify the copy paper size in advance. Then this equipment will detect the original size and automatically select the optimal reproduction ratio for the copy paper size.
3 BASIC COPY MODES 3.BASIC COPY MODES 3 Select the desired paper size and then press [AMS]. y If you want to select a paper size other than the following, you need to register the size as “OTHER”. Once you register this size, it will be specified every time you press [OTHER] on the touch panel. North America: LD, LG, LT, ST Other than North America: A3, A4, B4, B5 For how to register, see the following page: P.
3 BASIC COPY MODES Specifying both the original size and the copy paper size separately 1 Place paper in the drawer(s). 2 Place the original(s). 3 Press [ZOOM] on the touch panel. 4 Select the desired sizes for the original and copy paper. y If you want to select a size other than the following for the original size and copy paper size, you need to register the size as “OTHER”. Once you register this size, it will be specified every time you press [OTHER] on the touch panel.
3 BASIC COPY MODES 3.BASIC COPY MODES Registering paper sizes to “OTHER” size If you want to select a size other than the following for the original size and copy paper size, you need to register the size as “OTHER” following the procedures below. Once you register this size, it will be specified every time you press [OTHER] on the touch panel.
3 BASIC COPY MODES Specifying reproduction ratio manually 1 Place paper in the drawer(s). 2 Place the original(s). 3 Press [ZOOM] on the touch panel. 4 Press the buttons below to select the desired reproduction ratio. [ UP] and [ DOWN] buttons The reproduction ratio changes by 1% every time either of them is pressed. When you hold either down, the ratio goes up or down automatically. One-touch zoom buttons Select the desired ratio from [400%], [200%], [100%], [50%] and [25%].
3 BASIC COPY MODES 3.BASIC COPY MODES 5 Select the desired size. y If you want to select a paper size other than the following, you need to register the size as “OTHER”. Once you register this size, it will be specified every time you press [OTHER] on the touch panel. North America: LD, LG, LT, ST Other than North America: A3, A4, B4, B5 For how to register, see the following page: P.
3 BASIC COPY MODES Copying photo originals in the optimal reproduction ratio for copy paper size (PHOTO ZOOM) 68 1 Place paper in the drawer(s). 2 Place the original on the original glass in a landscape direction. 3 Press [ZOOM] on the touch panel. 4 Press [PHOTO ZOOM].
3 BASIC COPY MODES 3.BASIC COPY MODES 5 Select the original size. When the size of the original is other than the ones below, key in the dimension of the original manually. North America: 3" x 5", 4" x 6", 5" x 7" or 8" x 10" Other than North America: 9 x 13 cm, 10 x 15 cm, 13 x 18 cm or 20 x 30 cm P.70 “Setting photo originals in other sizes” 6 Select the desired copy paper size, and then press [OK].
3 BASIC COPY MODES 8 Place the next original, and then press the [START] button. 9 When the scanning of all the originals is finished, press [FINISHED] on the touch panel. Scanning of the next original starts. Alternatively, you can start scanning by pressing [YES] on the touch panel and then the [START] button on the control panel. If you have more than one original, repeat this step until the scanning of all the originals is finished. Copying starts.
3 BASIC COPY MODES Selecting Finishing Mode Finishing modes and optional finishing devices See the table below for each finishing mode. Finishing mode Description Non-sort Non-staple Copies exit without being sorted or stapled. Sort ( Copies exit in the same page order as the originals one set after another. P.73) Group ( P.73) Copies grouped by page exit. Rotate sort ( P.74) Copies exit set by set alternately in a different direction. Staple sort ( P.
3 BASIC COPY MODES Name of each part of the Finisher (optional) MJ-1103 2 1 7 3 6 4 1. 2. 3. 4. 5. 6. 7. Upper receiving tray Tray holder Lower receiving tray Sub-tray Front cover Hole Punch Unit MJ-6102 Stapling control section 1. 2. 3. 4. 5. 6. 7. 8. 9.
3 BASIC COPY MODES 3.BASIC COPY MODES Sort/Group mode When you make more than one set of copies, they can be made to exit in the same page order as that of the originals. This mode is called the sort mode. Copies can also be made to exit grouped by page. This mode is called the group mode.
3 BASIC COPY MODES 4 Press [SORT] or [GROUP]. 5 Select other copy modes as required, and then press the [START] button on the control panel. Rotate sort mode When you make more than one set of copies, one set can be made to exit on top of another set, alternating in portrait and landscape directions. This mode is called the rotate sort mode. Use 2 drawers and 2 stacks of paper of the same size.
3 BASIC COPY MODES 3.BASIC COPY MODES 3 Press [FINISHING] on the touch panel. 4 Press [ROTATE SORT]. 5 Select other copy modes as required, and then press the [START] button on the control panel.
3 BASIC COPY MODES Staple sort mode When you make more than one set of copies, the copied paper can be automatically stapled set by set. This mode is called the staple sort mode. You can choose from 3 different stapling positions. Example: When [FRONT STAPLE] is selected y Special paper such as OHP film or sticker labels is not applicable. y Copies in different sizes cannot be stapled. (If the lengths of the copies are the same, they can be stapled.) 76 1 Place paper in the drawer(s).
3 BASIC COPY MODES 3.BASIC COPY MODES 4 Select the desired stapling position from [FRONT STAPLE], [DOUBLE STAPLE] or [REAR STAPLE]. 5 Select other copy modes as required, and then press the [START] button on the control panel. When the number of sheets exceeds the maximum number of sheets available for stapling, this equipment automatically enters into the sort mode.
3 BASIC COPY MODES Magazine sort / Saddle stitch You can copy more than one original and bind them in a booklet format. This mode is called the magazine sort mode. Also you can have the copied booklet folded and stapled at its center. This mode is called the saddle stitch mode.
3 BASIC COPY MODES 3.BASIC COPY MODES The magazine sort mode can also be selected on the EDIT menu. If you select it on the EDIT menu, you can adjust the binding margin. For details, see the following page: P.110 “Magazine Sort Mode” 1 Place paper in the drawer(s). Special paper such as OHP film or sticker labels is not applicable. 2 Select the desired paper size. 3 Place the original(s). 4 Press [FINISHING] on the touch panel.
3 BASIC COPY MODES 5 Select the desired mode from [MAGAZINE SORT], [MAGAZINE SORT & SADDLE STITCH] and [SADDLE STITCH]. [MAGAZINE SORT & SADDLE STITCH] and [SADDLE STITCH] are selectable only when the Saddle Stitch Finisher (optional) is installed. 6 Select other copy modes as required, and then press the [START] button on the control panel. Hole punch mode You can punch copied paper when the Hole Punch Unit (optional) is installed on the Finisher.
3 BASIC COPY MODES 3.BASIC COPY MODES 3 Press [FINISHING] on the touch panel. 4 Press [HOLE PUNCH]. 5 Select other copy modes as required, and then press the [START] button on the control panel.
3 BASIC COPY MODES Manual staple mode You can staple copied paper manually without any copying operation. This is useful when you have forgotten to set the staple sort mode before starting copying, or when you want to staple originals. Maximum number of sheets available for manual stapling Paper weight Paper size 64 - 80 g/m2 (17 - 20 lb. Bond) 81 - 90 g/m2 (21 - 24 lb. Bond) 91 - 105 g/m2 (25 - 28 lb.
3 BASIC COPY MODES Duplex Copying You can copy a 1-sided original to a 2-sided copy or vice versa, or copy a 2-sided original to a 2-sided copy. This is useful when you want to save the paper, or when you want to copy a book-type original maintaining the same page order. 1-sided original -> 1-sided copy ( P.84) 2-sided original -> 1-sided copy ( P.84) 1-sided original -> 2-sided copy ( P.85) 2-sided original -> 2-sided copy ( P.85) Book-type original -> 2-sided copy ( P.
3 BASIC COPY MODES Making a 1-sided copy When you copy 2-sided portrait originals which open to the left/right on only 1 side of the paper, use the image direction function on the EDIT menu so that all the copied paper will exit in the proper direction. P.131 “Image Direction” “IMAGE DIRECTION” set 84 1 Place paper in the drawer(s). 2 Place the original(s). 3 Press [2-SIDED] on the touch panel. When using bypass copying, be sure to set the paper size.
3 BASIC COPY MODES 3.BASIC COPY MODES 4 Select the desired mode. 5 Select other copy modes as required, and then press the [START] button on the control panel. [1->1 SIMPLEX]: 1-sided original to 1-sided copy [2->1 SPLIT]: 2-sided original to 1-sided copy Making a 2-sided copy If 1-sided portrait originals have been placed in a landscape direction and you copy them on both sides of the paper, copied sheets are usually in the open to top/bottom direction.
3 BASIC COPY MODES 3 Press [2-SIDED] on the touch panel. 4 Select the desired mode. 5 Select other copy modes as required, and then press the [START] button on the control panel. [1 -> 2 DUPLEX]: 1-sided original to 2-sided copy [2 -> 2 DUPLEX]: 2-sided original to 2- sided copy When placing the original on the original glass, follow steps 6 and 7 on 86 Duplex Copying P.33 “Basic copying procedure”.
3 BASIC COPY MODES 3.BASIC COPY MODES Making a 2-sided copy from a book-type original You can make 2-sided copies from book-type originals such as books or catalog as in the same page order. A4, B5 and LT sizes are applicable. 1 Place paper in the drawer(s). 2 Press [2-SIDED] on the touch panel. 3 Press [BOOK -> 2] on the touch panel. When using bypass copying, be sure to set the paper size.
3 BASIC COPY MODES 4 Select the book copying type. Example: If pages 2 to 6 of a book which opens to the left are to be copied, select [LEFT -> LEFT]. 2 88 3 6 7 5 Press the drawer button corresponding to the desired paper size. 6 Select other copy modes as required. Only A4, B5 and LT sizes are applicable. If the copy needs a binding space, select the book margin mode on the EDIT menu. P.
3 BASIC COPY MODES 3.BASIC COPY MODES 7 Place the original on the original glass. Place the original with its bottom toward you, matching its center to the yellow indicator under the original glass. Do not place any heavy objects (4 kg (9 lb.) or over) on the original glass and do not press on it with force. Breaking the glass could injure you. 8 Press the [START] button on the control panel. Once the pages are scanned, set the next ones on the original glass.
3 BASIC COPY MODES Performing Copy & File With the Copy & File function, you can store the copied data in the share folder of the hard disk of this equipment or a specified PC on a network. The data can be stored in any of PDF, TIFF and XPS formats. y The data will be stored as black images. (Resolution: 600 dpi only) The data stored with this function are suited for printing but not for being imported as an image into your PC.
3 BASIC COPY MODES 3.BASIC COPY MODES 4 Press the necessary buttons for entering information about the data to be stored. Then press [OK]. FILE NAME: Press this to display the on-screen keyboard. Then enter the file name within 45 letters. MFP LOCAL: Press this to store the data into the share folder of this equipment. REMOTE 1, REMOTE 2: Press either of them to store the data into the share folder of a PC that is connected with this equipment via a network.
3 BASIC COPY MODES 7 When all have been scanned, press [FINISHED] on the touch panel. Copying and storing start. Setting share folder When a user who has the privilege of setting a share folder has pressed [REMOTE 1] or [REMOTE 2], the menu for specifying a directory appears. The setting items differ depending on the file transfer protocol to be used. FTP, SMB, NetWare IPX/SPX and NetWare TCP/IP are selectable for a file transfer protocol.
3 BASIC COPY MODES 3.BASIC COPY MODES SMB When you press any of the buttons below, the on-screen keyboard appears. Enter with the buttons on the touch panel or the digital keys on the control panel. When you finish the entry, press [OK]. NETWORK PATH: Press this to enter a network path to the folder where the data are to be stored. LOGIN USER NAME: Press this to enter a user name to access the network folder. Enter this as required. PASSWORD: Press this to enter a password to access the network folder.
EDITING FUNCTIONS 4. This chapter describes how to use various copying functions on the EDIT menu. Displaying EDIT Menu............................................................................................................ 96 Image Shift .............................................................................................................................. 97 Creating top/bottom margin or left/right margin ........................................................................................
4 EDITING FUNCTIONS Displaying EDIT Menu You can display the EDIT menu by pressing the [EDIT] tab on the touch panel when you want to use various editing functions. The EDIT menu has 2 pages. To switch the pages, press 96 Displaying EDIT Menu or .
4 EDITING FUNCTIONS Image Shift You can create a binding margin by shifting an image to the left, right, top or bottom of the copy paper. This function is called “image shift”. It is useful when you wish to punch or staple a stack of paper after copying it. With this function you can easily make a binding margin when you copy a book-type original on both sides of the paper.
4 EDITING FUNCTIONS 4 Select the type of binding margin. 5 Adjust the width of the binding margin. 1) Press [FRONT MARGIN] and adjust the binding margin width on the front side using [ 2 mm] and [ 100 mm]. 2) Press [BACK MARGIN] and adjust the binding margin width on the back side using [ 2 mm] and [ 100 mm]. 3) Press [OK]. Note that a left/right binding margin will be created on the opposite side on the back side of paper in duplex copying.
4 EDITING FUNCTIONS 4.EDITING FUNCTIONS 6 Press [OK]. 7 Select other copy modes as required, and then press the [START] button on the control panel. Creating bookbinding margin You can easily make a binding margin when you copy a book-type original on both sides of the paper. P.87 “Making a 2-sided copy from a book-type original” 1 Press [IMAGE SHIFT] on the EDIT menu.
4 EDITING FUNCTIONS 2 Press [BOOK]. 3 Adjust the width of the binding margin. 4 Press [OK]. 1) Press either [ 2) Press [OK]. 2 mm] (0.08") or [ 30 mm] (1.18"). Select the “Book-type original -> 2-sided copy” mode as well. P.
4 EDITING FUNCTIONS Edge Erase You can whiten the edge of the copied image when a shadow-like dark part appears on it. This function is called “edge erase”. It is useful when you want to make the copied image neat and clear if the edge of the original is dirty or torn. Only standard size originals are applicable. 1 Place paper in the drawer(s). 2 Place the original(s). 3 Press [EDGE ERASE] on the EDIT menu. When using bypass copying, be sure to set the paper size.
4 EDITING FUNCTIONS 102 4 Adjust the width of the part to be erased. 5 Select other copy modes as required, and then press the [START] button on the control panel. 1) Press either [ 2) Press [OK]. Edge Erase 2 mm] (0.08") or [ 50 mm] (1.97").
4 EDITING FUNCTIONS Book Center Erase You can whiten the center of the copied image when a shadow-like part appears on it. This function is called “book center erase”. It is useful when you copy book-type originals. Book center erase set 1 Place paper in the drawer(s). 2 Select the drawer for the desired paper size. 3 Press [BOOK CENTER ERASE] on the EDIT menu. No setting When using bypass copying, be sure to set the paper size.
4 EDITING FUNCTIONS 4 Adjust the width of the part to be erased. 5 Place the original on the original glass. 1) Press either [ 2) Press [OK]. 2 mm] (0.08") or [ 50 mm] (1.97"). Place the original with its bottom toward you, matching its center to the yellow indicator under the original glass. Do not place any heavy objects (4 kg (9 lb.) or over) on the original glass and do not press on it with force. Breaking the glass could injure you.
4 EDITING FUNCTIONS Dual Page You can copy the 2 facing pages of a book-type original or 2 original sheets placed side by side onto 2 separate sheets of paper or on both sides of 1 sheet of paper. This function is called “dual page”. You do not have to shift the original on the original glass. -12- -13- -12- -13- Only A4, B5 and LT sizes are applicable. 1 Place paper in the drawer(s). 2 Press [DUAL PAGE] on the EDIT menu. 3 Press [1 SIDE] or [2 SIDE].
4 EDITING FUNCTIONS 4 Select other copy modes as required. 5 Press the [BASIC] tab to display the BASIC menu, and then select A4, B5 or LT as the copy paper size. You can select “image shift” as well. P.97 “Creating top/bottom margin or left/right margin” When using bypass copying, be sure to set the paper size. 6 Open the desired page of the original and place it on the original glass.
4 EDITING FUNCTIONS 2IN1 / 4IN1 You can copy 2 or 4 originals to 1 sheet of paper by shrinking them. This function is called “2IN1” or “4IN1”. If you use this function together with duplex copying, you can make a total of 8 images on 1 sheet of paper. The illustrations below show how you can arrange the images.
4 EDITING FUNCTIONS 1 Place paper in the drawer(s). When using bypass copying, be sure to set the paper size. If you select paper of a different size to that of the original, press [ZOOM] on the BASIC menu. Then select the desired paper size and press [AMS] in the menu shown below. 108 2 Place the original(s). 3 Press [2IN1 / 4IN1] on the EDIT menu.
4 EDITING FUNCTIONS 4.EDITING FUNCTIONS 4 Perform 2IN1 / 4IN1 setting. NUMBER OF PAGES PER SHEET: If you want to copy 2 originals on 1 page, select [2IN1]. If you want 4 on 1 page, select [4IN1]. 2-SIDED: Select from [1->1 SIMPLEX], [1-> 2 DUPLEX], [2-> 2 DUPLEX] or [2->1 SPLIT]. Press [OK] after you have selected all the necessary items. 5 Select other copy modes as required, and then press the [START] button on the control panel. When the originals are placed on the RADF, scanning and copying start.
4 EDITING FUNCTIONS Magazine Sort Mode You can copy more than one original in the book-type page order. This mode is called the magazine sort mode. Also you can do this as well as fold and staple the copied sheets at their center. This mode is called the magazine sort & saddle stitch mode. Magazine sort mode 1 6 2 7 4 3 2 12 9 11 Magazine sort & saddle stitch mode 1 2 6 7 3 12 The magazine sort mode can also be selected on the BASIC menu. For details, see the following page: P.
4 EDITING FUNCTIONS 4.EDITING FUNCTIONS 4 Press [MAGAZINE SORT] on the EDIT menu. 5 Set the saddle stitch mode and the binding margin width as required. 1) When setting the saddle stitch mode, press [STAPLE ON]. If not required, press [STAPLE OFF]. 2) Press either [ 2 mm] (0.08") or [ 30 mm] (1.18") to adjust the binding margin width. 3) Press [OK]. For the maximum number of sheets available for saddle stitching, see the following page: P.
4 EDITING FUNCTIONS Image Editing You can select the various editing functions shown below for scanned images. Trimming: You can select a certain area of an original and copy only the selected area. Masking: You can mask a certain area of an original and copy only the unmasked area. Mirror image: You can reverse an image like a mirror. Negative/Positive reversal: You can reverse the light-and-dark of an image.
4 EDITING FUNCTIONS 4.EDITING FUNCTIONS 3 Press [TRIM] or [MASK]. 4 Place the original on the original glass with its face up. Place it with its bottom toward you. Match its top left corner against that of the original glass so that the original will be aligned with the original scales. Do not place any heavy objects (4 kg (9 lb.) or over) on the original glass and do not press on it with force. Breaking the glass could injure you.
4 EDITING FUNCTIONS 6 Key in the read values. 1) Press [X1], [X2], [Y1] and [Y2], and then key in the read values correspondingly. 2) You can specify up to 4 areas on 1 page. When you want to specify more than one area, press switch the area, and then key in the values correspondingly. 3) Press [OK] after you have specified all the areas. 7 or to Place the original again on the original glass with its face down. Place it with its bottom toward you.
4 EDITING FUNCTIONS 4.EDITING FUNCTIONS Mirror image / Negative/positive reversal You can reverse an image like a mirror (mirror image), or you can reverse light-and-dark of an image (negative/positive reversal). Mirror image Negative/Positive reversal Negative/positive reversal is available only when BLACK or FULL COLOR is selected as a color mode. 1 Place paper in the drawer(s). 2 Place the original(s). 3 Press [EDITING] on the EDIT menu.
4 EDITING FUNCTIONS 116 4 Press [MIRROR] or [NEG/POS]. 5 Select other copy modes as required, and then press the [START] button on the control panel.
4 EDITING FUNCTIONS XY Zoom You can change the reproduction ratio in both vertical and horizontal directions separately. This function is called “XY zoom”. 100% 200% 100% 200% The reproduction ratio is changeable from 25 to 400%. However in the following cases, this range is 25 to 200%.
4 EDITING FUNCTIONS 4 5 118 Set the reproduction ratio in both vertical and horizontal directions. 1) Press [X], and then press either [ 2) Press [Y], and then press either [ 3) Press [OK]. 25%] or [ 25%] or [ 400%] for a horizontal direction. 400%] for a vertical direction. Select other copy modes as required, and then press the [START] button on the control panel.
4 EDITING FUNCTIONS Cover Sheet You can add a special type of paper such as colored paper as a front cover sheet or a back cover sheet. This function is called “cover sheet”. The cover sheet mode has the following 4 types: 3 2 1 TOP BLANK: Adds a blank sheet as a front cover. RE P 20 ORT 03 3 2 1 RE P 20 ORT 03 TOP COPIED: Adds a copied sheet as a front cover. 3 2 1 BOTH BLANK: Adds 2 blank sheets as a front cover and a back cover.
4 EDITING FUNCTIONS 4 Press [COVER SHEET] on the EDIT menu. 5 Select the desired cover sheet mode. When you select [TOP COPIED] or [TOP COPIED BACK BLANK] and [1->2 DUPLEX] (duplex copying) together, the front cover will be a 1-sided copy. 6 Press the [BASIC] tab to display the BASIC menu. Then select a drawer in which normal paper is placed (not the one for the cover sheets). You must place the normal paper of the same size and direction as that for the cover sheets in advance.
4 EDITING FUNCTIONS 4.EDITING FUNCTIONS 7 Select other copy modes as required, and then press the [START] button on the control panel. When the originals are placed on the RADF, scanning and copying start. When they are placed on the original glass, follow steps 8 and 9. 8 Place the next original, and then press the [START] button on the control panel. 9 When the scanning of all the originals is finished, press [FINISHED] on the touch panel. Scanning of the next original starts.
4 EDITING FUNCTIONS Sheet Insertion You can insert a special type of paper such as colored paper at the desired page. This function is called “sheet insertion”. You can insert up to 2 types of sheets for a total of 50 pages. The sheet insertion mode has the following 2 types: 2 3 RE P 20 ORT 03 RE P 20 ORT 03 4 4 3 2 1 1 COPIED: Inserts a copied sheet, replacing the specified page. 3 2 1 BLANK: Inserts a blank sheet before the specified page. 1 Place sheets for sheet insertion.
4 EDITING FUNCTIONS 4.EDITING FUNCTIONS 5 Press either [COPIED] or [BLANK]. 6 Select the page where the insertion sheets will be inserted. 1) Select the type of the insertion sheets ([INSERT SOURCE 1] or [INSERT SOURCE 2]). 2) Key in page numbers (1 to 1000) where the insertion sheets will be inserted, and then press [SET]. Repeat steps 1) and 2) if you want to insert sheets at more than one page. 3) Press [OK] after you have keyed in the page numbers.
4 EDITING FUNCTIONS 7 Press the [BASIC] tab to display the BASIC menu. Then select the drawer in which normal paper is placed (not the one for sheet insertion). You must place the normal paper of the same size and direction as that for the insertion sheets in advance. 8 Select other copy modes as required, and then press the [START] button on the control panel. When the originals are placed on the RADF, scanning and copying start. When they are placed on the original glass, follow steps 9 and 10.
4 EDITING FUNCTIONS Time Stamp You can add the date and time on the copied paper. Printed at the bottom of a portrait copy Printed at the top of a landscape copy MM.DD.YYYY 14:54 MM.DD.YYYY 14:54 1 Place paper in the drawer(s). 2 Place the original(s). 3 Press [TIME STAMP] on the EDIT menu. 4 Select the direction and position of the time stamp. 5 Select other copy modes as required, and then press the [START] button on the control panel. 1) Select the direction ([SHORT EDGE] or [LONG EDGE]).
4 EDITING FUNCTIONS Page Number You can add a page number on the copied paper. Printed at the bottom center of a portrait copy Printed at the top right of a landscape copy 1 2 3 1 2 3 1 Place paper in the drawer(s). 2 Place the original(s). 3 Press [PAGE NUMBER] on the EDIT menu. 4 Select the direction and position of a page number. 1) Select the direction ([SHORT EDGE] or [LONG EDGE]). 2) Select the position ([TOP LEFT], [TOP CENTER], etc.).
4 EDITING FUNCTIONS 4.EDITING FUNCTIONS 5 Specify the page number you want to start with. 6 Select other copy modes as required, and then press the [START] button on the control panel. 1) Key in the page number. 2) Press [OK].
4 EDITING FUNCTIONS Job Build You can scan several stacks of originals whose settings are individually different, and then copy or store them in one operation. This function is called “job build”. For example, news clips (in the TEXT mode) and photographs in magazines (in the PHOTO mode) in A3 size and photographs in A4 size can be scanned in the optimal settings for each, and copied in one operation. y Up to 1000 pages of originals can be copied in one operation. There is no limit for the number of jobs.
4 EDITING FUNCTIONS 4.EDITING FUNCTIONS 2 Press [OK]. Job build is now set and the message below appears. 3 Place the first stack of originals, and then select settings. y When placing the original on the original glass, remember that 1 page is equal to 1 job. y When placing mixed-size originals on the RADF, see the following page: P.56 “Copying mixed-size originals in one operation” y If you want to use a particular drawer, select it.
4 EDITING FUNCTIONS 4 Press the [START] button on the control panel. 5 Place the next stack of originals, and then select the settings. Scanning starts. When the scanning of all the originals is finished, the message below appears. Repeat steps 4 and 5 until all the desired pages have been scanned. If you do not change any settings, those for the last job will be applied. 6 When the scanning of all the originals is finished, change the number of copy sets as required.
4 EDITING FUNCTIONS Image Direction When you make 1-sided portrait originals to 2-sided copy by placing them in a landscape direction, normally the copied pages are “open to top”. With this function you can make them “open to left”. This function is called “image direction”. When you make 2-sided “open to left” portrait originals to 1-sided copy, normally the copied pages exit in a different direction alternately. With this function, you can make them all exit in the same direction.
4 EDITING FUNCTIONS 5 Press [OK]. Image direction is now set. 6 132 Select other copy modes as required, and then press the [START] button on the control panel.
4 EDITING FUNCTIONS Book - Tablet As for the directions of originals or copied images, “open to left” is called “book” and “open to top” is called “tablet”. With this function you can make 2-sided originals to 2-sided copy, rotating only the back side of the copied page by 180 degrees, namely, you can copy “book” originals to “tablet” copy, or vice versa. 1 Place paper in the drawer(s). 2 Place the original(s). 3 Press [BOOK <->TABLET] on the EDIT menu. 4 Press [OK]. Book - tablet is now set.
4 EDITING FUNCTIONS ADF -> SADF You can switch the feeding mode when the RADF (Reversing Automatic Document Feeder) is used, from “ADF” to “SADF”. The paper feeding mode has 2 types as follows: ADF (Continuous feed mode): Feeds originals continuously when you press the [START] button on the control panel while originals are being placed on the RADF. This is useful when you make more than one copy in one operation. (Default setting) SADF (Single feed mode): Feeds originals one by one automatically.
4 EDITING FUNCTIONS 4.EDITING FUNCTIONS 5 Place the original(s) on the RADF one sheet at a time. The original is pulled into the RADF automatically, and then the menu below appears. Repeat step 5 if you have another original. The placed original will be pulled into the RADF automatically even if you do not press [YES] on the touch panel. 6 When the scanning of all the originals is finished, press [FINISHED].
4 EDITING FUNCTIONS Full Image You can copy the entire image of an original including any fine text at its edge. This function is called “full image”. With this function, the image will be copied with its reproduction ratio reduced by approx. 1 to 5%. 1 Place paper in the drawer(s). 2 Place the original(s). 3 Press [ZOOM] on the touch panel. 4 Select sizes for the original and copy paper. 1) Select the original size. 2) Select the paper size. 3) Press [CLOSE]. The menu returns to the BASIC menu.
4 EDITING FUNCTIONS 4.EDITING FUNCTIONS 5 Press [FULL IMAGE] on the EDIT menu. 6 Select other copy modes as required, and then press the [START] button on the control panel.
4 EDITING FUNCTIONS Image Repeat You can copy a certain area on an original repeatedly in the times that you specified. This function is called “image repeat”. y You can repeat copying up to 8 times. y Only standard size originals are available. When registering this function into a template, be sure to select [DISABLE] of “AUTOMATIC START”. If [ENABLE] is selected, copies may not be made correctly because the original size is not detected. P.163 “TEMPLATES” 1 Place paper in the drawer(s).
4 EDITING FUNCTIONS 4.EDITING FUNCTIONS Do not place any heavy objects (4 kg (9 lb.) or over) on the original glass and do not press on it with force. Breaking the glass could injure you. 4 Read the following 4 values to specify the area using the left and top scales on the original glass.
4 EDITING FUNCTIONS Omit Blank Page You can remove blank sheets included in the scanned originals before copying is started. This function is called “omit blank page”. y This function may not properly detect blank sheets included in the following types of originals: - Half-tone originals - Originals including sheets almost blank (e.g.
4 EDITING FUNCTIONS 4.EDITING FUNCTIONS 4 Press [OK]. Omit blank page is now set. 5 Select other copy modes as required, and then press the [START] button on the control panel. Scanning and copying start. A message notifying you of the number of the blank sheets appears for approx. 5 seconds.
4 EDITING FUNCTIONS Outside Erase You can whiten a shadow-like dark part which has appeared outside of the copied image; this has been caused by a gap between the original glass and the platen sheet. This function is called “outside erase”. It is useful when you place thick originals such as booklets on the original glass. Outside erase set No setting y This function is disabled when you place originals on the RADF or you place them on the original glass with the RADF closed fully.
4 EDITING FUNCTIONS 4.EDITING FUNCTIONS 4 Set “outside erase”. 1) Adjust the width of the border around the original by pressing either When you adjust it to the When you adjust it to the 2) Press [OK]. 5 or as required. side, the area to be detected as not belonging to the original is widened. side, the area to be detected as not belonging to the original is narrowed. Place the original on the original glass. y When placing the original, be sure that the RADF is fully raised.
IMAGE ADJUSTMENT 5. This chapter describes the image adjustment functions allowing you to change the overall color balance of the copied image, copy an original in a specified color, and so on. Displaying IMAGE Menu ...................................................................................................... 146 Using Image Adjustment Functions ................................................................................... 147 Color balance (YMCK adjustment) .................................
5 IMAGE ADJUSTMENT Displaying IMAGE Menu You can display the IMAGE menu by pressing the [IMAGE] tab on the touch panel when you want to use various image adjustment functions.
5 IMAGE ADJUSTMENT Using Image Adjustment Functions Color balance (YMCK adjustment) This function allows you to adjust the overall color balance of the copied image by changing the strength of YELLOW (Y), MAGENTA (M), CYAN (C) and BLACK (K). This function is available in the full color mode or the auto color mode. YELLOW (Y) MAGENTA (M) 1 Press [COLOR BALANCE] in the IMAGE menu. 2 Press or CYAN (C) BLACK (K) of each color to obtain the desired color balance.
5 IMAGE ADJUSTMENT 3 Press or of the color on each density area to obtain the desired color balance. For example, when you adjust the high density area of magenta (M) to the area becomes darker. side, the magenta in its high density After completing the adjustment, press [OK]. Canceling color balance adjustment y Move the indicator of the color whose adjustment you want to cancel to the middle, and then press [OK]. y If you want to cancel the adjustment of all colors, press [RESET], and then [OK].
5 IMAGE ADJUSTMENT 5.IMAGE ADJUSTMENT RGB adjustment This function allows you to adjust the overall color balance of the copied image by changing the strength of RED (R), GREEN (G) and BLUE (B). This function is available in the full color mode or the auto color mode. RED (R) GREEN (G) 1 Press [RGB ADJUSTMENT] in the IMAGE menu. 2 Press or BLUE (B) of the color to obtain the desired color balance, and then press [OK].
5 IMAGE ADJUSTMENT One-touch adjustment This function allows you to obtain the image quality already registered in this equipment. You can select the image quality from “WARM”, “COOL”, “VIVID”, “CLEAR” and “MARKER”. This function is available only in the full color mode.
5 IMAGE ADJUSTMENT 5.IMAGE ADJUSTMENT Background adjustment This function allows you to adjust the density of the original’s background. It avoids the back side of a 2-sided original becoming visible on its front side. Front Back Adjusted to have a lightened background Not adjusted This mode cannot be used with the automatic density adjustment function. P.61 “Density Adjustment” 1 Press [BACKGROUND ADJUSTMENT] in the IMAGE menu.
5 IMAGE ADJUSTMENT Sharpness This function allows you to emphasize or blur the outline of the image. 1 Press [SHARPNESS] in the IMAGE menu. 2 Press [SOFT] or [SHARP] to adjust the sharpness, and then press [OK]. When the sharpness level is adjusted to the [SOFT] side, the moire fringes on the printed photos, etc. are softened. If it is adjusted to the [SHARP] side, the letters and fine lines become sharper. Canceling sharpness adjustment y Move the indicator to the middle, and then press [OK].
5 IMAGE ADJUSTMENT 5.IMAGE ADJUSTMENT Twin color copying This function allows you to copy a colored original in 2 specified colors. There are 2 types of twin color copying as follows: TWIN COLOR SELECTABLE: The black part and the parts other than black in the original are copied in 2 specified colors. “CHANGE BLACK TO”: BLUE “SECOND COLOR”: MAGENTA RED & BLACK: The red part in the original is copied in red and the parts other than red are copied in black and white.
5 IMAGE ADJUSTMENT 154 2 Press [TWIN COLOR SELECTABLE]. 3 Select a color for the parts other than black in the original. 1) Press [SECOND COLOR]. 2) Select the desired color.
5 IMAGE ADJUSTMENT 5.IMAGE ADJUSTMENT 4 Select a color for the black part in the original. 1) Press [CHANGE BLACK TO]. 2) Select the desired color. After selecting the color, press [OK]. This is the end of the setting. If you want to adjust the color balance, press [ADJUST] and go to the next step. y When the two colors specified are the combination of black and a color other than black, color balance adjustment is enabled.
5 IMAGE ADJUSTMENT 6 Press or of the color on each density area to obtain the desired color balance. For example, when you adjust the high density area of magenta (M) to the area becomes darker. side, the magenta in its high density After completing the adjustment, press [OK]. Canceling color balance adjustment y Move the indicator of the color whose adjustment you want to cancel to the middle, and then press [OK]. y If you want to cancel the adjustment of all colors, press [RESET], and then [OK].
5 IMAGE ADJUSTMENT 5.IMAGE ADJUSTMENT 2 Press [RED & BLACK]. 3 To adjust the red color or the red-and-black area, press [ADJUST]. If you do not want to adjust the color, press [OK]. If you do not adjust the red color or the red-and-black area, this is the end of the setting. If you want to adjust it, go to the next step.
5 IMAGE ADJUSTMENT 4 Adjust the red color or the red-and-black area. Red in original Press or of yellow or magenta to adjust the red color balance. Range Adjustment Press or to adjust the red-and-black area. When you set the red area to be larger, the area to be copied in red becomes larger. When you set the black area to be larger, the area to be copied in black becomes larger. After completing the adjustment, press [OK]. This is the end of the setting.
5 IMAGE ADJUSTMENT 5.IMAGE ADJUSTMENT Mono color copying This function allows you to make copies in a single color except black. BLUE 1 Press [MONO COLOR] in the IMAGE menu. 2 Press the button corresponding to the desired color. Canceling mono color copying Press [MONO COLOR] in the IMAGE menu.
5 IMAGE ADJUSTMENT Hue This function allows you to adjust the hue of the basic color. This function is available in the full color mode or the auto color mode. 1 160 Press [HUE] in the IMAGE menu.
5 IMAGE ADJUSTMENT 5.IMAGE ADJUSTMENT 2 Adjust the hue. 1) Adjust the hue of the entire image by pressing or , in section A. 2) Adjust the hue of each basic color by pressing 3) Press [OK]. or , in section B. A B Canceling hue adjustment y Move the indicator of the color whose adjustment you want to cancel to the middle, and then press [OK]. y If you want to cancel the adjustment of all colors, press [RESET], and then [OK].
5 IMAGE ADJUSTMENT Saturation This function enables you to adjust the color saturation of the entire image. This function is available in the full color mode or the auto color mode. 1 Press [SATURATION] in the IMAGE menu. 2 Press or to adjust the saturation, and then press [OK]. Canceling saturation adjustment y Move the indicator to the middle, and then press [OK]. y Press [RESET], and then [OK].
TEMPLATES 6. This chapter describes how to use templates. Templates.............................................................................................................................. 164 Displaying template menu ..................................................................................................................................164 Using “Useful templates” ...............................................................................................................................
6 TEMPLATES Templates You can create a template with several functions that are frequently used so that they can be employed whenever you want by recalling the template, thus eliminating the need to perform complicated settings every time. Templates can be used in copying, scanning and sending a fax. Fax functions are available only when the FAX Unit (optional) is installed. 2008.5.5 = 1 1 + 2008.5.5 + 2008.5.5 2008.5.
6 TEMPLATES 6.TEMPLATES Using “Useful templates” This equipment has 12 default templates that can be used immediately. They are registered to the group number 001 “Useful templates”. For how to recall them, see the following page: P.
6 TEMPLATES Templates with e-Filing functions Function *1 Button Color mode: AUTO COLOR Original mode: TEXT/PHOTO Simplex/Duplex: 1 -> 1 SIMPLEX Storing method: Stored in the e-Filing box No copying Color mode: AUTO COLOR Original mode: TEXT/PHOTO Simplex/Duplex: 2 -> 1 SPLIT Storing method: Stored in the e-Filing box No copying Color mode: AUTO COLOR Original mode: TEXT/PHOTO Simplex/Duplex: 1 -> 2 DUPLEX Storing method: Stored in the e-Filing box Copying performed Color mode: AUTO COLOR Original mode:
6 TEMPLATES Registering Templates Templates must be registered to either the “public template group” or “private groups”. You can set a password to restrict the use of registered templates. Public template group: Provided by default. Templates in this group can be used by everyone. It is useful to register several combinations of functions frequently used in the entire office or department. Up to 60 templates can be registered to the public group.
6 TEMPLATES 4 Press [PASSWORD]. The on-screen keyboard appears. 5 Enter the Admin Password using the on-screen keyboard or the digital keys. Then press [OK]. When you enter the wrong Admin Password 3 times consecutively, this equipment will be locked for 30 seconds. In this case, wait until it is unlocked and then enter the correct password.
6 TEMPLATES 6.TEMPLATES 6 Select a template. 1) Press a blank button. 2) Press [SAVE]. To switch the menu Press 7 or . Enter the necessary information about the template. NAME 1 & 2: Enter the name of the template. NAME 1 appears above the template button and NAME 2 appears below. Be sure to enter at least one of them. When you press either of them, the on-screen keyboard appears. Enter within 11 letters. The symbols below cannot be used. ;:/\"=|*<>?+[],.
6 TEMPLATES 1) Press [PASSWORD], and then key in a 5-digit password. The letters keyed in appear as asterisks (*). 2) Press [RETYPE PASSWORD], and then key in the password again. 3) Press [OK]. Press the [CLEAR] button on the control panel to delete the letter keyed in. AUTOMATIC START: Press [ENABLE] if you want the operation of set functions to start immediately after pressing a button for the corresponding template.
6 TEMPLATES 6.TEMPLATES 2 Select a group. 1) Press the [REGISTRATION] tab. 2) Press a blank button. 3) Press [OPEN]. To switch the menu y Press or . y Key in the group number (3 digits). 3 Enter the necessary information about the group. NAME: Enter the name of the group. When you press it, the on-screen keyboard appears. Enter within 20 letters. Be sure to enter it. USER NAME: Enter the name of the group owner as required. When you press it, the on-screen keyboard appears. Enter within 30 letters.
6 TEMPLATES 1) Press [PASSWORD], and then key in a 5-digit password. The letters keyed in appear as asterisks (*). 2) Press [RETYPE PASSWORD], and then key in the password again. 3) Press [OK]. Press the [CLEAR] button on the control panel to delete a letter keyed in. When you have entered all the necessary items, press [OK]. The new group is now registered and the menu moves to the one for registering templates. 4 Press the [FUNCTION CLEAR] button on the control panel.
6 TEMPLATES 6.TEMPLATES 3 Select the desired group. 1) Press the [REGISTRATION] tab. 2) Press the button of the desired group. 3) Press [OPEN]. To switch the menu y Press or . y Key in the group number (3 digits). 4 Key in the password for the selected group. (If no password is set, go to step 5.) 5 Register a template following steps 6 and 7 on public template group”. 1) Key in the password. 2) Press [OK]. P.
6 TEMPLATES Recalling Templates When you recall a template, the functions set in the template will be available automatically. If automatic start function is enabled, this equipment will automatically start the operation of each function when you press the button for the corresponding template. 1 Place paper in the drawer(s). 2 Place the original(s). 3 Press [TEMPLATE] on the touch panel. The template menu appears. 4 Press the button for the group to which the desired template is registered.
6 TEMPLATES 6.TEMPLATES 5 Key in the password when you have selected the private group. (If no password is set, go to step 6.) 1) Key in the password. 2) Press [OK]. 6 Press the button for the desired template. To switch the menu Press or . Templates with the automatic start function enabled can be identified with . If this mark is displayed, you can press it to immediately start the operation of the functions set in the template.
6 TEMPLATES 176 7 Key in the password for the selected template. (If no password is set, go to step 8.) 8 Confirm that “Updated the template setting” is displayed on the touch panel. 9 Select other copy modes as required, and then press the [START] button on the control panel. 1) Key in the password. 2) Press [OK]. The message is displayed for approx. 3 seconds.
6 TEMPLATES Changing Data You can change the data of templates or private groups that are already registered, such as the template name, user name, password and setting of the automatic start function. The data of the public template group can be changed from the TopAccess menu but this cannot be done from the control panel. For how to change them from the TopAccess menu, refer to the TopAccess Guide. Changing private group data 1 In the template menu, select the desired group.
6 TEMPLATES Changing template data 1 In the template menu, select the group to which the desired template is registered. 1) Press the [REGISTRATION] tab. 2) Press the button for the desired group. 3) Press [OPEN]. To switch the menu y Press or . y Key in the group number (3 digits). 2 Enter the password as follows and then press [OK].
6 TEMPLATES 6.TEMPLATES 3 Select the desired template. 1) Press the button for the corresponding template. 2) Press [EDIT]. To switch the menu Press or . 4 Key in the password for the selected template. (If no password is set, go to step 5.) 5 Change the data following step 7 on template group”. 1) Key in the password. 2) Press [OK]. P.
6 TEMPLATES Deleting Groups or Templates You can delete private groups or templates no longer needed. If a private group is deleted, all the templates in the private group are also deleted. The public template group cannot be deleted. Deleting private groups 1 In the template menu, select the desired private group. 1) Press the [REGISTRATION] tab. 2) Press the button for the desired group. 3) Press [DELETE]. To switch the menu y Press or . y Key in the group number (3 digits).
6 TEMPLATES 6.TEMPLATES 3 Press [DELETE]. The private group is now deleted.
6 TEMPLATES Deleting templates 1 In the template menu, select the group to which the desired template is registered. 1) Press the [REGISTRATION] tab. 2) Press the button for the desired group. 3) Press [OPEN]. To switch the menu y Press or . y Key in the group number (3 digits). 2 Enter the password as follows and then press [OK].
6 TEMPLATES 6.TEMPLATES 3 Select the desired template. 1) Press the button for the desired template. 2) Press [DELETE]. To switch the menu y Press or . y Key in the group number (3 digits). 4 Key in the password for the selected template. (If no password is set, go to step 5.) 5 Press [DELETE]. 1) Key in the password. 2) Press [OK]. The template is now deleted.
CONFIRMING JOB STATUS 7. This chapter describes how to confirm the processing status and the history of copy jobs performed, and the amount of toner remaining in the toner cartridges. Confirming Copy Job Status ............................................................................................... 186 Confirming jobs in progress or ones in waiting...................................................................................................186 Confirming copy job history .....................
7 CONFIRMING JOB STATUS Confirming Copy Job Status You can confirm jobs in progress or ones in waiting, on the touch panel. Also you can delete, pause or resume jobs in waiting, and change their order. You can also confirm the history of copy jobs performed, the status of drawers and the amount of toner remaining in the toner cartridges. Confirming jobs in progress or ones in waiting You can confirm the jobs in progress or the ones in waiting, on the touch panel.
7 CONFIRMING JOB STATUS 7.CONFIRMING JOB STATUS Deleting jobs You can delete jobs that you no longer need to print. 1 Select the desired job on the print job list, and then press [DELETE]. 2 Press [DELETE]. The job is now deleted.
7 CONFIRMING JOB STATUS Pausing jobs You can pause jobs in waiting. Only the 11th and later jobs (counted from the job in progress) can be paused. Select the desired job on the print job list, and then press [PAUSE]. The job is now paused. The paused job is not printed even when its turn comes. Printing of the next job starts. Resuming the paused job Select the desired job, and then press [RESUME].
7 CONFIRMING JOB STATUS 7.CONFIRMING JOB STATUS Moving jobs You can change the order of the jobs in waiting by moving them within the list. Only the 11th and later jobs (counted from the job in progress) can be moved. They can be moved to 11th and later. 1 Select the desired job on the print job list, and then press [MOVE]. 2 Select the position that you want the job to move to. (It will come under the selected job.
7 CONFIRMING JOB STATUS Confirming copy job history You can confirm the history of copy jobs performed on the touch panel. 1 Press [JOB STATUS] on the touch panel. 2 Press the [LOG] tab. 3 Press [PRINT]. The print log list appears. Copy jobs appear on the print log list as well as print jobs.
7 CONFIRMING JOB STATUS 7.CONFIRMING JOB STATUS On the print log list, you can confirm the name of the user who performed the job, the date and time the job was printed, the paper size and the number of pages or copy sets. 7 jobs appear on 1 page of the print log list. When you press or on the touch panel, the menu will be changed to the previous one or the next one, so that you can view up to 120 jobs.
7 CONFIRMING JOB STATUS Confirming drawers You can confirm the size and type-setting of the paper or the amount remaining in the drawers. During printing you can confirm which drawer is feeding paper. 1 Press [JOB STATUS] on the touch panel. 2 Press the [SUPPLY] tab. During printing, the button for the drawer from which the paper is fed is highlighted. Press [CLOSE] when you finish the confirmation. The menu returns to the one shown before you pressed [JOB STATUS].
7 CONFIRMING JOB STATUS 7.CONFIRMING JOB STATUS Confirming amount of toner remaining You can confirm the approximate amount of toner remaining in the toner cartridge. 1 Press [JOB STATUS] on the touch panel. 2 Press the [TONER] tab. Press [CLOSE] when you finish the confirmation. The menu returns to the one shown before you pressed [JOB STATUS].
OTHER INFORMATION 8. Continuous Copying Speed ................................................................................................ 196 Color copying .....................................................................................................................................................196 Black-and-white copying ....................................................................................................................................
8 OTHER INFORMATION Continuous Copying Speed Copy speeds under the condition in which originals are placed on the original glass and single-side copies are made continuously with 100% reproduction ratio in the non-sort mode (unit: sheet/minute). y y y y Color copying consists of FULL COLOR, TWIN COLOR, MONO COLOR and IMAGE SMOOTHING. TOSHIBA-recommended paper is used for the values of the specifications below. The bypass copying speed when the paper size is specified is as listed below.
8 OTHER INFORMATION 8.OTHER INFORMATION e-STUDIO6530C Paper type Paper size A4, A5-R, B5, LT, ST-R, 8.5"SQ A4-R, B5-R, LT-R Feeder PLAIN/ RECYCLED PAPER THICK1 THICK2 THICK3 THICK4 SPECIAL 1 SPECIAL 2 Drawer 65 32 32 21 — — — Bypass tray 48 26 26 17 17 6 17 Drawer 46 23 23 15 — — — Bypass tray 36 20 20 13 13 4.5 13 B4, FOLIO, LG, COMP, 13"LG Drawer 31 15.5 15.5 10.5 — — — Bypass tray 28 13 13 9.5 9.5 3 9.5 A3, LD Drawer 30 13.5 13.
8 OTHER INFORMATION e-STUDIO6530C Paper type Paper size A4, A5-R, B5, LT, ST-R, 8.5"SQ A4-R, B5-R, LT-R Feeder PLAIN/ RECYCLED PAPER THICK1 THICK3 THICK4 SPECIAL 1 SPECIAL 2 Drawer 75 32 32 32 — — — Bypass tray 52 26 26 26 26 6 17 Drawer 54 23 23 23 — — — Bypass tray 38 20 20 20 20 4.5 13 B4, FOLIO, LG, COMP, 13"LG Drawer 39 15.5 15.5 15.5 — — — Bypass tray 30 13 13 13 13 3 9.5 A3, LD Drawer 37 13.5 13.5 13.
*3 *4 Yes Yes Yes *3 No Yes Yes *3 *4 Yes Yes Yes *3 No Yes Yes No Page number Job build Image direction Book <-> TABLET ADF -> SADF Full image Image repeat Omit blank page Outside erase Copy & File Store to e-Filing *3 Blank *3 *3 *3 Copied *3 *3 *3 Top copied back blank *3 *3 Time stamp Sheet insertion Cover sheet *3 Yes Yes XY zoom *3 Yes Yes Nega/Pos *3 Yes Yes Mirror Both blank Yes Yes Mask Top copied Yes Yes Trim *3 *3 *3 2IN1 / 4IN1
200 Yes No Yes No Hole punch Saddle stitch Rotate sort Yes Yes Staple sort No Yes Yes Group No Yes Yes Sort No Yes Yes Non-sort / Non-staple No No Magazine sort & Saddle stitch No *3 No Book - 2 *3 2 - 2 Duplex *3 No *3 1 - 2 Duplex 2 - 1 Split *3 *3 Copying Function Combination Matrix *5 Yes No Yes Yes No No Edge erase Book center erase Dual page Blank Copied Top copied back blank Both blank Top copied Top blank Nega/Pos Mirror Mask Trim *1 *1 *
Yes Yes Yes No No No No Yes Yes Yes Yes Yes Yes Yes No No No No Yes Yes Yes Yes Yes Auto color Black Twin color copy ʊ Twin color selectable Twin color copy ʊ Red & Black Mono color Text/Photo Text Photo Printed image Map Image smoothing No No No Yes No No Yes Clear Marker No No No Cool Vivid No No No No Yes Red & Black range adjustment Hue No Yes Yes No No No No No No No No No Yes No Yes Yes No Yes No No No No Yes Yes Yes No No No No No
202 No No Yes No No No No No No No No No No No No Twin color copy ʊ Twin color selectable Twin color copy ʊ Red & Black Mono color Text/Photo Text Photo Printed image Map Image Adjustment Function Combination Matrix Marker Clear Vivid Cool Saturation Hue Red & Black range adjustment Twin color selectable adjustment Sharpness Background adjustment One touch adjustment Warm Yes No No No Yes Yes Yes No Yes Yes No No Yes No No Yes No Yes Yes Photo Original Mode
INDEX Numerics 2IN1 / 4IN1 ..............................................................107 [2-SIDED] ...................................................................8 A A/B format .................................................................11 ADF ........................................................................134 ADF -> SADF ..........................................................134 Alert message indication area .......................................
Finishing mode finishing mode ........................................................52 group .............................................................. 71, 73 hole punch ...................................................... 71, 80 magazine sort .................................................. 71, 78 magazine sort & saddle stitch ............................ 71, 78 manual staple .................................................. 71, 82 non-sort non-staple ............................................
Private group changing private group data ...................................177 creating ...............................................................170 deleting ................................................................180 private group ........................................................167 registering templates .............................................172 [PROOF COPY] ...........................................................9 Proof copy ................................................
206 INDEX
FC-5520C/6520C/6530C OME080008B0
MULTIFUNCTIONAL DIGITAL COLOR SYSTEMS Copying Guide 2-17-2, HIGASHIGOTANDA, SHINAGAWA-KU, TOKYO, 141-8664, JAPAN R071220E9102-TTEC Ver02 2009-12 ©2008, 2009 TOSHIBA TEC CORPORATION All rights reserved