Parallel Port Flash Card Reader User's Manual
Table of Contents Proprietary Notice and Disclaimer ................................................................. 2 Introduction ........................................................................................... 3 Contacting Actiontec Customer Support ............................................ 3 Features ................................................................................................. 4 Getting Started ..........................................................................
Introduction The CameraConnect Pro allows your desktop system to use the same PCMCIA and CompactFlash storage technology as most notebook and palmtop computers. It also provides a convenient way to transfer data from Digital Cameras that use ATA Flash Cards, CompactFlash Cards, or Smart Media (SSFDC) Devices without the bother and slow transfer rates of serial port downloads.
Features 32 bit drivers for use with Windows 95/98 and Windows NT 4.0. Hardware acceleration using parallel port EPP mode for faster data transfers Reads and writes PCMCIA ATA Flash Cards, CompactFlash Association Cards, and SSFDC (Solid State Floppy Disk Card) Devices. Reads CompactFlash Cards and SSFDC Devices without an adapter. Software based Smart Media (SSFDC) management supports up to 64MB devices for easy future updates. Does not require additional IRQ or DMA settings.
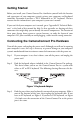
Getting Started Before you install your CameraConnect Pro, familiarize yourself with the location and appearance of your computer system’s printer port connector and keyboard connector. Determine if you have a “PS/2” keyboard or an “AT” keyboard. The best resource for this information is your computer system user’s manual. If you can’t find your computer user’s manual, go to “Appendix B: Technical Reference” at the back of this manual for help.
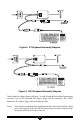
Figure 2: AT Keyboard Assembly Diagram Figure 3: PS/2 Keyboard Assembly Diagram Notice how the adapter shown in Figure 1 is used in both of the keyboard connection scenarios. For an AT keyboard, the adapter plugs into the computer. For a PS/2 keyboard, the adapter plugs into the keyboard cable. Step 4 After you have completed the installation of the CameraConnect Pro, check your work again to verify that all the connections are correct and that each connector is firmly inserted and secure.
Step 5 Reconnect the power cord you disconnected in step 1 and turn on the computer. Look at the front of the CameraConnect Pro during start-up. Do you see a green light? If the green light is on and you receive no keyboard errors, you have correctly installed the power-tap to your keyboard. Both the keyboard and printer pass-through cables on the CameraConnect Pro must be attached to the proper connectors on your computer.
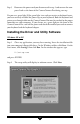
Step 3 The setup utility will display the software license agreement. You must click Yes to continue. Step 4 The Choose Destination Location dialog box will appear next, suggesting a folder where the drivers will be installed. Click Next to install in the location displayed, or click Browse to pick a different location.
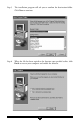
Step 5 The installation program will ask you to confirm the destination folder. Click Next to continue. Step 6 When the file has been copied to the location you specified earlier, click Finish to restart your computer and enable the software.
Windows NT 4.0 Step 1 On the Windows taskbar, click Start. On the Start menu, click Settings, then click Control Panel. Double-click on SCSI Adapters. Step 2 Click the Drivers tab to bring it to the front, then click the Add button.
Step 3 Next, insert the CameraConnect Pro’s installation disk into the A drive and click Have Disk. Step 4 In the next dialog box, be sure that A:\ appears under “Copy manufacturer’s files from:”. Click Continue.
Step 5 Window NT will find the CameraConnect Pro driver on the disk. Click OK. Windows NT 4.0 will copy and install the CameraConnect Pro driver. Step 7 Allow Windows NT to restart the system and enable the CameraConnect Pro. If you had difficulty with the procedure above, place the installation disk in the A drive. On the Start menu, click Run, then type a:\setup.exe and click OK. Follow the on-screen instructions.
Using the CameraConnect Pro Front Panel Functions Figure 4: Front Panel Arrangement Figure 4 shows the front panel layout of the CameraConnect Pro. There are two indicator LEDs, three slots, and two eject buttons. The indicator lights display the power-on and device-busy states of the reader. The green LED indicates that the unit has power and is ready to function. The amber LED shows that data is being read from or written to the device.
An inserted card will not be recognized until you perform some relevant action, such as reading or writing to the device. When you select the CameraConnect Pro’s “Removable Disk” icon in My Computer, your computer system’s speakers will emit a tone if a card is recognized. If a card is not recognized, an error message will be displayed. To eject a card, press the ejector button into the case. This will allow the CompactFlash Card to be easily removed by hand.
tect and configure itself to use these devices. Figure 7: Inserting an Smart Media (SSFDC) Device Figure 7 shows the correct way to insert an SSFDC device into the CameraConnect Pro. Notice that the gold pads are facing up. If you attempt to insert the device with the gold pads facing down, the device will not be recognized by the CameraConnect Pro. Note: Insert only one card at a time into the CameraConnect Pro. If two or more cards are inserted at the same time, none of them will work.
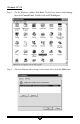
Step 2 Double-click the My Computer icon on the Windows desktop as shown below. Step 3 The CameraConnect Pro will be identified as a Removable Drive and a drive letter will be assigned to it in My Computer. Click on its Removable Drive icon to select it as shown below. Do not double-click the icon.
Step 4 From the File menu, choose Format. Step 5 The Format dialog box will appear. You can perform a “full format” or select options such as Quick (erase.) Below is the Format dialog box for Windows 98. Windows 95 displays a slightly different dialog box but the options offered will be the same. Click the Start button in this dialog box to begin formatting. Note: Do not use the format function on a computer running Windows NT 4.0.
Viewing, Writing, and Copying Files Use My Computer or Windows Explorer to gain access to the files contained on your flash cards. When the CameraConnect Pro is installed, it is assigned a drive letter like any other disk drive in your system. You may write to and copy files from your ATA Flash Cards, Compact Flash Cards, and SmartMedia Devices using standard Windows drag-n-drop copy.
Some resident programs may be shown as minimized applications on the taskbar. These programs constantly interrogate the printer port and can prevent the CameraConnect Pro from operating. Printers that have residant programs are generally multifunction inkjet printers that have faxing and scanning functions. Some laser printers may also include this type of resident program. They monopolize the port making it unavailable to other applications.
Using The CameraConnect Pro Utility When you load the CameraConnect Pro Drivers in Windows 95 or Windows 98, a utility program is also installed. This utility provides some useful information about the CameraConnect Pro’s installation parameters and the status of any cards which are installed in it. The CameraConnect Pro Utility can be started from Programs menu. On the Start menu, click Programs, click CameraConnect Pro, then click CameraConnect Utility. The utility will display the dialog box shown below.
The Reader Status and Setting block shows the CameraConnect Pro’s current operational mode, as well as indicating if a card is present or the sockets are empty. The parallel port modes displayed are SPP (standard), PS/2 (simple bidirectional), EPP (enhanced parallel port), and ECP (extended capabilities port). The PS/2 listing will be shown by a system with a bidirectional printer port configured in standard mode. SPP mode is a standard unidirectional printer port.
Error Messages and Troubleshooting This section lists some common error messages and operational problems that might be encountered when using the CameraConnect Pro and offers suggestions for their correction. If you have difficulties when trying to share the printer port with several external devices, it is suggested that you obtain a separate parallel port card for some of your devices.
Some Common Problems When I insert a card into the CameraConnect Pro, nothing happens. You must access the CameraConnect Pro through Windows My Computer or Windows Explorer before you can view or copy files. When I double-click the Removable Drive icon in My Computer, I can see my picture files. How do I view them with my picture program? You can copy your files into your hard drive and open them from there, or you can open them directly from the card.
The CameraConnect Pro will not install. (No Drive Letter Assigned) You may not have enough drive letters available to your system. In Windows 95 or Windows 98, right-click the My Computer icon on the desktop and choose Properties from the menu that appears. In the System Properties window, click on the Device Manager tab. Double-click the Disk Drives icon in the device tree to show what drives are installed in the system.
The green light on the CameraConnect Pro never comes on and the computer’s light is also off. If both the computer system’s power light and the green light on the CameraConnect Pro are off, you should turn off the power and disconnect the CameraConnect Pro. If your system is functioning normally, not be allowing power sharing from the keyboard connector. Contact your computer’s manufacturer for assistance.
Appendix A: Uninstalling the CameraConnect Pro Uninstalling in Windows 95 or Windows 98 Step 1 On the Start menu, click Settings, then click Control Panel. In Control Panel, double-click Add/Remove Programs. Step 2 Click CameraConnect Pro Reader to select it. Then click Add/Remove. Step 3 A warning message will ask you to confirm the removal of the CameraConnect Pro Reader from the system. Click the Yes button. Step 4 After the files have been removed, click OK.
Windows NT 4.0 Step 1 On the Start menu, click Settings, then click Control Panel. In Control Panel, double-click on SCSI Adapters. Step 2 Click on the Drivers tab. In the list, click to select CameraConnect Pro Reader. Then click Remove. Step 3 A warning message will ask you to confirm the removal of the CameraConnect Pro Reader from the system. Click the Yes button. Step 4 The driver will be removed from your system. Click Cancel.
Appendix B: Technical Reference External Port Connectors Figure 10: Printer (LPT) Port Connector - Front View Figure 11: AT Keyboard Connector - Front View Figure 12: PS/2 Keyboard Connector - Front View 28
Notices Declaration of Conformity This equipment has been tested and found to comply with the limits for a Class B digital device, pursuant to Part 15 of the FCC Rules. These limits are designed to provide reasonable protection against harmful interference in a residential installation. This equipment generates, uses and can radiate radio frequency energy and, if not installed and used in accordance with the instructions, may cause harmful interference to radio communications.