
User guide
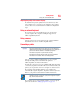
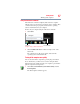
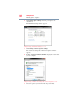
Table Of Contents
- Portégé® R700 Series User’s Guide
- Contents
- Introduction
- Chapter 1: Getting Started
- Selecting a place to work
- Setting up your computer
- Connecting to a power source
- Charging the main battery
- Using the computer for the first time
- Registering your computer with Toshiba
- Adding optional external devices
- Adding memory (optional)
- Recovering the Internal Storage Drive
- Erasing the Internal Storage Drive
- Checking the internal storage drive operating status
- Using the TouchPad™
- Using external display devices
- Using an external keyboard
- Using a mouse
- Connecting a printer
- Turning off the computer
- Customizing your computer’s settings
- Caring for your computer
- Chapter 2: Learning the Basics
- Chapter 3: Mobile Computing
- Chapter 4: Exploring Your Computer’s Features
- Chapter 5: Utilities
- TOSHIBA Assist
- TOSHIBA Application Installer
- Setting passwords
- TOSHIBA Face Recognition Utility
- TOSHIBA Security Assist
- TOSHIBA PC Diagnostic Tool Utility
- TOSHIBA HDD Protection Utility
- Mouse Utility
- TOSHIBA Hardware Setup
- USB Sleep and Charge Utility
- TOSHIBA Zooming Utility
- TOSHIBA Button Support
- TOSHIBA Accessibility
- Fingerprint Authentication Utility
- TOSHIBA eco Utility™
- TOSHIBA Service Station
- TOSHIBA PC Health Monitor
- Chapter 6: If Something Goes Wrong
- Problems that are easy to fix
- Problems when you turn on the computer
- The Windows® operating system is not working
- Fixing a problem with Device Manager
- Memory problems
- Power and the batteries
- Keyboard problems
- Display problems
- Disk or storage drive problems
- Optical disc drive problems
- Sound system problems
- ExpressCard® problems
- Printer problems
- Modem problems
- Wireless networking problems
- DVD operating problems
- Develop good computing habits
- If you need further assistance
- Other Toshiba Internet Web sites
- Toshiba’s worldwide offices
- Appendix A: Hot Keys/TOSHIBA Cards
- Appendix B: Power Cord/Cable Connectors
- Glossary
- Index

84
Getting Started
Turning off the computer
To connect a printer to your computer:
1 Connect the printer cable to the printer and then connect the
other end to one of the computer’s USB ports.
2 Plug the printer’s power cable into a live AC outlet.
Setting up a printer
Some printers require a specific installation process. Refer to your
printer installation guide for instructions before completing the
following procedure.
If your printer does not support Plug and Play, follow these steps to
set it up for the first time. You only need to set up the printer once.
1 Click Start, Control Panel, Hardware and Sound, and then
under Devices and Printers, click Add a printer.
The Add Printer Wizard appears.
(Sample Image) Add Printer Wizard
2 Follow the on-screen instructions to set up your printer.
Turning off the computer
Pressing the power button before shutting down the Windows
®
operating system could cause you to lose your work. Make sure the
system indicator panel’s storage drive light and the drive in-use light
are off. If you turn off the power while a disk/disc is being accessed,
you may lose data or damage the disk/disc and/or drive.
NOTE