
Owner's manual


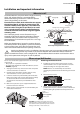

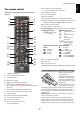


Table Of Contents
- INSTALLING YOUR TV
- CONNECTING YOUR TV
- SETTING UP YOUR TV
- CONTROLS AND FEATURES
- General controls
- Sound controls
- Widescreen viewing
- Picture controls
- Picture Mode
- Picture preferences
- Reset
- ColourMaster
- Base Colour Adjustment
- Colour Temperature
- Auto Brightness Sensor
- Active Backlight Control
- Black/White Level
- MPEG NR – Noise Reduction
- DNR – Digital Noise Reduction
- Resolution +
- Cinema Mode
- Resetting the advanced picture settings
- Expert Picture Settings
- Automatic Format (Widescreen)
- 4:3 Stretch
- Blue Screen
- Picture Position
- Picture still
- HDMI Information Display
- Wireless LAN Information
- Setting up the Network
- Network Device Setup
- USB HDD Record Function
- Using Toshiba Places
- Using Hybrid TV Standard (if available)
- Using Intel® Wireless Display
- Using the Media Player
- Other features
- The timers
- Energy Saving Settings
- Digital on-screen information
- Using EPG (Electronic Programme Guide)
- Digital settings – parental control
- Digital settings – Channel Options
- Digital settings – other settings
- Software Upgrade and Licences
- System Information and Reset TV
- PC Settings
- Input selection and AV connections
- Using HDMI CEC Control
- TEXT SERVICES
- PROBLEM SOLVING
- INFORMATION

9
CONNECTING YOUR TV
English
Connecting an HDMI® device
The HDMI input on your television receives digital
audio and uncompressed digital video from an
HDMI source device.
This input is designed to accept HDCP (High-Bandwidth
Digital-Content Protection) programme material in digital
form from EIA/CEA-861-D–compliant consumer electronic
devices (such as a set-top box or DVD player with HDMI
output). For acceptable video signal formats, see page 83.
NOTE: Supported Audio format: Linear PCM, Dolby Digital
(AC-3), sampling rate 32/44.1/48kHz.
Connect an HDMI cable (type A connector) to the HDMI
terminal.
For proper operation, it is recommended that you use an
HDMI cable with the HDMI Logo ( ).
• If your HDMI connection is capable of 1080p and/or your
television is capable of refresh rates greater than 50Hz, you
will need a Category 2 cable. Conventional HDMI/DVI cable
may not work properly with this model.
• HDMI cable transfers both video and audio. Separate
analogue audio cables are not required (see illustration).
To view the HDMI device video, press the
o button to select
HDMI 1, HDMI 2 or HDMI 3 mode.
This feature enables the audio signal of the TV to
be sent to the AV amplifier via the HDMI cable. It
will not be necessary to connect a cable from the
audio output of the TV to the audio input of the AV
amplifier to reproduce the audio received from the
tuner of the TV through the AV amplifier.
To connect an HDMI device
HDMI cable
HDMI device
the back of your television
HDMI’s ARC (Audio Return Channel)
feature
the back of your television
AV amplifier that supports ARC
HDMI cable