TOSHIBA DVD PLAYER OWNER'S MANUAL MODEL : SD-2715 DIGITAL AUDIO VIDEO 3DSurround Sound Before connecting, operating or adjusting this product, please read this instruction booklet carefully and completely.
PAGE 2 I INTRODUCTION The lightning flash with arrowhead symbol, within an equilateral triangle, is intended to alert the user to the presence of uninsulated 'dangerous voltage' within the product's enclosure that may be of sufficient magnitude to constitute a risk of electric shock to persons. V.IIVj _ _]i i[._]_ iVll _ _iii RISQUE DE NEpAs CHOC OUVRIR ELECTRIQUE WARNING:TO REDUCETHERISKOF ELECTRIC SHOCK,DONOTREMOVECOVER(OR BACK). NOUSER SERVICEABLEPARTSINSIDE.
INTRODUCTION Introduction Operation Safety Precautions ........................ Table of Contents ......................... _3 IMPORTANT SAFETY INSTRUCTIONS ...... 3 Using GUI Menu _3 General Information about GUI Menu ......... 23 3 _3 Detailed Description of each GUI Menu Icon ... 24 4-5 6 _3 Notes on Discs .......................... 7 of Controls PAGE 2 _3 Precautions ............................. _3 Identification I ................. 8-11 Advanced Operation Using a Title Menu ....
PAGE 4 I INTRODUCTION CAUTION: PLEASE READ AND OBSERVE ALL WARNINGS AND INSTRUCTIONS IN THIS OWNER'S MANUAL AND THOSE MARKED ON THE UNIT. RETAIN THIS BOOKLET FOR FUTURE REFERENCE. This set has been designed and manufactured to assure personal safety. Improper use can result in electric shock or fire hazard. The safeguards incorporated in this unit will protect you if you observe the following procedures for installation, use and servicing.
INTRODUCTION 13. Accessories Do not place this product on an unstable cart, stand, tripod, bracket, or table. The product may fall, causing serious injury to a child or adult, and serious damage to the product. Use only with a cart, stand, tripod, bracket, or table recommended by the manufacturer, or sold with the product. Any mounting of the product should follow the manufacturer's instructions, and should use a mounting accessory recommended by the manufacturer.
PAGE C _3 _1 _1 _1 6 I INTRODUCTION Notes on handling ) When shipping the DVD player, always use the original shipping carton and packing materials. For maximum protection, repack the unit as it was originally packed at the factory. Do not use volatile liquids, such as insect spray, near the DVD player. Do not leave rubber or plastic products in contact with the DVD player for a long time. They will leave marks on the finish.
INTRODUCTION I PAGE 7 This section shows you how to handle, clean, and store discs. f On Handling Discs On Storing Discs Do not touch the playback side of the disc. o o o Do not attach Do not store discs in a place subject to direct sunlight or near heat sources. Do not store discs in places subject to moisture and dust such as a bathroom or near a humidifier. Store discs vertically in a case. Stacking or placing objects on discs outside of their case may cause warping. paper or tape to discs.
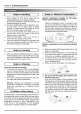
PAGE 8 I INTRODUCTION POWER indicator PLAY button RANDOM button STOP button PAUSE button I REPEAT button MENU button POWER but,o--'n'_ "'__-- ' m DISC SELECT (1 - 5) buttons _ , .
INTRODUCTION I PAGE 9 VIDEO OUT jack COMPONENT VIDEO OUT jacks S-VIDEO OUT jack [VIDEO OUTPUT SELECT switch v,o-o s- EO DIGr AL ANALOG 1 ANALOG 2 I COAXIAL DIGITAL AUDIO OUT jack AUDIO OUT (L/R) 1, 2 jacks POWER CORD Connect to an AC 120V, 60Hz outlet only. OPTICAL DIGITAL AUDIO OUT jack Remove the dust protection cap from the connector and connect the optical digital cable (not supplied) firmly so that the configurations of both the cable and the connector match.
PAGE 10 I INTRODUCTION I You will find instructions instruction manual. for each of the remote control functions in the appropriate sections of this f OPEN/CLOSE button_ OPEN/CLOSE POWER button GUI DISPLAY button_ GUt RETURN button DtsPLAY RETURN SETUP button_ ZOOM button ENTER button_ ....
INTRODUCTION Preparing the Remote Control ) Insert the batteries into the remote control so you can use it to operate the DVD player. Open the battery _ • 11 Operating with the Remote Control ) This section shows you how to use the remote control. Point the remote control at the remote sensor and press the buttons. cover. Insert batteries (AAA size). Make sure to match the + and - on the batteries to the marks inside the battery compartment.
PAGE 12 I CONNECTIONS Connect the DVD player to your TV. VIDEO OUTPUT SELECT switch Video cable (Y, Pb, Pr) (not supplied) S-video cable (Not supplied) Audio/Video cable (supplied) To S-video input To audio inputs To video input TV or monitor with audio/video inputs O O O Refer to the owner's manual of your Before you connect the DVD player making any connections. Connect the DVD player to your TV because DVD video discs are copy TV as well.
CONNECTIONS I PAGE 13 You can listen to the sound of audio CDs and DVD video discs in stereo.
PAGE 14 I CONNECTIONS Enjoying Dolby Digital Sound You can enjoy the high quality dynamic sound of Dolby Digital, Dolby Pro Logic, and 2 Channel Digital Stereo. Dolby Digital Dolby Digital is the surround sound technology used in theatres showing the latest movies, and is now available to reproduce this realistic effect in the home.
CONNECTIONS Enjoying Dolby Pro Logic Surround I PAGE 15 Sound Dolby Pro Logic Surround You can still enjoy the excitement of Surround Sound even if your AN receiver does not offer Dolby Digital decoding. If your AN receiver has a Dolby Pro Logic decoder, refer to the following connection diagram. onnect one or two rear speakers. _ To VIDEO OUT e output sound from the rear speakers I ill be monaural even if you connect two I ear speakers.
PAGE 16 I CONNECTIONS Enjoying /f2 Channel 2 Channel Digital Stereo Sound Digital Stereo You can enjoy the dynamic sound of 2 Channel Digital Stereo by connecting digital audio input and speaker system (right and left front speakers).
BASIC OPERATION I PAGE 17 This section explains the basics on how to play back a DVD video disc. Preparations When you want to play back DVD video discs, turn on the TV and select the video input source connected to the DVD player. When you want to enjoy the sound of DVD video discs or audio CDs from the audio system, turn on the audio system and select the input source connected to the DVD player. For connection details, see pages 12 through 16.
PAGE 18 I BASIC OPERATION If you want to select another disc, press DISC SKIP on the remote control once or more, or press DISC SELECT (1 - 5) on the front panel. Alsoyou can selecta disc in the DVD playerdirectly by usingthe remote control,press DISC SKIP and then pressa numberbutton(1-5) on the remotecontrol withinone second. OPEN/CLOSE 0 0 GUI _lp DISPLAY RETURN ZC_,. 7 7 @ Press PLAY to begin playback. Playback begins. You can skip this step ifthe disc is alreadyplaying automatically.
BASIC OPERATION I PAGE 19 A OPEN/CLOSE © Press STOP during playback. @ GUI AL_ P DISPLAY RETURN ZOQ • When play is stopped, the unit memorizes the point where STOP was pressed (RESUME function). Press PLAY and playback will resume from this point. C) This operation works only with discs for which the elapsed playing time appears in the DVD display window during stop. Resume function will be cleared when the STOP is pressed on the STOP mode.
PAGE 20 I BASIC OPERATION =-"------""-._,' ',_ i I TalHIR I n _ Press EX-CHANGE during playback to open the loading drawer. ] °!°o w DISC SKIP Press DISC SKIP to rotate the disc tray to the desired position. The carousel will advance clockwise by one disc tray. Note: The disc tray which was in the play position can not be exchanged. EX-CHANGE Exchange the discs and press EX-CHANGE OPEN/CLOSE to close the loading drawer.
BASIC Press PAUSE during • DVD/Video CD • ! OPEN/CLOSE © O OPERATION I PAGE 21 playback. The player will be placed in the still picture mode. CD Playback will be paused. GUI __p oISPLAY RETURN Z(P_ Press PAUSE during still playback. (Each time you press PAUSE, the picture advances one frame) To resume normal playback, press PLAY.
PAGE 22 I BASIC OPERATION You can play back discs at various speeds. Press and hold SKIP 1<4 or bbl button for about two seconds during playback. OPEN/CLOSE GUI D_sPLAY RETURN [TV screen] • SLOW" • (11/11_) The image advances (or reverses) is relatively slow at first. When the button is pressed again, the speed increases. (Each time the button is pressed, the speed increases up to 4 steps (DVD) or 3 steps (CD/Video CD).) The speed will be maintained even after the button is released.
OPERATION This unit features an icon based GUI menu showing disc information (title/chapter/track number, elapsed playing time, audio/subtitle language, angle, and sound) and player information (repeat play, play mode, marker, etc.). Some icons only show the indicated information. Other icons allow settings to be changed. © 1 MENU Press GUI DISPLAY • • 0 GUI I PAGE 23 Common procedures _ 0PEN/CLOSE USING during playback. Title function can be accessed from the stop mode.
PAGE 24 I OPERATION You can view information USING GUI MENU about a disc and its operational Press GUI DISPLAY during playback. FV screen] DVD GUI status on the TV screen. FUNCTION (Press A/V to select desired item) SELECTION METHOD Indicatesthe currenttitle number; and to jump to a desired title number Indicates the current chapter number; and to jump to a desired chapter number Indicates the elapsed time; and directly select scenes by the desired time.
ADVANCED Some movie discs may contain two or more titles. If the disc has a title menu recorded on it, the TOP MENU button can be used to select the movie title and related menu options. (The details of operation differ depending on the disc used.) • _ OPERATION I PAGE 25 Press TOP MENU. A list of the titles on the disc is displayed. Selecting a title may not be possible on certain DVD discs.
PAGE 26 I ADVANCED OPERATION It is possible to change the subtitle language to a different language from the one selected at the initial setup. (See page 33 for further info.) This operation functions only on discs that include multiple subtitle languages. Press SUBTITLE during playback. When no subtitles are available,"OFF" willbe displayed insteadof the languagenumber. ®®®® _ O O ress SUBTITLE repeatedly until the desired language is selected.
ADVANCED OPERATION I Some DVDs may contain scenes which have been shot simultaneously from a variety of different angles. You can view each of these different angles using the ANGLE button. (The recorded angles differ depending on the disc used.) _ PAGE 27 Press ANGLE during playback. Number of angle being played back is displayed. _ ress ANGLE repeatedly until the desired angle is selected.
PAGE 28 I ADVANCED OPERATION Repeating viewing (listening) Press REPEAT during playback. Each time this button is pressed, the icon display changes as shown below and the disc will repeat a chapter or title (DVD) or a track (CD/Video CD). Repeating sections between two specific points (A-B repeat) While the disc is playing, press A-B RPT at the point where repeat play is to start (A). • DVD Repeat of chapter being played • You can select "OFF" at this step by pressing CLEAR.
ADVANCED Storing a MARKER in the DVD memory is similar to marking your page in a book. It allows you to quickly return to any point on the disc. OPERATION I PAGE 29 Storing a marker in the memory Press MARKER during play at the starting point to be viewed (listened to) again. Indicates "1/9" is stored in the memory. Up to 9 marks can be stored in the memory. 0PEN_SE © 0 Recalling/Clearing a marker GUI _p DIsP_Y RETURN Z_=. 4 _ ress SEARCH during playback.
PAGE 30 I ADVANCED OPERATION The Zoom function allows you to magnify the video image and to navigate through the enlarged image. 1 2 @ ® Press ZOOM during playback or still playback to activate the Zoom function. If you press ZOOM repeatedly, the magnification increases (6 steps). level ® Press A/T/
ADVANCED The player plays the tracks on the disc in the order you specify. _ OPERATION I PAGE 31 Press PROGRAM on the stop mode. The program menu screen appearson the TV. Note: Program play function is possible only with audio CDs. It does not work with DVD movie discs and Video CDs (Version 2.0). OPEN/CLOSE © • To exit the screen, press PROGRAM or RETURN. @ GUI A_p DISPLAY RETURN ZOO Enter the disk number using the numerical keys (1-5) and then press ENTER.
PAGE 32 I INITIAL SETTINGS Once the initial settings have been completed, the player can always be operated under the same conditions (especially with DVD discs). The settings will be retained in the memory until they are changed, even if the power is switched off. Selection of initial settings Press SETUP in the stop or playback The SETUP menu is displayed. mode. OPEN.LOSE © O GUl Jt_P DISPLAY RETURN ZOo _ 3 ress A/V to select the desired item.
INITIAL To select the audio soundtrack language, subtitle language and the language used in title menus or DVD menus. SETTINGS I PAGE 33 At the setup screen, press A/V to select "Disc Audio" and press I_. When you play back a DVD video disc, the DVD player automatically displays the pre-selected subtitle language if it is included on the disc. ! OPEN/CLOSE © O GUI __p DISPLAY RETURN Zt'_ _ Press A/V to select the desired language and then press ENTER.
PAGE 34 I INITIAL SETTINGS To prohibit the playing of specified DVDs which are unsuitable for children. • Some DVD discs contain a restriction level which enables parents to remove scenes or prevent playback of discs by children. DVD players are equipped with a password designed to prevent children from changing the restriction level settings. Selecting rating level (DVD only) From the SETUP screen, "Rating" and press I_. press A/T to select OPEN/CLOSE © @ GUI _,lp DISPLAY RETURN Zt),_,.
INITIAL SETTINGS I PAGE 35 Setting your password (DVD only) 0PENiCLOSE © O If you change the rating level to "7" or lower, you must enter a 4-digit "password" to prevent playback of discs with higher ratings. GUI _p DISPLAY RETURN At the SETUP screen, press • to select "Password" and press I_. Z(Y_,. _ ..._ROG_ -® ® CLEAR I ...q ANGLE SUBTm_E AUDIO CD CD CD MARKER SEARCH RANDOM CD CD REPEAT A-B RPT CD CD CD DISC SKIP Input a 4-digit password and press ENTER.
PAGE 36 I INITIAL SETTINGS Select the appropriate screen type according to your TV set; conventional size screen (4:3) or wide-screen (16:9). _At the SETUP screen, press &/V to select "TV Aspect" and press I_. _ Press A/V to select the desired Aspect and press ENTER. A OPEN/CLOSE © @ Gill ___lp 0IsPLAY RETURN ZOo -2 @ PROGRAM @®®© CLEAR ®®®® 4:3 Letterbox : Select when a conventional TV set is connected widescreen.
INITIAL Selects language for SETUP menus and onscreen displays. SETTINGS I PAGE 37 From the SETUP screen, press A/_l' to select "Menu Language" and press I_. oP_,E O GUI -2 Press A/V to select the desired Language and press ENTER.
PAGE 38 I INITIAL SETTINGS Each DVD disc has a variety of audio output options. Set the player's Digital Audio Output according to the type of audio system you use. _At the SETUP screen, press A/T to select Digital Audio Output and press I_. _ Press A/T to select the desired output and press ENTER. You can select Digital Audio Output or Sampling Frequency item by pressing ENTER.
INITIAL The DRC, Vocal and PBC settings can be changed. _ SETTINGS I PAGE At the SETUP screen, press A/V "Others" 39 to select and press I_. ! OPEN/CLOSE © O GUI ___p DISPLAY RETURN ZOO -2 _ ress A/V to select the desired items and press ENTER. The setting of the selected item are changed between On and Off. DRC (Dynamic Range Compression) On/Off On: Select this option to turn on the Dynamic Range Compression circuitry so that dialogue remains clear even at low volume levels.
PAGE 40 I INITIAL SETTINGS Enter the appropriate code number for the initial settings "Audio", "Subtitle" and/or "Menu" (See page 33).
REFERENCE I PAGE 41 This DVD player can play back the following discs. Disc mark Contents Disc size 12 cm Audio+Video DVD video discs (moving pictures) VIDEO Maximum playback time Approx. 4 hours (single sided disc) Approx. 8 hours (double sided disc) 8 cm Approx. 80 minutes (single sided disc) Approx. 160 minutes (double sided disc) Video CDs Audio+Video Audio CDs Audio DIGITAL AUDIO 12 cm 74 minutes 8 cm 20 minutes 12 cm 74 minutes 8 cm 20 minutes CD-R/RW discs are also available.
PAGE 42 I REFERENCE Symptoms and Correction ) Check the following guide for the possible cause of a problem before contacting service. Symptom Cause Correction No power. • The power cord is disconnected. • Plug the power cord into the wall outlet securely. The power is on, but the DVD player does not work. • No disc is inserted. • Insert a disc. (Check that the DVD or, audio CD indicator in the DVD display is lit.) No picture.
REFERENCE DVD player/Outputs/Supplied f ,_ >, c_ > I PAGE 43 Accessories ) Power supply AC 120V, 60 Hz Power consumption 16 W Weight 12.6 Ibs (5.7 kg) External dimensions (W X H X D) 17" X 4.7" X 15.1" (430 x 118 x 381 mm) Signal system NTSC Laser Semiconductor laser, wavelength 650 nm (DVD), 780 nm (CD) Frequency range (audio) 4 Hz to 20 kHz Signal-to-noise More than 100 dB (EIAJ) ratio (audio) Dynamic range (audio) More than 90 dB (EIAJ) Harmonic distortion (audio) 0.
PAGE 44 I OTHERS Toshiba America Consumer Products, Inc. ("TACP"), Toshiba Hawaii ("THr') and Toshiba Canada Limited ("TCL") make the following limited warranties. These limited warranties extend to original purchaser or any person receiving this set as a gift from the original purchaser and to no other purchaser or transferee.
OTHERS I PAGE 45 How to Obtain Warranty Service (1) Refer to the troubleshooting guide in your owner's manual. This check list may solve your problem. (2) In the U.S.A., only call the TACP toll free number 800-631-3811, or if in Hawaii or Canada see listing below within (30) days after you find a defective product or part. (3) Arrange for the delivery of the product to the TACPiTHIiTCL Authorized Service Station or TACP Return Center.
TOSHIBA P/NO: 3834RS0020C Printed in Korea