TOSHIBA AMERICA INFORMATION SYSTEMS STORAGE DEVICE DIVISION IRVINE, CALIFORNIA SD-R2612 CD-RW/DVD-ROM COMBINATION MOBILE DRIVE USER MANUAL
CONTENTS Introduction..............................................................................1 Setup ........................................................................................3 Using the CD-RW/DVD-ROM Combo Drive ............................4 Troubleshooting.......................................................................7 Specifications ..........................................................................8 Drive Connectors......................................................
INTRODUCTION – SD-R2612 General Features CD-RW disc write/rewrite at 4X – 24X CD-R disc write at 4X - 24X 3-way Disc Eject (eject button, software, emergency eject hole) Average Access Time CD DVD-ROM (single) DVD-ROM (dual) DVD-RAM 130ms 130ms 150ms 250ms Horizontal or Vertical Mount 2MByte Buffer Playback interchangeability for CD-ROM and DVD-ROM discs Regionalization (RPC2 compliance) (DVD) BUS Interface ATAPI Format Compatibility CD: • • • • • • DVD • • • • • • • • 1 CD-DA (Red Book) - Standard Au
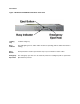
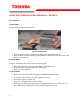
Front Panel Figure 1.SD-R2612 CD-RW/DVD Combo Drive Front Panel Loading Tray Load disc using tray. Busy Indicator The LED lights green or amber when the drive is operating (LED is amber when drive is writing.) Eject Button The Eject button is used to open the disc tray so you can install or remove a disc. Emergency Eject Hole The emergency eject hole is to be used only when the Loading Tray will not open when Eject button is pressed.
SETUP – SD-R2612 Toshiba recommends that only trained professionals install this CD-RW/DVD-ROM Combo drive into your laptop/notebook. Installation Notes • • • • • The SD-R2612 CD-RW/DVD-ROM Combo drive has no jumpers that need to be set Mounting orientation: 15° (horizontally), 15° vertically (volume control in down position), 30° (drive with volume control in up position). When mounting drive use 4 M2-PO.4 tapping holes located on the left and right sides of drive.
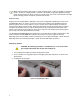
USING THE CD-RW/DVD-ROM Combo Drive – SD-R2612 Drive Operation Inserting Media To insert media perform the following steps: Figure 1.Inserting Disc 1. Open the drive's loading tray by pressing the Eject Button and pulling out the tray. 2. Place media disc into drive's loading tray, and lightly press down on the inner portion of the disc. 3. Gently close the disc tray. Removing Media To remove media disc from the drive, perform the following steps: 1.
NOTE: High-speed drives spin the disc at a high rotational speed. If a disc has printing on only half of the disc, or if there is a slight imbalance in the disc, the imbalance is greatly magnified by the high speed, causing the drive to vibrate or produce a fan-like noise. These effects are inherent in the highspeed technology and do not indicate a problem with the drive.
Handling Media DVD media is sensitive to dust and fingerprints. Carefully handle media by its edges only. If a DVD movie skips or hangs during playback, clean the media. Most DVD video playback issues are mediarelated and can be remedied by proper handling and care of media. Cleaning Media Try to avoid touching the read area (underside) of the disc as dirt and smears will degrade the disc accessing speed. If the disc becomes dirty wipe it with a damp soft cloth.
TROUBLESHOOTING – SD-R2612 Solution Problem Disc tray cannot be opened • • Check that there is power to drive. Use Emergency Eject instructions to open tray. Drive is not recognized by system • Is the drive connected properly? Are all cables plugged in properly (e.g. Power Cable, Interface Cable and Audio Cables).
SPECIFICATIONS –SD-R2612 General Interface: ATAPI Format Compatibility CD: • • • • • • DVD • • • • • • • • CD-DA (Red Book) - Standard Audio CD & CD-TEXT CD-ROM (Yellow Book Mode1 & 2) - Standard Data\ CD-ROM XA (Mode2 Form1 & 2) - Photo CD, Multi-Session CD-I /FMV (Green Book, Mode2 Form1 & 2, Ready, Bridge) CD-Extra/ CD-Plus (Blue Book) - Audio & Text/Video Video-CD (White Book) - MPEG1 Video DVD DVD-ROM (Book 1.02) DVD-Video (Book 1.1) DVD-R (Book 1.0, 3.9G) DVD-R (Book 2.0, 4.
Performance Transfer Rate DVD (Single) DVD (Dual) DVD+/-R DVD+/-RW DVD-RAM (Ver 2.
Environmental Ambient Temperature Operating Storage 5° to 50° C (41° to 122° F) -40° to 65° C (-40° to 149° F) Relative Humidity Operating Storage/Shipping 10% to 90% 5% to 95% (wet bulb 40° C max) Vibration Operating (5 to 500 Hz) (read) Operating (5 to 500Hz) (write) Non-operating (10 to 500Hz) Packing (10 to 25 Hz) 2.45 m/s2 (0.25G) (O-P) 2.45 m/s2 (0.25G) (O-P) 9.8 m/s2 (1.0G) (O-P) 9.8 m/s2 (1.
Drive Connectors –SD-R2612 Figure 1.SD-R2612 DVD Writeable Drive Rear Panel – Connector A 50-pin ATAPI interface connector is found at the rear of the SD-R2612 CD-RW/DVDATAPI Connector ROM Combo drive. Connecting cable should use Japan Aviation Electronics Industry Limited KX14-50Series L or equivalent connector. Table 1.Interface Pin Assignments PIN NO.