, OWNER S MANUAL 2.4GHz DIGITAL SPREAD SPECTRUM CORDLESS TELEPHONE SG-1701 The FIRST thing to do after unpacking your new cordless telephone is: CHARGE THE BATTERY ! Please read and follow the few instructions on PAGE 6 BEFORE YOU DO ANYTHING ELSE.
IMPORTANT SAFETY INSTRUCTIONS When using your telephone equipment, basic safety precautions should always be followed to reduce the risk of fire, electric shock and injury to persons, including the following: 1. Read and understand all instructions. 2. Follow all warnings and instructions marked on the product. 3. Unplug this product from the wall outlet before cleaning. Do not use liquid cleaners or aerosol cleaners. Use a dry cloth for cleaning. 4.
13. Do not use the telephone in the vicinity of a gas leak. CAUTION: TO REDUCE THE RISK OF FIRE OR INJURY TO PERSONS BY THE BATTERY, READ AND FOLLOW THESE INSTRUCTIONS. 1. Use only the appropriate type and size battery pack specified in the instruction manual provided for this product. 2. Do not dispose of the battery pack in a fire. The cell may explode. Check with State and local codes for possible special disposal instructions. 3. Do not open or mutilate the battery pack.
SERVICE REQUIREMENTS If the cordless telephone should malfunction, or need changes or modifications, all repairs will be performed by an authorized Toshiba Service Station. This unit has been registered with the FCC for direct connection to the telephone network. Under the FCC program, no customer is authorized to repair this unit. This applies to a unit both in and out of warranty.
INTRODUCTION Toshiba America Consumer Products, Inc. takes pride in presenting the telephone, one of the finest digital spread spectrum cordless telephones available. Intelligent design, superb craftsmanship, and the latest technological advances have been combined to provide you with a telephone that is easy to operate and will provide you with years of dependable service. Please take the time now to read your Owner’s Manual carefully, so that you may enjoy the many convenient features of your telephone.
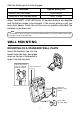
INSTALLATION 1. SETTING UP THE BASE UNIT For use on a desk or counter top follow the instructions below. DESKTOP MOUNTING: Snap the bracket's tab into the notches on the base. Fasten the AC adaptor cord to prevent it from being disconnected. Raise the antenna to vertical position. Telephone Line Cord Single-Line Telephone Jack (RJ11C) Power Outlet (AC 120V, 60Hz) AC Adaptor • USE ONLY WITH Supplied AC ADAPTOR (TAC-2981; power source AC 120V, 60Hz/DC 9V).
2. CHARGE THE BATTERY PACK Note Black Red Use only the supplied battery pack (TRB-1981; power source 800 mAh, 3.6V). q Remove the battery compartment cover on the back of the handset by sliding it down. w Plug the battery pack cord into the connector in the battery compartment in correct polarity. It fits in only one way. e Place the battery pack in the battery compartment. r Put the battery compartment cover back by sliding until it snaps into place.
After the battery pack is fully charged; Operation Approx. battery life While in use (Talk mode) up to 6 hours While not in use (Standby mode) up to 10 days When TALK/BATT LOW LED blinks, all handset buttons are disabled and the battery needs to be charged. If this occurs during a call, you hear short beeps. Finish the call as soon as possible and place the handset on the base unit.
• Route the cords through the guides. • Place the base unit on the posts of the wall plate and push down until it is firmly seated. • USE ONLY WITH Supplied AC ADAPTOR (TAC-2981; power source AC 120V, 60Hz/DC 9V). Notes • Do not use any outlet controlled by a wall switch. • If you don’t have a standard wall plate, cut out the template below and use it to position two screws (minimum length of 1-3/8 inches) into the wall with the heads protruding about 3/16 inch.
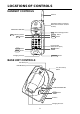
LOCATIONS OF CONTROLS HANDSET CONTROLS Antenna Speed Dial Index Card (back) Write down numbers stored in memory.
Please see “LOCATIONS OF CONTROLS” for the location of each button used for the following operations. TONE/PULSE SETTING Set the TONE/PULSE switch on the back of the base unit to TONE and make a trial call. If the call does not connect, set the TONE/PULSE to PULSE. MAKING A CALL 1. MAKING A CALL q Press TALK . w Listen for the dialtone. e Dial the phone number you are calling. 1, 4 3 r To hang up, press TALK again or place the handset on the base unit. The TALK/BATT LOW LED turns off. 2.
3. INTERFERENCE OR STATIC If you hear noise during a call, press CHANNEL to select another channel. The TALK/BATT LOW LED blinks during changing a channel. 4. CHANGING THE RINGER VOLUME Press / to select one of four ringer tone and volume combinations during standby mode. Each time you press / , the setting will change. 5.
8. SENDING TONE SIGNAL (for Pulse service user) Even if you have Pulse service (the Tone-Pulse switch is set to Pulse), you can use this phone with banking and other phone services requiring touch tone signals. q Dial the service number and wait for the connection. w Press TONE , then enter the numbers required. You will hear the tones on the line. 9. MUTING Press MUTE to turn off the microphone during a conversation. The TALK/BATT LOW LED blinks.
USING A HEADSET (option) For purchase of an optional accessory, please call 1-877-644-7373. You can talk with hands-free convenience using an optional headset (part #. RC008260) that has a 3/32-inch(2.5mm) plug. To connect the headset, open the rubber cover on the left side of the handset, then insert the headset’s plug into the jack. With a headset connected, you can make or answer calls as usual using the keys on the handset.
USING A BELT CLIP (option) You can attach an optional Belt Clip (part #. RC009263) to the handset in order to carry it on your belt. Attaching the Belt Clip to the Handset Insert the Belt Clip tabs into the holes on each side of the handset until they click. Note Be sure to insert the tab properly into each hole to prevent the belt clip from falling off. Removing the Belt Clip from the Handset Pull both sides of the Belt Clip to release the tabs from the holes.
MEMORY DIALING You can store up to 10 telephone numbers in memory. Notes In memory dialing operation, • If more than 20 seconds elapse between pressing buttons, the operation will be canceled and you must start over again. • If you press a wrong button, an error tone sounds and the handset returns to standby mode. • If a call comes in, the operation will be canceled and you will hear the ring. 1. STORING NUMBERS You can store up to 20 digits including #, , TONE, and PAUSE in one memory address.
2. DIALING A STORED NUMBER q Pick up the handset and press TALK . The TALK/BATT LOW LED lights. w Press MEM . e Enter the memory address (0 to 9). The stored number will be dialed. Note If you enter a memory address which does not have any stored number, error beeps sound. 3. ERASING A STORED TELEPHONE NUMBER q Pick up the handset. (Do not press the w Press the MEM TALK button.) button twice. e Enter the memory address button (0 to 9) you wish to erase.
ACCESSORIES SUPPLIED ACCESSORIES Rechargeable Battery pack AC Adaptor Telephone Cord Owner’s Manual Speed Dial Index Bracket (1) (1) (1) (1) (1) (1) TRB-1981 Part #. RC009814 TAC-2981 Part #. RC009792 Part #. RC008231 Part #. RC009815 Part #. RC009264 Part #. RC009262 OPTIONAL ACCESSORIES Headset Belt Clip (1) Part #. RC008260 (1) Part #. RC009263 For the purchase of Accessories, please call 1-877-644-7373.
PROBLEM SOLUTION TALK/BATT LOW LED blinks. The handset does not ring or receive a page. • The battery is low. →Recharge the battery. • The handset is located too far away from the base or the battery has been discharged. →Return the handset to charge when your call is finished. • The digital security code has changed. →Remove the handset from the base unit and press and hold PAGE . While the handset is emitting, return the handset to the base unit. • The battery is low.
WARRANTY/SERVICE TELEPHONE/TELEPHONE ANSWER MACHINE LIMITED WARRANTY Toshiba America Consumer Products, Inc. (“TACP”), and Toshiba Hawaii, Inc. (“THI”), make the following limited warranties. These limited warranties extend to the original consumer purchaser or any person receiving this set as a gift from the original consumer purchaser and to no other purchaser or transferee.