SX-2801.qxd 3/15/1 6:02 PM Page 1 , OWNER S MANUAL 900MHz DIGITAL SPREAD SPECTRUM CORDLESS TELEPHONE Preparation SX-2801 Basics Caller ID/Call waiting Additional Information The FIRST thing to do after unpacking your new cordless telephone is: CHARGE THE BATTERY ! Please read and follow the few instructions on PAGE 2 BEFORE YOU DO ANYTHING ELSE.
SX-2801.qxd 3/15/1 6:02 PM Page 2 GETTING STARTED: DO THIS FIRST! FIRST, CHARGE THE HANDSET BATTERY! • Set your new phone in an out-of-the-way place near a power outlet where it will not be disturbed. • Plug the AC adaptor into the wall outlet. • Plug the AC adaptor cord into the power jack on the base unit. • Take the cover off the handset battery compartment; plug the battery connector into the receptacle inside the battery compartment and replace the cover. The connector only goes in one way.
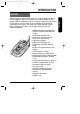
SX-2801.qxd 3/15/1 6:02 PM Page 3 INTRODUCTION FEATURES 3 Preparation Toshiba America Consumer Products, Inc., takes pride in presenting the new 900 MHz digital spread spectrum cordless telephone. The Toshiba cordless telephone features a 16-digit x 3-line dot matrix liquid crystal display (LCD) for caller ID on Call Waiting and speed-dial programming and calling. The sleek new design provides face-up battery charging even when wall mounted. Other features are summarized below.
SX-2801.qxd 3/15/1 6:02 PM Page 4 TABLE OF CONTENTS Preparation INTRODUCTION . . . . . . . . . . . . . . . . . . . . . . . . . . . . . . . . . . . . . . . . . .3 Features . . . . . . . . . . . . . . . . . . . . . . . . . . . . . . . . . . . . . . . . . . . . . .3 IMPORTANT SAFETY INSTRUCTIONS . . . . . . . . . . . . . . . . . . . . . . . . .6 LOCATION OF CONTROLS . . . . . . . . . . . . . . . . . . . . . . . . . . . . . . . . . .8 Handset . . . . . . . . . . . . . . . . . . . . . . . . . . . . . . . . .
SX-2801.qxd 3/15/1 6:02 PM Page 5 TABLE OF CONTENTS Steps for entering names and special characters . . . . . . . . . . . . . . .24 If you make a mistake while entering a name . . . . . . . . . . . . . . . . . .25 Dialing a stored number . . . . . . . . . . . . . . . . . . . . . . . . . . . . . . . . . .25 Editing and deleting stored numbers . . . . . . . . . . . . . . . . . . . . . . . .26 Caller ID/Call waiting CALLER ID/CALL WAITING . . . . . . . . . . . . . . . . . . . . . . . . . . . . . . . . .
SX-2801.qxd 3/15/1 6:02 PM Page 6 IMPORTANT SAFETY INSTRUCTIONS When using your telephone equipment, basic safety precautions should always be followed to reduce the risk of fire, electric shock and injury. Preparation 1 Read and understand all instructions. 2 Follow all warnings and instructions marked on the product. 3 Unplug this product from the wall outlet before cleaning. Do not use liquid cleaners or aerosol cleaners. Use a dry cloth for cleaning.
SX-2801.qxd 3/15/1 6:02 PM Page 7 IMPORTANT SAFETY INSTRUCTIONS The RBRCTM Seal BATTERIES 1 Use only the appropriate type and size battery pack specified in the instruction manual provided for this product. 2 Do not dispose of the battery pack in a fire. The cell may explode. Check with State and local codes for possible special disposal instructions. 3 Do not open or mutilate the battery pack. Released electrolytes are corrosive and may cause damage to the eyes or skin. It may be toxic if swallowed.
SX-2801.
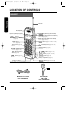
SX-2801.qxd 3/15/1 6:02 PM Page 9 LOCATION OF CONTROLS BASE UNIT Preparation DC IN 9V jack (page 10) LINE modular jack (page 10) Hook Antenna Cradle IN USE/CHARGE LED PAGE button (page 21) Charging contacts For purchase of accessories, please call 1-877-644-7373.
SX-2801.qxd 3/15/1 6:02 PM Page 10 INSTALLATION SETTING UP THE BASE UNIT (DESK TOP MOUNTING) For setting up the base unit follow the instructions below. Preparation Raise the antenna to vertical position. Telephone Line Cord Fasten the AC adaptor cord to prevent it from being disconnected. Single-Line Telephone Jack (RJ11C) Power Outlet (AC 120 V, 60 Hz) AC Adaptor • Plug the AC adaptor firmly into the base unit and the AC 120V outlet.
SX-2801.qxd 3/15/1 6:02 PM Page 11 INSTALLATION SETTING UP THE BASE UNIT (WALL MOUNTING) MOUNTING ON A STANDARD WALL PLATE: Preparation Raise the antenna. Single-Line Telephone Jack (RJ11C) Telephone Line Cord Power Outlet (AC 120 V, 60 Hz) AC Adaptor • Route the cords through the guides. • Place the base unit on the posts of the wall plate and push down until it is firmly seated. NOTES: • Do not use any outlet controlled by a wall switch.
SX-2801.qxd 3/15/1 6:02 PM Page 12 INSTALLATION Preparation CHARGING THE BATTERY PACK It is important to charge the battery for 12-16 hours continuously without any interruption before you use the handset for the first time. 1 Remove the battery cover on the Red Black back of the handset by sliding it down. 2 Plug the battery pack cord into the connector with the correct polarity. (black and red wires). 3 Place the battery pack in the battery compartment.
SX-2801.qxd 3/15/1 6:02 PM Page 13 INSTALLATION NOTES: • Use only the supplied battery pack (TRB-8000 power source 600mAh, 3.6VDC) • The battery pack is not charged properly if the charging contacts are dirty or tarnished. Clean the contacts occasionally with a dry cloth. Operation Preparation After the battery pack is fully charged; Approx.
SX-2801.qxd 3/19/1 9:26 AM Page 14 INSTALLATION Preparation Before using the Handset, make sure to read the following instructions. FLASH SELECT / TONE/ PULSE FUNCTION SETTING THE DIAL MODE Depending on your dialing system, set the mode as follows: 1 Press and hold until you hear a confirmation tone. 2 To set the dial mode for Dial Mode:Pulse Dial Mode:Tone FLASH pulse dialing, press / PULSE . Or to set the dial mode for tone dialing press TONE/ .
SX-2801.qxd 3/15/1 6:02 PM Page 15 INSTALLATION SETTING OR CANCELING THE AUTO TALK FUNCTION 1 Press FUNCTION . The LCD displays the sAuto Talk:Off 1s 2 CIDCW :On 3 Area Code: current setting. 2 Press SELECT . Each time you press the On/Off setting will be switched. 3 Press FUNCTION SELECT . The handset returns to standby mode.
SX-2801.qxd 3/15/1 6:02 PM Page 16 INSTALLATION SETTING THE AREA CODE Preparation It is necessary to program your area code so that local calls will be displayed properly on caller ID. 1 Press 2 Press FUNCTION or 3 sAuto Talk:Off 1s 2 CIDCW :On 3 Area Code: . to move the pointer to Area Code. 3 Press SELECT 1 Auto Talk:Off 2 CIDCW :On sArea Code: 3s 1 Auto Talk:Off 2 CIDCW :On 3 Area Code:615 . Enter a 3-digit area code. For example, enter “615.” If you enter a wrong number, press DELETE .
SX-2801.qxd 3/15/1 6:02 PM Page 17 INSTALLATION USING A HEADSET KL AT DIC NOTES: • The handset's earspeaker and microphone are turned off with a headset connected. • Pressing the VOL/RING (▲,▼) button of the handset also controls the connected headset's volume. • If you place the handset on the base unit while the headset is connected, be sure the handset is placed properly. 17 Preparation You can use an optional headset (part#: RC 008260) that has a 3/32inch(2.5mm) plug.
SX-2801.qxd 3/15/1 6:02 PM Page 18 BASIC OPERATION Before using the Handset, make sure to read the following instructions. VOL/RING ( ) ( ) FLASH REDIAL TALK VOL/RING / PULSE TONE/ / CHANNEL Basics DELETE MAKING A CALL Handset On The Base Handset Off The Base 1) Pick up the handset. 2) Press TALK . 3) Listen for the dial tone. 4) Dial the number. OR 1) Pick up the handset. 2) Dial the number, then press TALK . 1) Press TALK . 2) Listen for the dial tone. 3) Dial the number.
SX-2801.qxd 3/15/1 6:02 PM Page 19 BASIC OPERATION 3 NUMBER REDIAL You can redial any of the last three numbers dialed from the handset: 1 Press REDIAL in standby mode. The last dialed number (Redial 1) appears. Each time you press REDIAL , the LCD displays one of the three last dialed numbers (Redial 1 to Redial 3). 2 After the desired number has been selected, press TALK . The call will be connected. NOTES: • The handset redials only up to 32 digits even for a number that exceeds this limit.
SX-2801.qxd 3/15/1 6:02 PM Page 20 BASIC OPERATION TONE/PAUSE To Do this To temporarily switch to tone dial (When the base is set to pulse mode), see page 14. Press TONE/ . The following numbers will be sent as tone dialing. To enter a pause within the dialing sequence Press PAUSE . “P” appears in the display which represents a pause. Basics EXAMPLE : To make a call “0 PAUSE 12345678” with tone dialing in 0 2 3 4 5 1 PAUSE pulse mode, press TONE/ 7 8 .
SX-2801.qxd 3/15/1 6:02 PM Page 21 BASIC OPERATION PAGING THE HANDSET PAGE press PAGE . The handset beeps for 60 seconds. Basics 1 To locate the handset while it is off the base, Paging To stop paging, press PAGE or any key at the handset, or return the handset to the base unit. NOTE: You cannot page the handset during a call.
SX-2801.qxd 3/15/1 6:03 PM Page 22 MEMORY DIALING You can store up to 20 telephone numbers and their associated names in the memory. Basics NOTES: • Always press a button within 20 seconds or the phone will return to standby. • If you press a wrong button, an error tone sounds and the handset returns to standby mode. • If you receive an incoming call or a pager call from the base unit during the operation, the operation will be cancelled.
SX-2801.qxd 3/15/1 6:03 PM Page 23 MEMORY DIALING 3 Press . 4 To enter a name, use the number keys. SELECT Store Name • See the steps for storing names and special characters. (see page 24) • If a name is not required, go to step 5. 5 Press SELECT . Store Number 6 Enter a telephone number to be stored. Store Number 1P1234567890 Basics NOTES: • By pressing PAUSE , you can insert a 2-second pause in the memory dial to make a long distance call or call through a PBX.
SX-2801.qxd 3/15/1 6:03 PM Page 24 MEMORY DIALING STEPS FOR ENTERING NAMES AND SPECIAL CHARACTERS Refer to the letters on the number buttons to select the desired letter. Each button selects a character as shown below.
SX-2801.qxd 3/15/1 6:03 PM Page 25 MEMORY DIALING 10 When finished, press 11 Press stored. 12 Press . 1 1 2 SELECT 3 4 . 5 6 7 8 9 0 to be SELECT IF YOU MAKE A MISTAKE WHILE ENTERING A NAME Use or to move the cursor to the incorrect character. Press to erase the wrong entry, then enter the correct character. To delete all characters, press and hold DELETE . DELETE Basics DIALING A STORED NUMBER 1 Pick up the handset and press .
SX-2801.qxd 3/15/1 6:03 PM Page 26 MEMORY DIALING EDITING AND DELETING STORED NUMBERS You can delete a number or simply store another one in its place. When you store a new phone number, the data stored in that memory location is deleted automatically. 1 Pick up the handset and press and hold MEM The confirmation tone sounds. 2 Enter a two-digit number (01-20) or press . Memory Store sTed Doe 01s 02 DOE JOHN , to select the memory location you want to edit/delete. Basics 3 Press SELECT .
SX-2801.qxd 3/15/1 6:03 PM Page 27 MEMORY DIALING b DELETING THE STORED DATA (1) Press select (2) Press or or SELECT to move the pointer to . or DELETE . If is selected: A confirmation tone sounds and the number is erased. If is selected: The LCD returns to the “Memory Store” display. (3) Press MEM Delete Memory01? Yes sNo Memory01 Deleted Memory Store sTed Doe 01s 02 DOE JOHN , or return the handset to the base unit.
SX-2801.qxd 3/15/1 6:03 PM Page 28 CALLER ID/CALL WAITING VOL/RING VOL/RING ( ) TALK L.D./1 ( ) FLASH SELECT CID LOCAL/3 FUNCTION DELETE NOTES • Before you can take advantage of the Caller ID and Call Waiting features, you must subscribe to these services from your local telephone company. • Name and number caller ID only work in conjunction with service provided by your local telephone company.
SX-2801.qxd 3/15/1 6:03 PM Page 29 CALLER ID/CALL WAITING SEARCHING CALLER ID MEMORY To review who has called, follow the steps below. The caller ID memory retains a listing of the 50 most recent callers. 1 Pick up the handset and press CID . If new caller ID data does not exist: Total:02 If there is new caller ID data: New :01 Total:02 2 Press to display the latest incoming call. Press 3 Press to see previous incoming call. CID 1/7 9:30AM 12 DOE JOHN 555-2563 to return to standby mode.
SX-2801.qxd 3/15/1 6:03 PM Page 30 CALLER ID/CALL WAITING EDITING CALLER ID DATA You can edit the Caller ID data. 1 Pick up the handset and press CID . Then, press or repeatedly to display the Caller ID data you want to edit. 2 Press L.D./1 for a long distance call prefix “1” and for area code setting and cancellation. 1/7 9:30AM 12 Ted Doe 456-7890 L.D./1 LOCAL/3 key 1/7 9:30AM 12 Ted Doe 123-456-7890 key 1/7 9:30AM 12 Ted Doe 1-456-7890 LOCAL/3 L.D.
SX-2801.qxd 3/15/1 6:03 PM Page 31 CALLER ID/CALL WAITING 4 Press . A confirmation tone sounds and the Caller ID data is stored. Press CID to return to standby. SELECT If you select a memory location which is already stored: Press to select “ ” and press SELECT A confirmation tone sounds and the new data overwrites the old data. The LCD returns to the Caller ID display screen. . Replace Memory? Yes sNo If you select : The LCD returns to the Caller ID display screen.
SX-2801.qxd 3/15/1 6:03 PM Page 32 CALLER ID/CALL WAITING DELETE ALL CALLER ID DATA: 1 Press CID 2 Press DELETE New :01 Total:02 Press 3 Press . . Delete All? Yes sNo to select Yes or No. or . If you select , a confirmation tone sounds and the LCD displays “Total:00”. SELECT or DELETE If you select , the LCD displays the number of Caller ID calls. 4 Press CID Total:00 New :01 Total:02 to return to the standby mode.
SX-2801.qxd 3/19/1 9:27 AM Page 33 CALLER ID/CALL WAITING CALL WAITING OPTIONS Your phone gives you new options for call waiting. At the touch of a button, you can ask the caller to hold, send them to your voice mail service,or conference them into your current call. You may be required to subscribe to a voice mail service, call waiting, and call waiting options to use these features. Follow these steps to use call waiting options. This is an example for “Conference”. You receive a call waiting call.
SX-2801.qxd 3/15/1 6:03 PM Page 34 CALLER ID/CALL WAITING The options you can choose are shown below: No. 1 Option Ask to Hold 2 Tell Busy 3 4 Take Message Answer / Drop 1 5 Conference 6 7 Drop First Drop Last Meaning Prerecorded message asks 2nd caller to hold, and the waiting call is put on hold. Prerecorded message tells 2nd caller you are busy, and the waiting call is disconnected. Send 2nd caller to your voice mail service. Disconnects 1st caller and answers 2nd caller.
SX-2801.qxd 3/15/1 6:03 PM Page 35 TROUBLESHOOTING Should any problem occur with the unit, use the following simple tests to determine whether or not servicing is required. PROBLEM The handset battery pack does not charge. SOLUTION • The charging contacts of the handset and base are not clean. → Clean them with a dry cloth. • The battery is not connected with correct polarity. → Install the battery pack correctly. • The battery is several years old. → Replace with a new battery.
SX-2801.qxd 3/15/1 6:03 PM Page 36 TROUBLESHOOTING PROBLEM The handset does not ring or receive a page. CHARGE LED will not light when the handset is placed on the base. Additional Information Noise or interference The unit does not operate properly. 36 SOLUTION • The handset is located away from the base or the battery has been discharged. → Return the handset to charge when finished your call. • The digital security code is changed.
SX-2801.qxd 3/15/1 6:03 PM Page 37 TROUBLESHOOTING PROBLEM SOLUTION When the handset is returned to the base unit with the volume level set at High, a momentary squeal or howling sound may sometimes be heard. • This is normal. → It may be prevented by changing the volume setting to Medium or Low before returning the handset to the base unit. The phone does not display the Caller ID/Call Waiting data. • You have to subscribe to Caller ID/Caller ID on Call Waiting services.
SX-2801.qxd 3/15/1 6:03 PM Page 38 WARRANTY/SERVICE SERVICE REQUIREMENTS If the cordless telephone should malfunction, or need changes or modifications, all repairs will be performed by an authorized Toshiba Service Station. This unit has been registered with the FCC for direct connection to the telephone network. Under the FCC program, no customer is authorized to repair this unit. This applies to units either in or out of warranty.
SX-2801.qxd 3/15/1 6:03 PM Page 39 WARRANTY/SERVICE TELEPHONE/TELEPHONE ANSWER MACHINE LIMITED WARRANTY Toshiba America Consumer Products.Inc (“TACP”) and Toshiba Hawaii, Inc.(“THI”) make the following limited warranties. These limited warranties extend to the original consumer purchaser or any person receiving this set as a gift from the original consumer purchaser and to no other purchaser or transferee.
SX-2801.qxd 3/15/1 6:03 PM Page 40 For technical assistance, purchase of accessories or service, please access www.toshiba.com/tacp. IMPORTANT We suggest you record the following information and retain for your records along with your bill of sale or equipment document. Model no. Purchase date Dealer address © UCZZ01719BZ Serial no. Dealer 2001 TOSHIBA AMERICA CONSUMER PRODUCTS, INC.