Safety Precautions Sa Operating Instructions O Installation Instructions In Care and Cleaning Ca Troubleshooting Tips Tr USER MANUAL TDDP2013ES2 TDDP3513ES2 TDDP5013ES2 TDDP5013ES2P Warning notices: Before using this product, please read this manual carefully and keep it for future reference. change without prior notice for product improvement. Consult with your dealer or the manufacturer for details. version B - 01 - 2019 us-toshibalifestyle.
User Manual Safety Precautions ..................................................................................................................... 3 Operating Instructions ............................................................................................................. 6 Installation Instructions ......................................................................................................... 12 Care and Cleaning .........................................................................
To prevent injury to the user or other people and property damage, the following instructions must be followed. Incorrect operation due to ignoring of instructions may cause harm or damage. The level of risk is shown by the following indications. WARNING: This symbol indicates the possibility of death or serious injury. CAUTION: This symbol indicates the possibility of injury or damage to property. WARNING • Plug in power cord plug properly.
Safety Precautions CAUTION • Do not use the unit in small spaces. Lack of ventilation can cause overheating and fire. • Do not use in places where water may splash onto the unit. Water may enter the unit and degrade the insulation. It may cause an electric shock or fire. • Place the unit on a level, sturdy section of the floor. If the unit falls over, it may cause water to spill and damage belongings, or cause electrical shock or fire.
Safety Precautions WARNING - Electrical Information • The manufacturer’s nameplate is located on the rear panel of the unit and contains electrical and other technical data specific to this unit. • Be sure the unit is properly grounded. To minimize shock and fire hazards, proper grounding is important. The power cord is equipped with a three-prong grounding plug for protection against shock hazards. • Your unit must be used in a properly grounded wall receptacle.
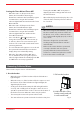
OPERATING INSTRUCTIONS Product Overview Front Rear Operating Instructions Control panel Panel Handle (both sides) Air outlet Air intake Air filter (behind the grill) Water bucket Water level window Caster Continuous drain hose outlet Power cord buckle (placed in the water bucket, used only when storing the unit.) Installed as shown below Power cord Power plug Fig. 1 NOTE All the pictures in this manual are for illustrative purposes only.
CAUTION Clean your unit occasionally to keep it looking new. Be sure to unplug the unit before cleaning to prevent shock or re hazards. Key Pad Features lter indicator light Bucket full indicator light Pump models only Continuous operation on indicator light Auto defrost operation on indicator light High fan indicator light Timer on/ indicator light LED Display NOTE The appearance of the control panel may vary slightly by model.
TURBO Button LED Display Control the Turbo speed. Press to select either Turbo or normal fan speed. Set the Turbo control to high for maximum moisture removal. When room humidity is at your preferred level, it is advised to turn off Turbo speed. Shows the set % humidity level from 35% to 85% or auto start/stop time (0 ~ 24) while setting, then shows the actual (+/- 5% accuracy) room % humidity level in a range of 30% RH (Relative Humidity) to 90% RH (Relative Humidity).
Setting the Timer ON and Timer OFF • • When the unit is off, first press the Timer button, the Timer ON indicator light illuminates. It indicates the Timer ON program is initiated. Press it again the Timer OFF indicator light illuminates. It indicates the Timer OFF is initiated. • Press or hold the and key buttons to change the Timer by 0.5 hour increments, up to 10 hours, then at 1 hour increments up to 24 hours. The control will count down the time remaining until start.
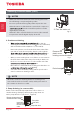
Removing Collected Water (cont.) NOTES Operating Instructions • When you remove the bucket, do not touch any parts inside the unit. Doing so may damage the product. • Be sure to push the bucket gently all the way into the unit. • When the unit is on, if the bucket is removed, the compressor , then the unit will beep 8 times and the digital display shows Eb. • 3. Pour the water out. Fig. 6 When the unit is off, if the bucket is removed, the unit will beep 8 times and the digital display shows Eb.
Removing Collected Water (cont.) Filter of the pump Press the power cord buckle into the rear cover. 1,Press the pump drain hose outlet in 2,Take the pump drain hose out NOTE: -Make sure the connection is tight and there is no leak. -Lead the water hose to the floor drain or a suitable drainage facility, the drainage facility and the water hose should be lower than the drain outlet of the unit. -Be sure to run the water hose sloping downward to let the water flow out smoothly.
INSTALLATION INSTRUCTIONS Positioning the Unit A operating in a basement will have little or no e ect in drying an adjacent enclosed storage area, such as a closet, unless there is adequate circulation of air in and out of the area. (See Fig. 9) Installation Instructions • Do not use outdoors. • This dehumidifer is intended for indoor residential applications only. This for commercial or industrial applications.
CARE AND CLEANING Turn the dehumidifier off and disconnect the plug from the wall before cleaning. 1. Clean the Grill and Case • Use water and a mild detergent. Do not use bleach or abrasives. • Do not splash water directly onto the unit. Doing so may cause an electrical shock, cause the insulation to deteriorate, or cause the unit to rust. • The air intake and outlet may get dirty during operation, use a vacuum cleaner or brush to clean. 2.
TROUBLESHOOTING TIPS Before calling for service, review this list. It may save you time and money. This list includes common occurrences that are not the result of defective workmanship or materials in this appliance. Problem Solution Make sure the dehumidifiers plug is connected firmly into the wall outlet. Unit does not start Check the house fuse/circuit breaker box. Dehumidifier has reached its preset level or bucket is full. Water bucket is not in the proper position.