
Operation Manual


75
Operations
74
How to use the JPEG Conversion Tool
The JPEG Conversion Tool converts JPEG files not supported by the projector, image files
in other formats, Microsoft
®
PowerPoint
®
files, and the like into JPEG files supported by the
projector. The JPEG files converted with this tool can be displayed by sending them using the
wireless LAN PC card
p.69
, or saving them on a memory PC card or a USB memory.
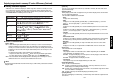
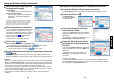
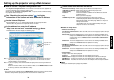
■ Launching the JPEG Conversion Tool
The window shown in the figure to the right appears on the
computer screen.
Drag the Image Quality Settings slider to the left or right to set the
image quality of the file after conversion. Lower values create
smaller files, but lower the image quality. (It is not possible to restore
the quality of an image after it has been lowered.)
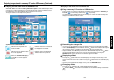
■ Converting an image file
This converts JPEG files using compression formats not supported by the projector,
Windows
®
metafiles (wmf), and bitmapped files (bmp) into JPEG
files.
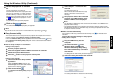
(1) In the Conversion Method field, select Converting image
file. (Status on launch)
(2) In the File settings field, click on the Browse button for
Original Image File Name.
The Open dialog box appears.
(3) In the Open dialog box:
(a) Specify the location of the file to be converted; and
(b) In the Files of Type field, click on the
button to select
the file format. A list of files of that format appear in the
Open dialog box.
(4) In the Open dialog box, select the file to convert, then
click on the Open button.
(5) In the JPEG Conversion Tool window, in the File
settings field, select Browse for File name after
conversion. The Save As dialog box appears.
(6) In the Save As dialog box:
(a) Specify the location in which to save the converted
file;
(b) Enter a file name of up to 8 characters in the File
Name field; and
(c) Press the Save button.
(7) (a) In the JPEG Conversion Tool, click on the
Conversion button.
(b) A confirmation dialog box opens. Click Yes.
The computer converts the file. When it finishes a
message appears informing you that a “JPEG file has
been created”.
(1)
(2)
(5)
(7)-(a)
(1)
(2)
(5)
(7)-(a)
(3)-(b)(3)-(b)
(3)-(a)
(4)
(6)-(b) (6)-(c)
(6)-(a)
(7)-(b)(7)-(b)
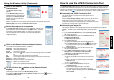
2
Click on the Remote
Control button.
The Remote Control window
appears.
As the Wireless Utility window is
still displayed, you can operate the
projector via the Remote Control
window, while using the Wireless
Utility’s functions.
While it is possible to use this function merely to operate the projector, closing the
Wireless Utility also closes the Remote Control window.
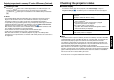
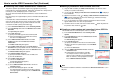
3
Select the projector to be operated.
In the Remote Control window, click on the button, and select the
desired projector from the pull-down list. When you make a selection,
the Remote Control window displays as shown in the right figure.
Only one projector can be selected. (It is not possible to operate
multiple projectors.)
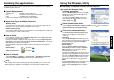
4
Click on the Remote Control window’s buttons.
The function of each button and box is as follows:
Power On:Turns projector power on.
Power Off:Turns projector power off.
Freeze: The picture is paused.
Input (box) : Click on the
button, and select the desired input from the pull-down
list.
Go: Switches to the input selected in the Input box.
Mute: Cuts off picture and sound. Click again to restore picture and sound.
Volume +/–: Adjust sound volume.
Resize Off: Restores the picture to its original size.
Resize +/–: Adjusts the enlargement ratio.
:Move screen (up/down/left/right/diagonal)
5
To quit, click on the button on the Remote Control
window.
Performing this does not close the Wireless Utility window.
To exit both the Wireless Utility and the Remote Control, click on the
button on
the Wireless Utility window.
Using the Wireless Utility (Continued)