
Operation Manual


79
Operations
78
4
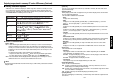
Select items from the menu on the left.
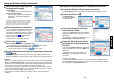
Wireless/Card Settings
: Make settings for the Wireless/Card input menu.
USB Memory Settings: Make settings for the USB memory input menu.
Status Display: Verify the projector state.
Features: Shows the functions available with the Wireless/Card and
USB input menus.
Top: Returns you to the top page.
TOSHIBA Projector Site
: The browser will display the home page at http://
multimedia.projector-toshiba.com/map.html, providing
projector information. The home page address is subject to
change without notice.
(The Toshiba’s web site can be browsed only when your
computer can access the Internet.)
● Details on major items
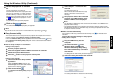
• Wireless/Card Settings
When Browser authentication has been set to On, access to the setup page requires the input
of the password.
Wireless Utility
:The items displayed on the screen can be set. Entering individual items
and press the Execute button to update their setting. Note, however, that
security items such as “Remote control” and “Browser authentication”
cannot be set.
Slide Show: The items displayed on the screen can be set. Entering individual items
and press the Execute button to update their setting.
• USB Memory Settings
When Browser authentication has been set to On, access to the setup page requires the input
of the password.
Slide Show: The items displayed on the screen can be set. Entering individual items
and press the Execute button to update their setting.
• Status display
Displays some states of the projector.
Projector: Displays the contents of status display in the menu.
Wireless/Card: Displays the contents of status display of the Wireless/Card input.
USB Memory: Displays the contents of status display of the USB memory input.
Maintenance: Describes an error if it occurs, for example, when the lamp has blown.
Note
•
Clicking the ? button opens a popup help window.
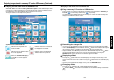
Setting up the projector using a Web browser
■ How to use the “Projector Configuration Tool”
The “Projector Configuration Tool” uses the Web server features of the projector to
set up the projector using a wireless LAN PC card.
When using the “Projector Configuration Tool”, set up the wireless LAN connecting
the projector and the computer.
1
See “Checking the projector status”
p.65
to display
information on the screen and write down the IP address.
2
Invoke Internet Explorer.
Internet Explorer Ver. 6.0* is recommended. Enable the Javascript functions.
* Toshiba does not guarantee the operation for later versions.
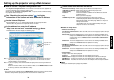
3
In the address bar, enter the IP address
“http://xxx.xxx.xxx.xxx/” recorded in step
1
above.
The Web browser will then display the following page.
Projector name
Projector ID
Menu
Note 1: To prevent access from third parties, the projector is restricted to permit access
only from the computer that has been set up for the TCP/IP to have the same
network address as the projector.
Note 2: If you use a proxy server, do not enable the proxy when accessing the above IP
address.
When the wireless LAN is set to use Ad hoc mode, use the WEB browser function
in the Easy Connect menu of Wireless Utility.
Note
•
This function can be enabled using the WEB Browser function in the Easy Connect menu
of Wireless Utility without specifying the URL into the browser’s address bar.