TEC Electronic Computing Scale SL-4700 SERIES Owner's Manual
Declaration of Conformity Manufacturer TOSHIBA TEC Type SL-4700 No. of EC type approval certificate T5982 Corresponds to the requirements of the following EC directives: Non-Automatic Weighing Instruments Directive 90/384/EEC 1 EMC Directive EMC 89/336/EEC Low Voltage Directive LVD 73/23/EEC The applicable harmonised standards are: EN 45 501 EN50 081-1 EN 60 950 EMC Compliance This is a class A product.
Contents page no. 1 Warnings 5 2 Specifications 8 3 Installation 10 4 Error Messages 15 5 Using the Scale 16 6 Management Mode 18 7 Before you call for service 22 CAUTION: 1. This manual may not be copied in whole or in part without prior written permission of TOSHIBA TEC. 2. The contents of this manual may be changed without notification. 3. Please refer to your local Authorised Service representative with regard to queries you may have in this manual.
1 Warnings 1 Warnings For your protection, all mains (110V or 230V) equipment used where damp or wet conditions may occur, must be supplied from a correctly fused source and protected by an approved RCD to BS7071 or BS7288 or IEC1008-2-2 BS EN 61008:1995. IF IN DOUBT SEEK ADVICE FROM A QUALIFIED ELECTRICIAN. To avoid the possibility of electric shock or damage to the machine, always isolate from the mains power supply before carrying out any routine maintenance.
1 Warnings Safety Summary Personal safety in handling or maintaining the equipment is extremely important. Warnings and Cautions necessary for safe handling are included in this manual. All warnings and cautions contained in this manual should be read and understood before handling or maintaining the equipment. Do not attempt to effect repairs or modifications to this equipment.
1 Warnings Disconnect the plug. Connect a grounding wire. If foreign objects (metal fragments, water, liquids) enter the machines, first turn off the power switches and disconnect the power cord plugs from the outlet, and then contact your authorized TOSHIBA TEC representative for assistance. Continued use of the machine in that condition may cause fire or electric shock. Disconnect the plug. When unplugging the power cords, be sure to hold and pull on the plug portion.
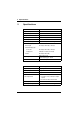
2 Specifications 2 Specifications Item SL-4700-US Weigh capacity 30lb x 0.01lb Tare capacity (maximum) 15lb Display 4 digits LCD Power requirement AC 120V ± 10%, 60Hz Operating temperature 14° F to 104° F Operating humidity 0% to 95% RH (non-condensing) Dimensions (appox.) Built-in type 13.78”(W) x 11.81”(D) x 3.43”(H) Remote display type Scale unit Display unit Platter 8 13.78”(W) x 11.02”(D) x 3.43”(H) 5.98”(W) x 2.32”(D) x 15.35”(H) 13.78”(W) x 11.02”(D) Weight (approx.
2 Specifications Dimensions (appox.) Scale unit Display unit Platter Weight (approx.) Interface 350mm(W) x 280mm(D) x 87mm(H) 152mm(W) x 59mm(D) x 390mm(H) 350mm(W) x 280mm(D) 4.
3 Installation 3 Installation 1. Make sure that the work surface is firm, steady and free from vibration and draughts. 2. Hold the scale by the base when picking up. Do not pick up the scale by the weigh plate or cross. 3. Adjust the feet if the scale is not level. To avoid the risk of RSI (Repetitive Strain Injury) it is important to ensure that the machine is placed on a surface which is ergonomically satisfactory to the user.
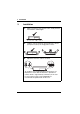
3 Installation Connections 1. 2. Remove the weigh plate. Connect the power cable.
3 Installation 12 3. Connect the display. (RP/TP models only) 4. Replace the weigh plate. Connect to power supply.
3 Installation Cable routing 1 2 3 4 4 8 3 5 7 6 2 9 1 1 2 3 4 SL-4700 Owner Manual 13
3 Installation Securing cable clips 14 SL-4700 Owner Manual
4 Error Messages 4 Error Messages ( If a persistent error message appears or the scale locks up, disconnect then reconnect the scale to the power supply. If the scale remains inoperative, contact your authorised service agent. Display overflow Weight unsteady Under range Over range Balance failed Display overflow error The load on the weighpan exceeds the scale capacity. Balance failed error On power up the weight is out of the allowed zero range.
5 Using the Scale 5 Using the Scale Testing the display Press LCD Displaying service information Press twice To reset the machine Press and hold LCD Zeroing the scale Make sure that the scale is at zero before weighing.
Place the goods onto the scale.
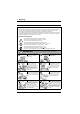
6 Management Mode 6 Management Mode Entering management mode C LCD Navigating management mode Branch - 6 - Sub-branch - Value For Example: Branch ( ) Sub-branch ( ) Branch ( ) Sub-branch ( ) Sub-branch ( ) Go to the next branch (press and hold). Go to next sub-branch. Go to the previous branch (press and hold). Go to previous sub-branch. C Sets the value to 0 enabling you to display a new value. Return to Branch 00 (press and hold). Displays the value.
6 Management Mode Example Turn the keyboard bleeper off and change the backlight time to 5 seconds. 6 6 6 C Press and hold 6 Press and hold Switching the bleeper alarm on/off Go to branch 19, Sub-branch 00 6 0 = Off 1 = On Switching the keyboard bleeper on/off Go to branch 19, Sub-branch 01 6 0 = Off 1 = On Target bleep Branch 19, Sub-branch 02 - Not applicable for this machine.
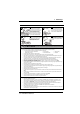
6 Management Mode Error bleeper Go to branch 19, Sub-branch 03 19.03 1 0 = Off 1 = On Changing the bleeper volume Go to branch 19, Sub-branch 04 19.04 1 0 = Quiet 1 = Loud Backlight timeout Branch 20, Sub-branch 00 - Not applicable for this machine. Sleep timeout Branch 20, Sub-branch 01 - Not applicable for this machine.
6 Management Mode Sleep key enable Branch 20, Sub-branch 02 - Not applicable for this machine. LED display brightness Branch 20, Sub-branch 03 - Not applicable for this machine. Changing the duration of a ‘Long’ press (press and hold) Go to branch 29, Sub-branch 00 29.00 200 Enter a value in units of 10 milliseconds (50 - 255). For example: 200 = 2 seconds 150 = 1½ seconds 100 = 1 second Enabling key timeout Go to branch 74, Sub-branch 01 74.
7 Before you call for service Changing the timeout period Go to branch 74, Sub-branch 02 6 7 Enter a value in units of 10 milliseconds (1 - 255). For example: 200 = 2 seconds 150 = 11⁄2 seconds 100 = 1 second Before you call for service It is our primary concern to give you full satisfaction and better service. If, however, any problem arises in connection with the operation of this scale, please check the following points before calling for service.
E EO1-31010B