TEC Electronic Computing Scale SL-9000-LSB SERIES Owner’s Manual
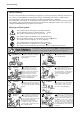
Safety Summary Safety Summary Personal safety in handling or maintaining the equipment is extremely important. Warnings and Cautions necessary for safe handling are included in this manual. All warnings and cautions contained in this manual should be read and understood before handling or maintaining the equipment. Do not attempt to effect repairs or modifications to this equipment.
Safety Summary Disconnect the plug. Connect a grounding wire. If foreign objects (metal fragments, water, liquids) enter the machines, first turn off the power switches and disconnect the power cord plugs from the outlet, and then contact your authorized TOSHIBA TEC representative for assistance. Continued use of the machine in that condition may cause fire or electric shock. Disconnect the plug. When unplugging the power cords, be sure to hold and pull on the plug portion.
TABLE OF CONTENTS Page 1.INTRODUCTION ............................................................................................. 1.1 APPLICABLE MODEL ........................................................................... 1.2 ACCESSORIES .................................................................................... 1-1 1-2 1-2 2. SPECIFICATION ............................................................................................. 2.1 SCALE ..............................................
Page 12. PROGRAMMED DATA VERIFICATION REPORTS ....................................... 12-1 13.PASSWORD SECURITY ................................................................................. 13-1 13.1 SETTING PASSWORD AND PROTECT MENU................................... 13-1 13.2 CALLING MENU BY ENTERING PASSWORD .................................... 13-3 14. OPERATING PROCEDURES ......................................................................... 14-1 14.1 WEIGHING OPERATION .........................
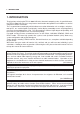
1. INTRODUCTION 1. INTRODUCTION Thank you for purchasing the TEC SL-9000-LSB Series electronic computing scale. As you will discover, the TEC SL-9000-LSB series has many features and functions designed for user friendliness as well as complete customer satisfaction. The 7-segment fluorescent display which indicates transaction information such as weights, unit prices, total prices, etc. and the liquid crystal display used to display commodity names and programming messages are provided with the scale.
1. INTRODUCTION 1.1 APPLICABLE MODEL 1.1 APPLICABLE MODEL • SL-9000-30M-LSB-US • SL-9000-15M-LSB-CA • SL-9000-15M-LSB-QR • SL-9000-15M-LSB-AU The description of the model number is as follows. SL-9000-30M-LSB-US Destination Code Max. Capacity ex.) US, CA, QR, AU etc. 30M: 30 lbs (decimal pound/multi-interval) Keyboard Type B: Built-in keyboard 15M: 15 Kg (multi-interval) Display Type LS: Liquid Crystal Display and 7 segment Display 1.
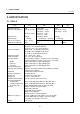
2. SPECIFICATION 2.1 SCALE 2. SPECIFICATION 2.1 SCALE Item US Maximum Capacity Minimum Scale Division 30 lb 0.005 lb (0~15 lb) CA QR Maximum Tare Display Range 2.000 lb 0 ~ 30.05 lb 15 Kg (30 lb) 0.002 Kg (0 ~ 6 Kg) 0.005 Kg (6 ~ 15 Kg) 0.005 lb (0 ~ 15 lb) 0.01 lb (15 ~ 30 lb) 1.000 Kg (2.205 lb) 0 ~ 15.025 Kg (0 ~ 30.05 lb) Unit Price Presettable Minimum Price Display $0.01 ~ 99.99 $0.01 $0.01 ~ 99.99 $0.
2. SPECIFICATION 2.2 OPTION 2.2 OPTION Option Name Model No. or Part No. Source LON Connector TM8P-88P Part No. EAJ-0028001 A modular connector used to connect scales See Note 2 to each other in a LON configuration. LON Terminal Resistor 285D-8P Part No. EAJ-0029001 A modular resistor attached to the scales See connected at both ends of the LON Note 2 configuration. LON Cable S-STLAN-2P (200 m/roll) Part No.
3. APPEARANCE 3. APPEARANCE 3.
4. DISPLAY 4.1 US TYPE 4. DISPLAY 4.1 US TYPE • US (UNITED STATES) CAPACITY WEIGHT 0 ~ 15 lb 15 ~ 30 lb SL-9000 WEIGHT lb %/T NET e=d 0.005 lb 0.01 lb PRICE/lb $ REG. M/D R/W PREPACK TOTAL PRICE X Z LON INLINE $ ERROR 4.2 CA TYPE Since the following two remote display sheets are enclosed with the CA machine, select one and affix it to the remote display. (Refer to Section 7 How to affix the remote display sheet.
4. DISPLAY 4.3 QR TYPE 4.3 QR TYPE SL-9000 WEIGHT 0 ~ 6 Kg 6 ~ 15 Kg e=d 0.002 Kg 0.005 Kg TARE T=-1 Kg Max. 15 Kg Min 0.04 Kg A B For the QR machine, the following multi-linqual display stickers are provided to adapt machines to use in various countries. Select one of them and affix it to positions A and B on the remote display. (Refer to Section 7 How to affix the remote display sheet.) • AG/CL (ARGENTINA/CHILE) PESO kg CERO NETO $ Affix to position A REG.
4. DISPLAY 4.4 AU TYPE 4.4 AU TYPE WEIGHT 0 ~ 6 Kg 6 ~ 15 Kg SL-9000 WEIGHT CERO NET kg e=d 0.002 Kg 0.005 Kg UNIT PRICE REG. M/D R/W 4-3 TARE Max. 15 Kg Min 0.
5. KEY LAYOUT 5.1 PROGRAMMING KEYBOARD 5. KEY LAYOUT 5.1 PROGRAMMING KEYBOARD SHIFT SET NEXT NEXT PLU AUTO CODE SEND RECEIVE ↑ ↓ CHANGE DELETE RETURN PLU PLU 1/4 ENTER - TEST ← → DELETE INSERT DELETE (A) 1 (B) 1/2 " 2 # 3 $ 4 % 5 & 6 ´ 7 ` 8 ? 9 @ 0 * Q + W ( E ) R / T : Y ; U < | = O > P [ A \ S ] D ˆ F G { H J } K ~ L - È Z É X Â C Ê V → B ← N ↓ M ↑ SPACE , > ! 1 -- PROG. CLEAR ZERO NOTE: . FEED Blank keys have no function.
5. KEY LAYOUT 5.1 PROGRAMMING KEYBOARD Function Name of Key _ ← → 1. 2. 3. 4. Displays the preceding PLU data. Used to set an auto code. Calls the preceding label format # when setting the print position. Selects a prgramming item. Moves the cursor to the left. Moves the cursor to the right. DELETE (A) 1/2 1. Deletes a selected character when setting commodity names. 2. Sets a unit price per 1/2 lb. INSERT 1 1. Inserts a space when setting a commodity name. 2.
5. KEY LAYOUT 5.2 OPERATION KEYBOARD AND SPEED KEYBOARD 5.2 OPERATION KEYBOARD AND SPEED KEY BOARD 1 2 Primary function Secondary function CA, QR, AU type US type 1 1/2 100 g 2 1/4 LB/kg 1 2 3 4 5 6 7 8 9 10 11 12 13 14 15 16 17 18 19 20 21 22 23 24 25 26 27 PRESET COUNT 28 29 30 32 32 33 34 35 36 37 38 39 40 41 42 43 44 45 46 47 48 49 50 51 52 53 54 55 56 57 58 59 60 61 62 63 64 65 66 67 68 ZERO TEST 4 69 3 70 1 ESC.
5. KEY LAYOUT 5.2 OPERATION KEYBOARD AND SPEED KEYBOARD Operation Keyboard Function Function Name of Key PLU Calls a PLU or clears displayed PLU. Prints the customer label. PRT/* Saves tare and unit price after taking off the commodity from a platter. SAVE Sets the quantity of commodity in "BY COUNT" mode. FOR Displays the date. DT/TM NEXT PLU 1. Selects the item for change Print/OFF. 2. Selects a programming item and a main menu. VOID 1. Cancels preceding data. 2.
5. KEY LAYOUT 5.2 OPERATION KEYBOARD AND SPEED KEYBOARD Name of Key Function No function GROUP # No function ST This key is used for item or subtotal discount by entering a percentage. (Optional key by initial setting) % Feeds the label. FEED Issues a test label. TEST Adjusts the zero point. ZERO Changes the label issue mode between Automatic issue and manual issue. (Optional key by initial setting) AUTO/ MANUAL 1 70 to Calls the PLU frequently used.
6. PROCEDURE BEFORE OPERATION 6. PROCEDURE BEFORE OPERATION 6. PROCEDURE BEFORE OPERATION 1. 2. 3. 4. 5. 6. 7. 8. 9. Unpack the accessories and scale from the carton. Install the remote display on the scale. (See Page 7-1.) Refer to Safety Precautions in this manual and set up the scale in a proper location. Load the label or receipt. (See Page 9-1.) Be sure to insert the power cord plug into an AC outlet. Adjust the level gauge. (See page 8-1.) Connect a PC-AT keyboard if necessary.
7. INSTALLATION PROCEDURE 7. INSTALLATION PROCEDURE 7. INSTALLATION PROCEDURE Remote Display WARNING! Be sure to cover the connectors with the connector cover because of high voltage and current. If the connectors are exposed to water, a leakage may result. CAUTION: Never place the scale upside down. Doing so will cause a malfusction. 1. To install the remote display, insert the two screws on the bottom of the remote pipe into the holes provided on the scale base. 2.
7. INSTALLATION PROCEDURE 7. INSTALLATION PROCEDURE 4. For the CA type, affix the remote display sheets to the remote display. For QR type, affix the remote display sticker to the blank remote display sheet which is preinstalled on the scale. Be sure to wipe the remote display surface clean before affixing the sheet or sticker. CA Type Remote Display Affix here. Remote Display Sheet Affix the remote display sheets to the depressed area of the remote display on both sides.
8. LEVEL ADJUSTMENT 8. LEVEL ADJUSTMENT 8. LEVEL ADJUSTMENT 1. Level Gauge Set the scale on a stable and level surface. Level the scale by turning the adjustable legs so that the air bubble is inside the center circle. Correct Incorrect 2. Adjustment Procedure When the air bubble moves toward the left side, turn the right adjustable legs clockwise. When the air bubble moves toward rear, turn the front adjustable legs clockwise.
9. REMOVAL AND REPLACEMENT OF MEDIA 9. REMOVAL AND REPLACEMENT OF MEDIA 9. REMOVAL AND REPLACEMENT OF MEDIA WARNING! Since there is a cutter at the paper outlet, be careful not to injure your fingers when replacing media. CAUTION: Do not hold the label cassette by the portion A. Doing so may deform the label cassette, causing damage when setting it in position. Please be sure to hold the label cassette as the following figure shows. A 1. Open the right cover.
9. REMOVAL AND REPLACEMENT OF MEDIA 9. REMOVAL AND REPLACEMENT OF MEDIA 4. Loosen the P-2.6x6 screw and move the label guide plate according to the media width. 5. Secure the label guide plate with the P-2.6x6 screw. Screw (P-2.6x6) 48-mm label dowel Label Guide Plate 57-mm label dowel NOTE: Ensure that the label guide plate aligns with the dowel. 6. Refer to the figure below and set the media on the label cassette. 7. Insert the roll stopper into the media core fully. 8.
10. OUTLINE OF OPERATION 10. OUTLINE OF OPERATION 10. OUTLINE OF OPERATION WARNING! Since there is a cutter at the paper outlet, be careful not to injure your fingers when issuing labels. Menu selection 2 Main Menu Main Power Switch ON 1 NEXT PLU VOID 0 REG. 1 MARK DOWN 2 REWRAP 3 SECURITY 4 READ 5 RESET 6 Increment Decrement Display OFF Press the POWER key or PROG. Press the POWER key Menu #1 Select the Menu # Other than Menu #1.
11. PROGRAMMING PROCEDURES How to access the Programming Menu 11. PROGRAMMING PROCEDURES Item # selection Increment Decrement How to access the Programming Menu NEXT VOID PLU or Enter a menu number ESC. 0 Password Programming starts NOTES: ENTER Select the programming menu group. unnecessary neccesary Select an item No. (See next page.) Enter the Password Programming completes 0 ~ 9 PROG. 1. When the selected menu ( 0 ) is protected from an access, refer to Section 13.
11. PROGRAMMING PROCEDURES How to access the Programming Menu Table 1: NO. Title and Contents of Programming Menu TITLE MENU GROUP ITEM No.
11. PROGRAMMING PROCEDURES How to enter characters How to enter characters Use the following procedure to enter a commodity name, address and ingredient message. Example) 1st line: TEC STORE 2nd line (TEL) 0123-45-6789 T E C SPACE S T O R E RETURN 1/4 1st line content SHIFT ( SHIFT T E DELETE E (A) 1/2 L 6 7 8 9 2nd line content NOTES: 1. ← and → keys are the cursor keys. 2.
11. PROGRAMMING PROCEDURES 11.1 11.1 UNIT PRICE CHANGE UNIT PRICE CHANGE Menu Group: 1 Item No.: 0 Unit prices stored in PLU can be changed under this menu. In this procedure, use the operation keys (except when calling a PLU by using a speed key). a
11. PROGRAMMING PROCEDURES 11.2 PLU DATA SETTING 11.2 PLU DATA SETTING Menu Group: 1 Item No.: 1 Setting or changing the contents of PLU (PLU#, UPC#, Commodity Name, etc.). b
11. PROGRAMMING PROCEDURES 11.2 PLU DATA SETTING Pressing the ↓ key instead of the ENTER key proceeds to the next menu. Pressing the ↑ key returns to the preceding menu. Verification label of PLU data Commodity Name PACKED ON Preset Tare Quantity PLU# SELL BY T1.000 NET WT. C T15.0% PRICE lb Mode Flag Compulsory Tare Shelf Life Preset % Tare Price UPC# TEC STORE (TEL) 0123-45-6789 NOTES: 1. A UPC code is made up of a combination of an entered code and an AUTO CODE.
11. PROGRAMMING PROCEDURES 11.3 INGREDIENT MESSAGE 11.3 INGREDIENT MESSAGE Menu Group: 1 Item No.: 2 Ingredient messages can be printed on a label with a maximum of 54 characters per line in small letters or 32 characters per line in boldfaced small letters, by up to 38 lines. C
11. PROGRAMMING PROCEDURES 11.4 NUTRITION FACTS 11.4 NUTRITION FACTS Menu Group: 1 Item No.: 3 Using the following procedure, nutrition information and caloric intake can be set. Serving Size and Servings Per Container consist must of maximum of a 18 characters. However, total number of characters including title characters must not exceed 30. d f
11. PROGRAMMING PROCEDURES 11.4 INUTRITION FACTS A Additional Information Area 2~6. (0~99999 or 0.0~999.9) e ENTER Enter the Vitamin A. (0~999) ENTER Enter the Vitamin C. (0~999) ENTER Enter the Calcium. (0~999) ENTER Enter the Iron. (0~999) ENTER Additional Information Area 7~12 (0~999) PROG.
11. PROGRAMMING PROCEDURES 11.4 INUTRITION FACTS • Set th e Daily Value Table AUTO CODE d Enter the Basic Calories. (Content No. 1) Enter the Basic Saturated Fat. (Content No. 3) ENTER ENTER Enter the Basic Sodium. (Content No. 5) ENTER Enter the Basic Dietary Fiber. (Content No. 7) ENTER Enter the Basic Total Fat. (Content No. 2) Enter the Basic Cholesterol. (Content No. 4) Enter the Basic Total Carbohydrate. (Content No. 6) ENTER ENTER ENTER ee NOTES: 1. DAILY VALUE (Max.
11. PROGRAMMING PROCEDURES 11.4 INUTRITION FACTS • Deleting Nutrition Data d DELETE PLU Enter the PLU#. (max. 6 dig.) ENTER e • Memory file sort The memory file is sorted when a memory full error occurs.
11. PROGRAMMING PROCEDURES 11.5 PLU VERIFYING LABEL 11.5 PLU VERIFYING LABEL Menu Group: 1 Item No.: 4 PLU data stored in the scale are verified in the following procedure. g
11. PROGRAMMING PROCEDURES 11.6 ADDRESS SETTING 11.6 ADDRESS SETTING Menu Group: 1 Item No.: 5 Store addresses and receipt header printed on label can be set within the following character limits. Address: 32 characters x 2 lines Receipt Header: 24 characters on the 1st/2nd line and 48 characters in the 3rd line h
11. PROGRAMMING PROCEDURES 11.7 11.7 SPECIAL INFORMATION SPECIAL INFORMATION Menu Group: 1 Item No.: 7 When the Net Weight Statement label is selected, 3 lines (32 characters/line) of special information can be printed on the label position where the net weight data is to be printed. The special information can be printed in the weigh and By Count mode. In the Fix mode, the net weight data is printed.
11. PROGRAMMING PROCEDURES 11.9 11.9 SPEED KEY SETTING SPEED KEY SETTING Menu Group: 1 Item No.: 9 The SL-9000 has a maximum of 70x2 speed keys which are very convenient to call PLUs quickly. (Refer to page 5-3 regarding the Key Layout.) i
11. PROGRAMMING PROCEDURES 11.10 PRINT FORMAT 11.10 PRINT FORMAT Menu Group: 2 Item No.: 0 The SL-9000 can memorize 5 different print formats. After print formats are set, you can call them by entering the print format number.
11. PROGRAMMING PROCEDURES 11.10 PRINT FORMAT Table 2: Label Format Number Table Select the format # for the label to be used by referring to the table below. Item Label Format # Label length (mm) Ingredient Line 48 mm width 57 mm width Kind of label Print of the NET WT. statement Nutrition Printing NON- POS Bar code POS change Impossible label label label Possible 00 (50) 0 30.0 10 (60) 0 40.0 49.2 11 (61) 6 54.0 63.5 12 (62) 12 68.8 13 (63) 18 82.6 14 (64) 22 92.
11. PROGRAMMING PROCEDURES 11.11 DATE/TIME SETTING 11.11 DATE/TIME SETTING Menu Group: 2 Item No.: 1 Date, time, machine number, and store code are set in this procedure. k
11. PROGRAMMING PROCEDURES 11.12 CMT/PL-3 PL-3 Operation Connect the PL-3 to the SL-9000 by using RS-232C Cable, then turn on the power of the SL9000 and the PL-3. Insert a data disc into the PL-3 and adjust the transmission rate to the SL-9000 ( 7 2 : 4800 BPS or 7 3 : 2400 BPS) by using the rotary switch. Press the SAVE key of the PL-3, then check whether the SAVE LED is on. Program the file number of the data disc by using the rotary switch. ( 4 1 : File No. 1, 4 2 : File No. 2, ..... 4 8 : File No.
11. PROGRAMMING PROCEDURES 11.12 CMT/PL-3 Table4 : Transmission Item List ITEM # Title on the Display Liquid Crystal Display Contents of Transmission 7 seg. 2 VERIFY PLU & ING 2 COMPARE PLU & ING. IN OLD FORMAT 3 READ PLU & ING 3 READ PLU & ING. IN OLD FORMAT 4 WRITE PLU TO CMT 4 SAVE PLU IN NEW FORMAT 5 VERIFY PLU = CMT 5 COMPARE PLU IN NEW FORMAT 6 READ PLU FM CMT 6 READ PLU IN NEW FORMAT 7 WRITE ING TO CMT 7 SAVE ING. IN NEW FORMAT 8 VERIFY ING = CMT 8 COMPARE ING.
11. PROGRAMMING PROCEDURES 11.13 IN-LINE/LOCAL 11.13 IN-LINE/LOCAL Menu Group: 2 Item No.: 3 When the SL-9000 is used as a satellite in an in-line system, the “ID #” and “Transmission delay time” can be set by the following procedure.
11. PROGRAMMING PROCEDURES 11.14 LON SYSTEM 11.14 LON SYSTEM Menu Group: 2 Item No.: 4 The SL-9000 scales which consist of a master, satellites, and a backup master are connected each other by the LON cable to transmit data such as PLU, ING., NUTRI, etc. ID# 1 is reserved for the master terminal. ID# 2 is reserved for the backup master terminal or satellite terminal. ID# 3 to 32 are for satellite terminals. Setting numbers other than the above results in an error.
11. PROGRAMMING PROCEDURES 11.14 LON SYSTEM Data Transmission The following data are down-line-loaded. Page 1: (0). All (PLU+ING+NUTRI) Page 2: (0). SPEED KEY (1). PLU (1). LOGO (2). ING. (2). VENDOR (3). NUTRITION (3). FREE FORMAT (4). U. PRICE (9). CHANGE PAGE (5). DATE/TIME (7). LOCK SCALE (Check the LON cable) (8). OPEN SCALE (Release the lock after checking the LON cable.) (9). CHANGE PAGE n Select a DLL data using the NEXT PLU and – keys. ENTER The error terminal ID# is displayed.
11. PROGRAMMING PROCEDURES 11.15 BAR CODE FORMAT 11.15 BAR CODE FORMAT Menu Group: 2 Item No.: 6 With the SL-9000 scale, four kinds of bar code formats are available. These formats can be changed freely. Example) Current format 2 9 C1 C2 C3 Flag Changed format 0 C4 C5 C6 P2 P3 UPC # 2 C2 C3 C4 Flag P4 P5 C/D Price C5 C6 P1 PC/D P2 Total check digit P3 P4 C/D Price check digit or Total check digit weight check digit.
11. PROGRAMMING PROCEDURES 11.15 BAR CODE FORMAT 2. When the ENTER key is passed, bar code format is checked. An error occurs in the following cases. Check digit (C/D) is at other than digit-13. Price check digit (PC/D) cannot be calculated. (Price is other than 4 or 5 digits.) Price is not set serially beginning from P1 to P4, or P1 to P5). Weight is not set serially beginning from W1 (W1 to W5). 3.
11. PROGRAMMING PROCEDURES 11.16 TITLES 11.16 TITLES Menu Group: 2 Item No.: 7 You can register and change displayed/printed titles of the additional information area for nutrition facts using the following procedure. Registered or changed title are stored in the RAM. When ALL clear or RAM clear is executed, these titles will be cleared and the initial titles will resume. Before starting this operation, set the initial setting #7-3 to 1.
11. PROGRAMMING PROCEDURES 11.17 TRANSFERRING LOGO DATA 11.17 TRANSFERRING LOGO DATA Menu Group: 2 Item No.: 8 Logo data is created on a PC and stored into RAM through the CMT interface. Two different sizes of logos, 320x118 dots and 256x64 dots, are available on the SL-9000 series. 64KB of RAM area is secured for logo data, in which the maximum of 13 logos (320x118 dots) or 26 logos (256x64 dots) can be stored. Before starting the following operation, set the initial setting #10-7 to 1.
11. PROGRAMMING PROCEDURES 11.18 IDIOM SETTING 11.18 IDIOM SETTING Menu Group: 2 Item No.: 9 Up to 50 terms frequently appearing in ingredient messages can be preset using the following procedure. The idiom number must be set from 1 to 50 in order. One idiom can contain a maximum of 20 characters. r
11. PROGRAMMING PROCEDURES 11.20 FREE FORMAT SETTING 11.20 FREE FORMAT SETTING Menu Group: 3 Item No.: 1 When using 57-mm wide labels, up to three print formats can be changed freely. Moreover, characters can be rotated and magnified, and print items are salectable. Enter the coordinate of each print item’s lower left corner using the lower left corner of a label as the origin. When a print item is located beyond the label width, an error will occur. Key functions ↓ : Moves downward (Data is stored.
11. PROGRAMMING PROCEDURES 11.20 FREE FORMAT SETTING NOTES: 1. The following print items cannot be magnified. 1 LOGOs 2 Safe handing precautions 3 Ingredient messages 4 Bar code 2. The following items cannot be rotated. 1 LOGO 2 Safe handling precautions 3 Bar code 3. Base label format numeric data is shown automatically. X coordinate: 0-383 dots (1 dot = 0.132 mm) Y coordinate: 0-1300 dots (1 dot = 0.154 mm) Format data beyond the effective print area results in an error. 4.
11. PROGRAMMING PROCEDURES 11.20 FREE FORMAT SETTING Print area size No. Print Item 23 24 25 26 27 28 29 30 (F) Prince (F) Price (title) (F) Unit price (F) Unit price (title) (F) Weight (F) Weight (title) (F) Price (F) Price (title) (F) LOGO 31 Normal X Y 138 32 105 13 140 20 105 13 106 20 105 13 138 32 105 13 320 118 Note Rotation X Y 146 32 120 13 147 20 13 120 112 20 120 13 146 32 120 13 When setting the print item positions (X and Y), an error will occur in the following cases.
11. PROGRAMMING PROCEDURES 11.20 FREE FORMAT SETTING Available format and print items for free format Format Data Print Item Description FREE FMT# FREE FORMAT NUMBER BASE LBL# BASE LABEL NUMBER LENGTH /mm LABEL LENGTH Refer to NOTE 4, page 11-30 CT. LINE/ING NUMBER OF INGREDIENT LINES H.
12. PROGRAMMED DATA VERIFICATION REPORTS 12. PROGRAMMED DATA VERIFICATION REPORTS 12. PROGRAMMED DATA VERIFICATION REPORTS The programmed data can be printed on journal paper. Before issuing these reports, load the journal paper. The programmed data verification reports cannot be issued with any label. The keys to be used in the following procedures are those on the numeric key pad, which is framed in black in the figure on page 51, but not on the programming keyboard.
12. PROGRAMMED DATA VERIFICATION REPORTS 12. PROGRAMMED DATA VERIFICATION REPORTS Table 7 Report Name Menu # Contents 50 PLU programmed data report All the preset PLU data are listed in the PLU # order (from small to large #). 51 Commodity description report All the preset commodity names are listed in the PLU # order (from small to large #). 52 Speed key programmed data report The PLU # and the commodity name preset on each speed key is listed.
13. PASSWORD SECURITY 13.1 SETTING PASSWORD AND PROTECT MENU 13. PASSWORD SECURITY You can protect all menus (except REG. menu) and set two step passwords for access to protected menus. 13.1 SETTING PASSWORD AND PROTECT MENU Liquid Crystal Display PROG. 0 REG. 1 MARK DOWN 2 REWRAP 3 SECURITY 4 READ 5 RESET 6 Select menus to be protected. Remote display WEIGHT 1 ESC. 4 w 0 2 UNIT PRICE TOTAL PRICE 0 0 0 3 4 6 PRT 0 -0 * P M R The following numeric keys represents each menu.
13. PASSWORD SECURITY 13.1 SETTING PASSWORD AND PROTECT MENU B Enter password B as 4 digits. 1 2 3 4 PRT * Exclude menus the password B cannot access. Remote display WEIGHT 1 2 6 UNIT PRICE TOTAL PRICE 1 1 0 1 -1 P M R S XZ PRT * w 0: Valid 1: Invalid -: Unnecessary ESC. NOTES: 1. Select validity of the password by pressing the key. 2. When the same password is entered for password A and B, password A has priority over the password B. 3.
13. PASSWORD SECURITY 13.2 CALLING MENU BY ENTERING PASSWORD 13.2 CALLING MENU BY ENTERING PASSWORD Liquid Crystal Display PROG. 0 REG. 1 MARK DOWN 2 REWRAP 3 SECURITY 4 READ 5 RESET 6 ESC. Enter a menu No. 0 ~ 6 Accessible with the password Accessible without the password 1 NEXT PLU (REG.) 0 Non protect menu 2 , ~ 6 or VOID PRT * Protect menu C Enter the 4-digit Password. ESC.
14. OPERATING PROCEDURES n NOTES BEFORE STARTING OPERATION 14. OPERATING PROCEDURES ■ NOTES BEFORE STARTING OPERATION (1) Insert the power plug into the AC outlet and turn the power ON. (2) A sixteen-second scanning will be performed after pressing the POWER key. (3) Do not move the scale while it is in operation. Should it become necessary to move it at any time, turn the power switch to the OFF position and be sure to reajust the level indicator after relocating the scale.
14. OPERATING PROCEDURES 14.1 WEIGHING OPERATION 14.1 WEIGHING OPERATION Menu: REG., M. DOWN, or REWRAP Mode: WEIGH The weigh mode is used to weigh a commodity and to issue the label. The label contains data such as a weigh, unit price (price per weight) and total price (calculated as a result of the weighing operation). The following is a basic operation seen at the sales floor of a store or at a back room where different kinds and weights of commodities are repacked.
14. OPERATING PROCEDURES 14.2 FIX PRICE OPERATION (FOR US TYPE ONLY) 14.2 FIX PRICE OPERATION (FOR US TYPE ONLY) The FIX mode (Fix Price Mode ) is used to issue a label for a commodity of a fixed price PLU (i.e. the price determined by the store), the weight of which may vary from commodity to commodity. In this mode, the Unit Price of the commodity looked up from the PLU file will be printed as the Total Price regardless of its actual weight, and the weight is also printed on the label. Menu: REG., M.
14. OPERATING PROCEDURES 14.3 BY COUNT OPERATION 14.3 BY COUNT OPERATION The BY-COUNT mode is used to issue the label of commodities of the same kind in a package (or may not be packed). The whole package quantity (or a certain quantity) and the whole package price (or the price per the quantity) are usually preset. Thus, it is not necessary to weigh the commodities by the scale in such cases. Menu: REG., M.DOWN, or REWRAP Mode: BY-COUNT Example) In case of purchasing 10 DONUTS for $1.
14. OPERATING PROCEDURES 14.3 BY COUNT OPERATION Example) An open price item can be sold as below: 1 piece at 15 dollars 15 pieces at 10 dollars 15 pieces sold at 0.5 dollars per 10 pieces Enter the PLU #. 5 Press: 1 PLU ex.) 1 Enter quantity Press: 1 5 Enter price FOR ex.) 2 ex.
14. OPERATING PROCEDURES 14.4 PRINT COUNT OPERATION 14.4 PRINT COUNT OPERATION With this procedure, a specified number of the same labels can be issued. Menu: REG., M.DOWN, or REWRAP Mode: WEIGH, FIX or BY-COUNT Example A) When operating in Weigh mode. PRESET COUNT Press: Set the number of labels. (Max. 99 labels) 5 0 PRT Press: * Enter the PLU #. 3 0 9 Press: PLU PLU data is saved. SAVE 1 Remove the commodity. Place a commodity on the platter. (Ex. 0.700 lb.
14. OPERATING PROCEDURES 14.4 PRINT COUNT OPERATION Example B) When operating in Fix or By Count mode. Press: PRESET COUNT Set the number of labels. (Max. 99) 2 5 PRT Press: * Enter the PLU #. 1 Press: 5 PLU [BY COUNT] PRT * Press, to save the PLU data: SAVE [FIX] SPLIT PRICE operation Place a commodity on the platter. (Ex. 1.320 lb.) MANUAL : Batch PRT The next label is issued after removing the current label. * On-demand Batch The labels are issued with the mount paper attached.
14. OPERATING PROCEDURES 14.4 PRINT COUNT OPERATION Example C) When issuing only the nutrition information label. Note that nutrition information can be printed only on several types of label. Refer to page 11-19. PRESET COUNT Select basic data and nutrition information labels or a nutrition information label by pressing this key. Set the number of labels. (Max. 99 labels) 9 9 PRT * Enter the PLU #. 3 9 PLU PRT * Table 8 The nutrition information labels are issued in the following methods.
14. OPERATING PROCEDURES 14.5 ISSUING LABELS WITH NET WEIGHT STATEMENT (FOR US TYPE ONLY) 14.5 ISSUING LABELS WITH NET WEIGHT STATEMENT (FOR US TYPE ONLY) Menu: REG., M.DOWN, or REWRAP Mode: FIX When the initial settings #1-7 and #1-8 are set to 1, a Net Weight Statement is printed on the label. A unit price and a tare registered in each PLU are printed as a price and a net weight. Example) The preset Price is $2.10 and the preset Net Weight is 12 oz.
14. OPERATING PROCEDURES 14.5 ISSUING LABELS WITH NET WEIGHT STATEMENT (FOR US TYPE ONLY) NOTES: 1. To print NET WT. data. from the FIX mode, load a label which has an area to print a NET WT Statement. 2. The quantity sold number and price data in NET WT. statement operation will be accumulated in the memory. No weight data will be accumulated. 3. The position of the decimal point is adjustable and a comma or period is selectable by the initial setting. 4. Weight data is shifted to the left. 5.
14. OPERATING PROCEDURES 14.6 TARE/SAVE FUNCTION PROCEDURES 14.6 TARE/SAVE FUNCTION PROCEDURES Menu: REG., M.DOWN, or REWRAP Mode: WEIGH or FIX (Tare % function is available in WEIGH mode only.) There are two kinds of tare subtraction procedures, one is “Direct tare”, the other is “Preset tare”. The SAVE key is used to save the tare, unit price, and PLU data after taking a commodity from the platter. 0.200 lb 2 0 Tare % 0 Place a container on the platter. (Ex. 0.
14. OPERATING PROCEDURES 14.7 CALLING AND PRINTING GRADE LINES 14.7 CALLING AND PRINTING GRADE LINES A grade line is a short message added to a commodity name. A grade line can be selected from maximum of 49 programmed grade lines and printed on the label. Menu: REG., M.DOWN, or REWRAP Mode: WEIGH or FIX, or BY COUNT Enter the PLU #. Press: 3 1 PLU Remote Display WEIGHT UNIT PRICE TOTAL PRICE ----- P 4 3.76 Commodity Name Press: Enter the G.LINE #. (1 to 49) G.
14. OPERATING PROCEDURES 14.8 CALLING AND PRINTING LOGOS 14.8 CALLING AND PRINTING LOGOS When the initial setting #10-7 is set to “1”, a logo containing a picture, a mark, a POP message etc., can be printed on the ingredient label having 12 lines or more for printing ingredient message. Logo data is created on the PC and stored into the memory through the CMT/PL-3 interface. Menu: REG., M.DOWN, or REWRAP Mode: WEIGH, FIX, or BY COUNT Press: LOGO Select the LOGO type (Normal < > F.Shopper).
14. OPERATING PROCEDURES 14.9 SELECTING PRINT ITEM AND ADJUSTING THE LCD BRIGHTNESS 14.9 SELECTING PRINT ITEM AND ADJUSTING THE LCD BRIGHTNESS Menu: REG, M.DOWN, or REWRAP Mode: WEIGH, FIX, or BY COUNT Press: PROG. NEXT PLU Select an item. (Refer to Table.
14. OPERATING PROCEDURES 14.9 SELECTING PRINT ITEM AND ADJUSTING THE LCD BRIGHTNESS NOTES:1. A store code can be printed in place of a ‘packed on date’ and ‘sell by date’ by changing the initial settings #6-5 and #6-6. To print a store code, select ‘packed on date’ or ‘sell by date’ as a print item using the above procedure. 2. Setting data will not be changed by turning the power off, changing the mode or calling a PLU. 3. The 0 key has no function. 4.
14. OPERATING PROCEDURES 14.11 BATCH PRINT MODE (with 30 Items Run Assignment) 14.11 BATCH PRINT MODE (with 30 Items Run Assignment) Menu: REG., M.DOWN, or REWRAP Mode: FIX, or BY COUNT Up to 99 label per PLU can be issued in non-scale mode. Up to 30 items can be preset. (However, 0 is preset, issuing will be canceled.) Enter the PLU #. 1 Press: Liquid Crystal Display PLU x #01/000001: C=0 ↑ y Item # (1 to 30) Press: Enter the number of labels to be issued (max.
14. OPERATING PROCEDURES 14.11 BATCH PRINT MODE (with 30 Items Run Assignment) Changing a Unit Price and Calling G.Line/LOGO x Enter the quantity. Call the Grade Line. Enter the required Grade Line# (1 to 49). Press: 3 0 GRADE LINE 1 2 PRT * Call PLU designation LOGO. (*1) Enter the required LOGO# (1 to 26). Press: LOGO 1 0 PRT * y *1 By calling the PLU designation LOGO, the LOGO can be designated per PLU and printed.
14. OPERATING PROCEDURES 14.11 BATCH PRINT MODE (with 30 Items Run Assignment) Stopping or Canceling Label Issue z Clear an error or stop label issuing. Cancel output Press: C VOID PRT * Stop issuing the labels and cancel PLUs which have not been output C A Completed NOTES: 1. When the label for NET. WT statement is not selected, pressing the PRESET COUNT key in FIX mode results in an error. 2. Programmed items are reset when: the power is off. changing the menu. (PROG.
14. OPERATING PROCEDURES 14.12 FLOATING VENDOR 14.12 FLOATING VENDOR Menu: REG Mode: WEIGH, FIX, or BY COUNT Floating vendor function allows you to register different commodities sales together. This function is available when the Initial Setting #11-1 is set to 1 and using a receipt. Be sure to select IN-LINE in Section 11.14 LON SYSTEM even if no scale is connected, then enter the ID# 1, turn the power off and then on.
14. OPERATING PROCEDURES 14.12 FLOATING VENDOR Price deletion Prices already registered can be deleted in the following procedure. Enter the deletion mode. Enter vendor #. VOID NEXT PLU: the next item VOID: the previous item Delete a registered price. NEXT PLU or VOID PRT * Exit the deletion mode. C Subtotal The following procedure will sum up all of the registered items. Enter vendor #. Press: ST Enter prices. C Press: PRT * A receipt will be issued.
15. TOTAL OPERATION 15. TOTAL OPERATION 15. TOTAL OPERATION In Read or Reset mode you can issue a sales report or reset report with either label or journal paper. Menu: READ or RESET READ The totals will not be cleared after they are printed on labels or journal paper. RESET The totals will be cleared after they are printed on labels or journal paper. ESC. 5 or 6 Issue each Report ESC. Label ←→ Journal No.
15. TOTAL OPERATION 15.1 HOURLY TOTAL REPORT 15.1 HOURLY TOTAL REPORT Ex.) REPORT Menu PRT 0 * NOTES:1. When issuing an hourly report, hours with no sales are not printed. 2. An hourly report is printed as follows: 1) Label: Issued sequentially in on-demand mode. 2) Journal paper: Issued with journal paper. 3) Label with backing paper: Issued sequentially in batch mode. 3. If the C key is pressed during issuance, the hourly report being printed will complete, then the total report will be issued.
15. TOTAL OPERATION 15.3 PLU TOTAL REPORT A Individual Total Ex.) Individual PLU Total (PLU #100) 1 0 PRT 0 * B Block Total Ex.) UPC Block Total (UPC #100100~100199) 1 0 0 PRT 1 * NOTE: The key represents 0 through 9. The most significant digit in the starting number is keys. followed by an appropriate number of C Zone Total Ex.) PLU Zone Total (PLU #100~107) 1 0 0 PLU 1 0 7 PRT * D Entire PLU Total PRT * NOTES:1.
16. ERROR MESSAGE TABLE 16. ERROR MESSAGE TABLE 16. ERROR MESSAGE TABLE Take the following action if an error message has appeared on the commodity name display along with the buzzer sounding. WARNING! If you cannot solve the problem with the following solution instruction, do not attempt further trouble shooting, by yourself. Turn the power off, unplug the printer, then contact TOSHIBA TEC Authorized Service representative for assistance.
16. ERROR MESSAGE TABLE 16. ERROR MESSAGE TABLE Label Issue Mode Message Cause Solution DATA ENTRY ERROR Error in key input. Press the C key, and re-input the right data. PLU NOT FOUND The PLU # being called is not registered. Press the C key, and check the PLU #. TOTALS OVERFLOW GRAND TOTAL or PLU TOTAL memory has been exceeded at the time of issuing a label. Press the C key, then the ESC. key and select ‘RESET’. Then sum up the exceeded memory.
16. ERROR MESSAGE TABLE 16. ERROR MESSAGE TABLE CMT Operation Mode Message Cause Solution Mismatch of the model type. Mismatch of the base unit. MISMATCH SPEC. Mismatch of the VERSION. Press the CLEAR key. Mismatch of the TRANSMITTING DATA. Mismatch of the scale capacity. Parity error Framing error Overrun error BAD TAPE OR CMT Press the CLEAR key. Data error Two or More Hardware error Press the CLEAR key. Time out error TIME OUT ERROR LON System Mode Error message Cause Solution COMMUNI.
17. CLEANING THE PRINT HEAD 17. CLEANING THE PRINT HEAD 17. CLEANING THE PRINT HEAD WARNING! Since there is a cutter at the paper outlet, be careful not to injure your fingers when cleaning the print head and cutter. If the print head is dirty, printing will not be clear. The print head should be cleaned with a print head cleaner everyday before use, according to the following procedure: 1. Open the label cover and remove the label cassette. (See page 9-1) 2.
18. TROUBLESHOOTING 18. TROUBLESHOOTING 18. TROUBLESHOOTING WARNING! This scale has been manufactured under strict quality control. If you have any trouble, however, DO NOT ATTEMPT TO FIX IT BY YOURSELF. Pull the power plug out of the outlet, and contact the TEC Authorized Service representative. Problems Solution “----” is displayed at power on. Was the power turned ON when something was on the platter? → Make sure nothing is on the platter and turn the power on again.
E PRINTED IN SINGAPORE EM1-31071G