Introduction 2 Connections 11 Basic playback 16 Advanced playback 19 Function setup 30 Others 36 DIGITAL VIDEO Upconverting 1080p Extended Detail DVD Player XDE600KU OWNER’S MANUAL Owner’s Record The model number and serial number are on the back of your DVD Player. Record these numbers in the spaces below. Refer to these numbers whenever you communicate with your Toshiba dealer about this DVD Player.
Introduction SAFETY PRECAUTIONS CAUTION: VISIBLE LASER RADIATION WHEN OPEN. DO NOT STARE INTO BEAM. AVIS WARNING: TO REDUCE THE RISK OF ELECTRIC SHOCK, DO NOT REMOVE COVER (OR BACK). NO USER-SERVICEABLE PARTS INSIDE. REFER SERVICING TO QUALIFIED SERVICE PERSONNEL. The exclamation point within the equilateral triangle is intended to alert the user to the presence of important operating and maintenance (servicing) instructions in this owner’s manual.
IMPORTANT SAFETY INSTRUCTIONS 9. 10. 11. 12. 13. 14. Read these instructions. Keep these instructions. Heed all warnings. Follow all instructions. Do not use this apparatus near water. Clean only with a dry cloth. Do not block any of the ventilation openings. Install in accordance with the manufacturer’s instructions. Do not install near any heat sources such as radiators, heat registers, stoves, or other apparatus (including amplifiers) that produce heat.
Introduction Precautions Notes on handling When shipping the DVD player, the original shipping carton and packing materials come in handy. For maximum protection, repack the unit as it was originally packed at the factory. Take care not to give it a shock or shake when carrying. Do not use volatile liquids, such as insect spray, near the DVD player. Do not leave rubber or plastic products in contact with the DVD player for a long time. They will leave marks on the finish.
Notes on Discs On handling discs Structure of disc contents Normally, DVDs are divided into titles, and the titles are sub-divided into chapters. VIDEO CDs and audio CDs are divided into tracks. Introduction Do not touch the playback side of the disc. DVD DVD Title 1 Chapter 1 Title 2 Chapter 2 Chapter 1 Chapter 2 Chapter 3 Playback side Do not attach paper or tape to discs.
Introduction Notes on Discs (continued) About this owner’s manual This owner’s manual explains the basic instructions of this DVD player. Some DVDs are produced in a manner that allows specific or limited operation during playback. As such, the DVD player may not respond to all operating commands. This is not a defect in the DVD player. Refer to instruction notes of discs. ” may appear on the TV screen during operation. “ ” means that the operation is not permitted by the A“ DVD player or the disc.
Table of Contents Introduction Advanced playback 2 3 4 5 Accessing a Specific Location Directly ....... 19 Locating a specific title/chapter/time ...................19 Repeating a Specific Segment.................. 20 Repeating a specific segment .............................20 Notes on region numbers ................................... 6 Playing in a Varied Order .......................... 20 Table of Contents ...................................... 7 Identification of Controls .......................
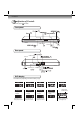
Introduction Identification of Controls See the page in for details. Front panel 8 16 16 16 10 HDMI indicator 12 16 PAUSE button 16 USB jack 29 16 Rear panel 11 HDMI OUT jack Power Cord 11 12 Y VIDEO PB PR VIDEO OUT OPTICAL OUT HDMI OUT S-VIDEO OUT AUDIO OUT R ANALOG L COAXIAL DIGITAL 14 OPTICAL OUT jack S-VIDEO OUT jack 14 15 15 11 11 DVD display The indicators vary depending on the kinds of discs you play.
Remote control Introduction The instructions in this manual describe the functions on the remote control. See the page in for details. 16 16 19 T / SEARCH button 19 22 PIC MODE button 17 23 23 24 24 16 16 17 18 18 17 17 18 18 25 16 18 20 25 16 19 16 21 DVD USB 20 30 DVD button 29 * RETURN button Return to menu display for VCD (2.0) discs with menu. 22 USB button 29 * MENU button Use the MENU button to display the menu included on many DVDs.
Introduction Identification of Controls (continued) Loading batteries 1 Open the cover. 2 Insert batteries (R03/AAA size). Operating with the remote control Point the remote control at the remote sensor and press the buttons. Distance: About 7 m (23 feet) from the front of the remote sensor Angle: About 30° in each direction of the front of the remote sensor Make sure to match the + and – on the batteries to the marks inside the battery compartment. Caution • Never throw batteries into a fire.
Connections Connections Connecting to a TV Connect the DVD player to your TV. Connecting to a TV PB Connections Y VIDEO PR VIDEO OUT OPTICAL OUT HDMI OUT S-VIDEO OUT AUDIO OUT R ANALOG L COAXIAL DIGITAL Normal TV To VIDEO OUT (yellow) S-Video cable (not supplied) To audio input To video input (yellow) To 2ch AUDIO OUT (R: red, L: white) If the TV has a S-video input, connect the DVD player with an S-video cable.
Connections Setting the video output signal (interlaced / progressive) You can setting the video output signal for better picture quality. Press the SETUP button on the remote control and select the Video option, then set the Video out to P-Scan. See 32 . If your TV does not support the progressive scan format, the picture will appear scrambled or blank. To return to normal picture, turn off progressive scan (P-Scan) by setting the Video out to Component mode. • Make the following setting.
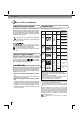
Connections Content of the output for each output jack is shown in the following table and differ depending on the On-Screen Display Setting: HDMI Output - Content of output for each output jack Video Component S-Video Output Output Output Composite 480i - - Composite Composite 480p S-Video - 480p 720p 1080i 1080p 1080p/24F Composite Composite Composite Composite Composite 480i 480i 480i 480i 480i - Connections On-Screen Display Setting “Video out” HDMI Output Setting Setting Component Invalid (
Connections Connecting to Optional Equipment (Continued) Connecting to an amplifier equipped with a Dolby® Digital decoder Dolby Digital Dolby Digital is the surround sound technology used in theaters showing the latest movies, and is now available to reproduce this realistic effect in the home. You can Manufactured under license from enjoy motion picture and live concert DVDs with this dynamic realistic sound by Dolby Laboratories.
Connections Connecting to an amplifier equipped with a DTS® decoder Amplifier equipped with a DTS decoder To COAXIAL type digital audio input To wall outlet Optical digital cable (not supplied) Connect either 75 Ω coaxial cable (not supplied) Manufactured under license under U.S. Patent #: 5,451,942 & other U.S. and worldwide patents issued & pending. DTS and DTS Digital Out are registered trademarks and the DTS logos and Symbol are trademarks of DTS, Inc. © 1996-2008 DTS, Inc. All Rights Reserved.
Basic playback Playing a Disc This section shows you the basics on how to play a disc. CAUTION Keep your fingers well clear of the disc tray as it is closing. Neglecting to do so may cause serious personal injury. Basic playback Preparations • When you want to view a disc, turn on the TV and select the video input connected to the DVD player. • When you want to enjoy the sound of discs from the audio system, turn on the audio system and select the input connected to the DVD player.
Variable Speed Playback You can play discs at various speeds, and resume playback from the location where you stopped playback. Playing in fast reverse or fast forward directions Press REV or FWD during playback. To resume normal playback Press PLAY. REV: Fast reverse playback FWD: Fast forward playback Notes • The DVD player mutes sound and subtitles during reverse and forward scan of DVDs. • The playback speed may differ depending on the disc.
Basic playback To start playback from the beginning regardless of the location where you stopped playback. 1 Press STOP twice. The DVD player deletes the memory of the location. 2 Press PLAY. Playback starts from the beginning of the current title. Playback starts from the beginning of the disc. Playback starts from the beginning of the current track. • If you want to return to the beginning of a DVD, open and close the disc tray once with the OPEN/CLOSE button before pressing the PLAY button.
Advanced playback Accessing a Specific Location Directly Locating a specific title/chapter/time 1 Press T. Press / to highlight the Title/Chapter/ Track/Time. SEARCH T e.g. 1 00 : 00 : 00 2 Press / to locate. 2 00 : 00 : 00 to select a section you want e.g. When you want to locate a chapter. Accessing the time using number buttons: Just enter 2 digits in order. The first two numbers you entered represent hours. The second two numbers you entered represent minutes.
Advanced playback Repeating a Specific Segment You can specify a desired segment and repeat it. Repeating a specific segment 1 Press A-B RPT at the beginning of the segment (point A) you want to play repeatedly. To resume normal playback Press A-B RPT until RepAB Off is displayed. A-B RPT RepAB Off A-B RPT Rep A- 2 Press A-B RPT again at the end of the segment (point B). The DVD player automatically returns to point A and starts repeat playback of the selected segment (A-B).
Playing in a Favorite Order You can combine your favorite titles, chapters or tracks and play them in the order you determine. You can program up to 12 selections into the memory (Memory playback). Setting titles, chapters or tracks in a favorite order 1 Insert a disc and press MEMORY during stop. MEMORY The following display appears. e.g. DVD Memory Play Chapter number Title number 1. While the display appears on the TV screen, press / / / to move the highlighted bar to the item you want to cancel.
Advanced playback Zooming a Picture You can magnify areas within a picture. Zooming a picture 1 To resume normal playback Press ZOOM during normal, slow or still playback. e.g. Off is displayed. ZOOM 2 Each time you press the ZOOM button, the magnification level changes as follows: 1 Press ZOOM repeatedly until the Original picture is restored. The centre part of the image will be zoomed in. ZOOM 2 3 Off Notes • Some discs may not respond to zoom feature.
Selecting the Picture Mode This DVD player provides four sets of picture color settings. You can easily select a preferred picture mode. Selecting the picture mode 1 Select the picture mode by pressing PIC MODE repeatedly. PIC MODE Each time you press the PIC MODE button, the picture mode changes. Notes • Picture mode is only available when the Video out is set to “HDMI” and outputs via HDMI. • If HDMI resolution is set to 480p or 720p, the Picture Modes cannot be activated.
Advanced playback Selecting the Camera Angle If the scene was recorded from multiple angles, you can easily change the camera angle of the scene you are watching. Changing the camera angle 1 Press ANGLE while playing a scene recorded with multiple angles. While playing a scene recorded with multiple angles, press the ANGLE button. ANGLE 2 Press ANGLE while the angle number is displayed on the TV screen. ANGLE Press the ANGLE button repeatedly to change the scene to the next angle in those recorded.
On-screen Display Operation When you turn on the on-screen display, you can view information on operational status and access features and settings. On-screen display operation Press NAVI. NAVI The following display appears. e.g. When playing a DVD. Select by pressing / then press ENTER to access the feature.
Advanced playback Playing MP3/WMA Files You can play MP3/WMA files that have been recorded on a CD-R or CD-RW on the DVD player. Playing MP3/WMA files Preparations • Make sure that a disc you want to play is compatible with this DVD player. 1 2 Place a CD that contains MP3/WMA files on the disc tray. 3 To stop playback, press STOP. Press OPEN/CLOSE to load the disc. A list of folders/files will appear on the screen. Press / to select the desired folder or track/ file, then press ENTER.
Advanced playback Viewing JPEG Files You can play JPEG files that have been recorded on a CD-R or CD-RW on the DVD player. You can select a preferred view: a page of 9 thumbnail images or a single image view. Also, rotating, enlarging and shifting of each image can be possible. Viewing JPEG files Preparations • Prepare a disc that contains JPEG files you want to view (see next page for Jpeg files compatibility). In Setup Menu, it is preferred to select “Original” for “View Mode” 32 .
Advanced playback JPEG files compatibility Discs whose compatibility with this DVD player has been confirmed by TOSHIBA are as follows. CANON QuickCD Kodak Picture CD FUJICOLOR CD NORITSU QSS CD JPEG disc compatibility with this DVD player is limited as follows: • Playable discs: CD-R (650MB / 74 min. only) CD-RW may not be compatible.
Advanced playback Playing USB Device You can connect the USB flash drives (not included) to the USB jack on the front of DVD player. You can play the files in MP3, WMA, DivX® or JPEG format stored on a USB flash drive by connecting it to this player. Connecting to USB flash drive 1 Plug the USB flash drive to the USB jack on the front of DVD player. 2 Press the USB button on the remote control to select USB mode during DVD stop.
Function setup Customizing the Function Settings You can change the default settings to customize performance to your preference. Setting details Setting procedure 1 Press SETUP during stop. OSD language : English The following on-screen display appears. Language : Off : English DVD menu OSD language : English : English : Off : English DVD menu : English OSD language 2 Press / to select an option for the setting you want to change, then press .
Audio Video DVD Aspect Ratio Video out : HDMI HDMI Resolution : Auto 1) Press SETUP button. 2) Press button, then use the / button to select Audio. 3) Press ENTER button, then use the / button to select a preferred language. 4) Press ENTER button. 5) Press SETUP button to exit the menu. OSD language French Spanish Aspect Ratio JPEG Interval : 5 seconds Picture Modes : Sharp DVD 1) Press SETUP button. 2) Press / button to select Video.
Function setup Customizing the Function Settings (continued) Setting details View Mode HDMI Resolution The user may select one of the following options: Fill: Fill the screen with decoded image. Original: Display image as it original size. “Original” is preferred for Jpeg viewing. Auto Fit: Automatically fit the decoded image on screen without distortion. Pan Scan: Automatically display decoded image on full screen without distortion. 1) Press SETUP button. button to select Video.
Sharp: Select this to make the picture sharper. Color: Select this to make the picture sharper with enhanced color. Contrast: Select this to make the picture sharper with bigger contrast. Off: Select this to follow the original picture setting. Aspect Ratio : 16 : 9 : Auto Fit Video out HDMI Resolution : HDMI Sharp Color JPEG Interval Contrast Picture Modes Off Night Mode DVD Night mode is equivalent to Dynamic Range Compress.
Function setup Customizing the Function Settings (continued) Setting details 4) Press “8888” using number buttons. (Please note, this is presetting password of this unit). Then press ENTER. Press ENTER again to list the parental level. The parental lock level is equivalent to the following ratings: Level 5: PG-R Level 1: Kid Safe Level 6: R Level 2: G Level 7: NC-17 Level 3: PG Level 8: Adult Level 4: PG-13 5) Press / to select the rating from 1 to 8.
Functions available for the HDMI Control Screen saver To turn on or off the screen saver (screen protection to prevent image burn). 1) Press SETUP button. 2) Press / button to select Misc. 3) Press button, then use the / button to select Screen saver. 4) Press ENTER button, then use the / button to select the On or Off mode. 5) Press ENTER button. 6) Press SETUP button to exit the menu.
Others Table of Languages Table of languages and their abbreviations Abbreviation ––– CHI (ZH) DUT (NL) ENG (EN) FRE (FR) GER (DE) ITA (IT) JPN (JA) KOR (KO) MAY (MS) SPA (ES) AA AB AF AM AR AS AY AZ BA BE BG BH BI BN BO BR CA CO CS CY DA DZ EL EO ET EU FA FI FJ FO FY GA GD GL 36 Language No alternate language Chinese Dutch English French German Italian Japanese Korean Malay Spanish Afar Abkhazian Afrikaans Amharic Arabic Assamese Aymara Azerbaijani Bashkir Belorussian Bulgarian Bihari Bislama Bengali,
Others Before Calling Service Personnel Check the following guide for the possible cause of a problem before contacting service. Symptoms and correction Symptom Cause Correction Page 11-12 No power. • The power plug is disconnected. • Connect the power plug securely into the wall outlet. The DVD player turned off by itself. • The automatic power off function turned the unit off. • Press the PLAY button. 16 No picture or abnormal color (pinkish, greenish, etc.).
Others Specifications DVD player / outputs / supplied accessories DVD Player Power supply 120 V AC, 60 Hz Power consumption 14 W (standby: less than 1.0W) Mass 1.34 kg External dimensions 430 x 41 x 203 mm (W/H/D) Signal system NTSC Laser Semiconductor laser, wavelength 650/780 nm Frequency range DVD linear sound : 48 kHz sampling 4 Hz to 22 kHz 96 kHz sampling 4 Hz to 44 kHz Signal-to-noise ratio More than 93 dB Audio dynamic range More than 80 dB Harmonic distortion Less than 0.
Others Limited United States Warranty Digital Audio Video (“DAV”) Product - Exchange Warranty Toshiba America Consumer Products, L.L.C. (“TACP”) makes the following limited warranties to original consumers in the United States. THESE LIMITED WARRANTIES EXTEND TO THE ORIGINAL CONSUMER PURCHASER OR ANY PERSON RECEIVING THIS DAV PRODUCT AS A GIFT FROM THE ORIGINAL CONSUMER PURCHASER AND TO NO OTHER PURCHASER OR TRANSFEREE. DAV PRODUCTS PURCHASED IN THE U.S.A. AND USED ANYWHERE OUTSIDE OF THE U.S.A.
811-E60091W010