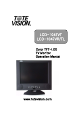
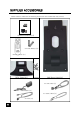
LCD-1047VT LCD-1047VR/TL Color TFT-LCD TV Monitor Operation Manual www.totevision.
LCD-1047VT/VR/TL COLOR TFT-LCD TV Monitor 1. LCD-1047VT (stand alone unit) 2. LCD-1047TL (unit in flush mount kit) 3.
SAFETY PRECAUTIONS Improper use can result in electric shock and/or fire. In order to prevent potential danger, please observe the following instructions when installing, operating and cleaning the product. To ensure your safety and prolong the service life of your color TFT-LCD TV monitor product, please read the following precautions carefully before using the product. ■ All operating instructions must be read and understood before the product is operated.
SAFETY PRECAUTIONS (Continued) Improper adjustment of controls not described in the instruction can cause damage, which often requires extensive adjustment work by a qualified technician. e. When the product has been dropped or damaged. f. When the product displays an abnormal condition. Any noticeable abnormality in the product indicates that the product needs servicing.
SUPPLIED ACCESSORIES Please check to make sure the following accessories are included with this product. TM390 ... XGA LCD-2200VT TM400 ...
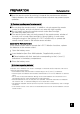
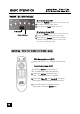
PREPARATION Remote Control ■ Use the remote control by pointing it towards the remote sensor window. Objects between the remote control and sensor window may prevent proper operation. Cautions regarding use of remote control ! ■ Do not drop the remote control . In addition, do not expose the remote control to liquids, and do not place in an area with high humidity. ■ Do not install or place the remote control under direct sunlight. The heat may deform the unit.
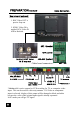
PREPARATION (Continued) Cable Connection Rear view of main unit 1. BNC Video OUT is passive loop out. 2. If BNC Video IN is applied, RCA Video IN will be disabled. EXT. Speaker KEY control (option) BNC Video IN & loop out *RS-232 (option) ANALOG RGB Y, Pb, Pr S-VIDEO PC SOUND Power input (DC 12V2A) R L Sound IN EXT. DC IR IN TV Antenna VIDEO IN AUDIO OUT *VIDEO OUT *VIDEO OUT is active output for VCR recording for TV or composite video input.
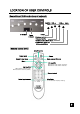
LOCATION OF USER CONTROLS Control Panel (C/P) on the front of main unit POWER ▼ VOL ▲ IR window Power Indicator ▼ CH ▲ Menu Power Decrease volume Increase volume Channel down / Move down Channel up / Move up Mode select/Menu Remote control (R/C) Auto Program Sound mute Select Under Scan Power Erase present Channel Menu Vol (▲)/(▼) ▲ Increase volume (up) ▼ Decrease volume (down) Ch (▲)/(▼) ▲Selects next higher channel. ▼Selects next lower channel.
BASIC OPERATION POWER Available Mode ■ Yes / □ No ■ PC ■ Video ■ S-Video ■ TV On / Off / Standby ■ by Control Panel (C/P) 1 Press the POWER button to turn on the main unit. 2 The power indicator lights green. 3 Press again the Power button to turn off. IR Window Power Indicator ■ by Remote Control (R/C) 1 Press the Power button to turn on the main unit. 2 Power indicator changes from red to green.
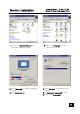
Monitor Installation 1 Double click [Control Panel ] icon from [My Computer] folder. 3 Select [Settings] in [Display Properties] window. 4 Click [Advanced...]. Available Mode ■ Yes / □ No ■ PC □ Video □ S-Video □ TV 2 Double click [Display] icon from [Control Panel] folder. 5 Select [Monitor] in the window shown above. 6 Set [Refresh Frequency:] at 60Hz. 7 Finally, click [Properties].
BASIC OSD USAGE Main Menu Screen 1 Press the Menu of R/C or C/P to display the OSD menu screen. 2 Press the Ch▲/▼ of R/C or C/P to move the cursor to desired menu icon. 3 Press the Sel of R/C or Menu of C/P to select the menu icon. 4 Press the Exit of R/C or select the Exit of OSD menu to disappear the main menu screen.
Available Mode ■ Yes / □ No ■ PC □ Video □ S-Video □ TV PC Setup Press the Vol▼ of R/C Press the Vol▲ of R/C or press the Ch▲ of C/P Selected item or press the Ch▼ of C/P Color 1024x768 60Hz Color Picture Function OSD Menu Misc. Sound Contrast Brightness Gamma Color Temp Color Adjust 1024x768 60Hz PICTURE Function Color Picture Function OSD Menu Misc. Sound Color Picture Function OSD Menu Misc. Sound Move down V-Position H.Position V.
Available Mode ■ Yes / □ No □ PC ■ Video ■ S-Video ■ TV TV &Video Setup Selected item Press the Vol▼ of R/C or press the Ch▼ of C/P Channel UP/DOWN Edit Add/Erase Select AUTO Search Fine Tune Under Scan Press the Vol▲ of R/C or press the Ch▲ of C/P 4 ADD AIR Erase STD YES HRC IRC NO -2 Normal Screen ..... The screen takes the source of 4:3 aspect ratio as its full-sized regular picture. You may loose some of the edge of the original image. Under scan mode ......
Available Mode ■ Yes / □ No ■ PC ■ Video ■ S-Video ■ TV OSD Setup Press the Vol▼ of R/C Press the Vol▲ of R/C or press the Ch▲ of C/P Selected item or press the Ch▼ of C/P Language 1 Press the Menu of R/C or C/P to select the Language. The language select menu screen will appear. 2 Press the Vol▲/▼ of R/C or press the Ch▲/▼ of C/P to move the cursor to the English or other. 3 Press the Vol ▲ of R/C or Menu of C/P to select the desired language. Then press Exit to move to previous menu screen.
Before calling for repair service... ■ Before calling for repair service, check the following items for possible remedies to the encountered symptoms. Problem Check below Reference Pages There is no picture or sound (TV,Video,PC). • Make sure the AC adapter is properly inserted in the power outlet. • Make sure the main power button of the main unit is on. • Make sure the signal cables are securely connected. • Make sure the power of an external input device is on.
SPECIFICATIONS LCD-1047VT/VR/TL Color TFT-LCD TV Monitor Resolution Color 1024 * 768, XGA Standard Color 262,144 Colors Brightness 250 cd/m2(nit) Contrast Ratio 450 : 1 Viewing Angle H : 160 ˚ Panel PC Signal (Analog RGB) Video / TV Type Amorphous Si TFT-LCD Actual Display Size 210.4 * 157.8mm Diagonal Length 10.4˝, 264.16mm H-Frequency 30~61 KHz V-Frequency 56~75 Hz Signal Level 0.
SPECIFICATIONS Available PC VGA Mode VGA Input Signal Resolution V-Frequency (Hz) H-Frequency (KHz) Pixel Rate (MHz) Standard Type 640 x 350 85 37.9 31.500 VESA Standard 640 x 400 85 37.9 31.500 VESA Standard 720 x 400 85 37.9 35.500 VESA Standard 60 31.5 25.175 Industry Standard 72 37.9 31.500 VESA Standard 75 37.5 31.500 VESA Standard 56 35.1 36.000 VESA Guidelines 60 37.9 40.000 VESA Guidelines 72 48.1 50.000 VESA Standard 75 46.9 49.
Warranty ONE YEAR LIMITED WARRANTY ToteVision warrants to the original purchaser that this product is free fromdefects in workmanship and material under normal use and conditions for a period of 1 year fromthe date of original purchase, subject to the limitations below. Should service be required by reason of any defect or malfunction during the warranty period, ToteVision will repair or at its discretion replace this product, without charge (except for a $15.