
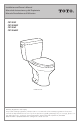
Installation Guide


7
ENGLISH
Installation Procedure (continued)
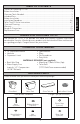
TOILET TANK FILL VALVE INSTRUCTIONS
Replacement Procedure
CST405F & CST406F
N OTE: The fill valve height has been preset at the factory and DOES NOT require
any height adjustments.
1. Shut off the water supply to the toilet.
2. Flush toilet and remove remaining water from tank with a sponge.
3. Remove the water supply connection at the fill valve.
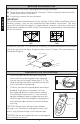
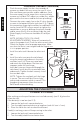
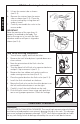
Ill. 8
Left
Right
Partial
Flush
Full
Flush
Mounting
Nut
Adjustable
Push Rods
Push Button
Housing
Tank
Lid
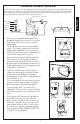
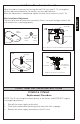
Push Button
Assembly
Flush Valve
Tank
Lid
Clip
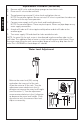
Lock Nut
Clockwise/
Counterclock-
wise
The rod(s) is too short, the buttons are lowered.
Buttons are at the correct level.
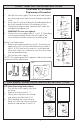
Push
Buttons
Tank Lid
Ill. 11
Ill. 9
Ill. 10
Adjust the rods as necessary by turning the rod 1 full turn (see Ill. 11); to lengthen,
turn the rod counterclockwise; to shorten, turn the rod clockwise.
When the adjustment is completed, tighten the lock nut to secure it (see Ill. 10).
After Installation/Adjustment
Flush the toilet two to three times to confirm there is no water leakage and that the
push mechanism is working properly.