Installation Manual Manual de Instrucciones Manuel D’Installation CST423SF CST424SF(G) CST743S CST744S(G) CST744SL CST744SF.10 CST754SF(N) CST784SF MS756204SF Warranty Registration and Inquiry For product warranty registration, TOTO U.S.A. Inc. recommends online warranty registration. Please visit our web site http://www.totousa.com. If you have questions regarding warranty policy or coverage, please contact TOTO U.S.A. Inc.
Thanks for Choosing TOTO®! ������������������������������������������������������������������������������������������� 3 Before Installation ��������������������������������������������������������������������������������������������������������������� 3 Common Tools Needed ���������������������������������������������������������������������������������������������������� 3 Included Parts ��������������������������������������������������������������������������������������������������������������������� 3
BEFORE INSTALLATION Read these instructions thoroughly before beginning work. Please leave these instructions for customers. These instructions contain maintenance and warranty information. If necessary, remove the existing toilet. ENGLISH IMPORTANT! Due to the powerful performance of our Cyclone, G-Max, E-Max and Power Gravity flushing systems, they are not specified for back-to-back installations.
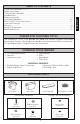
Installation Procedures (continued) N OTE: The toilet bowl has three points of contact, which will actually contact the bottom of the toilet tank when properly installed. The location of these points can be seen on the bowl at the tank receiving area. The three points are front left (1), front right (2), and back center (3). Recall these three points during the Toilet Tank installation. Bolt Cap Nut * Washer * Base Cap 2 1 3 Bowl Base 4) Place the tank upside down onto some padding.
Installation Procedures (continued) ENGLISH 6) Flush the water supply line for a few seconds to remove any debris that may enter the new fill valve. (For new home constructions and/or additions, flush the water supply line for more than a minute to help remove any residual PVC adhesives, solder flux, and/or pipe sealants that were used for the new plumbing.) C onnect the water supply line to the fill valve threads as seen at the bottom of toilet tank (see Ill. 5).
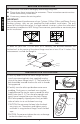
Replacement Procedure (continued) 7) Connect water supply to fill valve shank and hand-tighten only. NO TE: Do not overtighten. These are plastic parts. Never use pipe dope on any water supply connection. 9) Turn water supply ON and check for leaks outside the tank. NO TE: As water fills the tank, water is also directed into the overflow tube via the refill tube. This additional flow of water is critical to refilling your toilet’s bowl.
WARRANTY ENGLISH 1. T OTO warrants its vitreous china products (“Product”) to be free from defects in materials and workmanship during normal use when properly installed and serviced, for a period of one (1) year from date of purchase. This limited warranty is extended only to the ORIGINAL PURCHASER of the Product and is not transferable to any third party, including but not limited to any subsequent purchaser or owner of the Product.
ÍNDICE ¡GRACIAS POR ELEGIR TOTO! La misión de TOTO es dar al mundo estilos de vida más saludables, higiénicos y cómodos. Diseñamos cada producto guiándonos por el principio del equilibrio entre forma y función. Felicitaciones por su elección.
ANTES DE LA INSTALACIÓN Lea estas instrucciones detenidamente antes de comenzar a trabajar. Proporcione las instrucciones a los clientes. Estas instrucciones contienen información sobre el mantenimiento y la garantía. Si es necesario, quite el inodoro existente. ¡IMPORTANTE! Debido a la potente rendimiento de nuestro Ciclón, G-Max, S-Max y la gravedad de alimentación de agua corriente, no se precisan para las instalaciones de “back-toback”.
Procedimiento de Instalación (continuación) N OTA: El recipiente del inodoro tiene tres puntos de contacto, los cuales deberán tocar la parte de abajo del tanque cuando se es instalado debidamente. La ubicación de estos puntos puede ser vista en la parte del recipiente donde debe ir el tanque. Los tres puntos son delantero izquierdo (1), delantero derecho (2), y tracero central (3). Recuerde estos tres puntos cuando esté instalando el tanque. en la parte del recipiente donde debe ir el tanque.
Procedimiento de Instalación (continuación) ESPAÑOL 6) D escargue la línea de suministro de agua por algunos segundos para remover cualquier suciedad que haya entrado a la nueva vávula de llenado. (Para construcciones nuevas y/o adiciones, descargue la línea de suministro de agua por más de 1 minuto para ayudar a remover cualquier residuo de adhesivo de PVC, soldadura plástica, y/o sellantes de tubería que fueron usados para la nueva tubería).
Ajuste del Nivel del Agua Dependiendo de la planta de fabricación, usted debe tener una o ambas de las siguientes válvulas de llenado: Tipo A Tipo B Water Level Para una Válvula de Llenado Tipo A: Refere a la marca para el nivel de agua (WL) en la pared interior del tanque. Permita que el agua llene el tanque. Gire el tornillo de ajuste en el sentido de las agujas del reloj en la dirección (+) para aumentar la altura del nivel del agua. (ver Ilustración 1).
GARANTÍA ESPAÑOL 1. TOTO® garantiza que su vitreos china producto no presenta defectos en sus materiales ni de fabricación durante su uso normal cuando es instalado y mantenido adecuadamente, por un periodo de uno (1) año(s) a partir de la fecha de compra. Esta garantía limitada es válida solamente para el COMPRADOR ORIGINAL del Producto y no es transferible a una tercera persona, incluyendo, pero sin limitarse a, cualquier comprador o propietario subsecuente del Producto.
TABLE DES MATIÈRES Merci d’Avoir Choisi TOTO®! ����������������������������������������������������������������������������������������� 15 Outils Communs Nécessaires ����������������������������������������������������������������������������������������� 15 Pièces Incluses ����������������������������������������������������������������������������������������������������������������� 15 Avant de Commencer ����������������������������������������������������������������������������������������������������
AVANT L’INSTALLATION Lisez attentivement ces instructions avant toute installation. Mettez la notice d’utilisation à l’attention des clients de côté. Ces instructions comprennent des informations relatives à l’entretien et à la garantie. Si nécessaire, retirez le WC existant. IMPORTANT! En raison de la performance de nos puissants cyclones, G-Max, E-Max et la puissance de pesanteur chasses d’eau, ils ne sont pas précisés pour les installations de back-toback.
Procédure d’Installation (suite) N OTE: Lorsque la cuvette des toilettes est proprement installée, elle a trois points de contact avec le bas du réservoir. Ces points peuvent être vus sur la cuvette du côté de reception du réservoir. Ces points sont situés à: (1) avant-gauche, (2) avant-droit, et (3) arrière-centre. Répérez ces trois points pendant l`installation du réservoir. Trois points de Contact Capuchon du Boulton Ecrou * Rondelle * Support du Capuchon Support de Cuvette 2 1 Ill.
Procédure d’Installation (suite) 6) E TAPE 5 Raccorder les conduites d`eau GARANTIE LIMITEE - 1 ANS Faites couler l`eau dans les conduites pour quelques sécondes pour évacuer les débris restés dans la nouvelle valve de remplissage. (Pour de nouvelles maisons et/ou modifications, chassez l`eau des conduites pendant plus d`une minute pour débarrasser tous débris resultant de l`utilisation des outils de plomberie.
Procédure de Remplacement (suite) 7) C onnecter l’arrivée d’eau à la tige du robinet de remplissage et serrer manuellement. NO TE: Ne pas trop serrer. Il s’agit de pièces en plastique. Ne jamais utiliser de pâte à joint au niveau d’une connexion d’arrivée d’eau. 8) A ttacher le tuyau de remplissage sur le manchon du robinet de remplissage et fixer l’autre extrémité du tuyau de remplissage sur le tuyau de trop-plein. 9) Ouvrir l’arrivée d’eau et rechercher d’éventuelles fuites à ’extérieur du réservoir.
GARANTIE 1. TOTO garantit sa vitreous china produits contre tout défaut de matériau et de fabrication pendant l’utilisation normale, lorsqu`elle est correctement installée et maintenue pour une période de une (1) ans à dater de l`achat. La présente garantie limitée ne peut être prolongée que pour le seul ACHETEUR D`ORIGINE de l`appareil et n`est pas transférable à un tiers, y compris mais pas limité à tout acheteur ou propriétaire subséquent du produit.
ROUGH-IN DIMENSIONS / BOSQUEJO / ROBINETTERIE BRUTE 5-1/2” (140mm) * Recommended Dimensions * Dimensiones Recomendadas * Dimensions Recommandées 14” (355mm) 18-1/2” (470mm) 3/4” (20mm) A 1/2” Supply 1/2” Suministro 1/2” Alimentation C B 8”* (202mm) 12” (305mm) Model Modelo Model 6”* (153mm) A B C CST423SF 26-3/8” 16-1/8” 33-1/2” CST424SF(G) 28-1/4” 16-1/8” 33-1/2” CST743S 26-3/8” 14-5/8” 28-1/2” CST744SL 28” 16-1/2” 30-1/2” CST744S(G) 27-3/4” 14-5/8” 28-1/2” CST744SF.
REPLACEMENT PARTS / REFACCIONES / PIÈCES DE RECHANGE Model Flapper Modelo Tapón Modèle Clapet Fill Valve (Type A) Fill Valve (Type B) Válvula de Llenado (Tipo A) Válvula de Llenado (Tipo B) Robinet de Remplissage (Type A) Robinet de Remplissage (Type B) Flush Valve Trip Lever Válvula de la Cisterna Palanca de Descarga Soupape de Vidange Levier de Dèclenchement CST423SF THU175S TSU16A TSU08A.6 THU129W-5A THU141#XX CST424SF(G) THU175S TSU16A TSU08A.
TOTO® U.S.A., Inc. 1155 Southern Road, Morrow, Georgia 30260 Tel: 888-295-8134 Fax: 800-699-4889 www.totousa.com 0GU008Z-7 Rev Date: 10/10 Warranty Registration and Inquiry For product warranty registration, TOTO U.S.A. Inc. recommends online warranty registration. Please visit our web site http://www.totousa.com. If you have questions regarding warranty policy or coverage, please contact TOTO U.S.A. Inc.