
Installation Guide


LE JOINT DE
CAOUTCHOUC
SORTIE
D`EVACUATION
SUPPORT DE
CUVETTE
SUPPORT DU
CAPUCHON
RONDELLE*
ECROU*
CAPUCHON
DU BOULON
* Pas fournis
1
2
3
Mur Fini
Robinetterie
Bride de sol
C
/
L
C
/
L
Robinet
d`alimentation
TROIS POINTS DE CONTACT
Ecrou du
robinet de
remplissage
Joint Réservoir-Cuvette
boulon
Rondelle en
caoutchouc
Rondelle
métallique
Ecrou
V
U
E
D
E
L
A
C
O
U
P
E
D
E
C
Ô
T
E
1 & 2
1 & 2
3
3
NON
1 & 2 ESPACE
NONOUI
3 ESPACE
Ecrou de la
soupape de
vidange
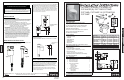
ETAPE 1Vérification des canalisations et robinetterie
Afin que vos nouvelles toilettes TOTO
®
soient bien posées , la
distance entre le mur fini et le centre de la bride de sol doit être
d`au moins de 25,4 à 30,48 cm. Cette mesure est la robinetterie.
Désinstallez les toilettes existantes (Si nécessaire
)
Coupez l`alimentation en eau. Tirez la chasse d`eau, essuyez toute
eau restée dans le réservoir et la cuvette. Débranchez le raccord
d`eau du réservoir. Retirez le réservoir et la cuvette.
Ensuite, retirez
l`ancien joint en caoutchouc et les anciens boulons de montage
.
ETAPE 2 Installation des Boulons de Montage
Nettoyez tout débris de la bride de sol des
toilettes. E
nsuite, installez les boulons de montage
(pas fournis)
dans les
orifices de la bride .
Le boulon doit être insérés
dans l`orifice avec la tête renversée
et tige filetée dirigée vers le haut.
ETAPE 3 Installation de la Cuvette
Retournez soigneusement la toilettes sur un rembourrage. Posez
fermement un joint de cuvette en caoutchouc (pas fourni) sur la
gorge circulaire autour de la sortie d`évacuation de la cuvette.
Retournez la toilette avec en la posant sur
la bride de sol. Après l`avoir bien posée,
exercez une force sur les bordures de la
toilette pour fixer le joint.
ATTENTION: Ne pas bouger la cuvette
après avoir fixé le joint en caoutchouc.
Posez les écrous et serrez jusqu`à ce
que la cuvette soit stabilisée sur la
bride. Placez les capuchons des boulons.
ATTENTION: Ne pas trop serrer les écrous pour éviter
d`endommager la cuvette en porcelaine.
ETAPE 4
Renversez le réservoir sur un
rembourrage. Vérifiez le petit écrou
de la valve de ramplissage et le grand
écrou de la soupape de vidange pour
sécuriser la connexion. Serrez l`écrou
à la main. Si desserré, fixez en faisant
un tour supplémentaire de 1/4 pour le
petit écrou de la valve de remplissage,
de 1/2 tour pour le grand écrou de la
soupape de vidange. Placez le joint
réservoir-cuvette sur l`écrou de la
soupape de vidange. En appuyant, étalez
le joint autour de l`écrou jusqu`à ce que le joint
touche le bas du réservoir.
Un petit espace est permis
entre le bas du réservoir et le
joint. Posez le réservoir sur le
côté. Placez une rondelle en
caoutchouc sur un boulon en
laiton. A partir de l`intérieur
du réservoir, insérez un boulon
à travers les trous du bas. A l`extérieur, placez une rondelle
métallique et un écrou autour du boulon. Maintenez le boulon centré
dans le trou et serrez l`écrou à l`aide de vos doigts. Faites un 1/2 tour
supplémentaire en utilisant une pince. Répétez ce processus pour les
autres trous du réservoir. Soulevez soigneusement le réservoir et
dirigez-le vers les boulons en laiton pour aligner le réservoir sur la
cuvette. Associez une rondelle métallique et un écrou sur chaque
boulon. Bien serrer les écrous à la main et vérifiez que le réservoir
est nivélé. Une fois nivélé, fixez les boulons jusqu`à ce que le réservoir
ait TROIS POINTS DE CONTACT avec la cuvette.
Trois Points de Contact
Lorsque la cuvette des toilettes est proprement installée,
elle a trois points de contact avec le bas du réservoir. Ces
points peuvent être vus sur la cuvette du côté de reception
du réservoir. Ces points sont situés à: (1) avant-gauche,
(2) avant-droit, et (3) arrière-centre. Répérez ces trois
points pendant l`installation du réservoir.
HSILGNE
SIAÇNARF
Montage Réservoir-Cuvette (Preparation)
10
3
7/8” BALLCOCK
THREAD
HAND TIGHTEN
ONLY
Plastic Bolt
Cap
Seat Hinge
Plastic Nut
Bowl
Seat Stopper
4
5
6
2
3
1 - Cap
2 - Plastic Bolt
3 - Seat Hinge
4 - Seat Stopper
5 - Toilet Bowl
6 - Plastic Nut
1
Mounting Hardware
STEP 6 Operation
NO BALLCOCK / FILL VALVE ADJUSTMENTS NEEDED.
Water will automatically stop at proper level. Flush toilet several
times. Check flapper valve for proper operation. Make sure that
chain is not tangled and flapper arm is in its proper position.
STEP 7
Install the toilet tank lid onto the toilet tank top.
STEP 8
Install the toilet seat onto the toilet bowl using the mounting
hardware in the toilet seat box. Place seat onto bowl and rotate
the hinge down. Position seat stoppers under the seat hinge.
Insert bolt into seat hinge and through the toilet bowl. Install
plastic nut onto bolt from underneath. Tighten the bolt securely.
Install the seat bolt caps.
NOTE: Tighten the seat bolt until the hinge is secure. The seat
and lid will have slight side to side movement which is
normal. This freedom of movement allows the seat to
SoftClose
®
without binding.
ONE YEAR LIMITED WARRANTY
Replacement Parts
STEP 5 Water Supply Line Connection
Flush the water supply line for a few
seconds to remove any debris that may
enter the new fill valve. (For new home
constructions and/or additions, flush the
water supply line for more than a minute
to help remove any residual PVC adhesives,
solder flux, and/or pipe sealants that were
used for the new plumbing.) Connect the
water supply line to the fill valve threads
as seen at the bottom of toilet tank. Tighten
this connection finger tight. AVOID using a
wrench to tighten the connection as you may
damage the plastic threads and/or cause the
fill valve to rotate inside the tank.
Water Supply Line Pressure should be 20 to 80 psi Static.
Model
Flapper
Fill Valve
(Type A)
Fill Valve
(Type B)
Flush Valve
Trip Lever
CST423EF
CST424EF
CST454CEF(G)
CST743E
CST744(E)(L)
CST744EF.10
CST754EF
CST754EFN
CST784EF
THU253S
THU253S
THU253S
THU277S
THU277S
THU277S
THU277S
THU253S
THU277S
TSU28A
TSU28A
TSU34A
TSU33A
TSU33A
TSU33A
TSU34A
TSU34A
TSU28A
TSU36A.6
TSU36A.6
N/A
TSU36A.6
TSU36A.6
TSU36A.6
N/A
N/A
TSU36A.6
THU252W-5A
THU252W-5A
THU252W-6A
THU252W-A
THU252W-A
THU252W-A
THU252W-A
THU252W-2A
THU252W-4A
THU141#XX
THU141#XX
THU068#XX
THU068#XX
THU068#XX
THU068#XX
THU141#XX
THU141#XX
THU148#XX
TOTO warrants its vitreous china products to be free from defects in materials
and workmanship during normal use when properly installed and serviced, for
a period of one (1) year from date of purchase. This limited warranty is
extended only to the ORIGINAL PURCHASER of the Product and is not
transferable to any third party, including but not limited to any subsequent
purchaser or owner of the Product. This warranty applies only to TOTO
Product purchased and installed in North, Central and South America.
TOTO’s obligations under this warranty are limited to repair, replacement or
other appropriate adjustment, at TOTO’s option, of the Product or parts found
to be defective in normal use, provided that such Product was properly
installed, used and serviced in accordance with instructions. TOTO reserves
the right to make such inspections as may be necessary in order to determine
the cause of the defect. TOTO will not charge for labor or parts in connection
with warranty repairs or replacements. TOTO is not responsible for the cost of
removal, return and/or reinstallation of the Product.
This warranty does not apply to the following items:
Damage or loss sustained in a natural calamity such as fire, earthquake,
flood, thunder, electrical storm, etc.
Damage or loss resulting from any accident, unreasonable use, misuse,
abuse, negligence, or improper care, cleaning, or maintenance of the
Product.
Damage or loss resulting from sediments or foreign matter contained in
a water system.
Damage or loss resulting from improper installation or from installation of
the Product in a harsh and/or hazardous environment, or improper
removal, repair or modification of the Product. This includes locations
where the water pressure is above local codes or standards. (NOTE:
Product model codes allow a maximum of 80 PSI. Check local codes or
standards for requirements).
Damage or loss resulting from electrical surges or lightning strikes or
other acts which are not the fault of TOTO or which the Product is not
specified to tolerate.
Damage or loss resulting from normal and customary wear and tear,
such as gloss reduction, scratching or fading over time due to use,
cleaning practices or water or atmospheric conditions, including but not
limited to, the use of bleach, alkali, acid cleaners, dry (powder) cleaners
or any other abrasive cleaners or the use of metal or nylon scrubbers.
a)
b)
c)
d)
e)
f)
In order for this limited warranty to be valid, proof of purchase is required.
TOTO encourages warranty registration upon purchase to create a record of
Product ownership at http://www.totousa.com. Product registration is
completely voluntary and failure to register will not diminish your limited
warranty rights.
THIS WARRANTY GIVES YOU SPECIFIC LEGAL RIGHTS. YOU MAY HAVE
OTHER RIGHTS WHICH VARY FROM STATE TO STATE, PROVINCE TO
PROVINCE OR COUNTRY TO COUNTRY.
To obtain warranty repair service under this warranty, you must take the
Product or deliver it prepaid to a TOTO service facility together with proof of
purchase (original sales receipt) and a letter stating the problem, or contact a
TOTO distributor or products service contractor, or write directly to TOTO
U.S.A., INC., 1155 Southern Road, Morrow, GA 30260 (888) 295 8134 or (678)
466-1300, if outside the U.S.A. If, because of the size of the Product or nature
of the defect, the Product cannot be returned to TOTO , receipt by TOTO of
written notice of the defect together with proof of purchase (original sales
receipt) shall constitute delivery. In such case, TOTO may choose to repair the
Product at the purchaser’s location or pay to transport the Product to a service
facility.
WARNING! TOTO shall not be responsible or liable for any failure of, or
damage to, this Product caused by either chloramines in the treatment of public
water supply or cleaners containing chlorine (calcium hypochlorite). NOTE:
The use of a high concentrate chlorine or chlorine related products can
seriously damage the fittings. This damage can cause leakage and serious
property damage.
THIS WRITTEN WARRANTY IS THE ONLY WARRANTY MADE BY TOTO.
REPAIR, REPLACEMENT OR OTHER APPROPRIATE ADJUSTMENT AS
PROVIDED UNDER THIS WARRANTY SHALL BE THE EXCLUSIVE
REMEDY AVAILABLE TO THE ORIGINAL PURCHASER. TOTO SHALL NOT
BE RESPONSIBLE FOR LOSS OF THE PRODUCT OR FOR OTHER
INCIDENTAL, SPECIAL OR CONSEQUENTIAL DAMAGES OR EXPENSES
INCURRED BY THE ORIGINAL PURCHASER, OR FOR LABOR OR OTHER
COSTS DUE TO INSTALLATION OR REMOVAL, OR COSTS OF REPAIRS
BY OTHERS, OR FOR ANY OTHER EXPENSE NOT SPECIFICALLY STATED
ABOVE. IN NO EVENT WILL TOTO’S RESPONSIBILITY EXCEED THE
PURCHASE PRICE OF THE PRODUCT. EXCEPT TO THE EXTENT
PROHIBITED BY APPLICABLE LAW, ANY IMPLIED WARRANTIES, INCLUD-
ING THAT OF MERCHANTABILITY OR FITNESS FOR USE OR FOR A
PARTICULAR PURPOSE, ARE EXPRESSLY DISCLAIMED. SOME STATES
DO NOT ALLOW LIMITATIONS ON HOW LONG AN IMPLIED WARRANTY
LASTS, OR THE EXCLUSION OR LIMITATION OF INCIDENTAL OR CONSE-
QUENTIAL DAMAGES, SO THE ABOVE LIMITATION AND EXCLUSION MAY
NOT APPLY TO YOU.
1.
2.
3.
4.
5.
6.