Installation Manual Manual de Instrucciones Manuel D’Installation CST474CEF(G) CST474CUF(G) CST764S(G) CST774S(G) CST794SF CST794EF Warranty Registration and Inquiry For product warranty registration, TOTO U.S.A. Inc. recommends online warranty registration. Please visit our web site http://www.totousa.com. If you have questions regarding warranty policy or coverage, please contact TOTO U.S.A. Inc.
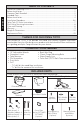
TABLE OF CONTENTS ENGLISH Thanks for Choosing TOTO®! ������������������������������������������������������������������������������������������� 2 Before Installation ��������������������������������������������������������������������������������������������������������������� 2 Common Tools Needed ���������������������������������������������������������������������������������������������������� 2 Included Parts �������������������������������������������������������������������������������������������
BEFORE INSTALLATION IMPORTANT! Due to the powerful performance of our Cyclone, G-Max, E-Max and Power Gravity flushing systems, they are not specified for back-to-back installations. The only means of installing these toilets in a back-to-back situation is when the toilet drain connections incorporate a WYE fitting. Please contact your builder or contractor prior to this installation.
INSTALLATION PROCEDURE Install Mounting Bolts Ill. 1 ENGLISH the mounting The bolt should be inserted into the slot with its head down and threaded shank pointed upward (ill. 1). Install Outlet Connection 2) D rill four 11/64” holes on the floor at the location shown in the Unifit RoughIn installation instructions found in the Rough-In box (see Illustration 2). (5/16” holes are for concrete / tile floor anchors). 3) T urn the PVC outlet connection upside down.
INSTALLATION PROCEDURE Tank to Bowl Mounting 1. inlet in bowl tank shelf. 4. Place washers on mounting bolts. Support tank and align mounting bolts through ½" holes in tank base and bowl mount shelf. Thread on nuts end, hand tighten before releasing the tank. Tighten nuts evenly until tank sets snug on bowl. NOTE: Do not grab the Tank-to-Bowl Gasket the tank. RubberWasher Tank Bowl Brass Washer Brass Nut Installing Toilet 1. sure that the spigot outlet of toilet slips into rubber sleeve and T-bolts 2.
INSTALLATION PROCEDURE Connecting Water Line 1) T he supply stop should be installed per the supply stop instruction at the location shown in the Before Installation section. Ill. 6 ENGLISH Water Inlet 2) Flush the water line briefly to ensure removal of debris. Connect flexible supply hose to supply stop. Washer Coupling Nut CAUTION: Hand-tighten only. 3) O pen the supply stop, checking for leakage. Slightly re-tighten if necessary. The water supply pressure should be 20 to 80 psi static.
TOILET TANK FILL VALVE INSTRUCTIONS 1) 2) 3) 4) 5) 6) Shut off the water supply to the toilet. Flush toilet and remove remaining water from tank with a sponge. Remove the water supply connection at the fill valve. Remove old fill valve and use damp sponge to clean hole in tank. Place new fill valve inside tank hole. Thread mounting nut onto fill valve shank and tighten the nut. NO TE: Do not over-tighten. Be sure to install fill valve in a position that does not interfere with the trip lever operation.
FLUSH VALVE SERVICING INSTRUCT ION ST453 Model Tank Only the remaining water from tank with a sponge. ENGLISH 2. Remove the tank lid and place it upside down on a clean surface. 3. Pull the clip on top of trip lever gear box as shown. 4. Pull gear box away and set on the side as shown. (see Ill. 1 & Ill. 2) remove it. (see Ill. 3) 6. Remove the grey rubber seal gasket and rinse under running water to clean. (see Ill. 4) Ill. 1 and gently press to snap and to lock into place. 9.
6. T o obtain warranty repair service under this warranty, you must take the Product or deliver it prepaid to a TOTO service facility together with proof of purchase (original sales receipt) and a letter stating the problem, or contact a TOTO distributor or products service contractor, or write directly to TOTO U.S.A., INC., 1155 Southern Road, Morrow, GA 30260 (678) 466-1300 or (888) 295-8134, if outside the U.S.A.
ÍNDICE ¡Gracias Por Elegir TOTO®! ��������������������������������������������������������������������������������������������� 10 Antes de la Instalación ����������������������������������������������������������������������������������������������������� 10 Herramientas Necesarias Común ����������������������������������������������������������������������������������� 10 Incluía Partes ��������������������������������������������������������������������������������������������������������������������� 11
ANTES DE LA INSTALACIÓN Lea estas instrucciones detenidamente antes de comenzar a trabajar. Proporcione las instrucciones a los clientes. Estas instrucciones contienen información sobre el mantenimiento y la garantía. Si es necesario, quite el inodoro existente. Doble Combinación WYE / 1/8 Curva ESPAÑOL ¡IMPORTANTE! Debido a la potente rendimiento de nuestro Ciclón, G-Max, S-Max y la gravedad de alimentación de agua corriente, no se precisan para las instalaciones de “back-toback”.
PROCEDIMIENTO DE INSTALACIÓN Instalación de los Pernos de Montaje 1) L impie la suciedad de la brida del suelo, luego instale los pernos de montaje en las ranuras de la brida (ver Ilustración 1). El perno debe insertarse en la ranura con la cabeza hacia abajo y el vástago roscado apuntando hacia arriba. Ill.
PROCEDIMIENTO DE INSTALACIÓN NOTA: No agarre el tubo de desagur para maniobrar el tanque. Rondana de Goma Tanque Recipiente Rondana de Laton Tuerca de Laton Instalación del Inodoro 1) L evante el inodoro y suavemente bájelo hasta colocarlo sobre la brida del suelo (ver Ilustración 5). Asegúrese de que la salida de la espig del inodoro se desplace en el manguito de goma y que los pernos en T se ajusten a través de las aperturas en la base del inodoro.
PROCEDIMIENTO DE INSTALACIÓN Conexión de Linéa de Aqua 1) E l tope de suministro debe instalarse de acuerdo con las instructiones para el tope de suministro en la ubicación, tal como se muestra en Antes de Instalacion sección. 2) Tire la cadena brevemente para asegurarse de que no quede suciedad. Conecte el suministro flexible al tope de suministro (ver Ilustración 6). PRE CAUCIÓN: Apriete a mano solamente.
INSTRUCCIONES PARA DE LA VÁLVULA DE LLENADO DEL TANQUE Procedimento de Reemplazo Cierre el suministro de agua al excusado. Tire la cadena y retire el agua restante del tanque con una esponja. Quite la conexión del suministro de agua de la válvula de llenado. Quite la válvula de llenado anterior y utilice la esponja húmeda para limpiar el orificio del tanque. 5) Coloque la válvula de llenado nueva en el orificio del tanque.
INSTRUCCIONES DE MANTENIMIENTO DE LA VÁLVULA DE DESCARGA Solo Tanque del Modelo ST453U 1. Cierre el suministro de agua y descargue el inodoro. 2. Quite la tapa del tanque y déjela invertida sobre una AÑOL ESPAÑOL 3. Levante la traba ubicada en la parte superior de la caja de cambios de la palanca de descarga como se muestra. 4. Retire la caja de cambios y deje a un lado como se muestra. (ver Ill. 1 y Ill. 2) 5. Rote y tire hacia arriba la torre de descarga para quitarla. (ver Ill.3) 6.
ESPAÑOL GARANTÍA 1. TOTO® garantiza que su vitreos china producto no presenta defectos en sus materiales ni de fabricación durante su uso normal cuando es instalado y mantenido adecuadamente, por un periodo de uno (1) año(s) a partir de la fecha de compra. Esta garantía limitada es válida solamente para el COMPRADOR ORIGINAL del Producto y no es transferible a una tercera persona, incluyendo, pero sin limitarse a, cualquier comprador o propietario subsecuente del Producto.
TABLE DES MATIÈRES Merci d’Avoir Choisi TOTO®! ����������������������������������������������������������������������������������������� 15 Outils Communs Nécessaires ����������������������������������������������������������������������������������������� 15 Pièces Incluses ����������������������������������������������������������������������������������������������������������������� 15 Avant de Commencer ����������������������������������������������������������������������������������������������������
AVANT L’INSTALLATION Lisez attentivement ces instructions avant toute installation. Mettez la notice d’utilisation à l’attention des clients de côté. Ces instructions comprennent des informations relatives à l’entretien et à la garantie. Si nécessaire, retirez le WC existant. IMPORTANT! En raison de la performance de nos puissants cyclones, G-Max, E-Max et la puissance de pesanteur chasses d’eau, ils ne sont pas précisés pour les installations de back-toback.
PROCÉDURE D’INSTALLATION Installer les Boulons de Montage 1) N ettoyez la bride de sol puis installez les boulons de montage dans les orifices de la bride (voir Illustration 1). Les boulons doivent être insérés dans la fente tête en bas et tige filetée dirigée vers le haut. Ill. 1 Installer le Raccord de Sortie FRANÇAIS 2) P ercez quatre trous de 11/64 po. dans le Ill. 2 plancher suivant l’instruction d’installation de robinetterie inclus dans la boîte (voir Illustration 2). (Trous de 5/16 po.
PROCÉDURE D’INSTALLATION Montage du Réservoir Sur la Cuvette 1) Rassurez-vous que le grand joint du réservoir-cuvette est bien monté sur la sortie de la chasse d`eau en dessous du réservoir. 2) Prenez soin de fixer correctement la soupape à flotteur et la soupape de vidange. 3) 3) Soulevez le réservoir, et soigneusement dirigez la sortie de la soupape de vidange dans l`entrée de la cuvette au niveau de la plaque de support cuvette-réservoir. 4) Placez les rondelles sur les boulons de montage.
PROCÉDURE D’INSTALLATION Raccorder la Conduite d’Eau REMARQUE: Le robinet d’arrêt doit être installé suivant les instructions relatives au robinet d’arrêt à l’emplacement mentionné dans Avant l’Installation section. 1) Chassez légèrement la conduite d’eau afin d’évacuer les débris. 2) Raccordez le flexible d’alimentation au robinet d’arrêt. ATT ENTION: Serrez à la main seulement. 3) O uvrez le robinet d’arrêt, vérifiez qu’il n’y a pas de fuite. Resserrez légèrement si necessaire.
INSTRUCTIONS DU ROBINET DE REMPLISSAGE DU RÉSERVOIR Installation Couper l’arrivée d’eau du toilette. Tirer la chasse d’eau et retirer l’eau restant dans le réservoir à l’aide d’une éponge. Retirer la connexion d’alimentation d’eau au niveau du robinet de remplissage. Retirer l’ancien robinet de remplissage et utiliser une éponge humide pour nettoyer l’orifice du réservoir. 5) Placer le robinet de remplissage neuf dans l’orifice du réservoir.
INSTRUCTIONS POUR L’ENTRETIEN DU ROBINET DE CHASSE Modèle de réservoir ST453U seulement : FRANÇAIS 1. Coupez l’alimentation en eau et tirez la chasse d’eau. 2. Déposez le couvercle du réservoir et posez-le à l’envers sur une surface propre. 3. Tirez la barrette sur le dessus de la boîte d’engrenages du levier de déclenchement, comme illustré. 4. Retirez la boîte d’engrenages et mettez-la de côté, comme illustré. (voir Ill. 1 et Ill. 2) 5.
GARANTIE 1. TOTO garantit sa vitreous china produits contre tout défaut de matériau et de fabrication pendant l’utilisation normale, lorsqu`elle est correctement installée et maintenue pour une période de une (1) ans à dater de l`achat. La présente garantie limitée ne peut être prolongée que pour le seul ACHETEUR D`ORIGINE de l`appareil et n`est pas transférable à un tiers, y compris mais pas limité à tout acheteur ou propriétaire subséquent du produit.
ROUGH-IN DIMENSIONS / BOSQUEJO / ROBINETTERIE BRUTE * Check for correct dimension NOTE: C ompensate accordingly for any baseboard blocks. * Confirme las dimensiones correctas NOTA: C ompense correctamente para rodapicés largos. * Vérifiez que les dimensions sont correctes NOTE: C ompensée convenablement pour le plinthe du mur. A 3/4" D C B 4-1/2"* 10" 8"* 10"* 12" 14" NOTE: T he water supply rough-in is significantly wider than the standard 5" rough-in. Consult your builder or contractor.
REPLACEMENT PARTS / REFACCIONES / PIÈCES DE RECHANGE Model Flapper Fill Valve Fill Valve Flush Valve Trip Lever Modelo Tapón Modèle Clapet Válvula de Llenado Válvula de Llenado Válvula de la Cisterna Palanca de Descarga Robinet de Remplissage (Type A or C) Robinet de Remplissage (Type B) Soupape de Vidange Levier de Dèclenchement THU347S TSU53A TSU99A.X THU252P-A THU068#XX CST474CEF(G) CST474CUF(G) 9BU094 TSU53A N/A THU389 THU390#CP CST794EF THU347S TSU53A TSU99A.
TOTO® U.S.A., Inc. 1155 Southern Road, Morrow, Georgia 30260 Tel: 888-295-8134 Fax: 800-699-4889 www.totousa.com 0GU011Z-5 Rev Date: 04/15 Warranty Registration and Inquiry For product warranty registration, TOTO U.S.A. Inc. recommends online warranty registration. Please visit our web site http://www.totousa.com. If you have questions regarding warranty policy or coverage, please contact TOTO U.S.A. Inc.