
Installation


6 7
ENGLISH
ENGLISH
INSTALLATION PROCEDURE
Metal Washer
Nut
Rubber Washer
Bolt
Cut Away View
NO
NO
YES
3
1 & 2
3 Gap
1 & 2
3
1 & 2
Gap
7/8” Ballcock Thread
HAND TIGHTEN ONLY
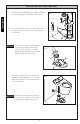
8. Lay the tank down on its back. Place a rubber
washer onto a brass bolt (see Illustration 7).
Reach inside the tank and position the bolt
through one of the holes in the bottom of the
tank. On the outside of the tank, place a metal
washer and nut onto the bolt. Hold the bolt
centered in the hole and tighten the nut finger
tight. Turn the nut an additional 1/2 turn with a
wrench. Repeat this process for the remaining
hole in the tank.
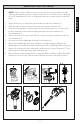
Pick up the tank and carefully guide the
brass bolts to align the tank with the bowl.
Attach a metal washer and the long nut to
each bolt. Tighten the nuts finger tight and
inspect that the tank is level (see Illustra-
tion 8).
Once level, tighten the bolts equally until
the tank makes THREE POINTS
OF CONTACT with the bowl.
9. Flush the water supply line for a few sec-
onds to remove any debris that may enter
the new fill valve. (For new home construc-
tions and/or additions, flush the water
supply line for more than a minute to help
remove any residual PVC adhesives, solder
flux, and/ or pipe sealants that were used
for the new plumbing.)
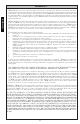
Connect the water supply line to the fill valve threads as
seen at the bottom of toilet tank (see Illustration 9). Tighten
this connection finger tight.
CAUTION: Avoid using a wrench to tighten the connection
as you may damage the plastic threads and/or cause the fill
valve to rotate inside the tank.
NOTE: The water supply pressure should be 20 to 80 psi
static.
Ill. 7
Ill. 8
Ill. 9