Installation and Owner’s Manual Manual de instrucciones y del propietario Manuel d’installation et d’utilisation Dual-flush Toilet Inodoro de doble descarga Toilettes à double chasse d’eau CST446, CST446F Warranty Registration and Inquiry For product warranty registration, TOTO U.S.A. Inc. recommends online warranty registration. Please visit our web site http://www.totousa.com. If you have questions regarding warranty policy or coverage, please contact TOTO U.S.A. Inc.
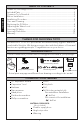
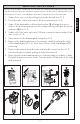
TABLE OF CONTENTS ENGLISH Thanks for Choosing TOTO! ..............................................................................2 Included Parts ......................................................................................................2 Common Tools Needed ......................................................................................2 Before Installation ................................................................................................3 Installation Procedure ..........
Read these instructions thoroughly before beginning work. Please leave instructions for customers. These instructions contain maintenance and warranty information. If necessary, remove the existing toilet and if new construction, purge the supply line. NOTICE Due to the powerful performance of our Tornado, G-Max, E-Max and Power Gravity flushing systems, they are not specified for back-to-back installations.
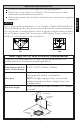
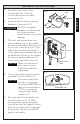
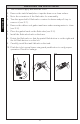
INSTALLATION PROCEDURE 1. ENGLISH 2. Open the Unifit Rough-In packaging. Follow the Unifit Rough-In Installation instruction to complete the rough-in installation (ill. 1). ill.1 Wax seal Place the template into position and follow its instructions to prepare for installing the toilet bowl. NOTICE Do not move the Unifit RoughIn on the Floor Flange after wax seal is set. If this notice is disregarded, discard the wax ring and replace with new wax ring. 3.
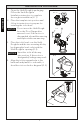
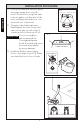
INSTALLATION PROCEDURE 6. Install the side screws to the mounting blocks. Cover the screw head with the provided screw caps (ill. 4). ill. 4 Side-screw Install the tank-to-bowl mounting hardware to the tank (ill. 5). ⚠CAUTION Do NOT overtighten hardware, as it may break the china and cause personal injury or property damage. 7. Side-screw ill. 5 Bolt Rubber washer Metal washer Nut Connect the water supply hose (not provided) to the fill valve (ill. 5).
INSTALLATION PROCEDURE ENGLISH 10. Pick up the tank and carefully guide the water supply hose over the bowl’s fill valve hole, align the tankto-bowl gasket over the inlet of the bowl, and align the tank bolts over the bolt holes of the bowl. 11. Using provided tank-tight nuts, hand tighten the nuts evenly until tank sets snugly on each of the 3 contact points on the bowl (ill. 8). ⚠CAUTION Do not overtighten the mounting bolts.
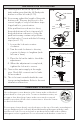
INSTALLATION PROCEDURE ill. 10 Push buttons 14. If necessary, adjust the length of the push button rods. They are factory set to the correct length, so only follow these steps if applicable to your situation. If the push button rods are too short, the push buttons will not sit properly. If the push button rods are too long, the push button may continuously activate the flush valve. Correct with the following steps (see ill. 11): Tank lid Left Right Full Flush Partial Flush Left 1.
CARE AND CLEANING NOTICE ENGLISH DO NOT USE IN-TANK BOWL CLEANERS. The use of high concentration of chlorine or chlorine-related products can seriously damage fittings in the tank. This damage can cause leakage and property damage. TOTO shall not be responsible or liable for any tank fitting failure or damage caused by the use of in-tank bowl cleaners. REPLACING THE FILL VALVE 1. Shut off the water supply. Flush the toilet and remove any remaining water from the tank.
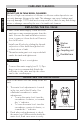
SERVICING THE FILL VALVE 1. Snap off the top cover by pulling from under the tab (see ill. 1). 2. Pinch the tabs of the lever arm to allow its removal (see ill. 2). 3. Snap off the adjustable rod from the bracket (1) allowing the unit to slide to the bottom and remove the retainer tab by pulling as the arrow indicates (3) (see ill. 3). 4. Grab hold of the valve unit, twist 1/4 turn counterclockwise and pull the unit out (see ill. 4). 5. Unscrew nut of the diaphragm housing (see ill. 5). 6.
SERVICING THE FLUSH VALVE ENGLISH 1. Turn off water supply and flush the toilet. 2. Remove the tank lid and place it upside down on a clean surface. 3. Note the orientation of the flush valve for reassembly. 4. Turn the upper half of flush valve counter-clockwise and pull it up to remove it (see Ill. 1). 5. Remove the rubber seal gasket and rinse under running water to clean (see Ill. 2). 6. Place the gasket back on the flush valve (see Ill. 3). 7. Install the flush valve back on the base.
WARRANTY 2. TOTO’s obligations under this warranty are limited to repair, replacement or other appropriate adjustment, at TOTO’s option, of the Product or parts found to be defective in normal use, provided that such Product was properly installed, used and serviced in accordance with instructions. TOTO reserves the right to make such inspections as may be necessary in order to determine the cause of the defect. TOTO will not charge for labor or parts in connection with warranty repairs or replacements.
ÍNDICE ¡Gracias por elegir TOTO! ................................................................................12 Partes incluidas ..................................................................................................12 Herramientas comunes necesarias ...................................................................12 Antes de la instalación ......................................................................................13 Procedimiento de instalación ..................................
ANTES DE LA INSTALACIÓN Lea detenidamente estas instrucciones antes de comenzar a trabajar. Proporcione las instrucciones a los usuarios. Estas instrucciones contienen información acerca del mantenimiento y de la garantía. Si es necesario, retire el inodoro existente y si construcción nueva, purgar la línea de suministro. Debido al potente rendimiento de nuestros sistemas de descarga Tornado, G-Max, E-Max y Power Gravity, no están especificados para las instalaciones respaldo con respaldo.
PROCEDIMIENTO DE INSTALACIÓN 1. 2. Abre el embalaje de Unifit. Sigue sus instrucciones de instalación completar la instalación del Unifit (il. 1). Coloque la plantilla en posición y sigue sus instrucciones a preparar para instalación la taza de inodoro. AVISO ESPAÑOL 3. No mueva el Unifit despues de el anillo de cera haya asentado. Si no se tiene en cuenta este aviso, deseche el anillo de cera y reemplace con el anillo de cera nuevo.
PROCEDIMIENTO DE INSTALACIÓN 6. Instale los tornillos laterales en los bloques de montaje. Cubra las cabezas del tornillos con las tapas suministrado (il. 4) il. 4 Vis de lado Instale las piezas de montaje del tanque-a-taza a el tanque (il. 5). ⚠PRECAUCIÓN NO APRIETE DEMASIADO. Si no se tiene en cuenta este aviso, puede romper el producto y provocar lesiones personales o daño a la propiedad. 7. Tapa Vis de lado il. 5 Coloque el junto tanque-a-taza en la tuerca de torre de descarga (il. 7).
PROCEDIMIENTO DE INSTALACIÓN 10. Levante el tanque y guíe con cuidado la manguera de suministro de agua encima a través de los orificios de válvula de llenado, aligne la junta tanque-a-taza a través de los orificio de entrada en la taza, y aligne la pernos de tanque a través de los orificios de pernos en la taza. ESPAÑOL 11. Utilice las tuercas de tanque suministrados, apriete a mano las tuercas igualmente hasta que el tanque haga tres puntos de contacto con la taza. (il. 8).
PROCEDIMIENTO DE INSTALACIÓN 14. Si necessario, ajuste los pulsadors. Las varillas de pulsadors están configuradas de fábrica a la longitud correcta, por lo que sólo debe seguir estos pasos si es aplicable a su situación. Si los pulsadors está demasiado corto, los pulsadors no se instalarán correctamente. Si la varilla es demasiado larga, los pulsadors activarán continuamente la válvula de descarga. Corrija estos problemas con los siguientes pasos (il. 11): 1. Afloje la contratuerca en sentido antihorario.
CUIDADO Y LIMPIEZA AVISO NO UTILICE LIMPIADORES EN EL RECIPIENTE DEL TANQUE El uso de cloro en alta concentración o productos derivados del cloro puede dañar seriamente los accesorios en el tanque. Este daño puede ocasionar fugas y daños en la propiedad. TOTO no se hará responsable por fallas o daños en los accesorios del tanque causados por el uso de limpiadores en el taza del tanque. REEMPLAZO LA VÁLVULA DE LLENADO ESPAÑOL 1. Cierre el suministro de agua.
MANTENIMIENTO DE LA VÁLVULA DE LLENADO 1. Desprenda la cubierta superior tirando de debajo de la pestaña (ver il. 1). 2. Presione las pestañas del brazo de palanca para permitir su extracción. (ver il. 2). 3. Desprenda la barra ajustable del soporte (1) permitiendo que la unidad se deslice hacia la parte inferior y retire la pestaña del retén tirando como indica la flecha (3) (ver il. 3). 4.
MANTENIMIENTO DE LA VÁLVULA DE DESCARGA ESPAÑOL 1. Cierre el suministro de agua y descarge el inodoro. 2. Retire la tapa del tanque y colóquela en forma invertida sobre una superficie limpia. 3. Observe la posición de los botones de la válvula de descarga para cuando deba volver a ensamblarla. 4. Gire la mitad superior de la válvula en sentido contrario a las manecillas del reloj y extraiga la válvula (ver Ill. 1). 5.
GARANTÍA 1. TOTO® garantiza que su vitreos china producto no presenta defectos en sus materiales ni de fabricación durante su uso normal cuando es instalado y mantenido adecuadamente, por un periodo de uno (1) año(s) a partir de la fecha de compra. Esta garantía limitada es válida solamente para el COMPRADOR ORIGINAL del Producto y no es transferible a una tercera persona, incluyendo, pero sin limitarse a, cualquier comprador o propietario subsecuente del Producto.
TABLE DES MATIÈRES Merci d’avoir choisi TOTO!...............................................................................22 Pièces incluses ...................................................................................................22 Outils nécessaires ..............................................................................................22 Avant l’installation..............................................................................................23 Procédure d’installation .........
AVANT L’INSTALLATION Lisez attentivement ces instructions avant toute installation. Veuillez mettre ces instructions à la disposition des clients. Ces instructions contiennent des information relatives à l’entretien et à la garantie. Si nécessaire, retirez l’ancient WC et si construction nouvelle, purgez la conduite d’alimentation.
PROCÉDURE D’INSTALLATION 1. 2. Ouvrir le paquet de Unifit. Suivez ses instructions d’installation pour terminer l’installation de l’Unifit (ill. 1). Ne pas bouger la cuvette après avoir fixé le joint en caoutchouc. Si cet avis n’est pas pris en compte, alors jetez le anneau de cire et la remplacer par une nouvelle anneau de cire.
PROCÉDURE D’INSTALLATION 6. Installez les vis latérales à les blocs de montage. Couvrir les têtes de vis avec les bouchons fournis (ill. 4). NE PAS trop serrer les pièces, il pourrait casser la porcelaine et causer des blessures ou des dommages matériels. Vis latérale Bouchon Placez le réservoir à l’envers sur un rembourrage. Inspecter l’écrou de le valve de remplissage (petit) et l’écrou de la valve de chasse (grand) pour une connexion sécurisée (ill. 6). Essayez de serrer les noix avec vos mains.
PROCÉDURE D’INSTALLATION 9. Placez le joint réservoir-á-cuvette sur l’écrou de la valve de chasse. Appuyez sur et étaler le joint sur l’écrou jusqu’à ce que le joint d’étanchéité fixe dans le filetage de l’écrou. Un léger écart entre le fond du réservoir et le joint est normal. AVIS: Assurez-vous que le joint est fixé par le filetage de l’écrou. 10.
PROCÉDURE D’INSTALLATION 14. Si nécessaire, ajustez les boutons-poussoirs. Les tiges de bouton-poussoir sont réglées en usine à la bonne longueur, alors suivez ces étapes si applicable à votre situation. Si les tiges des boutons-poussoirs sont trop courtes, les boutons-poussoirs ne se positionneront pas correctement. Si les tiges de boutons-poussoirs sont trop longues, le bouton-poussoir peut activer continuellement la valve de chasse. Corrigez ces problèmes avec les étapes suivantes (ill. 11): ill.
ENTRETIEN ET NETTOYAGE AVIS NE PAS UTILISER DE NETTOYANT DE CUVETTE DANS LE RESERVOIR. L’utilisation de concentration élevée de chlore ou de produits à base de chlore peut sérieusement endommager les raccords dans le réservoir. Ces dommages peuvent causer des fuites et des dommages matériels. TOTO ne peut être tenu responsible ou redevable pour toute défaillance des raccords du réservoir ou tout dommages causés par l’utilisation de nettoyants de cuvettes dans le réservoir.
INSTRUCTIONS D’ENTRETIEN DE VALVE DE REMPLISSAGE REMARQUE : En raison des conditions d’eau dans votre région, le filtre peut nécessiter un nettoyage périodique. Les indicateurs indiquant que le filtre nécessite un entretien comprennent un cycle de remplissage retardé, un cycle de remplissage intermittent ou une quantité d’eau insuffisante provenant du tube de remplissage. 1. Décrochez le couvercle supérieur en tirant sous l’onglet (voir ill. 1). 2.
INSTRUCTIONS D’ENTRETIEN DE VALVULA DE CHASSE 1. Arrêtez l’alimentation d’eau et déchargez les toilettes. 2. Déposez le couvercle du réservoir et posez-le à l’envers sur une surface propre. 3. Notez l’orientation de la valve de chasse pour le remontage. 4. Tournez la moitié supérieure de la valve de chasse dans le sens antihoraire et tirez vers le haut pour la retirer (voir Ill. 1). 5. Déposez le joint d’étanchéité en caoutchouc et rincez à l’eau courante pour nettoyer. (voir Ill.2) 6.
GARANTIE 1. TOTO® garantit sa vitreous china produits contre tout défaut de matériau et de fabrication pendant l’utilisation normale, lorsqu`elle est correctement installée et maintenue pour une période de une (1) ans à dater de l`achat. La présente garantie limitée ne peut être prolongée que pour le seul ACHETEUR D`ORIGINE de l`appareil et n`est pas transférable à un tiers, y compris mais pas limité à tout acheteur ou propriétaire subséquent du produit.
TOTO U.S.A., Inc. 1155 Southern Road, Morrow, Georgia 30260 Tel: 888-295-8134 Fax: 800-699-4889 www.totousa.com 0GU179 Rev Date: 11/2017 Warranty Registration and Inquiry For product warranty registration, TOTO U.S.A. Inc. recommends online warranty registration. Please visit our web site http://www.totousa.com. If you have questions regarding warranty policy or coverage, please contact TOTO U.S.A. Inc.