
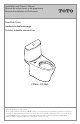
Installation Guide

7
ENGLISH
INSTALLATION PROCEDURE
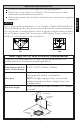
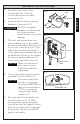
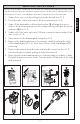
Push buttons
Tank lid
Left Right
Full
Flush
Partial
Flush
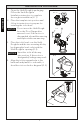
Clip
Locknut
Clockwise/
counter-clockwise
Push button assembly
Lid
Flush valve
13. Carefully place the lid on top of the
tank, making sure that the full flush push
button is on the left side (ill. 10).
14. If necessary, adjust the length of the push
button rods. They are factory set to the
correct length, so only follow these steps
if applicable to your situation.
If the push button rods are too short,
the push buttons will not sit properly. If
the push button rods are too long, the
push button may continuously activate
the flush valve. Correct with the following
steps (see ill. 11):
1. Loosen the lock nuts counter-
clockwise.
2. Turn the rods clockwise to shorten,
counter-clockwise to lengthen (each
full turn is 1mm).
3. Place the lid on the tank to check the
adjustment.
4. When the adjustment is completed,
tighten the lock nut to secure.
15. Turn on the water supply at the angle
stop. Check ALL connections for leaks.
Fix as needed.
16. The toilet seat is installed with the seat
top mounting hardware. Refer to the seat
installation instruction.
ill. 10
ill. 11
Flush valve
Left
Right
CARE AND CLEANING
Use a detergent or non-abrasive toilet cleaner and a soft bristled
plastic brush to clean your toilet. To remove hard water stains, use
vinegar or lime dissolving cleaner and a non-scratch scour pad
made for porcelain. Allow a little contact time to allow the cleaner
to dissolve the buildup.
Do not spray cleaner directly onto the button on the top of the tank, instead wipe it
using a dampened soft cloth with diluted dishwashing detergent and dry it with
another soft cloth. Do not use bleach or products that include acid or alkaline
detergents in their ingredients. Do not use metal scrub brushes or steel wool.