
Installation

4
ENGLISH
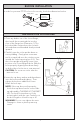
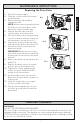
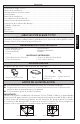
4) Flush water through the exible sup-
ply (not supplied) prior to connection
at ballcock/ll valve. Run water into a
bucket or similar catch basin until all
debris/minerals have cleared the exible
supply, to ensure that the ll valve does
not become contaminated. Connect the
exible supply to the ballcock/ll valve
shank using a exible chrome-copper
tube connector or equivalent (see Ill. 3).
C AUTION: Do not over-tighten the nut
at the ll valve.
Open the supply stop, checking for leak-
age. Slightly re-tighten if necessary. The
water supply pressure should be 20 to
80 psi static.(Trim Plate, Nipple, Valve &
Flexible Supply - not supplied.)
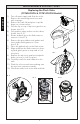
5) NOTE: No ballcock / ll valve adjust-
ments are needed. The water will auto-
matically stop at proper level.
Flush the toilet several times. Check
apper valve for proper operation.
Make sure that chain is not tangled and
apper arm is in its proper position.
6) Install the toilet tank lid onto the toilet
tank top.
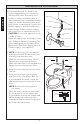
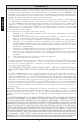
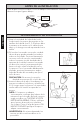
7) Install the toilet seat onto the toilet
bowl (see Ill. 4). (Top Mount Bolt Set
is included with the bowl). Insert the
rubber bushing nuts into the bowl seat
holes.
NO TE: Remove the existing seat if
necessary.
Place the seat on the bowl and rotate
the hinge unit into place while hold-
ing seat down on the bowl. Fasten and
tighten the bolt from the top with a
screwdriver. Replace the bolt cap and
the lower lid (if necessary).
Seat Bolt
Seat Bolt Cap
Hinge
Seat
Stopper
Bolt
Seat
Stopper
Hinge
Bowl
Nut
Ill. 4
INSTALLATION PROCEDURE
Water Inlet
Washer
Coupling Nut
Trim Plate
Nipple
Compression
Flexible Supply
(not supplied)
Tank
Valve
Valve Nut
Ill. 3