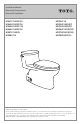
Installation Manual Manual de Instrucciones Manuel D’Installation MS614114CEF(G) MS624214CEF(G) MS626214CEF (G) MS644114CEF(G) MS874114S(G) MS884114 MS904114 MS934214(E)(S)F MS934304(E)(S)F MS964214C(E)F(G) MS974224C(E)F(G) MS984244CF(G) Warranty Registration and Inquiry For product warranty registration, TOTO U.S.A. Inc. recommends online warranty registration. Please visit our web site http://www.totousa.com. If you have questions regarding warranty policy or coverage, please contact TOTO U.S.A. Inc.
THANKS FOR CHOOSING TOTO! The mission of TOTO is to provide the world with healthy, hygienic and more comfortable lifestyles. We design every product with the balance of form and function as a guiding principle. Congratulations on your choice.
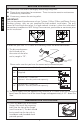
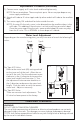
BEFORE INSTALLATION Read these instructions thoroughly before beginning work. Please leave instructions for customers. These instruction contain maintenance and warranty information. If necessary, remove the existing toilet. ENGLISH IMPORTANT! Due to the powerful performance of our Cyclone, G-Max, E-Max and Power Gravity flushing systems, they are not specified for back-to-back installations.
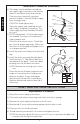
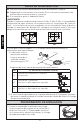
Installation Procedures (continued) 2) Drill four 11/64” holes on the floor at the location shown in the Unifit RoughIn installation instructions found in the Rough-In box (see Illustration 2). (5/16” holes are for concrete / tile floor anchors). Ill. 2 Finished Wall Floor C 3) Turn the PVC outlet connection upside down. Firmly press a new wax seal onto the circular recess around the outlet opening. Turn the outlet connection upright and lower it into position over the closet flange.
Installation Procedures (continued) ENGLISH 6) T he supply stop should be installed per the supply stop instruction at the location shown in the Before Installation section. Flush the water line briefly to ensure removal of debris. Connect flexible supply hose to supply stop. Ill. 6 Water Inlet Washer CAUTION: Hand-tighten only. O pen the supply stop, checking for leakage. Slightly re-tighten if necessary. The water supply pressure should be 20 to 80 psi static.
Replacement Procedure (continued) 8) A ttach refill tube to fill valve nipple and clip other end of refill tube to the overflow pipe. 9) Turn water supply ON and check for leaks outside the tank. NO TE: As water fills the tank, water is also directed into the overflow tube via the refill tube. This additional flow of water is critical to refilling your toilet’s bowl. Once the water stops filling the tank, some residual drops of water may drip from the fill valve.
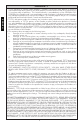
WARRANTY ENGLISH 1. T OTO warrants its vitreous china products (“Product”) to be free from defects in materials and workmanship during normal use when properly installed and serviced, for a period of one (1) year from date of purchase. This limited warranty is extended only to the ORIGINAL PURCHASER of the Product and is not transferable to any third party, including but not limited to any subsequent purchaser or owner of the Product.
ÍNDICE ¡GRACIAS POR ELEGIR TOTO! La misión de TOTO es dar al mundo estilos de vida más saludables, higiénicos y cómodos. Diseñamos cada producto guiándonos por el principio del equilibrio entre forma y función. Felicitaciones por su elección.
ANTES DE LA INSTALACIÓN Lea estas instrucciones detenidamente antes de comenzar a trabajar. Proporcione las instrucciones a los clientes. Estas instrucciones contienen información sobre el mantenimiento y la garantía. Si es necesario, quite el inodoro existente. ¡IMPORTANTE! Debido a la potente rendimiento de nuestro Ciclón, G-Max, S-Max y la gravedad de alimentación de agua corriente, no se precisan para las instalaciones de “back-toback”.
Procedimiento de Instalación (continuación) 2) Taladre cuatro agujeros de 11/64” agujeros en el suelo en el lugar que se indica en el Unifit Bruto-En a partir de las instrucciones de instalación que se encuentran en Bruto-En la casilla (ver Ilustración 2). (5 / 16 “agujeros son para hormigón / anclajes de piso azulejo). Ill. 2 Pared Suele C/L B C 2" PRE CAUCIÓN: No mueva la conexión de salida una vez que fijó el sello de cera.
Procedimiento de Instalación (continuación) 6) E l tope de suministro debe instalarse de acuerdo con las instructiones para el tope de suministro en la ubicación, tal como se muestra en Antes de Instalacion sección. Tire la cadena brevemente para asegurarse de que no quede suciedad. Conecte el suministro flexible al tope de suministro (ver Ilustración 6). PRE CAUCIÓN: Apriete a mano solamente. A bra el tope de suministro, verifique que no haya fugas, vuela a ajustar un poco, si fuera necesario.
Procedimiento de Reemplazo (continuación) 7) Conecte el suministro de agua al vástago de la válvula de llenado y sólo ajústelo manualmente. NO TA: No ajuste demasiado. Éstas son piezas plásticas. No utilice lubricante en ninguna conexión de suministro de agua. 9) Abra el suministro de agua y verifique que no haya pérdida de agua fuera del tanque. NO TA: A medida que el agua llene el tanque, también será derivada al tubo de desagüe a travs del tubo de relleno.
GARANTÍA ESPAÑOL 1. TOTO® garantiza que su vitreos china producto no presenta defectos en sus materiales ni de fabricación durante su uso normal cuando es instalado y mantenido adecuadamente, por un periodo de uno (1) año(s) a partir de la fecha de compra. Esta garantía limitada es válida solamente para el COMPRADOR ORIGINAL del Producto y no es transferible a una tercera persona, incluyendo, pero sin limitarse a, cualquier comprador o propietario subsecuente del Producto.
TABLE DES MATIÈRES Merci d’Avoir Choisi TOTO®! ����������������������������������������������������������������������������������������� 15 Outils Communs Nécessaires ����������������������������������������������������������������������������������������� 15 Pièces Incluses ����������������������������������������������������������������������������������������������������������������� 15 Avant de Commencer ����������������������������������������������������������������������������������������������������
AVANT L’INSTALLATION Lisez attentivement ces instructions avant toute installation. Mettez la notice d’utilisation à l’attention des clients de côté. Ces instructions comprennent des informations relatives à l’entretien et à la garantie. Si nécessaire, retirez le WC existant. IMPORTANT! En raison de la performance de nos puissants cyclones, G-Max, E-Max et la puissance de pesanteur chasses d’eau, ils ne sont pas précisés pour les installations de back-toback.
Procédure d’Installation (suite) Ill. 2 Mur Plancher C 2" 3) R etournez le raccord de sortie en PVC. Pressez fermement un nouveau joint en caoutchouc sur la gorge circulaire autour de l’ouverture de la sortie. Tournez le raccord de sortie vers l’endroit et posez-le bien en position sur la bride de sol. Pressez fermement sur le joint en caoutchouc afin de le positionner correctemnet (voir Illustration 3). ATT ENTION: Ne pas bouger le raccord de sortie après avoir fixé le joint en caoutchouc.
Procédure d’Installation (suite) 6) L e robinet d’arrêt doit être installé suivant les instructions relatives au robinet d’arrêt à l’emplacement mentionné dans Avant l’Installation section. Chassez légèrement la conduite d’eau afin d’évacuer les débris. Raccordez le flexible d’alimentation au robinet d’arrêt. ATT ENTION: Serrez à la main seulement. O uvrez le robinet d’arrêt, vérifiez qu’il n’y a pas de fuite. Resserrez légèrement si necessaire.
Procédure de Remplacement (suite) 7) C onnecter l’arrivée d’eau à la tige du robinet de remplissage et serrer manuellement. NO TE: Ne pas trop serrer. Il s’agit de pièces en plastique. Ne jamais utiliser de pâte à joint au niveau d’une connexion d’arrivée d’eau. 8) A ttacher le tuyau de remplissage sur le manchon du robinet de remplissage et fixer l’autre extrémité du tuyau de remplissage sur le tuyau de trop-plein. 9) Ouvrir l’arrivée d’eau et rechercher d’éventuelles fuites à ’extérieur du réservoir.
GARANTIE 1. TOTO garantit sa vitreous china produits contre tout défaut de matériau et de fabrication pendant l’utilisation normale, lorsqu`elle est correctement installée et maintenue pour une période de une (1) ans à dater de l`achat. La présente garantie limitée ne peut être prolongée que pour le seul ACHETEUR D`ORIGINE de l`appareil et n`est pas transférable à un tiers, y compris mais pas limité à tout acheteur ou propriétaire subséquent du produit.
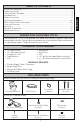
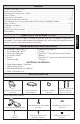
ROUGH-IN DIMENSIONS / BOSQUEJO / ROBINETTERIE BRUTE * Check for correct dimension NOTE: C ompensate accordingly for any baseboard blocks. * Confirme las dimensiones correctas NOTA: C ompense correctamente para rodapicés largos. * Vérifiez que les dimensions sont correctes NOTE: C ompensée convenablement pour le plinthe du mur. A 3/4" D C B 4-1/2"* 10" 8"* 10"* 12" 14" NOTE: T he water supply rough-in is significantly wider than the standard 5" rough-in. Consult your builder or contractor.
REPLACEMENT PARTS / REFACCIONES / PIÈCES DE RECHANGE Model Flapper Fill Valve Flush Valve Trip Lever Modelo Tapón Modèle Clapet Válvula de Llenado Válvula de la Cisterna Palanca de Descarga Robinet de Remplissage Soupape de Vidange Levier de Dèclenchement TSU39A THU245W-4 MS614164CEF(G) MS624214CEF(G) THU310S THU331S TSU25A THU013P MS644164CEF(G) THU310S TSU39A THU245W-4 MS874164S(G) THU175S TSU08A.11 THU013W MS884164 THU140S TSU07A.5 THU001 MS904164 THU092-5 TSU06A.
TOTO® U.S.A., Inc. 1155 Southern Road, Morrow, Georgia 30260 Tel: 888-295-8134 Fax: 800-699-4889 www.totousa.com 0GU003Z-8 Rev Date: 07/10 Warranty Registration and Inquiry For product warranty registration, TOTO U.S.A. Inc. recommends online warranty registration. Please visit our web site http://www.totousa.com. If you have questions regarding warranty policy or coverage, please contact TOTO U.S.A. Inc.