Installation Manual Manual de Instrucciones Manuel D’Installation MS604114CEF(G) MS604114CUF(G) MS634114CEF(G) MS853113 MS853113E MS853113S MS854114 MS854114S(L)(G) MS854114E(L)(G) MS863113(E) MS864114(E)(L) MS924154F Warranty Registration and Inquiry For product warranty registration, TOTO U.S.A. Inc. recommends online warranty registration. Please visit our web site http://www.totousa.com. If you have questions regarding warranty policy or coverage, please contact TOTO U.S.A. Inc.
TABLE OF CONTENTS ENGLISH Thanks for Choosing TOTO! �����������������������������������������������������������������������������������������������2 Before Installation ����������������������������������������������������������������������������������������������������������������2 Common Tools Needed ������������������������������������������������������������������������������������������������������2 Included Parts ����������������������������������������������������������������������������������������
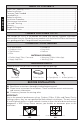
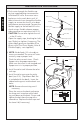
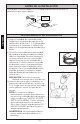
BEFORE INSTALLATION In order for your new TOTO toilet to fit correctly, check the dimensions below: Wall * Recommended minimum requirement. * 6" C/L ENGLISH Supply Valve Closet Flange 12" C/L INSTALLATION PROCEDURE 1) Clean any debris out of the closet flange, then install the mounting bolts into the slots of the flange (see Illustration 1). The bolt should be inserted into the slot with its head down and threaded shank pointed upward. 2) Carefully turn the toilet upside down on some padding.
INSTALLATION PROCEDURE ENGLISH 4) Flush water through the flexible supply (not supplied) prior to connection at ballcock/fill valve. Run water into a bucket or similar catch basin until all debris/minerals have cleared the flexible supply, to ensure that the fill valve does not become contaminated. Connect the flexible supply to the ballcock/fill valve shank using a flexible chrome-copper tube connector or equivalent (see Ill. 3). Ill.
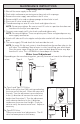
MAINTENANCE INSTRUCTIONS Replacing the Fill Valve Shut off the water supply to the toilet. Flush toilet and remove remaining water from tank with a sponge. Remove the water supply connection at the fill valve. Remove old fill valve and use damp sponge to clean hole in tank. Place new fill valve inside tank hole. Thread mounting nut onto fill valve shank and tighten the nut. NO TE: Do not over-tighten. Be sure to install fill valve in a position that does not interfere with the trip lever operation.
MAINTENANCE INSTRUCTIONS Replacing the Flush Valve (CST604CUFG Model Only) 1) ENGLISH Turn off water supply and flush the toilet. Remove the remaining water from tank with a sponge. 2) Remove the tank lid and place it upside down on a clean surface. 3) Pull the clip on top of trip lever gear box as shown. (see Ill.1) 4) Pull gear box away and set on the side as shown. (see Ill. 2). 5) Rotate and pull up on the flush tower to remove it. (see Ill. 3).
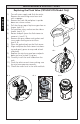
MAINTENANCE INSTRUCTIONS Replacing the Drain Valve 3) 4) 5) 6) 7) 8) 9) 10) 11) 12) 13) Shut off the water supply. Flush the toilet to remove the water ill. 1 inside the tank. Remove the tank lid and place somewhere safe. NOTE: Before removing anything from the tank, note the placement of the Flush Tower drain valve, chain and refill tube. Unhook the refill tube from the overflow tube of the drain valve.
WARRANTY ENGLISH 1. T OTO warrants its vitreous china products (“Product”) to be free from defects in materials and workmanship during normal use when properly installed and serviced, for a period of one (1) year from date of purchase. This limited warranty is extended only to the ORIGINAL PURCHASER of the Product and is not transferable to any third party, including but not limited to any subsequent purchaser or owner of the Product.
ÍNDICE ¡Gracias por elegir TOTO! ������������������������������������������������������������������������������������������������ 9 Antes de la instalación ������������������������������������������������������������������������������������������������������� 9 Herramientas necesarias común ��������������������������������������������������������������������������������������� 9 Incluía partes ������������������������������������������������������������������������������������������������������������������
ANTES DE LA INSTALACIÓN A fin de que su nuevo inodoro TOTO se adapte correctamente controle las dimensiones que figuran debajo: Válvula de suministro 6" Pared * Requisito mínimo recomendado C/L * Brida del suelo 12" C/L ESPAÑOL PROCEDIMIENTO DE INSTALACIÓN 1) L impie la suciedad de la brida del suelo, luego instale los pernos de montaje en las ranuras de la brida. (ver Ill. 1). El perno debe insertarse en la ranura con la cabeza hacia abajo y el vástago roscado apuntando hacia arriba.
PROCEDIMIENTO DE INSTALACIÓN NO TA: retire el asiento existente si fuera necesario. Coloque el asiento sobre el recipiente y gire la unidad de charnelas hasta alcanzar la ubicación correcta mientras sostiene el asiento contra el recipiente. Ajuste los pernos desde la parte superior con el destornillador. Vuelva a colocar la tapa del perno y baje la tapa (si fuera necesario). 11 Ill.
INSTRUCCIONES DE MANTENIMIENTO Procedimiento de reemplazo de la válvula de llenado ESPAÑOL 1) Cierre el suministro de agua al excusado. 2) Tire la cadena y retire el agua restante del tanque con una esponja. 3) Quite la conexión del suministro de agua de la válvula de llenado. 4) Quite la válvula de llenado anterior y utilice la esponja húmeda para limpiar el orificio del tanque. 5) Coloque la válvula de llenado nueva en el orificio del tanque.
INSTRUCCIONES DE MANTENIMIENTO Reemplazo de la válvula de descarga (solo del modelo cst604cufg) Cierre el suministro de agua y descargue el inodoro. 2) Quite la tapa del tanque y déjela invertida sobre una superficie limpia. 3) Levante la traba ubicada en la parte superior de la caja de cambios de la palanca de descarga como se muestra. 4) Retire la caja de cambios y deje a un lado como se muestra. (ver Ill. 1 y Ill. 2) 5) Rote y tire hacia arriba la torre de descarga para quitarla. (ver Ill.
INSTRUCCIONES DE MANTENIMIENTO Sustitución de la válvula de drenaje 1) 2) 3) 4) ESPAÑOL 5) 6) 7) 8) 9) 10) 11) 12) 13) Cierre el suministro de agua. Tubo de llenado Descargue el inodoro para eliminar el agua del tanque. Tubo de ill. 1 desbordamiento Retire la tapa del tanque y colóquela en un lugar seguro. NOTA: Antes de retirar nada del tanque, tenga en cuenta la ubicación de la válvula de drenaje, de la cadena Torre de descarga Válvula de drenaje y del tubo de llenado.
ESPAÑOL GARANTÍA 1. TOTO® garantiza que su vitreos china producto no presenta defectos en sus materiales ni de fabricación durante su uso normal cuando es instalado y mantenido adecuadamente, por un periodo de uno (1) año(s) a partir de la fecha de compra. Esta garantía limitada es válida solamente para el COMPRADOR ORIGINAL del Producto y no es transferible a una tercera persona, incluyendo, pero sin limitarse a, cualquier comprador o propietario subsecuente del Producto.
TABLE DES MATIÈRES Merci d’avoir choisi TOTO! �����������������������������������������������������������������������������������������������������16 Outils communs nécessaires ���������������������������������������������������������������������������������������������������16 Pièces incluses ����������������������������������������������������������������������������������������������������������������� 16 Avant l’installation �����������������������������������������������������������������������������
AVANT L’INSTALLATION Afin que votre nouvelle toilette TOTO s’adapte correctement, vérifiez les dimensions cidessous: Supply Valve Wall 6" * Recommended minimum requirement. C/L * Closet Flange 12" C/L PROCÉDURE D’INSTALLATION 1) E nlever tous les débris présents au niveau de la bride des toilettes, puis installer les boulons de support (non fournis) dans les orifices de la bride (voir Illustration 1).
PROCÉDURE D’INSTALLATION 4) Purger l’eau à l’aide du flexible (non fourni) avant de procéder à la connexion au robinet à flotteur / de remplissage. Faire couler l’eau dans un seau ou un récipient similaire jusqu’à ce que tous les débris / produits non organiques soient éliminés du flexible, afin de ne pas contaminer le robinet de remplissage.
INSTRUCTIONS D’ENTRETIEN Procédure de remplacement 6) Visser l’écrou de fixation sur la tige du robinet de remplissage et serrer l’écrou. REMARQUE : Ne pas trop serrer. Veiller à installer le robinet de remplissage dans une position qui ne gêne pas le fonctionnement du levier de déclenchement. 7) Connecter l’arrivée d’eau à la tige du robinet de remplissage et serrer manuellement. REMARQUE : Ne pas trop serrer. Il s’agit de pièces en plastique.
INSTRUCTIONS D’ENTRETIEN L’entretien du robinet de chasse (modèle CST604CUFG seulement) 1) FRANÇAIS Coupez l’alimentation en eau et tirez la chasse d’eau. 2) Déposez le couvercle du réservoir et posez-le à l’envers sur une surface propre. 3) Tirez la barrette sur le dessus de la boîte d’engrenages du levier de déclenchement, comme illustré. 4) Retirez la boîte d’engrenages et mettez-la de côté, comme illustré. (voir Ill. 1 et Ill. 2) 5) Tournez la colonne de la chasse d’eau et remontez-la pour la déposer.
INSTRUCTIONS D’ENTRETIEN 1) 2) 3) 4) 5) 6) 7) 8) 9) 10) 11) 12) 13) Fermez l’arrivée en eau. Tube de remplissage Actionnez la chasse d’eau de la toilette pour retirer l’eau du réservoir. ill. 1 Tube de tropRetirez le couvercle du réservoir et plein placez-le dans un endroit sécuritaire. REMARQUE : Avant de retirer quoi que ce soit du réservoir, notez l’emplacement de la valve du drain, de Tour de Valve du drain soupape de la chaîne et du tube de remplissage.
GARANTIE 1. TOTO garantit sa vitreous china produits contre tout défaut de matériau et de fabrication pendant l’utilisation normale, lorsqu`elle est correctement installée et maintenue pour une période de une (1) ans à dater de l`achat. La présente garantie limitée ne peut être prolongée que pour le seul ACHETEUR D`ORIGINE de l`appareil et n`est pas transférable à un tiers, y compris mais pas limité à tout acheteur ou propriétaire subséquent du produit.
ROUGH-IN DIMENSIONS / BOSQUEJO / ROBINETTERIE BRUTE * Check for correct dimension NOTE: C ompensate accordingly for any baseboard blocks. * Confirme las dimensiones correctas NOTA: C ompense correctamente para rodapicés largos. * Vérifiez que les dimensions sont correctes NOTE: C ompensée convenablement pour le plinthe du mur.
REPLACEMENT PARTS / REFACCIONES / PIÈCES DE RECHANGE For flapper type drain valve Model Flapper Fill Valve Flush Valve Trip Lever Modelo Tapón Modèle Clapet Válvula de llenado Válvula de la cisterna Palanca de descarga Robinet de remplissage Soupape de vidange Levier de dèclenchement CST604CEF(G) THU499S TSU51A THU013PR THU004#XX CST604CEFRG THU499S TSU51A THU013PR THU341#CP CST604CUF(G) 9BU094 TSU55A THU421-A THU422#CP CST634CEF(G) THU499S TSU53A THU245P-3R THU004#XX CS
REPLACEMENT PARTS / REFACCIONES / PIÈCES DE RECHANGE For flush tower type drain valve Model Drain Valve Válvula de drenaje Valve du drain Flush Tower Torre de descarga Chasse d’Eau Seal Gasket Junta de sellado CST604CEF(G)T THU451.10A-A THU440 CST604CEFRGT THU451.10A-A CST634CEF(G)T THU460.
TOTO® U.S.A., Inc. 1155 Southern Road, Morrow, Georgia 30260 Tel: 888-295-8134 Fax: 800-699-4889 www.totousa.com 0GU013Z-10 Rev Date: 12/15 Warranty Registration and Inquiry For product warranty registration, TOTO U.S.A. Inc. recommends online warranty registration. Please visit our web site http://www.totousa.com. If you have questions regarding warranty policy or coverage, please contact TOTO U.S.A. Inc.