
Owner's Manual


3
ENGLISH
INSTALLATION PROCEDURE
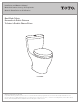
In order for your new TOTO
®
toilet to fit correctly, please
check the following dimensions:
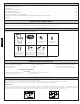
1) Distance between finished wall and the center of the Closet
Flange, “RI”, must be 12” (305mm).
2) Water supply should be approximately 8” to 10” to the left
(facing the bowl) from the center line of closet flange, and
approximately 6” above the finished floor.
3) Using the provided template, confirm the installation di-
mensions of the Socket and the mounting blocks.
Supply
Valve
Finished Wall
"RI"
C/L
Closet
Flange
12” (305mm) Rough-In
2-9/16”
(65mm)
3-1/8”
(79mm)
6” (152mm)
9”
(229mm)
Before Installation (continued)
1) Place the installation template so that the baseline of the template and the center line of
the closet flange line up. Mark the screw locations for the Socket and mounting blocks.
Drill holes at the marked locations per the installation type below. In the case of tile or
concrete floor installation, use the provided plastic anchors.
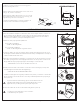
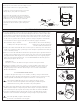
2) Clean any debris out of the closet flange, then install the mounting bolts into the slot of
the flange head down with the threaded shank of the bolt pointed upward as shown (Ill. 1).
Slide each bolt until the end of slot.
3) Turn the Socket upside down. Firmly press a new wax seal onto the circular recess around
the outlet opening. Turn the Socket upright and lower it onto the position over the closet
flange. With the unit properly aligned, press down firmly to set the wax seal.
CA UTION: Do not move the Socket after wax seal is set.
Ill. 1
Wax Seal
(not included)
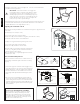
4) Install a washer and nut on the T-bolt to secure the Socket to the flange (see Ill. 2). Nut
should be tightened 1/2 turn after hand-tightening.
CAUTION: DO NOT USE EXCESSIVE FORCE.
Install the mounting blocks using the provided screws, washers, and anchors. Ensure that
blocks are firmly connected to the floor. Use the provided template for the proper align-
ment (see Ill. 3).
Ill. 2
Flange
12" (305mm)
Rough-In
CAUTION
To prevent water and odor leakage, please ensure that the wax seal
is fitted properly between the Socket and the flange. Do not over-
tighten the nuts, as damage to the plastic parts may result.
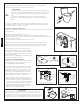
5) Place the toilet bowl over the Socket and mounting blocks (see Ill. 4).
Ill. 4
In order to prevent leakage, be sure to insert the
toilet all the way into position.
CAUTION
For wood floor installation:
• 11⁄64” for Mounting Blocks
For concrete/tile installation:
• 1 1⁄32” for Mounting Block using white anchors
With the location properly marked, drill holes.
Ill. 3