
Installation Guide


5
ENGLISH
Installation Procedures (continued)
5) NOTE: No ballcock / ll valve adjust-
ments are needed. The water will auto-
matically stop at proper level.
Flush the toilet several times. Check
flapper valve for proper operation.
Make sure that chain is not tangled and
flapper arm is in its proper position.
6) Install the toilet tank lid onto the toilet
tank top.
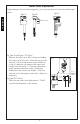
7) Install the toilet seat onto the toilet
bowl (see Ill. 4). (Top Mount Bolt Set
is included with the bowl). Insert the
rubber bushing nuts into the bowl seat
holes.
NO TE: Remove the existing seat if
necessary.
Place the seat on the bowl and rotate
the hinge unit into place while hold-
ing seat down on the bowl. Fasten and
tighten the bolt from the top with a
screwdriver. Replace the bolt cap and
the lower lid (if necessary).
Seat Bolt
Seat Bolt Cap
Hinge
Seat
Stopper
Bolt
Seat
Stopper
Hinge
Bowl
Nut
Ill. 4
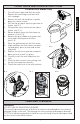
TOILET TANK FILL VALVE INSTRUCTIONS
Replacement Procedure
1) Shut off the water supply to the toilet.
2) Flush toilet and remove remaining water from tank with a sponge.
3) Remove the water supply connection at the ll valve.
4) Remove old ll valve and use damp sponge to clean hole in tank.
5) Place new ll valve inside tank hole.
6) Thread mounting nut onto ll valve shank and tighten the nut.
NO TE: Do not over-tighten. Be sure to install ll valve in a position that does not
interfere with the trip lever operation.
7) Connect water supply to ll valve shank and hand-tighten only.
NO TE: Do not overtighten. These are plastic parts. Never use pipe dope on any
water supply connection.
8) Attach rell tube to ll valve nipple and clip other end of rell tube to the overow
pipe.
9) Turn water supply ON and check for leaks outside the tank.
NO TE: As water lls the tank, water is also directed into the overow tube via the
rell tube. This additional ow of water is critical to relling your toilet’s bowl.
Once the water stops filling the tank, some residual drops of water may drip
from the ll valve. This is NORMAL as these drops will subside.