
Installation Guide


2
ENGLISH
TABLE OF CONTENTS
THANKS FOR CHOOSING TOTO!
The mission of TOTO is to provide the world with healthy, hygienic and more comfortable lifestyles. We design every product
with the balance of form and function as a guiding principle. Congratulations on your choice.
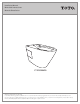
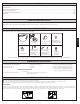
INCLUDED PARTS
Check to make sure you have all these parts from the package:
Thanks for Choosing TOTO! ..................................................................................................................................................................2
Included Parts ..........................................................................................................................................................................................2
Common Tools Needed ..........................................................................................................................................................................2
Before Installation ................................................................................................................................................................................ 2-3
Installation Procedure .......................................................................................................................................................................... 3-4
Warranty....................................................................................................................................................................................................5
COMMON TOOLS NEEDED
• 12” pipe wrench
• 10” adjustable wrench
• Carpenter’s Level
• Tape Measure
MATERIALS REQUIRED:
(Not Included)
• Supply Stop Valve
• Screwdriver
• Putty Knife
• Drill
• Pliers
• Mounting (T) Bolts & Nuts (2pc)
• Wax Ring / Seal
• For wood oor installation:
- 3/32” drill bit for Socket or Modular Rough-In
- 11/64” drill bit for Mounting Block
• For concrete/tile installation:
- 9/32” drill bit for Socket or Modular Rough-In
- 11/32” drill bit for Mounting Block
BEFORE INSTALLATION
Read these instructions thoroughly before beginning work.
Please leave instructions for customers. These instructions contain maintenance and warranty information.
If necessary, remove the existing toilet and if new construction, purge the supply line.
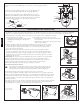
IMPORTANT!
Due to the powerful performance of our Cyclone, G-Max, E-Max and Power Gravity ushing systems, they are not specied for back-to-back
installations. The only means of installing these toilets in a back-to-back situation is when the toilet drain connections incorporate a WYE tting.
Please contact your builder or contractor prior to this installation.
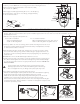
Double Combination WYE / 1/8 Bend
YES
Double Sanitary Tee / Sanitary Cross
NO
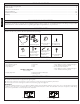
Bowl Modular Rough-In
Side Plates
Screw & Washer
for Mounting
Block Installation
(4 pieces each)
Side Screw & Side
Screw Cap for
Mounting Block
Installation
(2 pieces each)
Mounting Block
(2 pieces)
Screw with Washer
(2 pieces)
Anchor
(4 large pieces)
(2 small pieces)