
Installation Guide


I-shaped water supply pipe
Install the water shutoff valve as designated.
Install I-shaped water supply pipe.
Install L-shaped water supply pipe.
L-shaped water supply pipe
*Do not connect pipe in
the wrong direction.
Water shutoff valve
Installing the water shutoff valve
Water shutoff valve
*Wrap sealing tape around the fitting on the water supply pipe.
shutoff valve
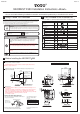
Parts and Installation Instruction
Installation Procedure
Positioning the drain hole and pipes
Marking off the self-tapping screw holes
Confirm that the position of the drain hole and pipes are properly
lined up as designated in the drawing.
The line designating the center of the toilet bowl is the same line
designating the center of drain hole.
On the floor On the wall
Install cover.
Install cover.
Cover
Place paper installation template so that the base line of paper
installation template and the center line of a toilet bowl match.
Confirm that water shutoff valve is located in the designated position.
*If the water shutoff valve is in the wrong position it could obstruct
other parts of the product.
Mark off the self-tapping screw holes of the outlet connection.
Paper installa-
tion template
Drain hole
See next page
Cover
4
5
1
2
3
Position of the water
min.12”
(305mm)
4-1/2”
(115mm)
2
-3/8”
(60mm)
6-7/8”
(175mm)
4-1/2”
(115mm)
1/2” Water supply
on the wall
Center lines of the
Drain hole
Closet flange
(not included)
1/2” Water supply
on the floor
min. 12”
(305mm)
Self-tapping screw for the outlet connection
(Not included)
Wax ring
(Not included)
(Not included)
T bolt
Water shutoff valve
Special tool
*The special tool is used
for cleaning water supply filter.
The tool should be put here
after using.
These side panels should be put on
after the top unit is installed.
Special tool holder
Velcro Tape
Connector to top unit
Side panel (right)
Toilet bowl
Filter
Toilet flushing valve
Nut
Washer
<Point>
Water supply hose
Mounting plates
Outlet connection
Hex bolts