Installation Manual Manual de Instrucciones Manuel D’Installation CST442 Warranty Registration and Inquiry For product warranty registration, TOTO U.S.A. Inc. recommends online warranty registration. Please visit our web site http://www.totousa.com. If you have questions regarding warranty policy or coverage, please contact TOTO U.S.A. Inc., Customer Service Department, 1155 Southern Road, Morrow, GA 30260 (888) 295-8134 or (678) 466-1300 when calling from outside of U.S.A.
TABLE OF CONTENTS Thanks for Choosing TOTO! �����������������2 Common Tools Needed �������������������������2 Before Installation �����������������������������������2 Included Parts �����������������������������������������3 Care and Cleaning ����������������������������������3 Installation Procedure ����������������������������4 Maintenance Instructions �����������������������8 Warranty ������������������������������������������������10 Rough-In Dimensions ��������������������������29 ENGLISH THANKS FO
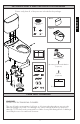
INCLUDED PARTS AND INSTALLATION DIAGRAM Please verify that all of the parts are included in the package: ENGLISH Box 1 Tank to Bowl Gasket Box 2 x2 x2 x4 x4 Manual Unifit Rough-In Mounting Screw with Washer (2 pieces) Template Anchor (2 pieces) Rough-In Instructions CARE AND CLEANING WARNING! DO NOT USE IN-TANK BOWL CLEANERS. The use of high concentration of chlorine or chlorine-related products can seriously damage fittings in the tank. This damage can cause leakage and serious property damage.
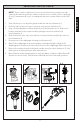
INSTALLATION PROCEDURE 1. Open the Unifit Rough-In packaging. Follow the Unifit Rough-In Installation instruction. Ill. 1 ENGLISH 2. Place the template into position and follow its instructions to prepare for installing the toilet bowl. A A NOTICE Do not move the Unifit Rough-In on the Floor Flange after wax seal is set. If this notice is disregarded, discard the wax ring and replace with new wax ring. Ill. 2 A A 3.
INSTALLATION PROCEDURE Ill. 4 Align the toilet perpendicular to the back wall and parallel to side walls; it should not sit crooked or diagonal (see illustration 4). ENGLISH 4. A 5. Make sure it’s aligned before securing. Ill. 5 6. Install the side screws to the mounting blocks. Cover the screw head with the provided screw caps (see illustration 5).
INSTALLATION PROCEDURE 8. Lay the tank down on its back. Place a rubber washer onto a brass bolt (see Illustration 7). Ill. 7 Metal Washer ENGLISH Reach inside the tank and position the bolt through one of the holes in the bottom of the tank. On the outside of the tank, place a metal washer and nut onto the bolt. Hold the bolt centered in the hole and tighten the nut finger tight. Turn the nut an additional 1/2 turn with a wrench. Repeat this process for the remaining hole in the tank.
INSTALLATION PROCEDURE 10. No ballcock / fill valve adjustments are needed. The water will automatically stop at proper level. Flush the toilet several times. Check the valve for proper operation. Make sure that chain is not tangled and that the flapper arm is in its proper position. ENGLISH Standard Seat Connection Washlet™ Seat Connection 11. Install the toilet tank lid onto the toilet tank top. Toilet bowl outer surface 12.
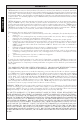
MAINTENANCE INSTRUCTIONS Fill Valve Replacement Procedure 1. Shut off the water supply to the toilet. ENGLISH 2. Flush toilet and remove remaining water from tank with a sponge. 3. Remove the water supply connection at the fill valve. 4. Remove old fill valve and use damp sponge to clean inside tank. 5. Place new fill valve inside tank. 6. Thread mounting nut onto fill valve shank and tighten the nut. NO TE: Do not over-tighten.
SERVICING THE FILL VALVE 1. Snap off the top cover by pulling from under the tab (see illustration 1). 2. Pinch the tabs of the lever arm to allow its removal (see illustration 2). 3. Snap off the adjustable rod from the bracket (1) allowing the unit to slide to the bottom and remove the retainer tab by pulling as the arrow indicates (3) (see illustration 3) . 4. Grab hold of the valve unit, twist 1/4 turn counterclockwise and pull the unit out (see illustration 4). 5.
WARRANTY 1. T OTO warrants its vitreous china products (“Product”) to be free from defects in materials and workmanship during normal use when properly installed and serviced, for a period of one (1) year from date of purchase. This limited warranty is extended only to the ORIGINAL PURCHASER of the Product and is not transferable to any third party, including but not limited to any subsequent purchaser or owner of the Product.
ENGLISH NOTES 11
ÍNDICE ¡Gracias por elegir TOTO! ������������������12 Herramientas comunes necesarias �����12 Antes de la instalación �������������������������12 Partes incluidas �������������������������������������13 Cuidado y limpieza �������������������������������13 Procedimiento de instalación ��������������14 Mantenimiento �������������������������������������19 Garantía �������������������������������������������������20 Bosquejo �����������������������������������������������31 ¡GRACIAS POR ELEGIR TOTO! La misió
DIAGRAMA DE INSTALACIÓN Y PARTES INCLUIDAS Verifique que todas las piezas estén incluidas en el envase: Caja 1 Junta de Tanque a Recipiente Caja 2 x2 x2 x4 ESPAÑOL x4 Manual Conexión de salida de PVC Tornillo de montaje con Arandela (2 piezas) Plantilla Anclaje (2 piezas) Instrucciones de montaje CUIDADO Y LIMPIEZA ¡ADVERTENCIA! NO UTILICE LIMPIADORES DENTRO DE LA TAZA DEL TANQUE. El uso de productos clorados o con alta concentración de cloro puede dañar gravemente los accesorios en el tanque.
PROCEDIMIENTO DE INSTALACIÓN 1. Abra el embalaje del montaje Unifit. Siga las instrucciones de instalación del montaje Unifit. 2. Coloque la plantilla en posición y siga sus instrucciones para preparar la instalación de la taza del inodoro. Ill. 1 A ESPAÑOL AVISO No mueva el montaje Unifit sobre la brida del suelo después de colocado el sello de cera. Si ignora este aviso, deseche el anillo de cera y reemplácelo por uno nuevo. A Ill. 2 A A 3.
PROCEDIMIENTO DE INSTALACIÓN 4. Alinee el inodoro en forma perpendicular a la pared trasera y paralelo a las paredes laterales; no debe estar inclinado ni en diagonal (ver Ilustración 4). 5. Asegúrese de que esté alineado antes de fijarlo. Ill. 4 A 6. Instale los tornillos laterales en los bloques de montaje. Cubra la cabeza de los tornillos con los tapones provistos (ver Ilustración 5) Ill.
PROCEDIMIENTO DE INSTALACIÓN 8. Acueste el tanque sobre su parte trasera. Coloque una rondana de goma en el perno metálico (ver Ilustración 7). ESPAÑOL Extienda su mano dentro del tanque y coloque el perno a través de uno de los orificios del fondo del tanque. En la parte de afuera del tanque, coloque una rondana metálica y una tuerca en el perno. Mantenga el perno centrado en el orificio y apriete la turca con sus dedos. Dé 1/2 vuelta adicional a la tuerca con la llave para tubería.
PROCEDIMIENTO DE INSTALACIÓN 10. No es necesario ajustar la válvula de relleno/ llave del flotador. El agua se tendrá al nivel apropiado de forma automática. Tire la cadena varias veces. Controle que la válvula de la cisterna funcione adecuadamente. Asegúrese de que la cadena no esté enredada y que el brazo de la cisterna se encuentre en la posición correcta. Conexión del asiento estándar Conexión del asiento Washlet™ ESPAÑOL 11. Instale la tapa del tanque en el inodoro. 12.
REEMPLAZO LA VÁLVULA DE LLENADO 1. 2. 3. 4. Cierre el suministro de agua al excusado. Tire la cadena y retire el agua restante del tanque con una esponja. Quite la conexión del suministro de agua de la válvula de llenado. Quite la válvula de llenado anterior y utilice la esponja húmeda para limpiar el orificio del tanque. 5. Coloque la válvula de llenado nueva en el orificio del tanque. 6. Enrosque la tuerca de montaje en el vástago de la válvula de llnado y ajuste la tuerca. NO TA: No ajuste demasiado.
MANTENIMIENTO DE LA VÁLVULA DE LLENADO 1. Desprenda la cubierta superior tirando de debajo de la pestaña (ver ilustración 1). 2. Presione las pestañas del brazo de palanca para permitir su extracción. (ver ilustración 2). 3. Desprenda la barra ajustable del soporte (1) permitiendo que la unidad se deslice hacia la parte inferior y retire la pestaña del retén tirando como indica la flecha (3) (ver ilustración 3) . 4.
GARANTÍA 1. TOTO garantiza que su vitreos china producto no presenta defectos en sus materiales ni de fabricación durante su uso normal cuando es instalado y mantenido adecuadamente, por un periodo de uno (1) año(s) a partir de la fecha de compra. Esta garantía limitada es válida solamente para el COMPRADOR ORIGINAL del Producto y no es transferible a una tercera persona, incluyendo, pero sin limitarse a, cualquier comprador o propietario subsecuente del Producto.
ESPAÑOL NOTAS 21
TABLE DES MATIÈRES Merci d’avoir choisi TOTO! �����������������22 Outils nécessaires ���������������������������������22 Avant l’installation ��������������������������������22 Pièces incluses ��������������������������������������23 Nettoyage ���������������������������������������������23 Procédure d’installation �����������������������24 Entretien ������������������������������������������������29 Garantie �������������������������������������������������30 Dimensions brutes ���������������������������
PIÈCES ET SCHÉMA D’INSTALLATION INCLUS Assurez-vous que toutes les pièces sont incluses : Boîte 1 Joint de Cuve à Bol Boîte 2 x2 x2 x4 Manuel Unitaire Brut Vis de montage avec rondelle (2 pièces) Gabarit Ancre (2 pièces) Instructions de l’adaptateur Rough-In NETTOYAGE AVERTISSEMENT! NE PAS UTILISER LES NETTOYEURS POUR CUVETTE DE TOILETTE DANS LE RÉSERVOIR.
PROCÉDURE D’INSTALLATION 1. Ouvrir l’emballage unitaire brut. Suivez les instructions d’installation de l’unitaire brut. 2. Mettez le gabarit en place et suivez les instructions pour vous préparer à installer la cuvette. Ill. 1 A A AVIS FRANÇAIS Ne déplacez pas l’unitaire brut sur la bride de sol une fois le joint de cire est fixé. Si vous ignorez cet avis, jetez l’anneau en cire et remplacez-le par un nouvel anneau en cire. Ill. 2 A A 3. Placez la cuvette sur l’unitaire brut et Ill.
PROCÉDURE D’INSTALLATION 4. Alignez la toilette perpendiculairement au mur arrière et parallèlement aux murs latéraux; elle ne doit pas être croche ou inclinée (voir Illustration 4). Ill. 4 A 5. Assurez-vous qu’elle est bien alignée avant de la fixer. 6. Installez les vis latérales aux blocs de montage. Couvrez les têtes de vis avec les capuchons fournis (voir Illustration 5). Ill.
PROCÉDURE D’INSTALLATION 8. Posez le réservoir sur le côté. Placez une rondelle en caoutchouc sur un boulon en laiton (voir Illustration 7). A partir de l`intérieur du réservoir, insérez un boulon à travers les trous du bas. A l`extérieur, placez une rondelle métallique et un écrou autour du boulon. Maintenez le boulon centré dans le trou et serrez l`écrou à l`aide de vos doigts. Faites un 1/2 tour supplémentaire en utilisant une pince. Répétez ce processus pour les autres trous du réservoir.
PROCÉDURE D’INSTALLATION 10. Aucun reglage du robinet a flotteur / de remplissage est necessaire. L`eau s`arrêtera automatiquement au niveau approprié. Tirez plusieurs fois la chasse d`eau. Vérifiez que le clapet de non-retour fonctionne correctement. Rassurezvous que la chaîne n`est pas entortillée et que le bras du clapet est dans sa position adéquate. Raccord de siège standard Raccord de siège Washlet™ 11. Installer le couvercle du réservoir des toilettes. 13.
REMPLACEMENT DE LA VALVE DE REMPLISSAGE 1. Couper l’arrivée d’eau du toilette. 2. Tirer la chasse d’eau et retirer l’eau restant dans le réservoir à l’aide d’une éponge. 3. Retirer la connexion d’alimentation d’eau au niveau du robinet de remplissage. 4. R etirer l’ancien robinet de remplissage et utiliser une éponge humide pour nettoyer l’orifice du réservoir. 5. Placer le robinet de remplissage neuf dans l’orifice du réservoir. 6.
ENTRETIEN DE LA VANNE DE REMPLISSAGE REMARQUE : En raison des conditions d’eau dans votre région, le filtre peut néces siter un nettoyage périodique. Les indicateurs indiquant que le filtre nécessite un entretien comprennent un cycle de remplissage retardé, un cycle de remplissage intermittent ou une quantité d’eau insuffisante provenant du tube de remplissage. 1. Décrochez le couvercle supérieur en tirant sous l’onglet (voir illustration 1). 2.
GARANTIE 1. TOTO garantit sa vitreous china produits contre tout défaut de matériau et de fabrication pendant l’utilisation normale, lorsqu`elle est correctement installée et maintenue pour une période de une (1) ans à dater de l`achat. La présente garantie limitée ne peut être prolongée que pour le seul ACHETEUR D`ORIGINE de l`appareil et n`est pas transférable à un tiers, y compris mais pas limité à tout acheteur ou propriétaire subséquent du produit.
ROUGH-IN DIMENSIONS / BOSQUEJO / ROBINETTERIE BRUTE 31
TOTO® U.S.A., Inc. 1155 Southern Road, Morrow, Georgia 30260 Tel: 888-295-8134 Fax: 800-699-4889 www.totousa.com 0GU099 Rev Date: 1/19 Warranty Registration and Inquiry For product warranty registration, TOTO U.S.A. Inc. recommends online warranty registration. Please visit our web site http://www.totousa.com. If you have questions regarding warranty policy or coverage, please contact TOTO U.S.A. Inc.