
Installation


8 9
ENGLISH
ENGLISH
1
2
1
2
3
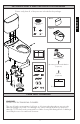
1. Snap off the top cover by pulling from under the tab (see illustration 1).
2. Pinch the tabs of the lever arm to allow its removal (see illustration 2).
3. Snap off the adjustable rod from the bracket (1) allowing the unit to slide to the
bottom and remove the retainer tab by pulling as the arrow indicates (3)
(see illustration 3) .
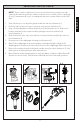
4. Grab hold of the valve unit, twist 1/4 turn counterclockwise and pull the unit out
(see illustration 4).
5. Unscrew nut of the diaphragm housing (see illustration 5).
6. Remove the diaphragm from its housing by carefully pulling the edge of the
diaphragm (see illustration 6). Note the position of the diaphragm while removing.
7. Remove the strainer from the tube with needle nose pliers (see illustration 7). Use
twisting motion while pulling to help with removal.
8. Rinse all parts under running water to clear any debris, residues or films. Reinstall
all parts in reverse order. Turn the water ON and check for leaks and operation.
Ill. 1 Ill. 2 Ill. 3
Ill. 6
SERVICING THE FILL VALVE
Ill. 4
Ill. 5
NOTE: Due to water conditions in your area, the strainer may require periodic
cleaning. An indication that the strainer requires service can be seen in a delayed
fill cycle, intermittent fill cycle, or inadequate amount of water flow from the refill
tube.
1
2
Ill. 7